Reply
 
Thread Tools Display Modes
  #1  
Old 05-15-2024, 10:57 AM
makilaak makilaak is offline
Member
 
Join Date: Oct 2004
Location: Espoo, Finland
Posts: 91
Default Hideaway bumper brackets

I just bought some pieces for hideaway headlights including bumper brackets to notice that those are for fixed ones... Great, yes. As I live abroad returns are impossible. I understood that you can modify them for hideaways, but I would like to know how? Does anyone have diameters for those extra supports?

  #2  
Old 05-16-2024, 12:22 PM
north's Avatar
north north is offline
Ultimate Warrior
 
Join Date: Oct 2006
Posts: 6,418
Default

Not sure what you mean. The front bumper brackets for non hideaway GTO and all LeMans are a formed single piece while the hideaway brackets are welded assembly. I guess you could make a hole in the standard brackets to allow the crank rod between the actuator and headlight door to pass.

__________________
My Break Away Squad
1969 Fbird (Base, 350 & Sprint Cvt’s - 400HO & TA Hardtops)
1969 LeMans (2dr & 4dr Hardtop and a Cvt)
1969 LeMans Safari 2 seat Wagon
1969 GTO (2 Cvt, 2 Hardtops & Judge Hardtop)
1969 Catalina (3 Cvt’s & a 2dr hardtop)
1969 Ventura 2 Seat Wagon
1969 Executive 4dr Sedan
1969 Bonnie Cvt
1969 Bonnie 3 Seat Wagon (2 of them)
1969 Bonnie Brougham (4dr Hardtop & Cvt)
1969 Grand Prix SJ (2 of them)
1969 2+2 2dr Hardtop (Canadian model)
  #3  
Old 05-17-2024, 04:23 AM
makilaak makilaak is offline
Member
 
Join Date: Oct 2004
Location: Espoo, Finland
Posts: 91
Default

I just wondered if that supportative structure needs to be welded due to heavier light assembly? I could weld additional material, but would like to get dimensions to do that. Also I saw that there is a hole already in non-hideaway brackets, but possibly then not in right position.

  #4  
Old 05-19-2024, 10:08 AM
Formulajones's Avatar
Formulajones Formulajones is offline
Ultimate Warrior
 
Join Date: Jan 2012
Posts: 10,924
Default

I've messed with that before. All that's needed is to enlarge the holes in the standard brackets that are already there, for the actuator rod to pass through, just as North mentioned.

As far as added support, I've never found any of that to be necessary.

__________________
2019 Pontiac Heaven class winner

https://youtu.be/XqEydRRRwqE
  #5  
Old 05-19-2024, 11:45 AM
steve v's Avatar
steve v steve v is offline
Ultimate Warrior
 
Join Date: Apr 2003
Location: Raleigh, NC
Posts: 2,627
Default

What I recall is the headlight door assembly itself will hit the standard bumper bracket as the door lowers to the open position.
The correct hideaway bumper brackets will make your life easier.

  #6  
Old 05-31-2024, 11:37 AM
3goats's Avatar
3goats 3goats is offline
Senior Chief
 
Join Date: Apr 2005
Location: Canada
Posts: 492
Default

You can modify a standard brackets to work. They just need to move over so doors can open as OP mentioned.
I did it myself. Just slice them open and bend them to correct dimensions and fill in the hole.
I was lucky and had a hideway piece to build off and measure. etc.
These were for my race car so i didnt care about correctness i just wanted the hideaway grills to work. Turned out good and you dont really see them.
I will look for pictures and post for you if it helps.

  #7  
Old 06-02-2024, 04:48 PM
Red Box Rebel Red Box Rebel is offline
Senior Chief
 
Join Date: Jun 2005
Location: Republic of Texas, San Antonio
Posts: 289
Default

I would not make all the modifications to the non-hideaway brackets. The correct hideaway brackets will make the installation much easier and will be correct. If you have the time, tools and ability to convert the non-hideaway brackets to accommodate the hideaway doors and other parts have at it. The correct hideaway brackets are available from AMES part number "B199WD." Expensive, but worth it in the long run.

  #8  
Old 06-02-2024, 07:43 PM
Tuske427's Avatar
Tuske427 Tuske427 is offline
Member
 
Join Date: Sep 2016
Location: Los Angeles
Posts: 73
Default

Quote:
Originally Posted by makilaak View Post
I just bought some pieces for hideaway headlights including bumper brackets to notice that those are for fixed ones... Great, yes. As I live abroad returns are impossible. I understood that you can modify them for hideaways, but I would like to know how? Does anyone have diameters for those extra supports?
I happen to have the front bumper off of my GTO while I'm on an unrelated project posted in another thread, and I took some pics of my hideaway assembly for you since it's all apart and easy to see. Now, I can't guarantee that this is "correct" as this is my first A body GTO and my car has been cobbled together by prior owners (68 bumper and hood latch for example) but I can tell you that whatever is here does function well. Close eyes will notice that I relocated where my expansion springs attach. I was having issues with the doors not staying closed when I turn the car off and this solved it. Plenty of vacuum to open and close them, and they stay closed when the car is off. Both sets of vacuum hoses merge at a "T" fitting which then goes back to the headlight switch. Hope this (and the next few posts) are helpful.
Attached Thumbnails
Click image for larger version

Name:	IMG_3571.jpg
Views:	18
Size:	93.0 KB
ID:	634617   Click image for larger version

Name:	IMG_3572.jpg
Views:	17
Size:	57.4 KB
ID:	634618   Click image for larger version

Name:	IMG_3573.jpg
Views:	17
Size:	65.1 KB
ID:	634619   Click image for larger version

Name:	IMG_3574.jpg
Views:	16
Size:	61.6 KB
ID:	634620   Click image for larger version

Name:	IMG_3575.jpg
Views:	15
Size:	59.8 KB
ID:	634621  


__________________
Long live the Muscle Car
Instagram @tuske427
1967 Firebird #BVbird
1967 Firebird 400 4 speed project
1969 Verdoro green GTO (daily)
  #9  
Old 06-02-2024, 07:44 PM
Tuske427's Avatar
Tuske427 Tuske427 is offline
Member
 
Join Date: Sep 2016
Location: Los Angeles
Posts: 73
Default

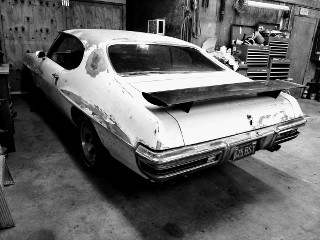
2nd post. more pics of the driver side and one of the pass
Attached Thumbnails
Click image for larger version

Name:	IMG_3576.jpg
Views:	10
Size:	64.9 KB
ID:	634622   Click image for larger version

Name:	IMG_3577.jpg
Views:	10
Size:	42.4 KB
ID:	634623   Click image for larger version

Name:	IMG_3578.jpg
Views:	10
Size:	61.6 KB
ID:	634624   Click image for larger version

Name:	IMG_3579.jpg
Views:	9
Size:	59.2 KB
ID:	634625   Click image for larger version

Name:	IMG_3580.jpg
Views:	9
Size:	59.5 KB
ID:	634626  


__________________
Long live the Muscle Car
Instagram @tuske427
1967 Firebird #BVbird
1967 Firebird 400 4 speed project
1969 Verdoro green GTO (daily)
  #10  
Old 06-02-2024, 07:47 PM
Tuske427's Avatar
Tuske427 Tuske427 is offline
Member
 
Join Date: Sep 2016
Location: Los Angeles
Posts: 73
Default

pics of the passenger side. again, I hope this is helpful for ya
Attached Thumbnails
Click image for larger version

Name:	IMG_3580.jpg
Views:	9
Size:	59.5 KB
ID:	634627   Click image for larger version

Name:	IMG_3581.jpg
Views:	8
Size:	57.0 KB
ID:	634628   Click image for larger version

Name:	IMG_3582.jpg
Views:	8
Size:	59.7 KB
ID:	634629   Click image for larger version

Name:	IMG_3583.jpg
Views:	7
Size:	55.8 KB
ID:	634630   Click image for larger version

Name:	IMG_3584.jpg
Views:	8
Size:	60.1 KB
ID:	634631  


__________________
Long live the Muscle Car
Instagram @tuske427
1967 Firebird #BVbird
1967 Firebird 400 4 speed project
1969 Verdoro green GTO (daily)
  #11  
Old Yesterday, 07:29 AM
makilaak makilaak is offline
Member
 
Join Date: Oct 2004
Location: Espoo, Finland
Posts: 91
Default

Thanks - very good pictures and advice!! I certainly would have bought new correct bumber brackets from Ames, but as I already have now 'the wrong ones' I think I need to work with them. Additional delivery costs, taxes, custom fees will make me more crazy than just welding. I wonder if someone could share some dimension how to upgrade the non-hiden brackets so they could work?

  #12  
Old Yesterday, 11:15 PM
Tuske427's Avatar
Tuske427 Tuske427 is offline
Member
 
Join Date: Sep 2016
Location: Los Angeles
Posts: 73
Default

Quote:
Originally Posted by makilaak View Post
Thanks - very good pictures and advice!! I certainly would have bought new correct bumber brackets from Ames, but as I already have now 'the wrong ones' I think I need to work with them. Additional delivery costs, taxes, custom fees will make me more crazy than just welding. I wonder if someone could share some dimension how to upgrade the non-hiden brackets so they could work?
I took a screen grab from (Frank's pontiac parts) online- can you confirm your brackets look like the ones on the left? If yes then I can measure mine tomorrow (which are like the ones on the right) and let you know. I just need to understand what I'm comparing against...
Attached Thumbnails
Click image for larger version

Name:	Screen Shot 2024-06-03 at 8.07.14 PM.jpg
Views:	8
Size:	34.5 KB
ID:	634706  

__________________
Long live the Muscle Car
Instagram @tuske427
1967 Firebird #BVbird
1967 Firebird 400 4 speed project
1969 Verdoro green GTO (daily)
Reply


Posting Rules
You may not post new threads
You may not post replies
You may not post attachments
You may not edit your posts

BB code is On
Smilies are On
[IMG] code is On
HTML code is Off

Forum Jump


All times are GMT -4. The time now is 06:23 PM.


About Us

The PY Online Forums is the largest online gathering of Pontiac enthusiasts anywhere in the world. Founded in 1991, it was also the first online forum for people to gather and talk about their Pontiacs. Since then, it has become the mecca of Pontiac technical data and knowledge that no other place can surpass.


Copyright © 2017