


| FAQ |
| Members List |
| Social Groups |
| Calendar |
| Search |
| Today's Posts |
|
#81
 05-08-2008, 06:16 PM
|
||||
|
||||
|
The Big Brown truck showed up today with the hose clamps from McMaster Carr. I got the big clamps to do the 1.75" section of the lower radiator hose, as well as some smaller clamps to do the heater hose.
 In retrospect, I should have installed the little hose reducer a little further back in the heater hose so it would not be so visible, but oh well. It's done. One thing that I learned while working on the RX7 is that the LSx engines are a little finicky to "burp." One trick that really helps is to fill the engine through the upper radiator hose. What this does is fill the block as much as possible before the engine is even started. After filling the engine through the upper hose, I fired it up and topped off the radiator. I don't think that cooling will be an issue at all with this engine. I have a huge Be Cool radiator and it took about 20 minutes for the engine to reach 210. Once the thermostat opened I topped off the radiator again. The fans kicked on at just over 210 (the ECU documentation said they are supposed to kick on at 212) and it only took about 10 seconds for the temp to drop enough for the fans to shut off. Driving around I don't think the fans will kick on at all. Andrew |
|
#82
05-08-2008, 10:11 PM
|
||||
|
||||
|
In a previous update I mentioned that I swapped out my brake master cylinder for another one. I did this mainly to resolve an issue with the push rod retention method. The MC that I am currently using has a nice deep pushrod hole as well as a clip on the tip of the pushrod that retains it inside the MC. Just because everything bolted up fine, doesn’t mean that this MC will work in my application. The pedal seemed to be very high and the pedal effort is rather high. So I decided to see what was really happening at the caliper. I went to my local hydraulic hose retailer and picked up an inexpensive pressure gauge. After installing the gauge in a bleeder screw in my caliper I had a friend step on the break pedal and to see what kind of pressure was being generated. Keep in mind that Wilwood rates their calipers at a maximum of 1200psi. From what I understand, past that point the caliper starts to deflect. So here is the result:
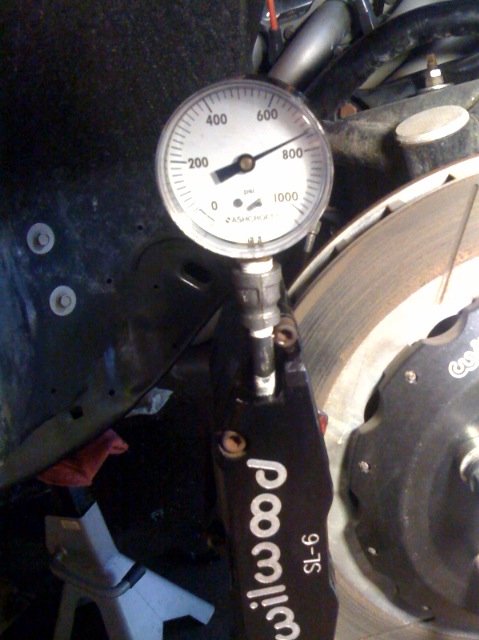 With moderate pedal effort my friend was able to generate a fairly easy 800-1000psi at the caliper. By pushing a little harder I am sure that he was going past 1200psi. With all that being said, I think that this MC will work just fine. The pedal effort will be moderate and the braking will be excellent! Andrew |
|
#83
05-10-2008, 01:12 PM
|
||||
|
||||
|
Small correction. The brake MC is actually from a 1977 Malibu. I am using Raybestos PN MC39946.
Andrew |
|
#84
05-10-2008, 05:05 PM
|
|||
|
|||
|
As much as GM swapped engines around??? I think it makes little difference what's under the hood so long as the installation is professional and the performance is impressive.
Best of luck on your project, Andrew.....Robert |
|
#85
05-11-2008, 01:00 AM
|
||||
|
||||
|
Quote:
Andrew |
|
#86
05-11-2008, 02:44 AM
|
|||
|
|||
|
You have earned it, Andrew.....The quality of your workmanship is indeed impressive.
I remember how much hell I got when I helped a friend put a 572 crate BBC into a second generation Firebird. No matter what you called it, or whether you loved it or hated it, the car absolutely flew....It is a real rattler. I even get hate mail for painting genuine Pontiac engines red, which has always been our competition engine color, dating back to our Flathead and Y-Block Fords. Sure, the Silver-Blue is the old stand-by factory color, but whatever happened to being different??? I am very old fashioned.....I like the old 4 speeds and carburetors, but I admire your ingenuity and 'Outside-the-Pontiac-Box' way of thinking. Keep up the good work...Robert Last edited by Z Code 400; 05-11-2008 at 02:54 AM. |
|
#87
05-11-2008, 02:50 AM
|
|||
|
|||
|
Quote:
Let me caution you about the use of galvanized fittings to conduct pressure tests on the brake system. These parts are full of imperfections and are not rated for much over 45 psi safely. I have seen a number of those fittings fail on the shop compressed air system at a low 165-170 psi. Best of luck and do be careful...Robert |
|
#88
05-11-2008, 09:24 AM
|
||||
|
||||
|
Quote:
Andrew |
|
#89
05-11-2008, 11:25 AM
|
|||
|
|||
|
Murphy's Law is quite prevalent in my shop, so I take no chances. Dad had a galvanized elbow fail on his D8 (Caterpillar) hydraulic system and upon inspection, it was cast very thin in one spot. It is common to see those fittings in some applications, but they always scare me.
Sacry when all that fluid comes flying back at you....:-) Hope you had a productive weekend!!!...Robert |
|
#90
05-11-2008, 07:49 PM
|
||||
|
||||
|
Quote:
http://www.vibratesoftware.com/html_...aft_Angles.htm Andrew |
|
#91
05-12-2008, 12:29 AM
|
|||
|
|||
|
Quote:
I used to put a lot of 302 SBC's in Vegas and in order to reduce wheelhop and driveline vibration, not only did I raise the pivot points on the upper control arm mounting points, but I made my own adjuastble control arms from Geo Storm rear wishbones. This allowed me to set the pinon angle anywhere I wanted with a few turns of a wrench. I also built my own tubular crossmembers for the T-50 5-speed gearboxes out of chrome moly aircraft tubing and swapped the front and rear suspension over to 5-lug. Nothing as trick as what you are doing, of course, but they would easily run deep into the 12.00's with very basic parts. One of the things we found common to the the Chevrolet Vega (and something no one else ever addressed) was the engine centerline didn't line up with the centerline of the axle, so we made our own motor mounts to correct this. The driveline is much less forgiving of lateral misalignment in terms of vibration. Sounds like you have the problem on the run. I especially like the creative use of weight jacks...something you don't see on too many street cars. Keep up the good work...Robert Last edited by Z Code 400; 05-12-2008 at 12:36 AM. |
|
#92
05-12-2008, 08:34 PM
|
||||
|
||||
|
Robert,
Neat trick with the Geo Storm control arms. I am using Edelbrock adjustable upper control arms which make changing the pinion angle a snap. Big day today. After a rather dismal, windy day yesterday, the weather today was just amazing. I needed a little inspiration so I decided that it was time for the GTO to move under its own power. I so installed a seat, put on some wheels, cleared out the tools, and pulled it out of the garage.   Of course I couldn't resist. So I went around the block. The clutch is silky smooth. Converting from the old Z-bar to the hydraulic release was definitely worth it. The clutch actuation is just like on a modern car. Super smooth. I still don't have exhaust so the drive was short. The brakes felt solid so the MC is working well. I also noticed some noises which I think are the result of my messing around with driveline angles. I raised the back of my transmission to get the angles perfect, but now the u-joint is grazing the floor. More on driveline angles later. Notice how much higher the front sits. I bet it's up a minimum of 2". I can't wait to get the thing scaled. I am also contemplating getting a fiberglass hood and ditching the shaker. The stock hood is probably 40-50 lbs, plus another 10 lbs for the shaker. A Glasstek fiberglass hood is probably about 25 lbs. I am open to opinions. Andrew |
|
#93
05-12-2008, 08:57 PM
|
|||
|
|||
|
Looks great, Andrew.....You are making good time on that swap too....Robert
|
|
#94
05-12-2008, 09:18 PM
|
|||
|
|||
|
Quote:
To me....a true hot rod is 100% business....No accessories...stick shift and rather primitive in nature...Spartan if you will....and I drive mine in 100° weather, because it just seems natural to me that hot rods are like that....But I freeze to death at anything under 70° outside. They are 'tough guys' cars....:-) I do enjoy taking the family out in the MBZ with the A/C on high and I love to see the work that Andrew is doing because he is showing the true spirit of the hot rodder. When people take him to task for swapping engines, I think back to how people reacted to my Dad's use of the Cadillac OHV V8 in 34 Fords back in the 1950's....but no one could beat him either. I am probably too tight to invest in the kind of project that Andrew is doing, because we always had a really tight budget, but I certainly admire his workmanship and the way he blends the old and new technology in such a fluid fashion. Keep the photos coming, Andrew.....:-) |
|
#95
05-14-2008, 08:43 PM
|
||||
|
||||
|
This is an update for the techno geeks. If you like looking at pretty pictures, stop reading now, and move on. If being diligent about every little technical detail of your car is something that you enjoy doing, than please read on.
Ever since I have owned my car, all 23 years, I have had some sort of vibration in the driveline at speeds about 70 MPH. Most of the equipment on my car has changed numerous times. The only constant being the ride height. In recent weeks I have really been studying what actually happens with these cars when they are lowered. I give a lot of credit to Troy, I forget his user name here. LOL He and I have exchanged some messages back and forth and he has really helped me to understand what it will take to make my car smooth. This is a thread that he started on Chevelles.com: http://www.chevelles.com/forums/showthread.php?t=213271 There is also another great website that I used: http://www.vibratesoftware.com/html_...aft_Angles.htm This is by far the best website for explaining and measuring driveline angles. The problem with GM A-bodies is that as the cars are lowered in the rear and front working angle increases dramatically. While it is possible to match the the rear working angle to the front working angle with adjustable upper control arms in the rear, this still does not address the problem of just having too much working angle. I have no doubt that I will get 10 different opinion on this post. There seems to be a lot of conflicting information when it comes to driveline angles. I feel that the information in the above website is the most accurate that I have seen to date. For the sake of this discussion I will always refer to something pointing UP when it is pointing from the back to the front of the car. Like this: [front] \ [rear] = UP [front] / [rear] = DOWN I made a spacer which raised the back of the transmission about 1/2". My final readings were as follows: Transmission: 2.5* UP Driveshaft: .3* UP Pinion: 2* DOWN Front working angle: 2.5 - 0.3 = 2.2* Rear working angle: 2 + 0.3 = 2.3* I ran the car on jackstands and took it up to about 4000 RPM in 6th gear, which is over 5000RPM driveshaft speed. It seemed very smooth. Much more so than at other setting. The ultimate test will be how the car feels at speed. Andrew |
|
#96
05-16-2008, 07:20 PM
|
||||
|
||||
|
Today I got the notice of approval from Grundy Insurance. On Monday I will go get the car registered and it will be legal to drive on the street. I also ordered a new 3" to 3" Dr. Gas x-pipe. This will just make the exhaust work a little simpler and cleaner. That should be here on Monday.
My car is not orange..LOL  Andrew |
|
#97
05-16-2008, 10:54 PM
|
|||
|
|||
|
Andrew,
What do you think you have invested in this swap so far???? The workmanship looks fantastic....Robert |
|
#98
05-17-2008, 02:00 AM
|
||||
|
||||
|
Quote:
Andrew |
|
#99
05-17-2008, 06:56 PM
|
||||
|
||||
|
I was going through some old paperwork this afternoon and I found my old corner scale sheet. Here are the numbers with driver:
[Front Left]-------------------------[Front Right] 1218----------------------------------1153 [Rear Left]---------------------------[Rear Right] 929------------------------------------884 Total Weight = 4184 56.7% front 43.4% rear Andrew |
|
#100
05-22-2008, 06:07 PM
|
||||
|
||||
|
Today I got the exhaust buttoned up. A new Dr.Gas x-pipe was installed and connected the headers to the mufflers. The car is very quiet. Almost too quiet. I has a nice deep tone. It is a hair louder than a new ZO6 Corvette. I got the wideband hooked up as well and as suspected the car was a little rich. Once I drove it a little the ECU started trimming the A/F ratio and now it is very close. I may not have to get it tuned at all. We'll see how the WOT A/F ratio is on the dyno.
I also weighed the car on the new scales at Beech Bend. I had 1/3 of a tank of gas, no hood, no passenger seat, and I was in the car. I think I am about 275. Anyone care to guess what the car weighed? Andrew |
| Reply |
|
|
The PY Online Forums is the largest online gathering of Pontiac enthusiasts anywhere in the world. Founded in 1991, it was also the first online forum for people to gather and talk about their Pontiacs. Since then, it has become the mecca of Pontiac technical data and knowledge that no other place can surpass.


 Linear Mode

