| FAQ |
| Members List |
| Social Groups |
| Calendar |
| Search |
| Today's Posts |
|
#21
|
||||
|
||||
|
That looks good
|
|
#22
|
||||
|
||||
|
FWIW my opinion is that "no gap" is correct.
__________________
Regards, "455HO" Lloyd 2008 GMC Sierra Denali 2WD Crew, L92 6L80E, Silver w/ Ebony guts, 14.26 @ 98 
|
|
#23
|
||||
|
||||
|
http://www.firebirdnation.com/forums...nel-alignment/
The guy lost all credibility in his gap theory when he states: "2. The middle of the hood arches above the fender. Commonly attributed to the "Formy arch" or lousy hood springs. It's actually also caused by the hood being too far back and the arch of the hood not matching the arch of the fender." Really? so when I replaced the bowed hood on my black 72 in the exact same spot with an NOS hood that sat flat, I must have somehow magically fixed the bumper gap instead? So how come the bowed hood on my Gramma's '75 (which uses a nose piece that bolts flush to the fender) is bowed up, too? Total rubbish. |
|
#24
|
||||
|
||||
|
P.S. in case he doesn't believe my 19,000 mile car. Here is a photo of the 1,700 mile SD's nose. No gap.
|
|
#25
|
||||
|
||||
 Who don't like gaps?  Gap Fan
__________________
72 Bird |
|
#26
|
||||
|
||||
|
Mine is outta whack, and it bothers me. I got gaps and is slightly shifted towards the driver side.
That's on the list of winter projects for the car.
__________________
"Those poor souls have made the fatal mistake of surrounding us. Now we can fire in any direction" 1970 Trans Am RAIII 4 speed 1971 Trans Am 5.3 LM7 1977 Trans Am W72 Y82 1987 Grand National |
|
#27
|
||||
|
||||
|
|
|
#28
|
||||
|
||||

__________________
"Those poor souls have made the fatal mistake of surrounding us. Now we can fire in any direction" 1970 Trans Am RAIII 4 speed 1971 Trans Am 5.3 LM7 1977 Trans Am W72 Y82 1987 Grand National |
|
#29
|
||||
|
||||
|
Here are some photos of the SD. I even got out some feeler gauges for exact measurements.
On the passenger side there is zero clearance between the endura edge and the fenderedge. On the driver's side you can fit a .005 feeler gauge at the top of the fender but nothing on the side. (The .002 is the thinnest I had and it would not squeeze between). Also, the back edge of the endura is not painted. They must have painted these bumpers with the paint gun aimed in a "head on" direction and did not dust the back side of the mounting area. The mounting flange is the unpainted grey material with a hint of overspray. And note the bad alignment job on the top of the fender to endura.     
Last edited by njsteve; 07-16-2016 at 08:21 PM. |
|
#30
|
||||
|
||||
|
I "think" this "Gap" "theory" may have come to play with some noses being Re installed Very snug and the sides "flaring out", especially on older, sun worn bumpers.
I did chuckle when the feeler gauges came out though!! may as well post my "gap" LOL>
__________________
"The Future Belongs to those who are STILL Willing to get their Hands Dirty" .. my Grandfather |
|
#31
|
||||
|
||||
|
Great picture Bruce, love it!
|
|
#32
|
||||
|
||||
|
Quote:
Oh well, its a driver. 
__________________
"Those poor souls have made the fatal mistake of surrounding us. Now we can fire in any direction" 1970 Trans Am RAIII 4 speed 1971 Trans Am 5.3 LM7 1977 Trans Am W72 Y82 1987 Grand National |
|
#33
|
||||
|
||||
|
Quote:
__________________
"The Future Belongs to those who are STILL Willing to get their Hands Dirty" .. my Grandfather |
|
#34
|
||||
|
||||
|
Who ever wrote this is one persons opinion. Fender alignment is dictated by the door to QP and A-pillar gap and alignment. Worn frame bushings will cause a big problem with fender to nose alignment due to fenders are bolted to the body and nose is supported by the frame/frame bushing combo. Core support must be square X measurement from upper fender body shell bolt locations. Also frame must be in correct location with body alignment holes. Usually body frame bushings wear and cause the most issues. Hood fits into gap created by proper fender to door and door to A-pillar alignment.
Procedure that I always use is this. With car level on suspension. 1. align frame per assembly manual with new bushings and hardware. 2. Set correct door to QP gaps and flushness with surface of QP sheet metal. Also check to make sure the gap to A-pillar is correct. 3. install fenders to fit doors with proper gaps without the core support on at this point. Measure hood width and rear fender gap to make sure you are close to correct clearance. 4. Add core support and shim up to fit the fenders just as factory did. large washers found below the core support bushings between bushing and frame. That way you will not pull the fenders down( when bolted) to an improperly shimmed core support and distort the fenders to nose alignment. Make sure the core support is X distance correct from the upper rear fender bolts. Use tape to measure. 5. Add hood and check for squareness. Check for uniform gap. If you have problems with your hood hinges you will know it at this point. Hood will open and close sideways or out of square. Big problem. 6. Add front nose bumper to frame brackets snug and set forward to allow for nose installation. make sure your upper rubber snubbers are in good shape. bolt nose to brackets with correct hardware. 4 bolts. leave the rubber snubbers and slotted brackets loose that go to the core support. Support bumper and loosen frame to bumper bracket bolts and snug bumper to fenders. Tighten up all bolts. Most will still see a small gap. Place jack under frame cross member and jack up till gap gets a little wider. do final adjustment and split the difference between the present gap. now let the jack down slowly and check for pushing. no push on front fenders to nose. Just snug. This may take a couple times to get it right. Hope this helps. Works for me every time.
__________________
White/Blue 71 455 HO T/A Auto Blue/Blue 71 455 HO T/A 4 Sp White/Sandalwood 71 455 HO T/A 4 Sp White/Black 70 RAIII T/A M21/373 (stripper) Carousel Red/Black 69 GTO Judge 4 Sp 2002 Firehawk Red/Black 6Sp |
|
#35
|
||||
|
||||
|
This is good info for me as I'm getting close to hanging my sheet metal and it's been a while since I last did it.
On Step #3 - before placing the core support do you have to support the front of the fenders or with the bolts in at the A-pillar and on the cowl top and bottom (lower back edge of fender) is that enough to support it? Thanks Chad .
__________________
1966 Ford F250 Deluxe Camper Special Ranger Custom Paint - San Jose plant http://www.ford-trucks.com/forums/12...al-ranger.html 1966 Ford F250 4x4 Red/White 4-speed - San Jose plant 1966 Ford F250 4x4 White 4-speed - San Jose plant http://www.ford-trucks.com/forums/11...-f250-4x4.html 1971 Trans Am White/Blue 4-speed limited options - Norwood plant http://forums.maxperformanceinc.com/...d.php?t=757496 Last edited by TA455HO; 07-21-2016 at 12:08 PM. |
|
#36
|
||||
|
||||
|
Thanks Skunkwerks, nice info. It brings up a few questions. What roll do the upper donuts and plates play in alignment? It sounds like they just secure everything once the alignment is done primarily at the frame mount. On mine, my passenger side has good bumper gap but the drivers side is too wide. Both sides line up well both vertically and horizontally I just have a big gap on the one side. Judging from the witness marks on top of the core, it looks like they tried to pull the drivers side of the bumper side back and then hold it there with the upper clamps but over time the bracket worked its way back out. Since the passenger side is fine do you think I can loosen the L bracket to frame bolts and the upper donut/plate bolts on just the driver side and take up the slack at the frame without messing with the passenger side?
__________________
-- Kevin 1971 Trans Am, White/Blue 455 YC Block with Edelbrock Performer RPM Aluminum Heads, 10-10.5 estimated CR, E-Performer Plus cam (soon to be 041 + Rhoads), Comp Cams 1.65:1 roller tip rockers, E-Performer Aluminum Intake (soon to be topped by a FiTech EFI), TRW forged pistons, Hedman Husler Headers, 3" dual exhaust with Flow Master mufflers. |
|
#37
|
||||
|
||||
|
Quote:
You do not want any interference between the fenders and the core support with original factory adjustment. Fenders are supported enough with the top cowl bolt, inside door opening bolt ,two lower bolts and under hood fender to body. let the front of the fender hang. Core support is kind of a floating piece anyway. Not solidly mounted (Rubber mounts and shims). Trick is to re-shim the core support to fit the new front of fender height to avoid being pulled down when the fenders are bolted the core support. Pulling the fenders down to meet the support will bow them and cause the hood line to not fit the fenders. this will also cause the nose line to not have the perfect profile to the hood line and fenders.
__________________
White/Blue 71 455 HO T/A Auto Blue/Blue 71 455 HO T/A 4 Sp White/Sandalwood 71 455 HO T/A 4 Sp White/Black 70 RAIII T/A M21/373 (stripper) Carousel Red/Black 69 GTO Judge 4 Sp 2002 Firehawk Red/Black 6Sp |
|
#38
|
||||
|
||||
|
Quote:
Gap on the drivers side indicates you need to re-adjust the lower bumper bracket and upper rubber snubber and core support upper bracket. loosen all these bolts on drivers side. snug bumper to fender and tighten all bolts back. You will need an extra hand for this. If there is still a small gap then place jack under cross member and jack up till gap gets slightly bigger. Then do a final adjustment. should help. Check your upper rubber snubbers. if they are old or worn get some new ones. they do help to hold the bumper snug to the fenders.
__________________
White/Blue 71 455 HO T/A Auto Blue/Blue 71 455 HO T/A 4 Sp White/Sandalwood 71 455 HO T/A 4 Sp White/Black 70 RAIII T/A M21/373 (stripper) Carousel Red/Black 69 GTO Judge 4 Sp 2002 Firehawk Red/Black 6Sp |
|
#39
|
||||
|
||||
|
Quote:
__________________
-- Kevin 1971 Trans Am, White/Blue 455 YC Block with Edelbrock Performer RPM Aluminum Heads, 10-10.5 estimated CR, E-Performer Plus cam (soon to be 041 + Rhoads), Comp Cams 1.65:1 roller tip rockers, E-Performer Aluminum Intake (soon to be topped by a FiTech EFI), TRW forged pistons, Hedman Husler Headers, 3" dual exhaust with Flow Master mufflers. |
|
#40
|
|||
|
|||
|
Quote:
My apologies for not making my intent more clear with my wording in a sentence. I should have written.... IT CAN ALSO BE CAUSED by the hood being too far back and the arch of the hood not matching the arch of the fender. And the quoted sentence seems out of context without the sentence that preceded the list the quote was taken from.... "These are the most noticeable effects of trying to have the bumper touch the fender." I do not doubt that replacing a bowed hood with a NOS one worked or that a 75 (with different mounting not being discussed) could have a bowed hood. .................................................. .................................................. .......................... Below is a copied and pasted version of the piece I wrote. I debated with myself for a long time before writing it as I knew there would be a bunch of folks who might be offended at my suggestion that their cars might not be assembled the way the designers intended. However, my desire to see what I consider one of the best front end designs GM came out with look as good as possible combined with the desire to help people avoid paint and other body damage won out and I wrote the piece. So for those who didn't follow the link in the OP please keep an open mind and read the piece slowly. I'm more than willing to discuss the topic or agree to disagree and move on, you do it your way and I'll do it mine. I've spent waaaay too many hours studying and researching this topic. My last computer had hundreds of old and new pics I'd collected of peoples cars with and without the gap. Almost every car that didn't have the gap I could find other pics of the same car that showed one or more of the symptoms where other panels wouldn't line up, body lines that didn't match, or reflections that didn't flow over the bumper/fender transition. The white car I picked for the post being discussed (pasted below) was chosen because it was an extreme example which was being disassembled, and I contacted the owner for permission. I do not doubt for a moment that some cars left the factory with the bumper touching the fenders or that some cars were delivered from dealers with the bumpers touching the fenders. However I do not believe they were designed to be installed that way. I believe the design allowed for the subframe/bumper assembly to be isolated away from the body/front fender assembly while allowing the body lines and reflections in the paint to flow over the gap. .................................................. .................................................. .......................... Soapbox time! 70-73 Firebird front bumper and panel alignment. I was a car guy teen when these cars were new and been researching/studying the bumper mounting , panel fitment, and the gaps for the past 25-30 years since my stepson got his first 70. Most of the 70-73 front ends on birds I see now have not been assembled/aligned correctly. THE FRONT BUMPER IS NOT SUPPOSED TO TOUCH THE FENDERS. There is supposed to be a gap. It's wider than people want to see. Nobody likes it, not even the folks at Pontiac liked it when they were new. As you can see in the pics below the marketing people at Pontiac photoshopped (was that a thing then?) the gap between the fender and bumper right out of some of the pics in the 70 brochure because it looks "funny". I see many beautiful cars where the owners have taken every step they can, buying NOS and correct original pieces for crazy prices just so they know they've got the right stamping's, date codes, etc. only to see the whole front end isn't panel aligned correctly. I feel bad for them because they just don't know. To me it's almost like hearing someone say they've got a "Big Block" Pontiac. Soon after these cars were built they started getting in accidents etc.requiring bodywork and paint. IF the person took it back to the dealer the shop might have put the bumper back on correctly however many shops might just try to eliminate or reduce the gap if they even knew there was supposed to be a gap. It's been over 45 years since these cars were built and so even a body man who was in his 20's is probably retired even if he was a body man his whole life. So the folks who've been repainting these cars the past 30 years or so probably never even saw these cars new and don't realize the bumper isn't supposed to touch the fender. Most in the restoration/ body repair business now never saw these cars before they started being reassembled wrong so they try to split the differences and make the panel alignment/gaps look as good as they can with the bumper tight to the fender because they never even saw one with the correct gap. The misconception has gone on so long now that the majority of the cars I see now are assembled wrong and look kinda wonky but few realize why. The poor panel alignment is often attributed to the lower quality sheet metal stamping of yesteryear. The subframe, bumper brackets, and bumper (as a solidly bolted structure) were isolated from the unibody,fenders, core support, splash pan, and core support/latch brackets (again solidly bolted structure) by 8 rubber bushings allowing the 2 sections to move slightly independent of each other. 4 rubber body mounts, 2 rubber core support mounts, and the 2 rubber upper bumper mounts. This allowed movement of the two structures individually and so a gap was needed between the fenders and bumper to prevent the bumper being deformed on uneven surfaces and when the car was jacked up. When the first urethane bumpers arrived on the 69's they put a rubber gasket between the bumper and body and people didn't like it so in 70 they reduced the gap and left it open. The gap needs to be roughly 3/16" - 1/4" on most of the cars to get everything lined up as well as can be keeping in mind that factory stamping and tolerances of early 70's cars was nothing like today's cars. In this first page from the brochure you can see that the marketing guys made the gap disappear on the passenger side of the upper image while it is clearly seen on the lower image. 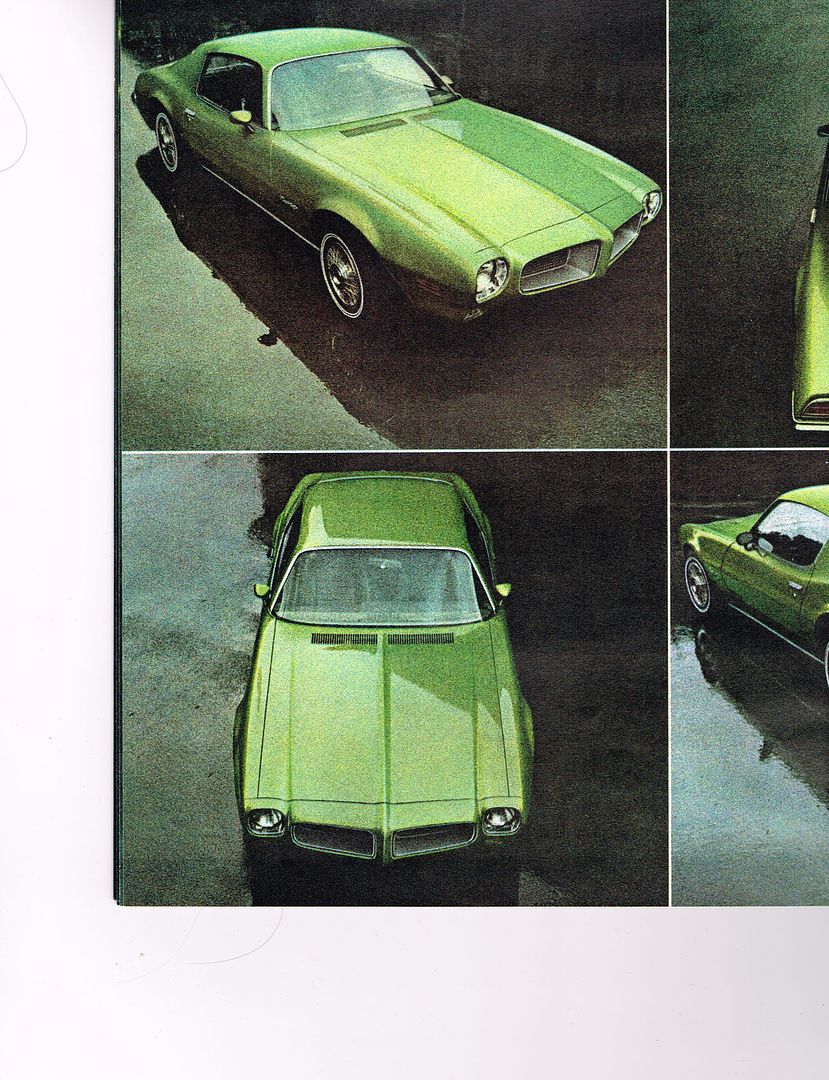 On the page below you can clearly see the gap, note the front of the hood lines up with the front of the fender. 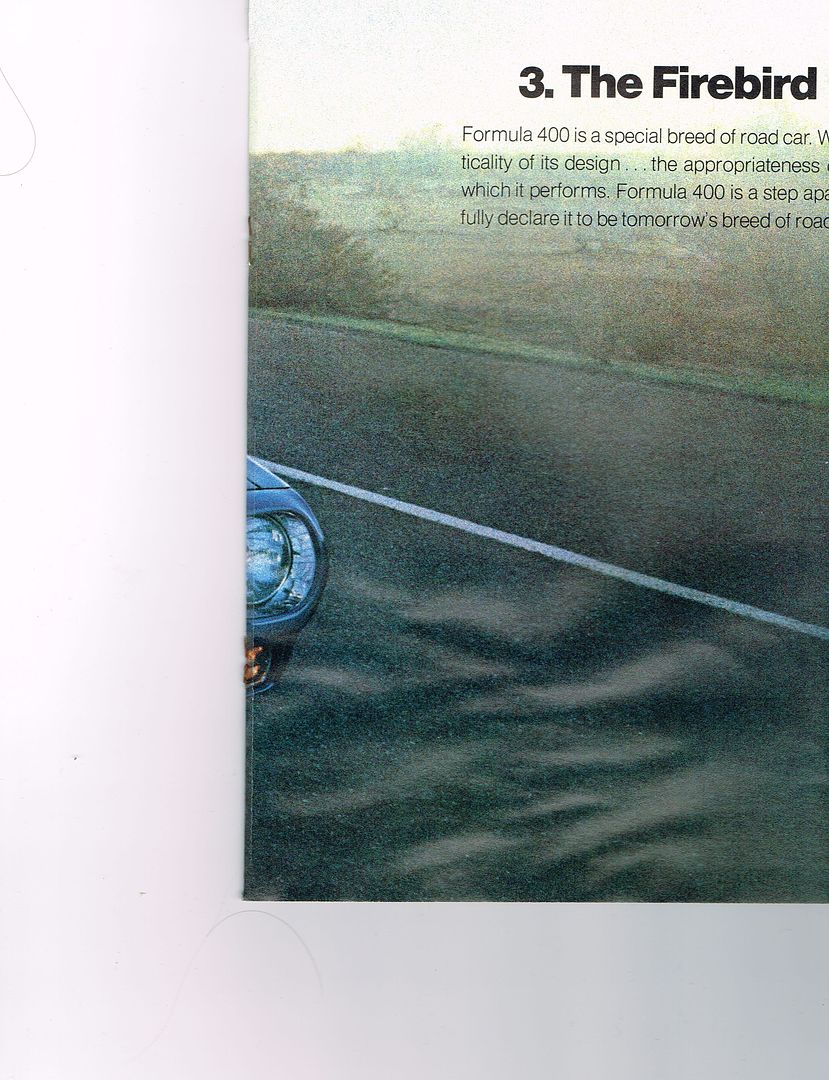 Apparently the marketing folks figured the gap showed up waaay too much on a white car. 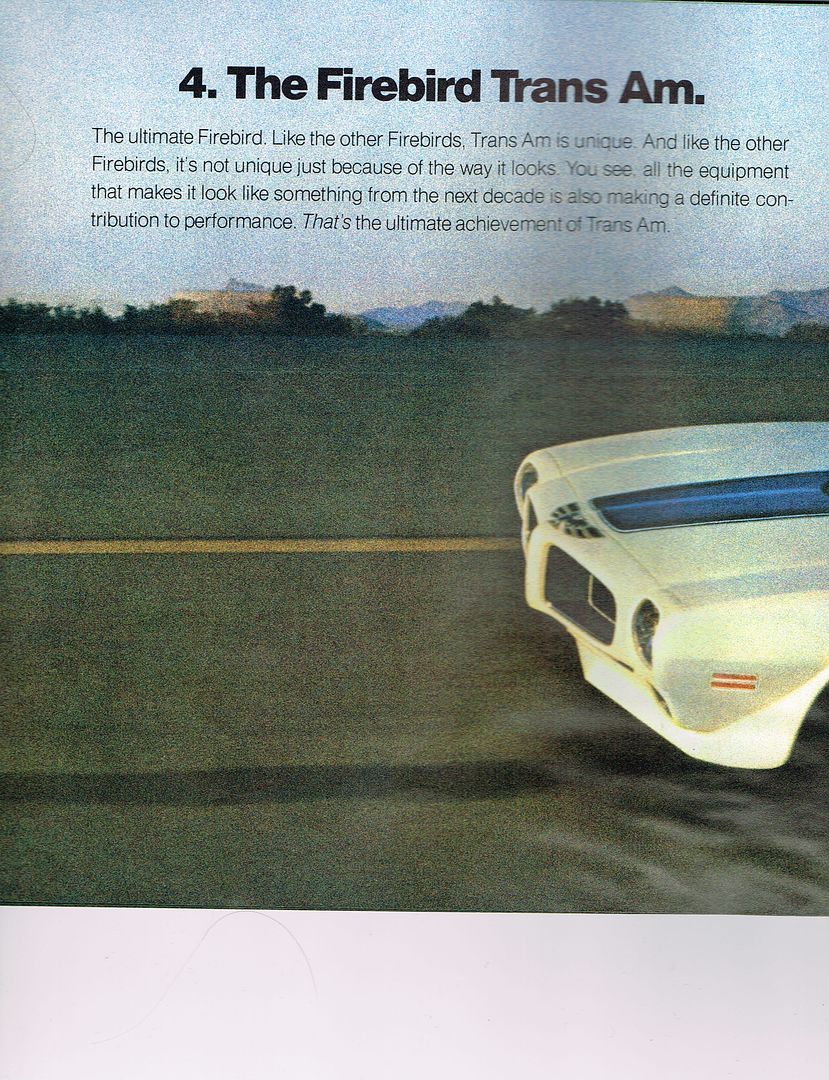 Pic below is exaggerated to show how the body lines and fitment get screwed up. Think of it as taking a slice out of a cone and then trying to mate the remaining pieces. The gap needs to be roughly 3/16" - 1/4" on most of the cars to get everything lined up as well as can be keeping in mind that factory stamping and tolerances of early 70's cars was nothing like today's cars. When folks try to have the bumper touch the fender it causes problems aligning the front end sheet metal. Several problems arise and folks try to juggle all the pieces to minimize the affects but the pieces won't line up well so the common thought is "They just didn't make the cars very good back then" These are the most noticeable effects of trying to have the bumper touch the fender. 1. The hood sticking too far back toward the windshield and sticking up even when the hinges are adjusted to the max trying to lower it. 2. The middle of the hood arches above the fender. Commonly attributed to the "Formy arch" or lousy hood springs. It's actually also caused by the hood being too far back and the arch of the hood not matching the arch of the fender. 3. When the bumper is tight to the fender people pull the fenders in toward the hood trying to get the points on the top of the bumper to line up with the top of the fender. this causes too small of a gap to the hood and often the car gets assembled without the side rubber hood bumpers because they push the hood up causing the mid hood arch to be off even more with the fender. 4. When the fenders are pulled in, the bottoms of the fender get pulled in afterward when trying to get the side of the fender to curve like the side of the bumper. Then the splash pan seems like it's too long. 5. The side body line will be off because when pulling the bumper tight to the fender it also gets raised to have the top of the bumper flush with the top of the fender. So the bumper body line ends up slightly higher than the fender body line. Sometimes this gets "fixed" during bodywork with filling/blocking if the bumper is on the car at the time. 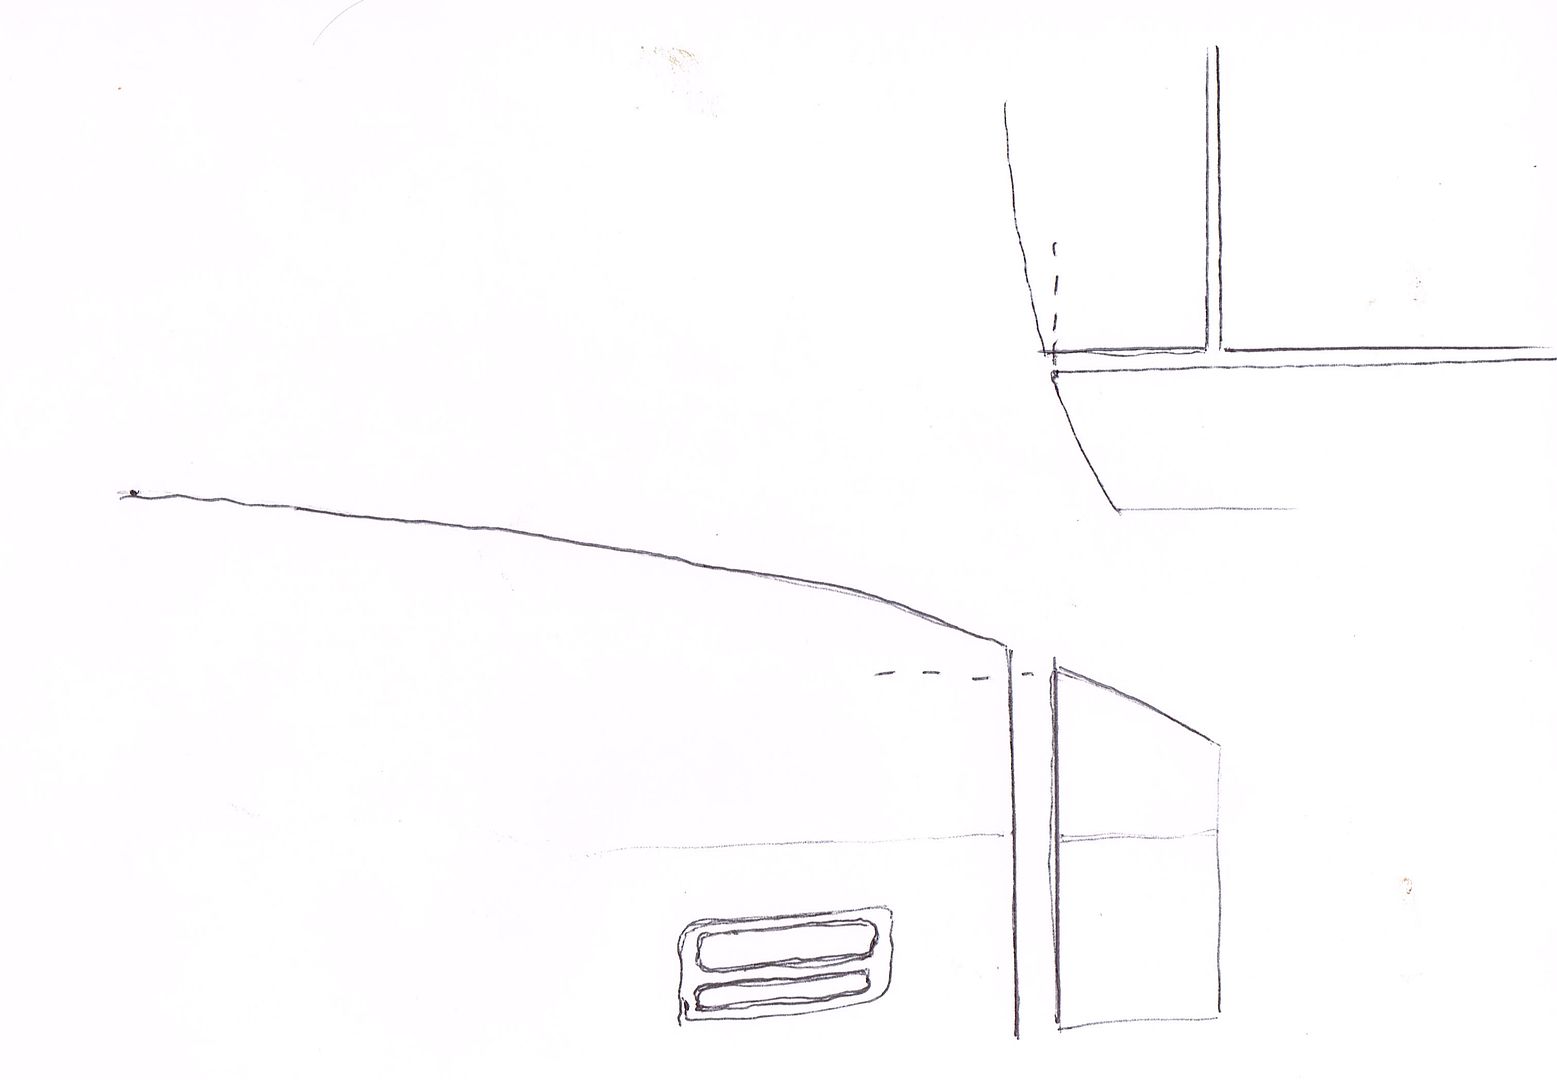 The crude sketches below show how the car is built. The main portion of the car is comprised of the unibody along with all the front sheet metal bolted solidly together (excluding hood because it's on hinges). It includes the fenders, inner fenders, inner fender extensions, core support, latch support, and splash pan. The smaller section includes the subframe, bumper brackets, and bumper (with lights and grills) bolted solidly together with the front suspension and steering attached. A third section is the engine/transmission bolted solidly together and "floating" on rubber mounts over the subframe. The gap was necessary to allow the two main sections of the car to move a little independent of each other without damaging the sides of the bumper and paint on the leading edge of the fenders.. Even if you use solid body mounts the bumper still needs the gap to get the panel alignment correct because it was designed knowing the gap was necessary and the body lines needed to appear to flow over the gap. 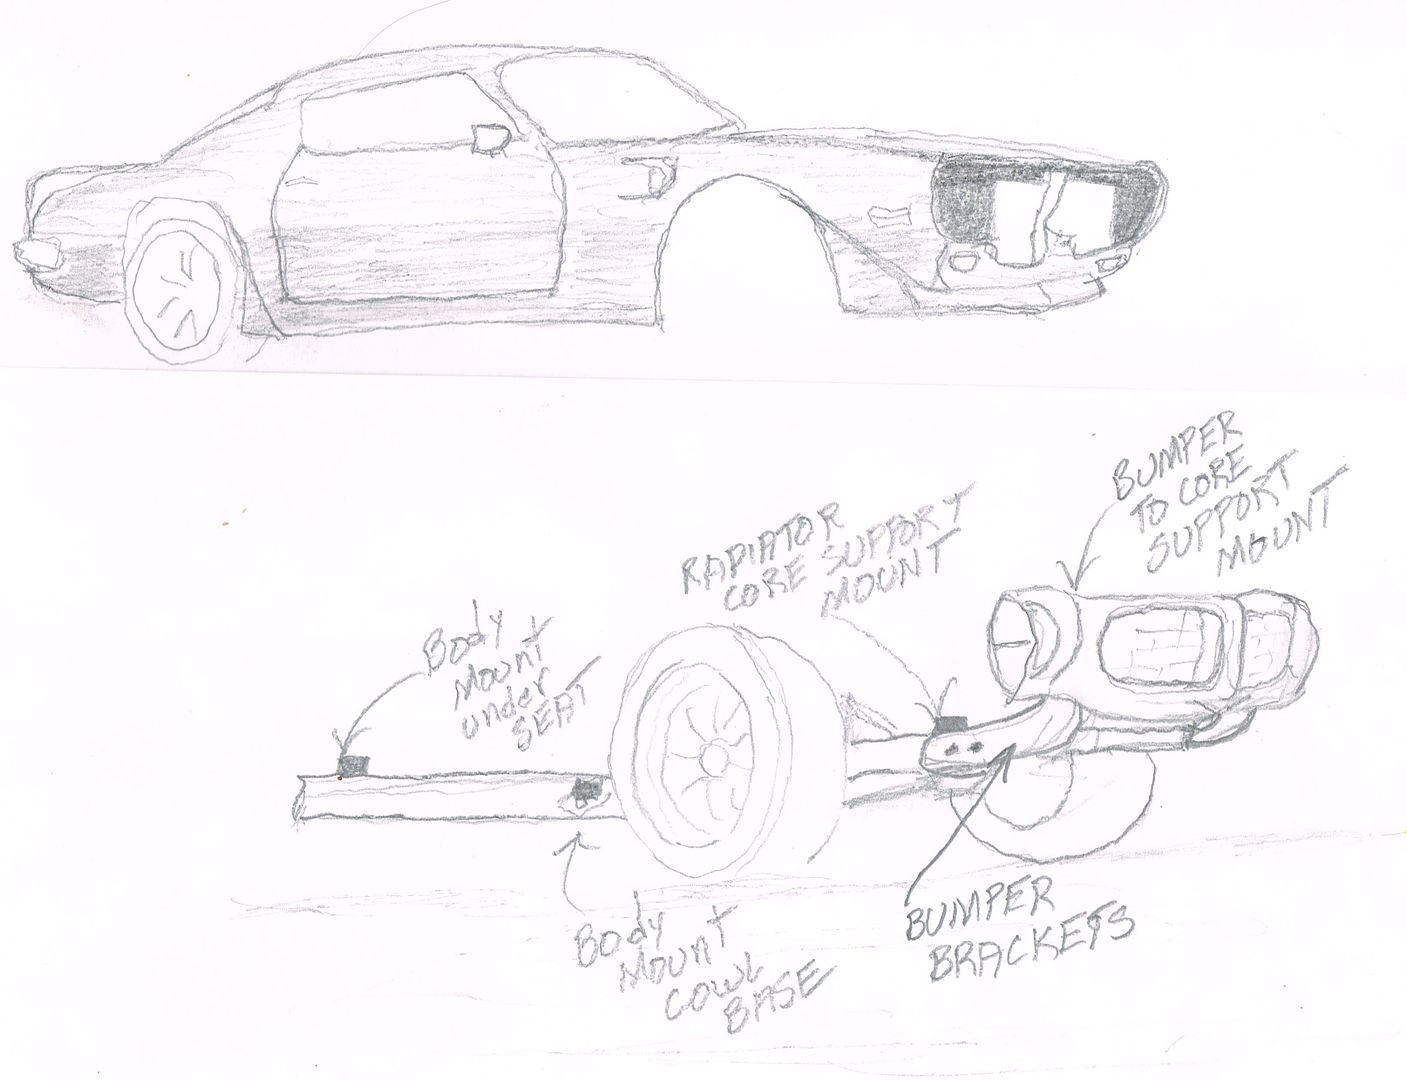 Came across some pics on another forum that demonstrate how NOT to line up the bumper. This is a classic example of what happens when folks try to have the bumper touch the fender and don't know what they're doing is wrong. As an added bonus it also shows how the more flexible formy hood reacts. Don't worry, I'm not picking on someone's car that's being used like this. It's already apart for restoration. The bumper below looks like it was installed while the car was on jack stands or a lift and they tried to have the bumper touch the fender. Then when they dropped the car on the ground the result was popping the paint on the drivers side of the bumper and a funny gap on the passengers. The hood was moved back so there would be a gap and the hood corners by the windshield probably got sanded off because they looked funny. The fenders were pulled in toward the hood in front trying to match the bumper causing the raised section of the Formy hood mid fender. Also notice the side body line of the bumper is now too high compared to the fender. 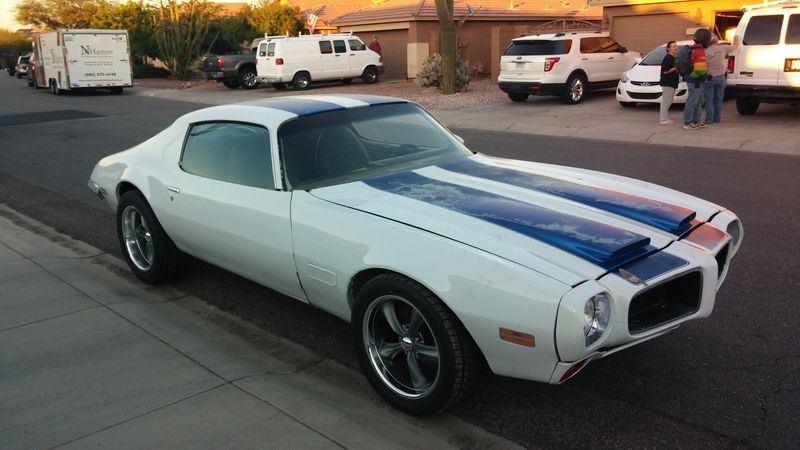 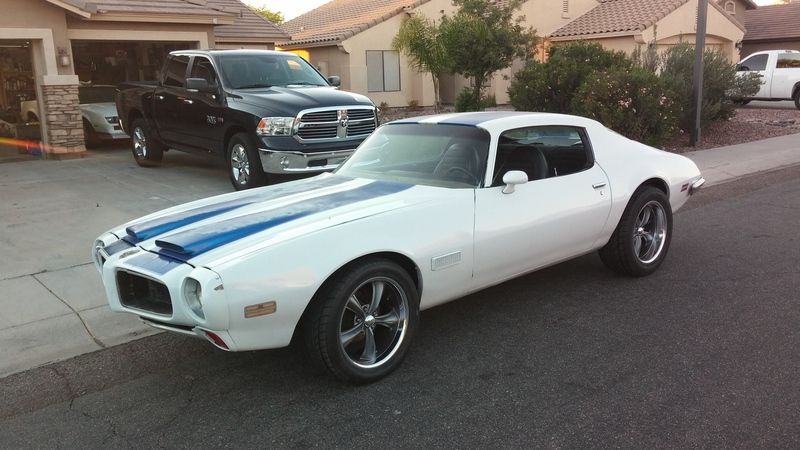
|
| Reply |
|
|