


| FAQ |
| Members List |
| Social Groups |
| Calendar |
| Search |
| Today's Posts |
|
#1
 11-15-2015, 09:44 AM
|
||||
|
||||
|
I am wondering if I could get some of you guys to post some pictures of how your seams are sealed up on your cars. I would like to duplicate the process as close as I can to original & I am guessing it varies from car to car. I did look at a 72 GTO & his were surprisingly clean. I just don't remember what mine looked like as too much time has passed
 What I am looking for is the seams around the trunk, trunk floor pans, rockers to cowl & rear quarters, & also the top of the firewall. Any pictures you could take of your car in these areas would be hugely appreciated. I included pictures of my car sealer-less so you can see where I am asking about. Thanks, 68 RT
__________________
 68 GTO 4-spd Convertible 78 S/E Trans am L78, WS6 Auto 78 S/E Trans am W72, WS6 Auto 79 10th aniv W72 Trans am 80 Indy pace car Trans am 89 Trans am GTA |
|
#2
11-15-2015, 09:48 AM
|
||||
|
||||
|
One other thing. Did the cowl data tag get painted over? I removed it when the body went in for media blasting, I have the correct fasteners (I think) I thought it would look cool to clean the tag & install it that way, but I am guessing thats not how it should be.
__________________
68 GTO 4-spd Convertible 78 S/E Trans am L78, WS6 Auto 78 S/E Trans am W72, WS6 Auto 79 10th aniv W72 Trans am 80 Indy pace car Trans am 89 Trans am GTA |
|
#3
11-15-2015, 01:14 PM
|
|||
|
|||
|
the trim tags where nice and shiney alum, but got the black out treatment after paint.,,on the cowl and firewall areas
you can buy the rivits for the tag, but anytime you touch that tag, the nay sayers think youre pulling something..there are restorers that will everything in their power to never touch the tag...Pontiac has PHS so idont think its as critical. its your car...do it the way you like it..
__________________
Mark.. The Goat whisperer "I spent a lot of my money on booze, crazy women, and fast cars. The rest I just squandered." 
|
|
#4
11-15-2015, 01:37 PM
|
||||
|
||||
|
I bought this car after it experienced an intense interior fire. Much of the paint blistered off the upper areas including the cowl. I knew the tag would get destroyed in media blasting so I took it off. I was glad I did as it had a lot of surface rust under the tag. I am trying to make this car look close to how it was built in 1968, but I am changing things that won't match its build sheet, so as nice as the car will be, it will never be a concourse car because of those changes. I am adding power windows, a tilt column, , , an AM/FM radio & possibly a wood wheel. & probably the biggest no-no is its not going to be April Gold. I'm going with a 68 color, but I just never liked the gold that much. Not sure why.... So The car will appear completely correct by an inspection, but options won't all match.
I did find numbers & stampings all over the body as I was restoring it so I am guessing those would help authentic what the car is. I also have endless pictures of everything from the time it rolled off my trailer to pictures I took this morning. I have restored a lot of cars & this things has been my biggest challenge & my nemesis. I start a thread on it when its closer to finished. I'm getting sooooo close to paint now. Hopefully it will shine sometime this winter! Putting it back together will be the fun part. But I will probably be bugging your guys like never before on the correctness of things as I go.
__________________
68 GTO 4-spd Convertible 78 S/E Trans am L78, WS6 Auto 78 S/E Trans am W72, WS6 Auto 79 10th aniv W72 Trans am 80 Indy pace car Trans am 89 Trans am GTA |
|
#5
11-16-2015, 06:31 PM
|
||||
|
||||
|
Is anyone able to post a few pictures of these areas? I have scoured with google & really can't find any good pictures that show how the seam sealer was applied in those areas.
I do know a guy with a 72 GTO that I could go look at, just was hoping to see some from cars closer to the same year. thanks, 68RT
__________________
68 GTO 4-spd Convertible 78 S/E Trans am L78, WS6 Auto 78 S/E Trans am W72, WS6 Auto 79 10th aniv W72 Trans am 80 Indy pace car Trans am 89 Trans am GTA |
|
#6
11-16-2015, 11:46 PM
|
||||
|
||||
|
I don't have any of those pics at present but I can give you a description of how mine looks in those areas.
Pic 1- There is seam sealer there but it appears to have been just half-heartedly rubbed in with a finger, however, the seams are fully filled. No brush marks. Pic 2- There really doesn't seem to be any sealer there. Looks more like a single glob of weld bead that was ground down flat. Most of the seam is visible. The 'glob' may be seam sealer but I don't remember it being the case when I stripped the car (10+ years ago) Pic 3- About the same as pic 2. Most of the seam is visible and if someone was using seam sealer there, they weren't very serious about it. Pic 4- That's the 'glob' I'm talking about on the other spots and they look about like that seam. No real attempt to seal it or hide it. Pic 5- Lots of seam sealer on that raised seam that runs parallel to the fender, heavily brushed on with maybe a 1" brush . They were not at all careful with it. There were a few big globs of sealer dropped on the sides of the cowl as they slopped it on. The spotweld seam that runs across the top of the firewall is almost as sloppy but no brushmarks. It's a pretty heavy bead just kind of wiped down flat. No real attempt to hide it though. My car was built in Arlington in May of '68.
__________________
Greg Reid Palmetto, Georgia Last edited by Greg Reid; 11-16-2015 at 11:52 PM. |
|
#7
11-17-2015, 10:52 PM
|
||||
|
||||
|
Thanks for your efforts Greg. Its funny, I have seen so many 68'-69's at various car shows in the past couple years & never thought to look at that stuff. Restoring a car is difficult in that way. So hard to plan everything out where it just falls together. I just have to get the backside of the trunk lid finished & the front valance & I can start my final sanding & figure out my painting strategy. Its been a long road with this car. Getting close though now.

__________________
68 GTO 4-spd Convertible 78 S/E Trans am L78, WS6 Auto 78 S/E Trans am W72, WS6 Auto 79 10th aniv W72 Trans am 80 Indy pace car Trans am 89 Trans am GTA |
|
#8
11-17-2015, 11:21 PM
|
||||
|
||||
|
Well, hopefully someone will post some pics for you but truly, the only seam on my car that looks different than the pics you posted are the ones in the upper corners of the trunk opening and the ones that are now covered by the fenders and hood, ie. the cowl seams. I don't think anyone would fault you if you filled them though.
__________________
Greg Reid Palmetto, Georgia |
|
#9
11-18-2015, 06:55 AM
|
||||
|
||||
|
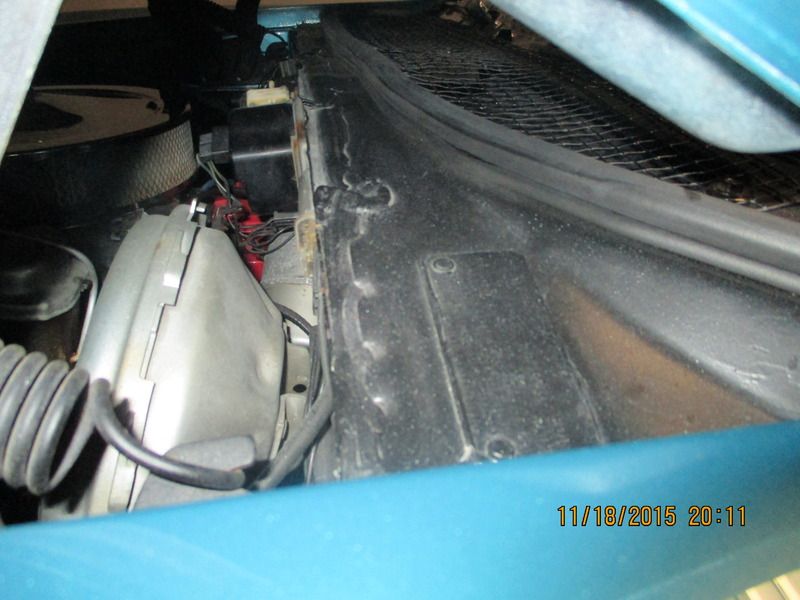
Guess I'm not too worried about the ones on the cowl behind the fender as they will never be seen. I think the most noticeable will be the front/top of the cowl where all the spot welds are in front of the weatherstrip location.
__________________
68 GTO 4-spd Convertible 78 S/E Trans am L78, WS6 Auto 78 S/E Trans am W72, WS6 Auto 79 10th aniv W72 Trans am 80 Indy pace car Trans am 89 Trans am GTA |
|
#10
11-18-2015, 11:02 AM
|
||||
|
||||
|
I might be able to get you a pic of that seam. Impossible to see the entire thing with the hood in place but I could zoom in on a few inches of it and it's pretty much the same way all the way across. Basically, it looks like a thick bead was laid down with a caulk gun and they took a putty knife and very casually flattened it out.
__________________
Greg Reid Palmetto, Georgia |
|
#11
11-18-2015, 03:13 PM
|
||||
|
||||
|
I'm guessing ever car is different depending on the day & who's hands are on the caulk gun. I just wasn't sure what areas had free flowing beads, brushed on, or smoothened out with a finger. Too bad its november, I could just go to a car show & peek at a few

__________________
68 GTO 4-spd Convertible 78 S/E Trans am L78, WS6 Auto 78 S/E Trans am W72, WS6 Auto 79 10th aniv W72 Trans am 80 Indy pace car Trans am 89 Trans am GTA |
|
#12
11-18-2015, 09:13 PM
|
||||
|
||||
|
The cowl area is pictured here as best I could. get it. Once again, no sealer anywhere except sloppily applied on all the cowl seams and more smoothly applied at the forward corners of the trunk opening. The rest look just like your pics.
__________________
Greg Reid Palmetto, Georgia |
|
#13
12-11-2019, 04:22 PM
|
||||
|
||||
|
As I am in the same situation and did not do a good job of taking pictures before removing caulk. Invaluable that there are restoration questions we all have and the answers we can get.
|
|
#14
12-11-2019, 05:06 PM
|
||||
|
||||
|
I can probably get some pics tonight, mine still has a lot of the OEM caulking .... and in most places you'll be able to see a cutaway view as big pieces are cracking and falling off
|
|
#15
12-11-2019, 07:38 PM
|
||||
|
||||
|
Was pretty sloppy from the factory. Some looked nicer than others, i guess it depends on the guy behind the applicator
I can post picts of what I did since the OP. Hard to believe that was 4 years ago already......Would be fun to try to take the pictures from the same angle as I did back then.
__________________
68 GTO 4-spd Convertible 78 S/E Trans am L78, WS6 Auto 78 S/E Trans am W72, WS6 Auto 79 10th aniv W72 Trans am 80 Indy pace car Trans am 89 Trans am GTA |
|
#16
12-11-2019, 08:58 PM
|
|||
|
|||
|
I think in line tube had step by step restoration of a 69 with pictures of the original seam sealer
__________________
"Honestly the car will only be there for a few weeks, OK maybe a month at the most" |
|
#17
12-11-2019, 11:44 PM
|
||||
|
||||
|
Any pictures would be great. I have the whole underside seam sealed and ready for paint. Trunk area, and cowl area I don't have done, so that is where I question.
|
|
#18
12-12-2019, 12:01 PM
|
||||
|
||||
|
These are from one of my 69's but since no one has put pics up I figure they are better than nothing. Car is late production at Fremont btw.
__________________
My Break Away Squad 1969 Fbird (Base, 350 & Sprint Cvts - 400HO & TA Hardtops) 1969 LeMans (2dr & 4dr Hardtop and a Cvt) 1969 LeMans Safari 2 seat Wagon 1969 GTO (2 Cvt, 2 Hardtops & Judge Hardtop) 1969 Catalina (3 Cvts & a 2dr hardtop) 1969 Ventura 2 Seat Wagon 1969 Executive 4dr Sedan 1969 Bonnie Cvt 1969 Bonnie 3 Seat Wagon (2 of them) 1969 Bonnie Brougham (4dr Hardtop & Cvt) 1969 Grand Prix SJ (2 of them) 1969 2+2 2dr Hardtop (Canadian model) |
|
#19
12-12-2019, 12:04 PM
|
||||
|
||||
|
another pic
__________________
My Break Away Squad 1969 Fbird (Base, 350 & Sprint Cvts - 400HO & TA Hardtops) 1969 LeMans (2dr & 4dr Hardtop and a Cvt) 1969 LeMans Safari 2 seat Wagon 1969 GTO (2 Cvt, 2 Hardtops & Judge Hardtop) 1969 Catalina (3 Cvts & a 2dr hardtop) 1969 Ventura 2 Seat Wagon 1969 Executive 4dr Sedan 1969 Bonnie Cvt 1969 Bonnie 3 Seat Wagon (2 of them) 1969 Bonnie Brougham (4dr Hardtop & Cvt) 1969 Grand Prix SJ (2 of them) 1969 2+2 2dr Hardtop (Canadian model) |
|
#20
12-12-2019, 12:06 PM
|
||||
|
||||
|
The data tag and the vin tag are two different things...you can do whatever you want with the data tag, including having a new one made.
__________________
Jimmy M 68 GTO |
| Reply |
|
|
The PY Online Forums is the largest online gathering of Pontiac enthusiasts anywhere in the world. Founded in 1991, it was also the first online forum for people to gather and talk about their Pontiacs. Since then, it has become the mecca of Pontiac technical data and knowledge that no other place can surpass.


 Linear Mode

