


| FAQ |
| Members List |
| Social Groups |
| Calendar |
| Search |
| Today's Posts |
|
#121
 12-21-2009, 01:52 PM
|
|||
|
|||
|
The Lizard skin would not be applied to within a couple of inches of where the quarter would be spot welded, applying a thick coating any closer might interfere with slipping the quarter into place. Applying a sound proofing before installing the quarter will allow for sound proofing to be applied to some areas that would be difficult to reach after the quarter is installed, mainly the upper area where the quarter joins the roof and the area around the rear side window. I also plan to coat the inner structure/brace before installing the quarter and to spray the outside of the outer wheel well. Hopefully this will help make the car quit. These are all areas that would be hard to coat after the quarter is installed. I will be using a weld-through primer where the panel is welded on. Spot Welds for the most part with a few plug welds where the spot welder won't reach.
__________________
68 Lemans - GTO appearance LS3 68 Eldorado - waiting for restoration 96 Roadmaster Wagon 2014 Infiniti Q50S Hybrid Marietta GA |
|
#122
01-09-2010, 02:03 PM
|
|||
|
|||
|
Updates: Progress stopped since Thanksgiving
 It's bad being at home and being too ill to work on the car. Had my gall bladder removed and just now recovering enough to do little things. It's bad being at home and being too ill to work on the car. Had my gall bladder removed and just now recovering enough to do little things.Picking up where I left off in November, I was fabricating new metal to replace some swiss cheese. 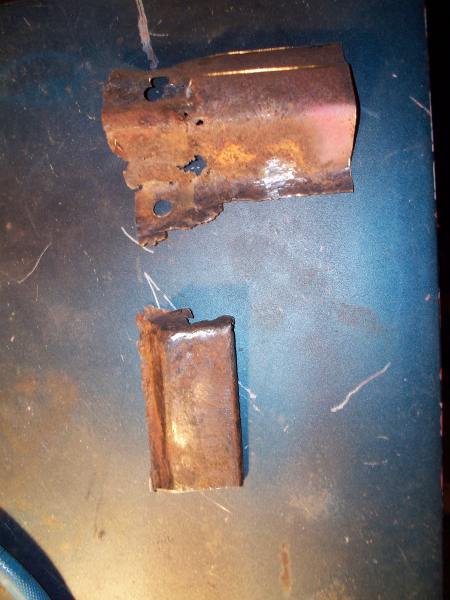 And the Installtaion of the replacement. 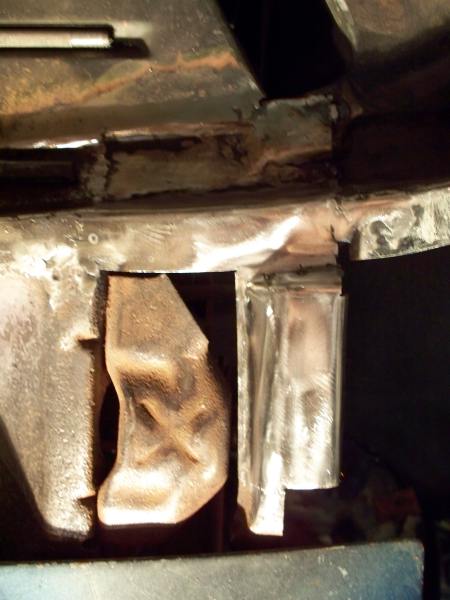 I also purchased 2005 GTO bucket seats for my project. I think the stock 68 seats aren't going to hold me in place. I still remember back in the 70's taking a curve really fast in my 69 Bonneville and sliding half way across the front seat! 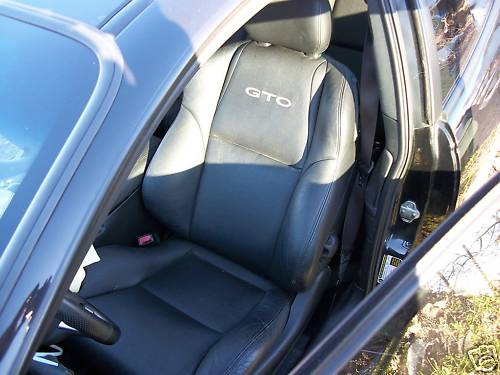 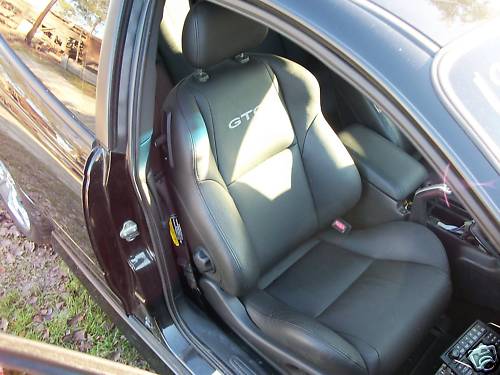 I'm ready to apply epoxy primer to wheel wells and inner structure, but poor weather is keeping me from priming the car, although the car is in my basement with the temperatures in the teens, I can't ventilate my basement and keep it warm enough for painting. Today's expected high 25. However there are plenty of other things that need doing.
__________________
68 Lemans - GTO appearance LS3 68 Eldorado - waiting for restoration 96 Roadmaster Wagon 2014 Infiniti Q50S Hybrid Marietta GA |
|
#123
01-10-2010, 07:25 PM
|
||||
|
||||
|
We must be on the same wavelength .I've been thinking of buying a set of 2004-2006 GTO seats for my 69. I have the original seats but even with new foam and covers they still weren't very comfy for extended rides like new cars. Last summer I got fed up with them and went to a local yard and picked out a set from a prelude (it was the only blue set that was comfy and undamaged). I love them except entry and exit is a little harder with seats with side bolsters. Can't wait to see them installed in your car. The weather here has been uncooperative too. Hope you get well soon.
George |
|
#124
02-03-2010, 09:46 AM
|
|||
|
|||
|
I put a set of 2004 GTO seats in my 69 bird, LOVE THEM! ride is so much firmer and they hold you in place. I did a write up with pics..
http://forums.maxperformanceinc.com/...d.php?t=577022 You wont regret it..
__________________
1969 Pontiac Firebird 400 - Candy Green 1977 Pontiac Trans Am 400 W72 - Black |
|
#125
02-08-2010, 01:46 AM
|
|||
|
|||
|
Restoration Updates - Fender work
The bottom of the passenger side fender was bondo city. 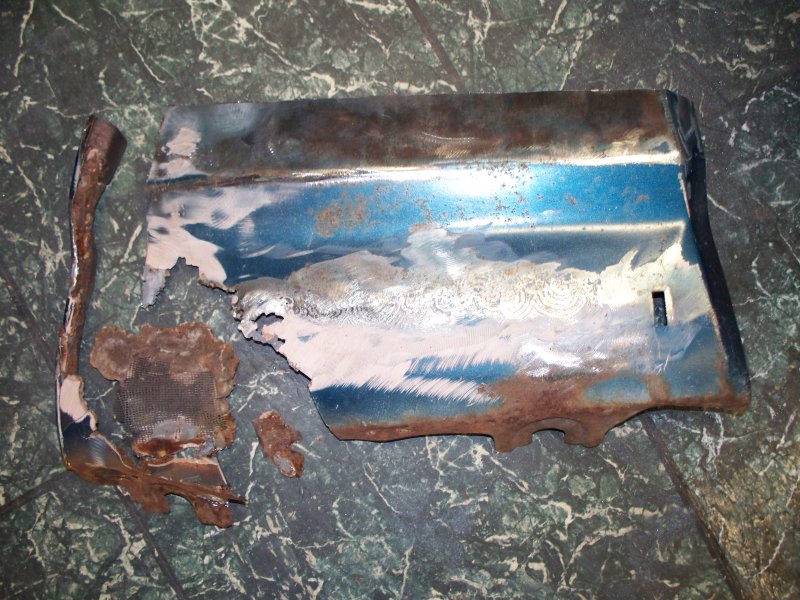 New metal welded in - This is my first try at butt welding where the joint will be visible 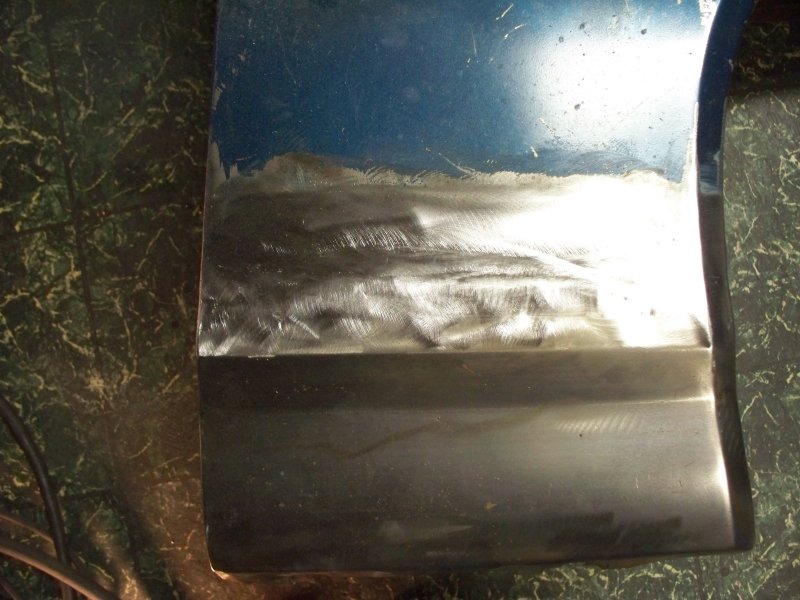 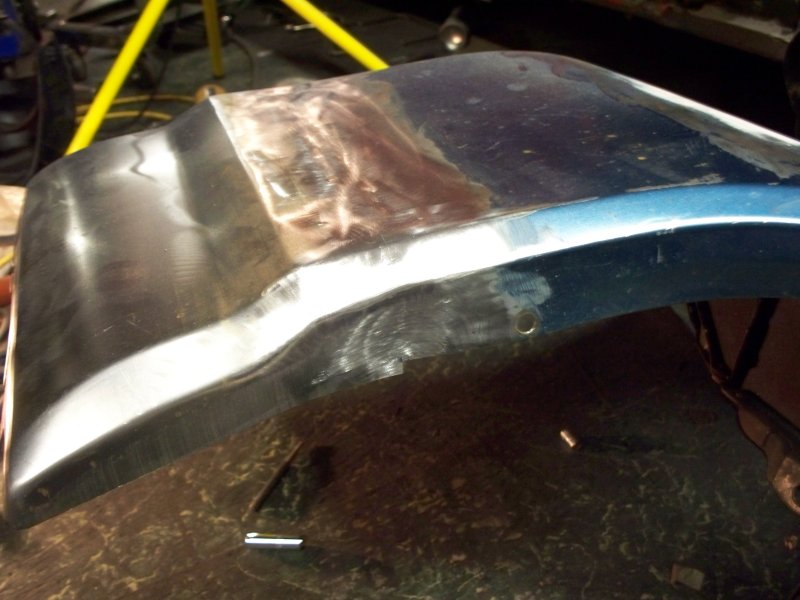 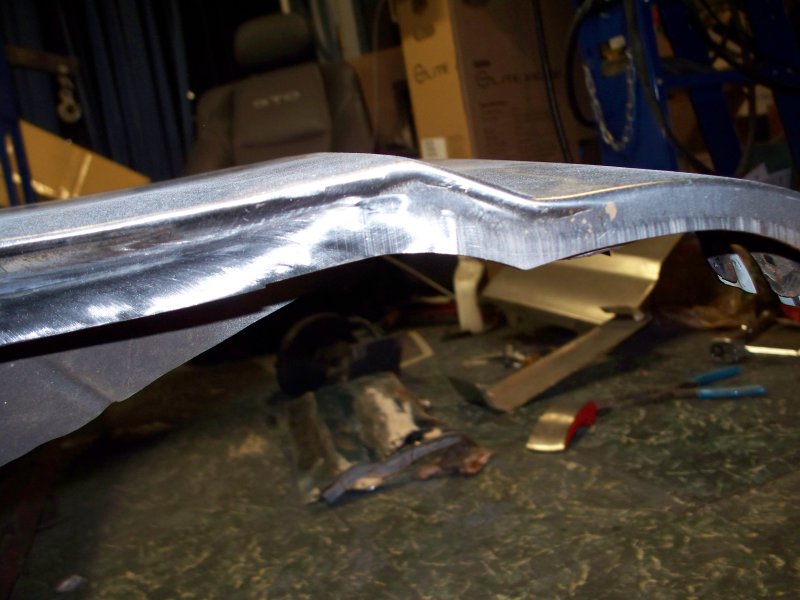 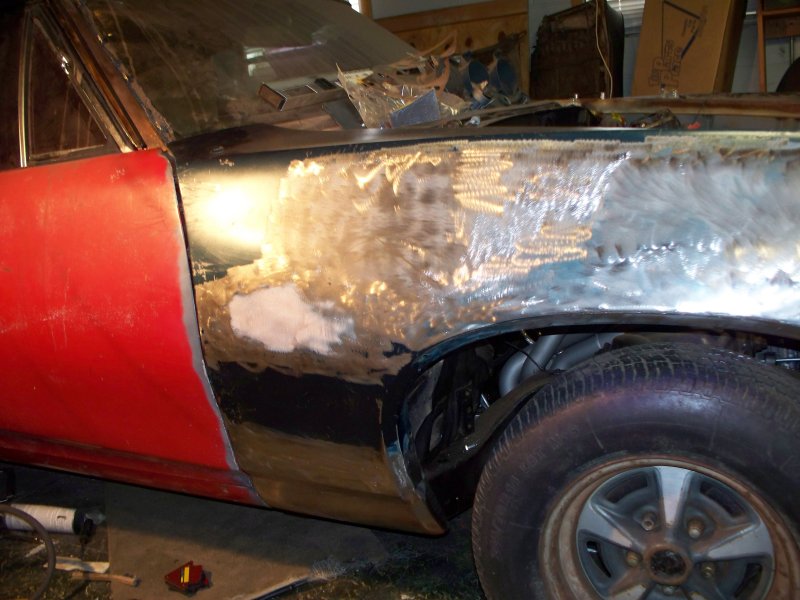 Thats it for the fender for now. I can't paint until the ouside temperature reaches the 50's. I will remove the rest of the paint and the balance on the filler and apply an epoxy primer when the weather permits. 2005 GTO seat install. As you can see in my signature I used to own a 2006 GTO. I put about 25k miles on the GTO in about 14 months. I can say that the seats were very comfortable and with 2004-2006 GTO seats being relative easy to obtain I decided to obtain a set. I left the 68 seat mounts intact should I want to reinstall the 68 seats. 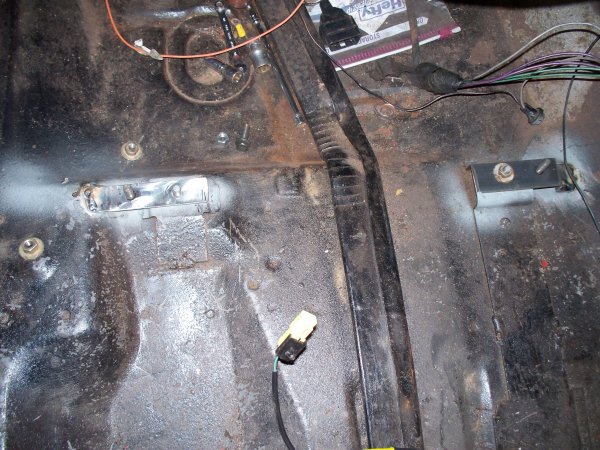 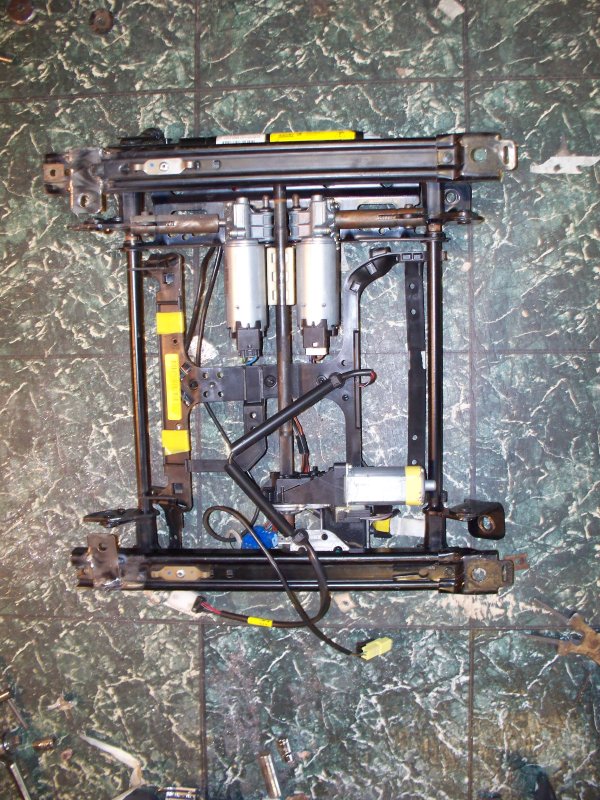 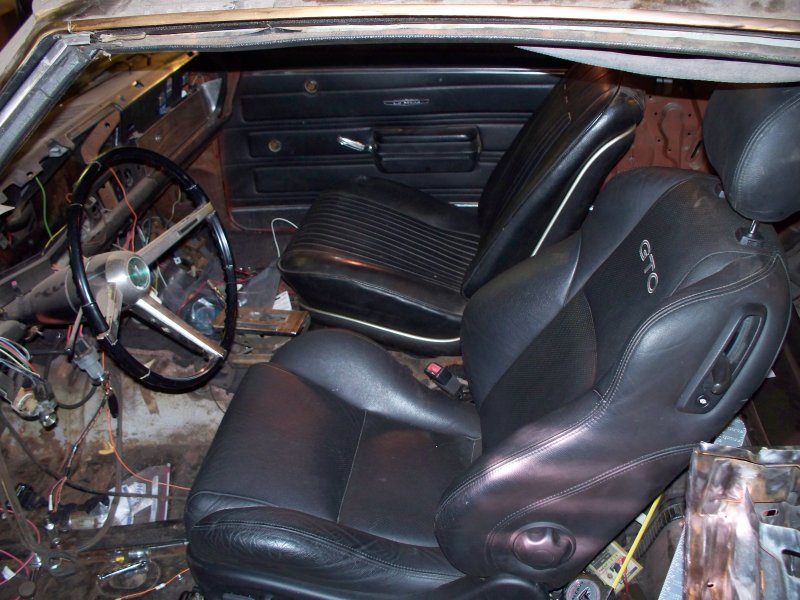 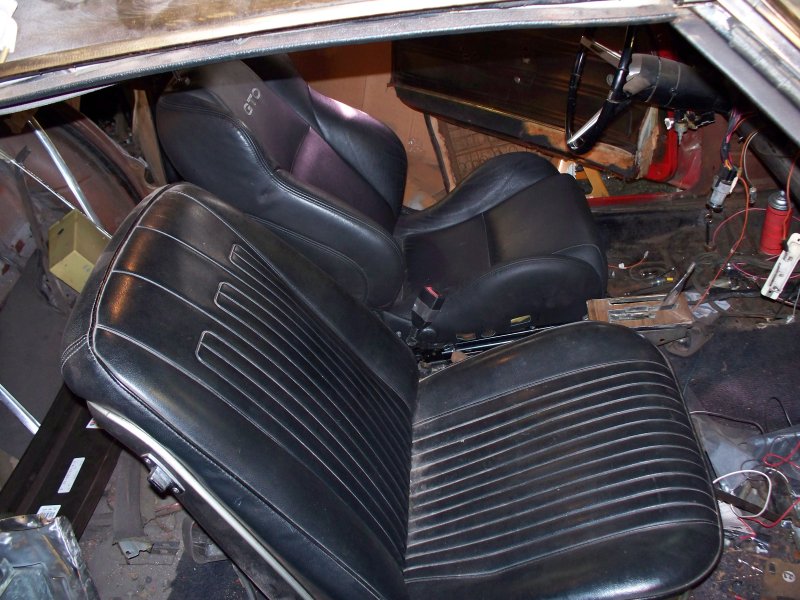
__________________
68 Lemans - GTO appearance LS3 68 Eldorado - waiting for restoration 96 Roadmaster Wagon 2014 Infiniti Q50S Hybrid Marietta GA |
|
#126
05-18-2010, 09:03 PM
|
||||
|
||||
|
updates?
|
|
#127
05-19-2010, 12:57 AM
|
|||
|
|||
|
I been putting in several hours per night and then I'm too tired to update thread. So the thread hasn't been updated in a while.
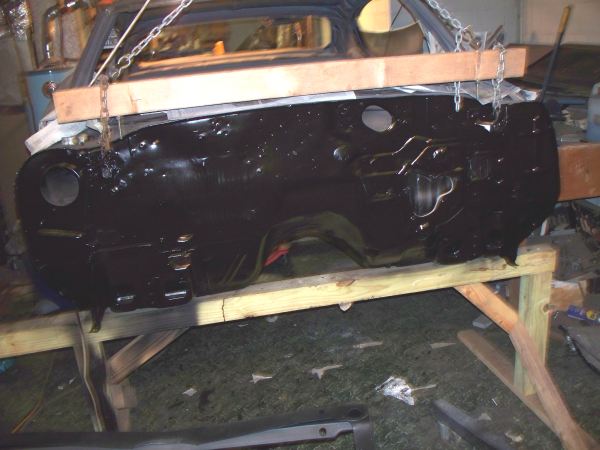
I removed windshield and found window channel had rust. 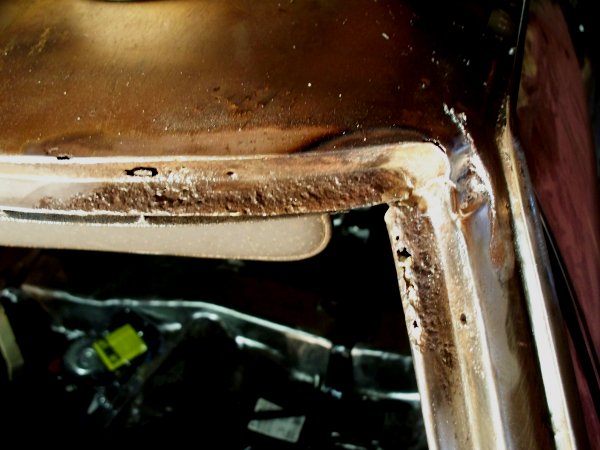 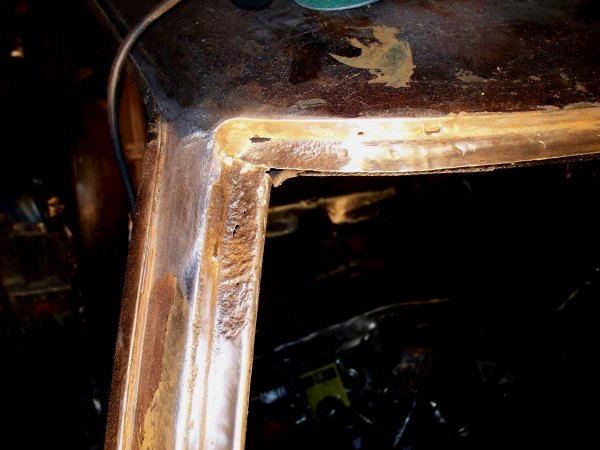 I have bent and welded in new metal. 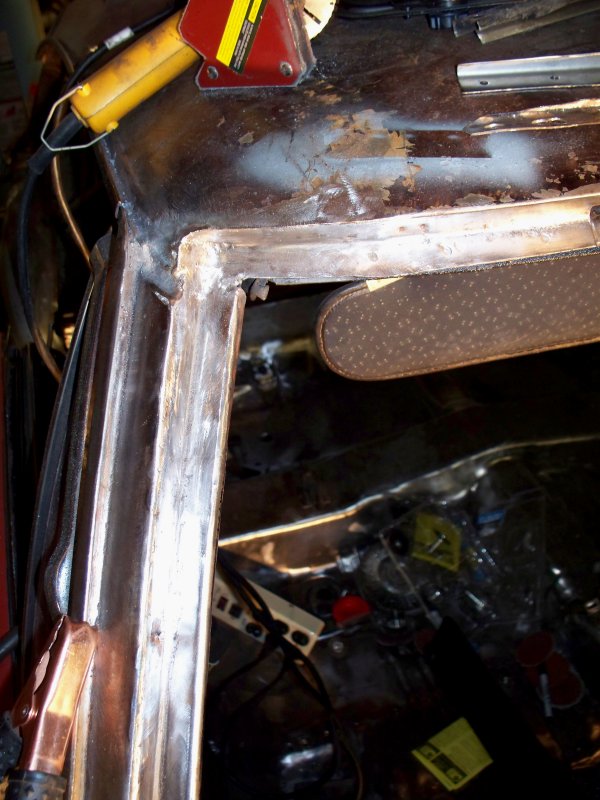 Painted under the deck filler. 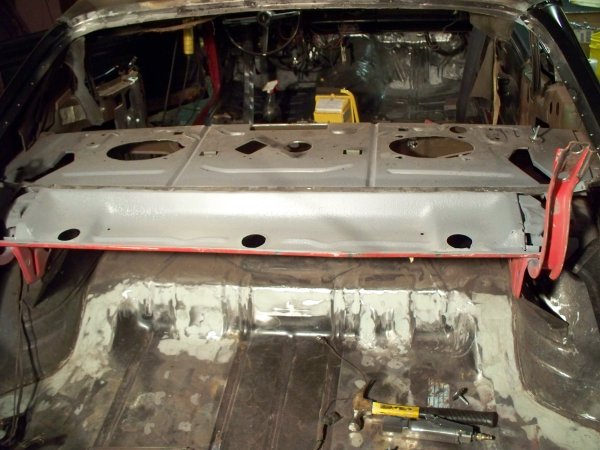 Quarter panels have been installed. The rear window is just setting in place, so I can check fitting of trim. Trunk lid however is too far gone. Trunk lid had been hit near the key hole, almost an inch of filler, after removing the filler, found that a body grinder had ground much of the metal away (ground through it in several spots) and there is not enough meal left to repair the lid. I need a 68 trunk lid if anyone has one. 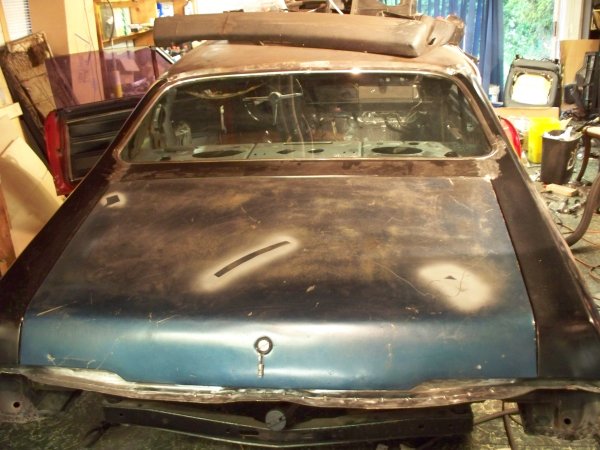 At this point I'm ready to start the frame off. Lifting the body off with 2 engine lifts. 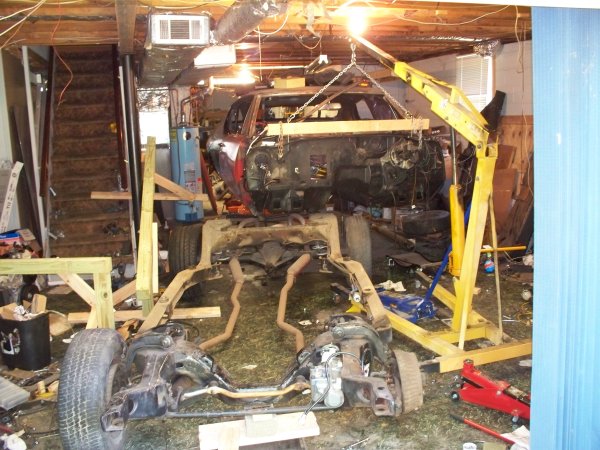 Frame now removed so I can clean and paint. When checking frame measurements, I found that the left upper control arm mount is pushed back by 1/8" and the left front of the frame is pushed back by 1/2". I am unable to find a shop that will work on the frame so I repaired it myself using a 10-ton body jack and some 4x4's and 2x4's for bracing. Now all dimensions are within 1/16". 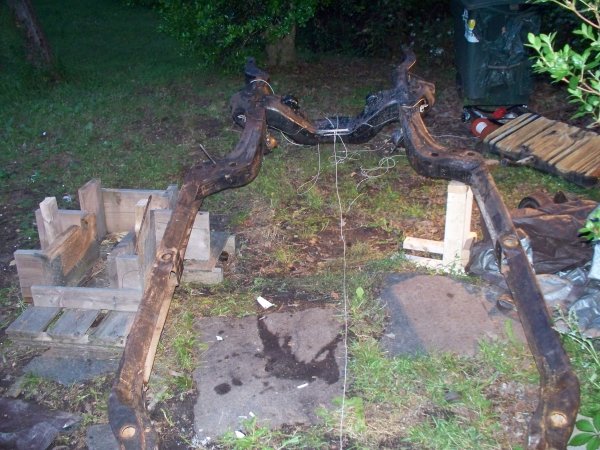 Body sitting on home made stand. 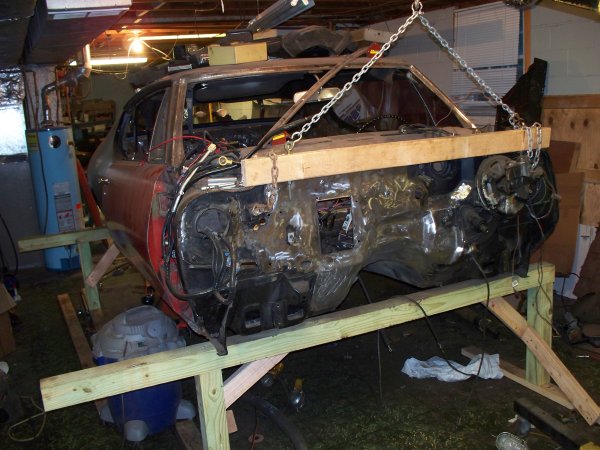 I'm about to order a Moser 12 bolt with disc brakes, Tru-Trac and 3.42 axel. The rear end in the car locked up while I was pushing the frame out the basement door. It's a good thing I didn't try to drive the car. The Most I did was put it in drive and let it move a couple of inches. My next tasks include blasting the frame with black beauty, priming with epoxy primer. I'm thinking about using Eastwood Ceramic Black Chassis paint.
__________________
68 Lemans - GTO appearance LS3 68 Eldorado - waiting for restoration 96 Roadmaster Wagon 2014 Infiniti Q50S Hybrid Marietta GA |
|
#128
06-16-2010, 11:28 PM
|
|||
|
|||
|
Parts are starting to come in. My Moser rear end has arrived.
 I have just primed the frame and plan to paint the frame with Eastwood Ceramic Chassis Black paint tomorrow. I have decided against using b-body spindles. I didn't find out until a month ago that b-body spindles will increase the turing radius. That is one thing I can't live with as I must make a sharp U-turn every time I leave my house and a stock A-body will just barely make the turn as is. The other issues with using B-body spindles is increased bump steer and slower turning. Unfortunately this really complicated everything and made things really expensive. First getting 12" brakes for an a-body spindle is difficult. I can't use C5 brakes since I am using a 16" wheel. I finally bought a vintage racing brake kit from Kore3 that lets me use Corvette C3 rotors which are 11.75" and 1.25" thick. This kit however will set me back by over $1200 dollars compared with $350 for all new b-body brakes. Since I wanted better handling than the stock A-body can provide I selected a suspension setup from scandc.com. Further complicating this setup was Tobin from Kore3 informed me that none of the stock type reproduction spindles are any good for performance use and have a habit of breaking when pushed really hard. Tobin's suggestion was to use stock spindles. My spindles are drum rather that disc and since I know my car was involved in a front end collision I don't want to use the spindles that came on the car. This leaves only AFX spindles and L&N spindles. AFX spindles are not currently available so I ended up with L&N spindles for a hit of $1000. So I ended up with a tall spindle after all. Just a very expensive one designed for an A-body car, that doesn't have the issues that affect a B-body spindle conversion. I also decided to use Currie-Trac rear control arms. These seem to be the best available choose to correct the poor GM design. The Currie-Trac seem to have more suspension travel without binding than any of the other aftermarket choices. The stock GM rear control arms work by both flexing both the control arm and the rubber bushings to stop bind.
__________________
68 Lemans - GTO appearance LS3 68 Eldorado - waiting for restoration 96 Roadmaster Wagon 2014 Infiniti Q50S Hybrid Marietta GA |
|
#129
07-02-2010, 12:02 AM
|
|||
|
|||
|
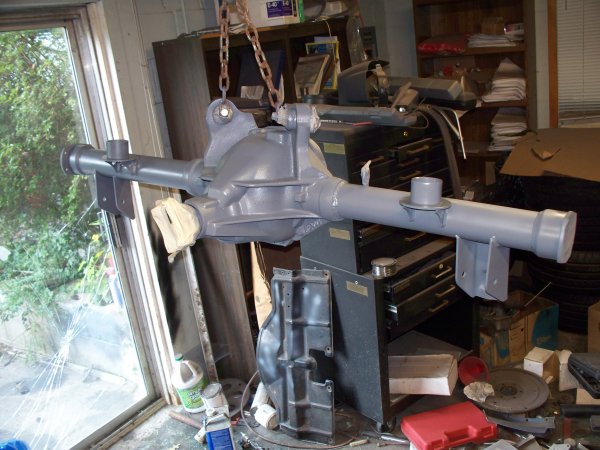
I'm still waiting for parts to be able to make the frame a roller. CURRECTRAC rear control arms have been on order for 3 weeks and my spindles are at Kore3 for custom brakes. I did get the frame painted. Here are some before and after pictures.
The ugly before 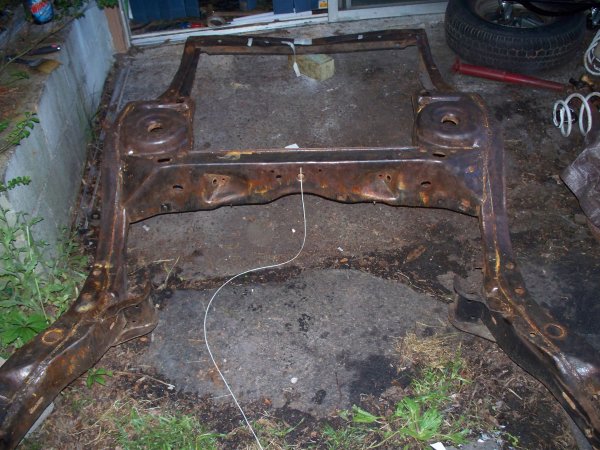 Cleaned 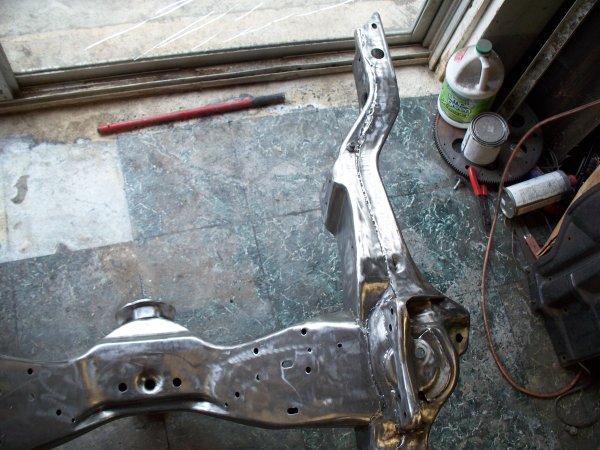 Epoxy Primed 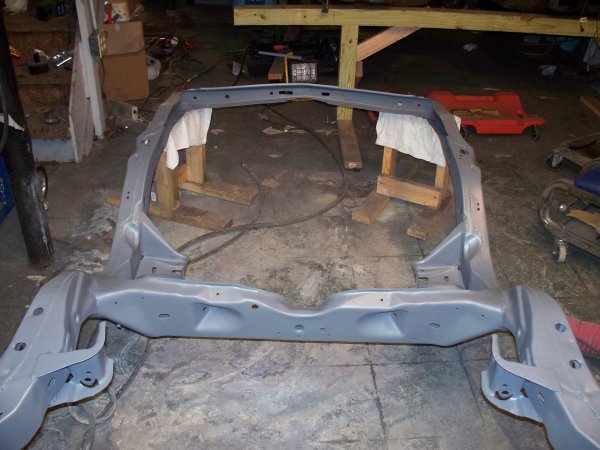 Eastwood Ceramic Chassis Paint- Warning this is nasty stuff, if you can't ventilate extremely well, don't use it. It contains iso-cyanides.  I screwed up when drilling for the cross member and didn't get it straight. In any event I had decided that I needed to bolt the cross member directly to the frame. I don't think rubber mounts are a good idea when the engine mounts and the transmission to cross member mount is poly. To much flexing could break the transmission. This also solves the clearance issue with the transmission lines hitting the floor. This mod gives a 1/4" of additional clearance The other item, look at my transmission. Part of it is black and part looks unpainted. The unpainted part was black until I used compressed air to clean the dust off. The paint came off in big sheets. The part that is still painted, I prepped myself as I had to swap the bell housing, the paint on the rest of the transmission was incompatible with the black paint I used. 
__________________
68 Lemans - GTO appearance LS3 68 Eldorado - waiting for restoration 96 Roadmaster Wagon 2014 Infiniti Q50S Hybrid Marietta GA |
|
#130
07-02-2010, 04:02 PM
|
|||
|
|||
|
Good to see you back posting again FB, looks like its coming together nice. Im in the process of removing the body off of my 67 to send the frame out for powder coating and then start fitting things together. All of the sudden the accessory drive kits for the LS motors are nowhere to be found. Went to order my non ac one from pace and he said they don't know when they will have them again. May be buying them piece by piece.
|
|
#131
07-06-2010, 10:44 PM
|
|||
|
|||
|
Decision time for the big hole in the firewall. Since it's not possible to run the factory air setup can anyone see any reason not to weld up the hole ?
 I brought my Moser 12 bolt home from work today. Decided to introduce it to the engine thats going to try to break it.  Here are my front control arms. They are made by SPC. The rears are still missing in action.  My shocks are in. Bilstein HD shocks. 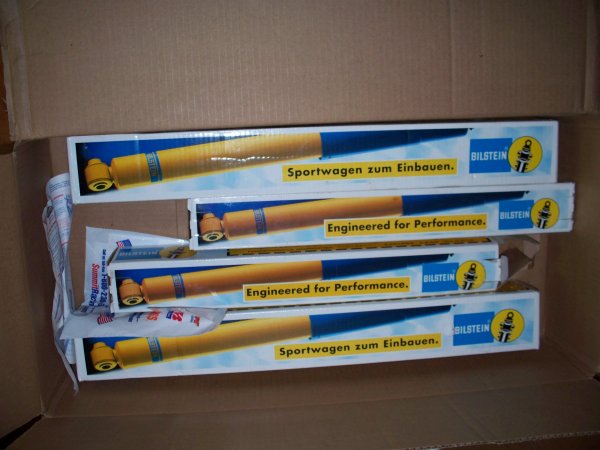 Kore3 is still trying to engineer brakes for my 16" steel wheels. This is a picture of the setup but it will need to be modified to fit the L&N spindle.  The L&H tall spindles. 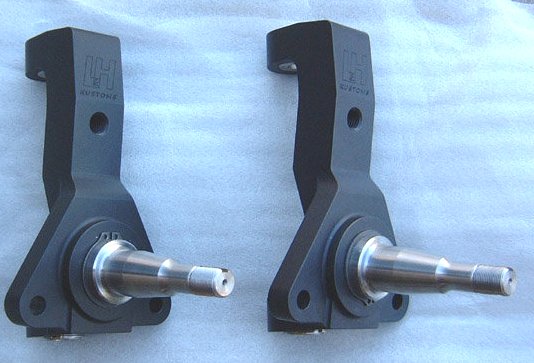
__________________
68 Lemans - GTO appearance LS3 68 Eldorado - waiting for restoration 96 Roadmaster Wagon 2014 Infiniti Q50S Hybrid Marietta GA |
|
#132
07-07-2010, 08:09 PM
|
||||
|
||||
|
Looks like good progess. Getting new parts is always fun!
|
|
#133
07-15-2010, 11:16 PM
|
|||
|
|||
|
Painted the Rear. Epoxy Primer.
 Eastwood Ceramic Chassis paint, this stuff works great, I just wish it wasn't so toxic. 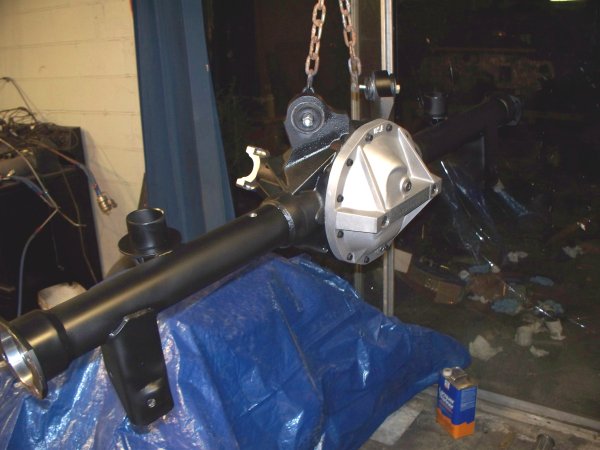 I started bolting things together. Not final, just trial fit. Couldn't resist setting one of my wheels in place 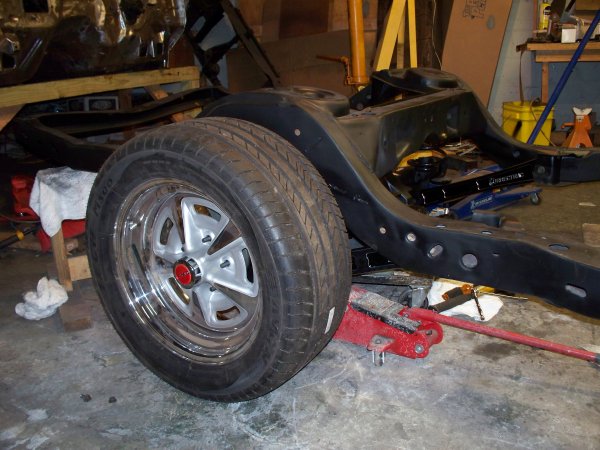 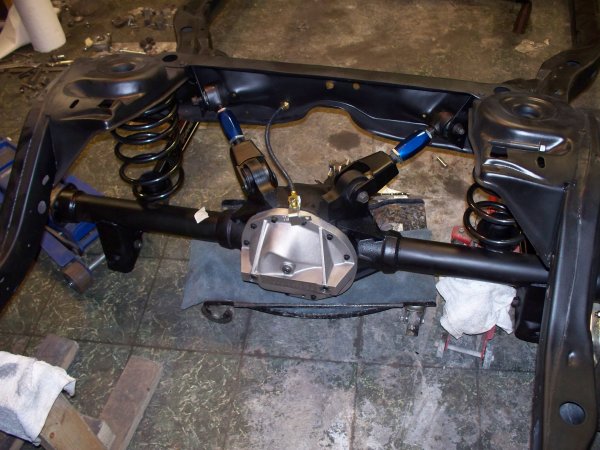 Looks like the Currietrac upper control arm will need spacers. 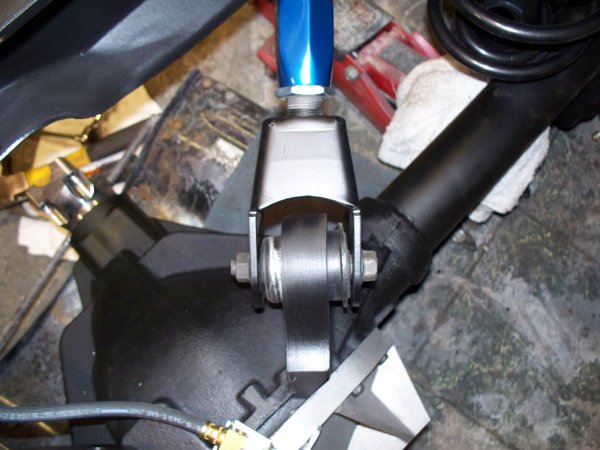 This 12 bolt reproduction rear brake bracket won't work with the Moser rear. I guess the rear cover is much thicker on the Moser. I have never seen a stock 12 bolt in person so I have no feel for how much differect the Moser is compared to stock. Looks like I will be making a custom bracket. 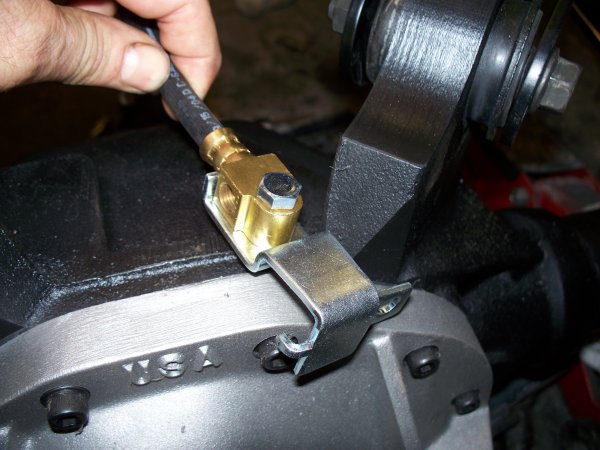 A shot of the lower control arm. 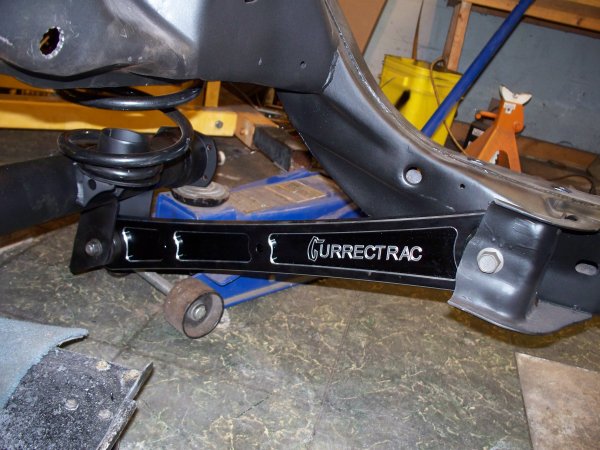 Kore3 was unable to make their vintage racing kit work with my L&H spindles, so they are designing a custom setup for me. To recap my brake problems, I am using 16" wheels, so brake options are limited. I know I am giving up braking performace by using 16" wheels, but this project is not about max performace, just to create a good street car with much better performace than stock. Here is a drawing showing the custom setup. It will use Gen 3 Corvette rotors and Wilwood Calipers. 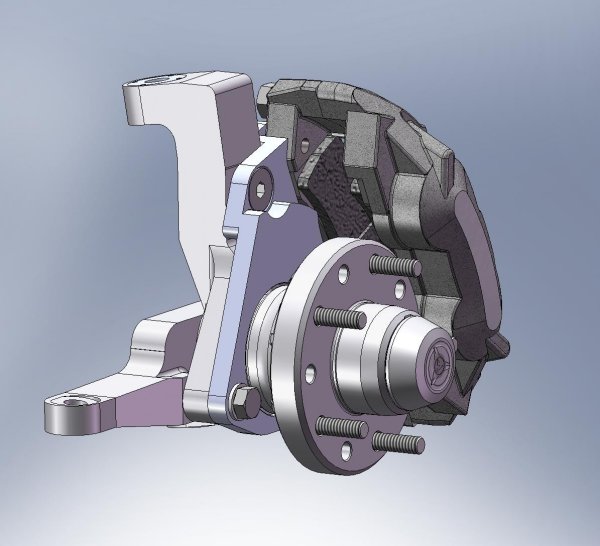
__________________
68 Lemans - GTO appearance LS3 68 Eldorado - waiting for restoration 96 Roadmaster Wagon 2014 Infiniti Q50S Hybrid Marietta GA |
|
#134
10-04-2010, 12:46 AM
|
|||
|
|||
|
A bunch of problems since my last post. My Moser rear end shipping without the seals being installed, I was also shorted mounting hardware. The seal for the center section is impossible to install without the right type of tool which is hard (impossible) to find. Moser made a installing tool and sent it to me since the alternative would be to send the rear end back which was not something I wanted to do. After receiving the installing tool I was able to install the seal. Other issues were ball joints that don't fit the SPC upper control arm. I bought two sets that didn't fit, one came from NAPA the other was a Moog. I finally got SCandC to send me a pair that fit. The brakes took about 2 months for the custom brackets.
While waiting for the brakes I did some work to the body, painted the interior with epoxy primer. 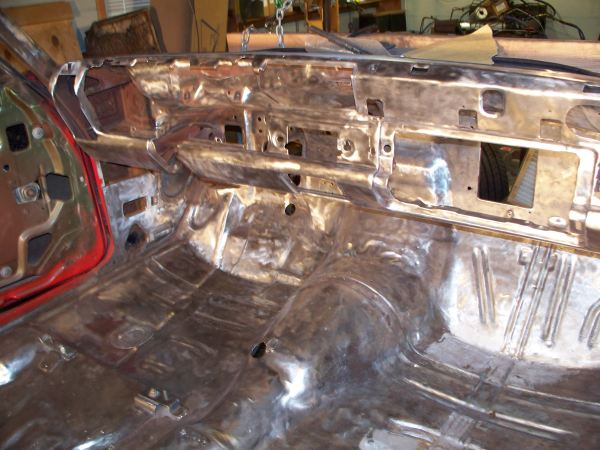 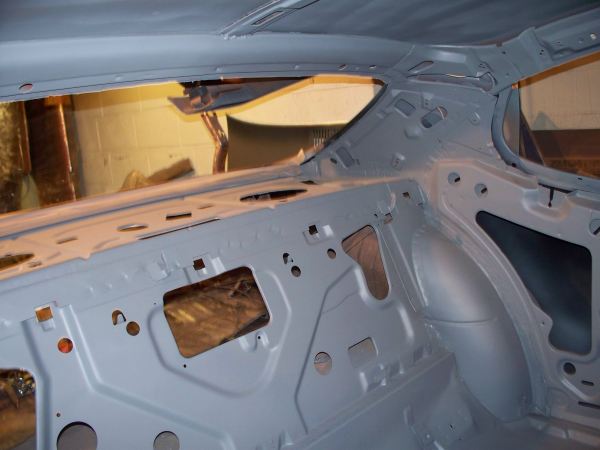 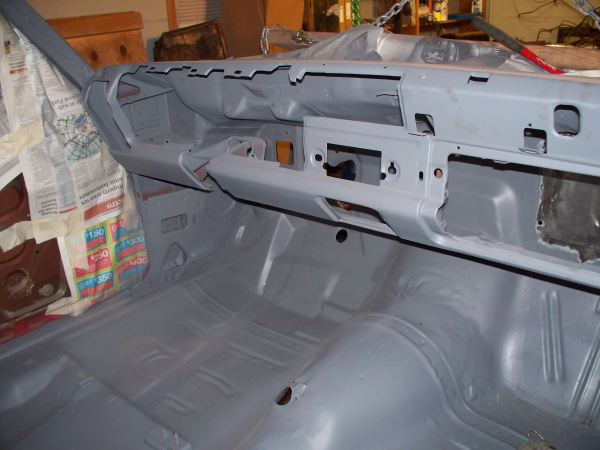 Filled in the AC Box hole, also filled in other other holes that are no long needed. 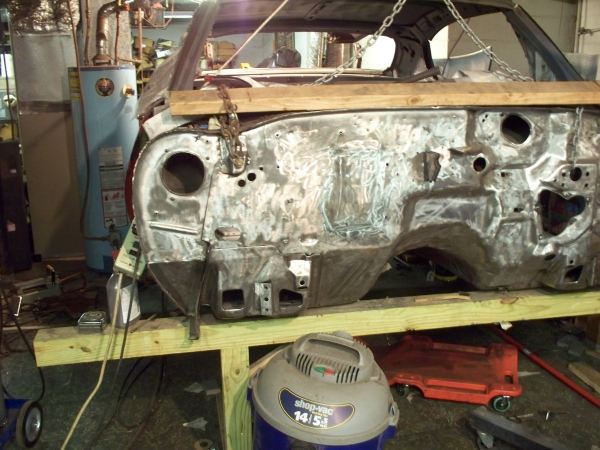 The underside of the car is almost ready for paint. Hopefully I can soon remount the body to be frame. Here are pictures of the front brake install. These are C3 rotors 12" x 1.25". 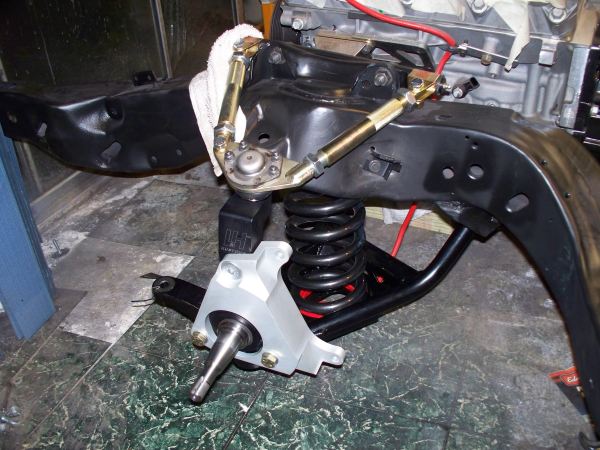  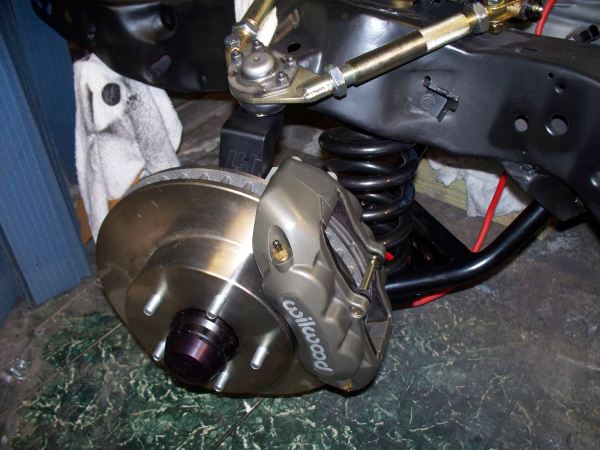 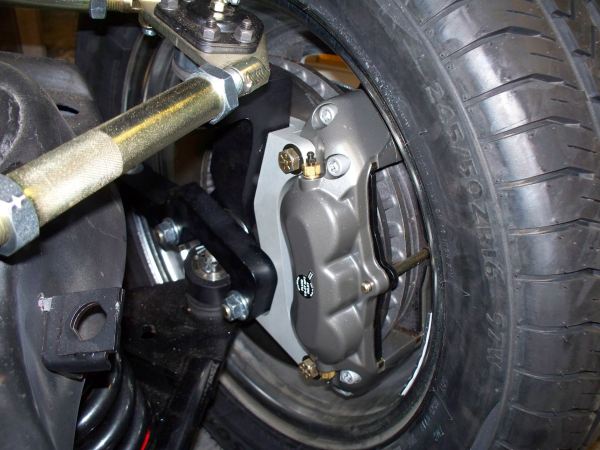 While checking steering clearance I found I had a problem with the driver side tie rod end hitting the oil pan. The passenger side cleared by the thickness of card stock. I didn't have clearance problems until I installed a Delphi 600 steering box. Anyway the problem has been solved, I put 3/8" of spacers under the driver side engine mount. I now have slightly more than 1/16" clearance on both sides. I just hope this doesn't cause other problems. 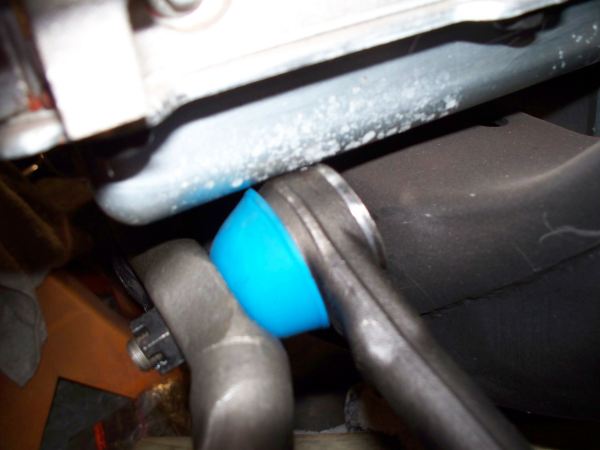 On a different topic, we purchased a 2008 Chevy Express van for work to replace my 96 Roadmaster Wagon. The wagon is getting old and constantly giving trouble. The van we purchased has a 4.8 LS engine and 4L80E transmission. In the month we have had this van I have driven it about 1000 miles and I can only say I am really impressed with the gas mileage and performance of this Little engine. On a 400 mile trip I got 19 mpg and that was with about 1500 LB of cargo. When empty I got over 21 mpg on an 80 mile trip. The van however is very heavy and city mileage is only 14-15 mpg. Distance between fillups is 450-600 miles since it holds 31 gallons. On a bad note I put my 2006 GTO seats in the van. I'm getting too old and have back problems to be able to sit on standard van seats for long perionds of time. Giving up my GTO seats didn't turn out too bad.  I found a set of blue 2006 GTO seats. These seats are almost new, they came out of a car with less than 12K miles. These should work better for my interior since I was planning to use blue but ended of with black seats. Instead of a two tone interior with some black and some blue, it will all be blue. I found a set of blue 2006 GTO seats. These seats are almost new, they came out of a car with less than 12K miles. These should work better for my interior since I was planning to use blue but ended of with black seats. Instead of a two tone interior with some black and some blue, it will all be blue.
__________________
68 Lemans - GTO appearance LS3 68 Eldorado - waiting for restoration 96 Roadmaster Wagon 2014 Infiniti Q50S Hybrid Marietta GA |
|
#135
10-04-2010, 11:14 AM
|
|||
|
|||
|
looks great!
hadn't heard of those spindles, that's excellent. |
|
#136
10-10-2010, 11:01 PM
|
|||
|
|||
|
I got the firewall, underside and wheel weels painted this weekend. The body is ready to be mounted on the frame. The frame however is not ready. I am having trouble finding 3/16" brake line in bulk that is any good. Both the steel and SS line I purchased is thicker where it is joined together and after flaring there is a bump where the tube was jointed. The tubing was Summit's house brand.
 Pictures of my new seats, these will replace the black ones. 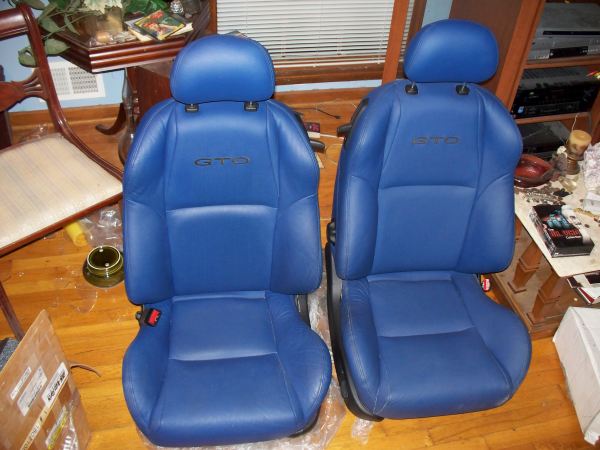
__________________
68 Lemans - GTO appearance LS3 68 Eldorado - waiting for restoration 96 Roadmaster Wagon 2014 Infiniti Q50S Hybrid Marietta GA |
|
#137
11-26-2010, 02:15 AM
|
|||
|
|||
|
Well I spent several weeks waiting for tubing then finding out that I still couldn't make a good double flare. The problem was a small chip in the die of my hydraulic flaring tool. It took a another week to get a new die. Wasted about a month before resolving the problem.
I did a few other things during this time. I sprayed lizard skin sound control, then followed it with a layer of lizard skin ceramic insulation. 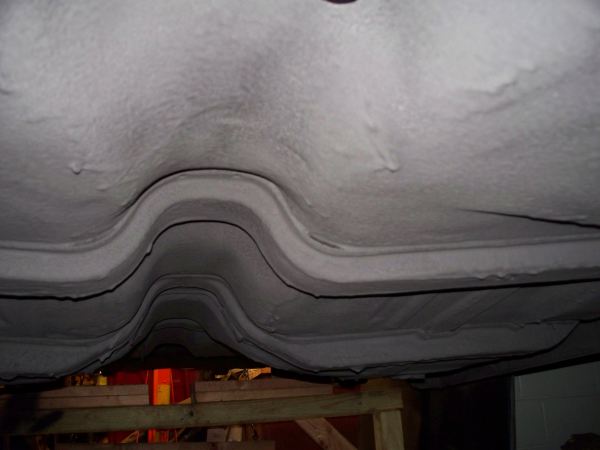 I repainted the transmission since the paint I used was not compatible with the paint on the transmission. This time I stripped all of the paint off and used a black epoxy. 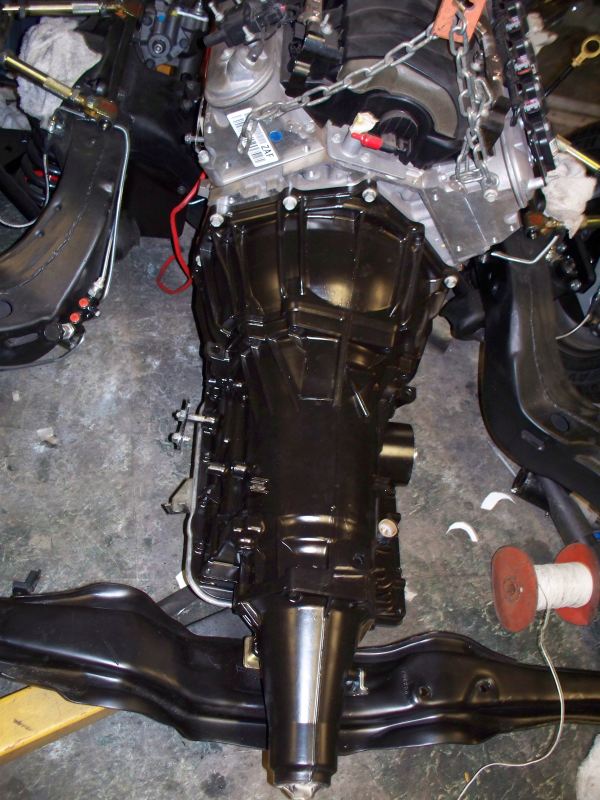 I also made a dust shield since the autokraft oil pan leaves a big gap between the pan and transmission. I used 22 gauge metal since nothing thicker was available at HD or Lowe's. If I had to do it again I would use 16 gauge since this plate is a little flimsy. I ended up running it threw a bead roller to stiffen it up a little. 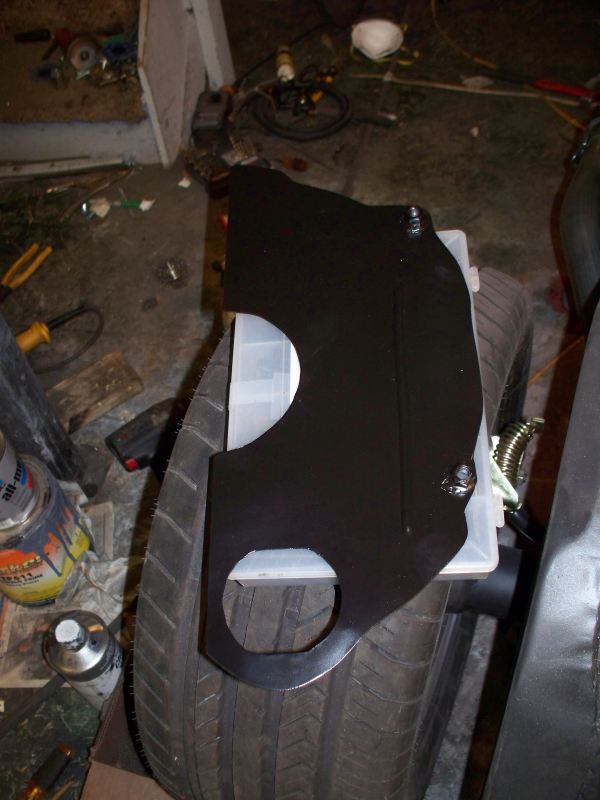 I bought a pypes 2-1/2 exhaust system. When test fitting the parts I don't like how close the pipe is to the shock. That is a plastic dust shield with the exhaust only about 1-1/2" away at the nearest point. Looks like it will require some type of insulation wrapped around the dust shield. 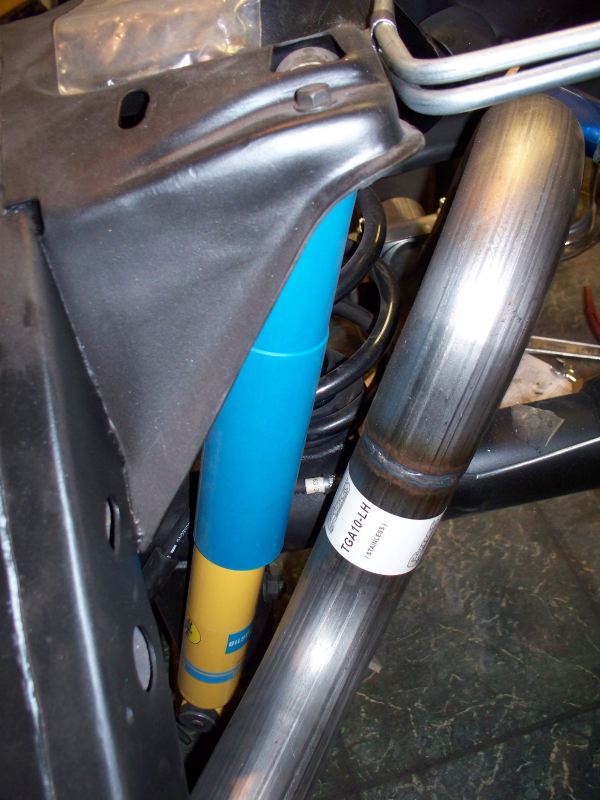 I cleaned up the brake pedal and mount. Before and after 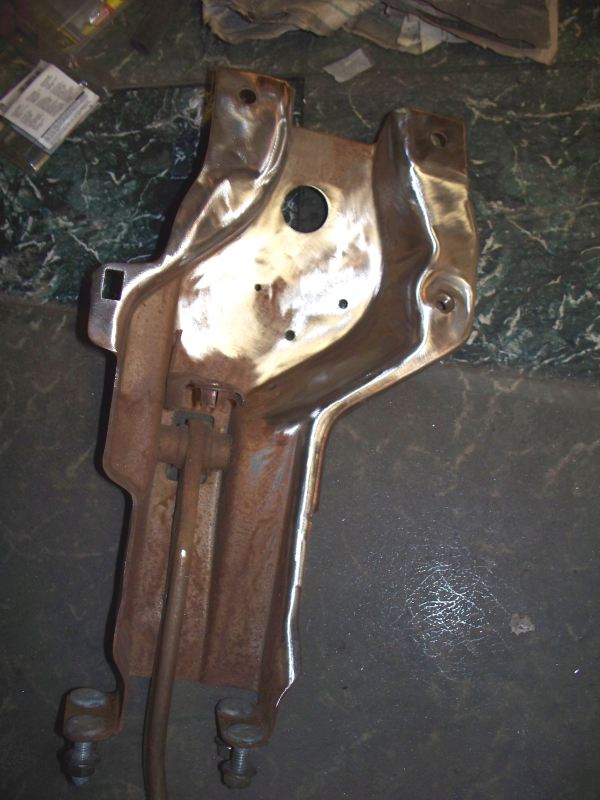  And finally I got all of the brake and fuel lines installed. 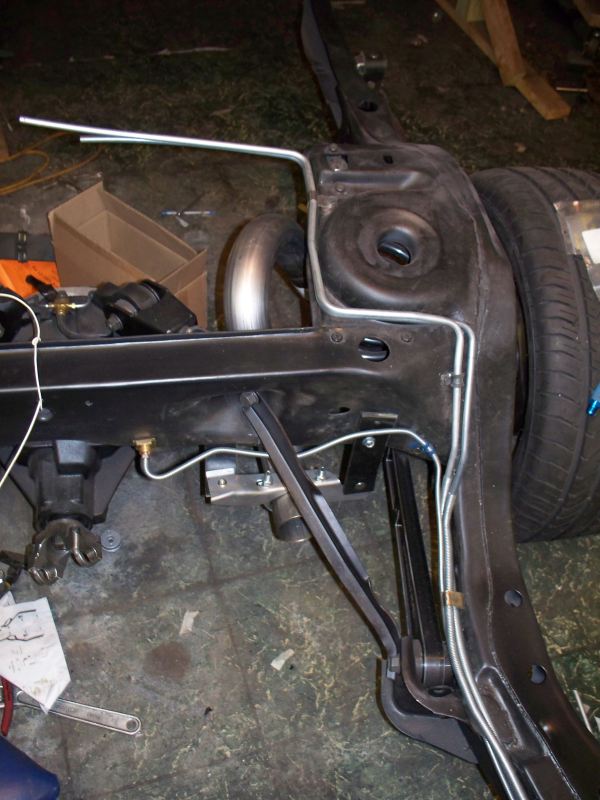 I think I have help lined up in the next two days to help me reinstall the body. I probably could have done this alone but I injured my right arm and would have a difficult time without some help. If all goes well I should be able to post a picture of the body on the frame in the next few days.
__________________
68 Lemans - GTO appearance LS3 68 Eldorado - waiting for restoration 96 Roadmaster Wagon 2014 Infiniti Q50S Hybrid Marietta GA |
|
#138
11-26-2010, 10:03 AM
|
||||
|
||||
|
FB-
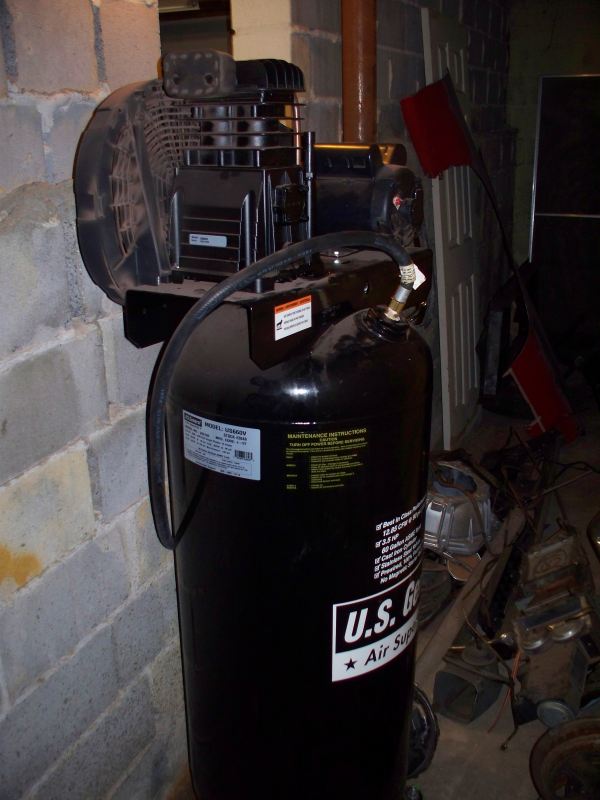
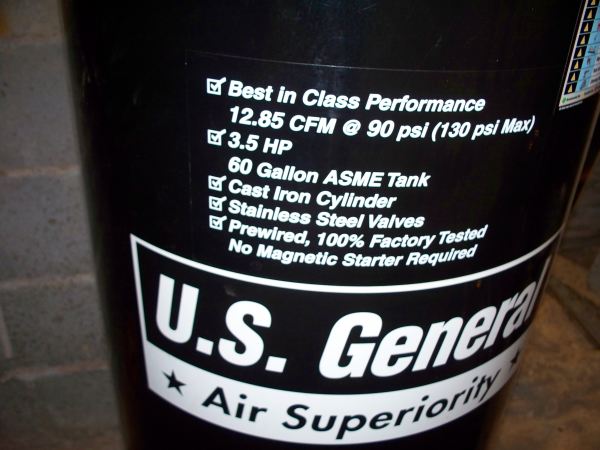
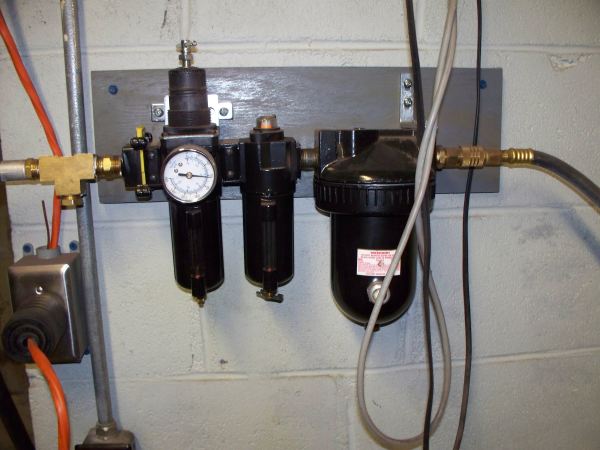
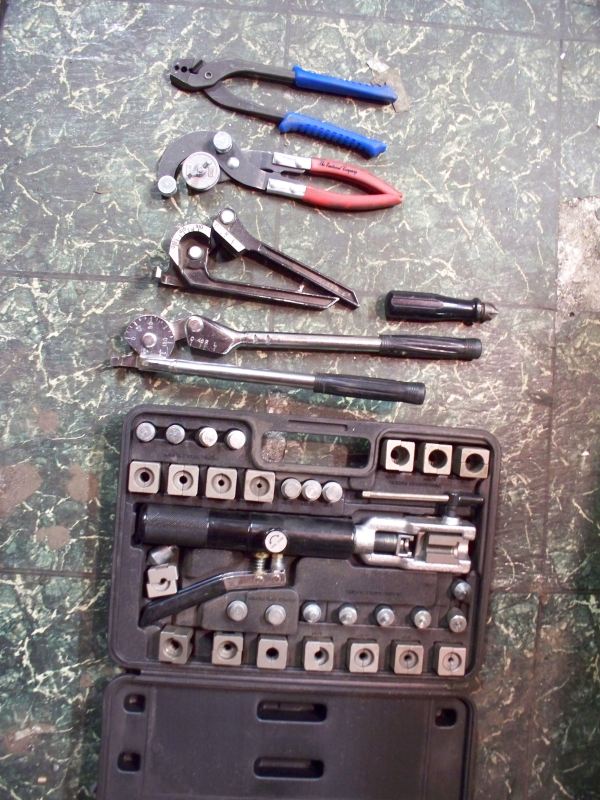
Glad to see your plugging away. A few tool questions. What is your air compressor(specifically air dryer etc) set up that allows you to spray paint? And, what hydraulic flaring tool did you buy (mastercool?)? Thanks- John |
|
#139
11-28-2010, 02:00 AM
|
|||
|
|||
|
Quote:
Quote:
   Quote:
 Here is a close up of a 3/8" flare on SS. 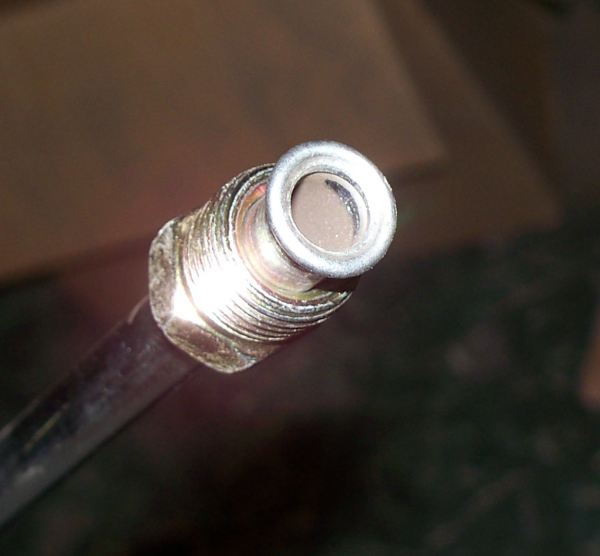
__________________
68 Lemans - GTO appearance LS3 68 Eldorado - waiting for restoration 96 Roadmaster Wagon 2014 Infiniti Q50S Hybrid Marietta GA |
|
#140
11-28-2010, 09:53 AM
|
||||
|
||||
|
Thanks for the info.
What is the blue handled "plier"? Interesting you're able to spray with a passive dryer. I thought an active dryer system was needed. |
| Reply |
|
|
The PY Online Forums is the largest online gathering of Pontiac enthusiasts anywhere in the world. Founded in 1991, it was also the first online forum for people to gather and talk about their Pontiacs. Since then, it has become the mecca of Pontiac technical data and knowledge that no other place can surpass.


 Linear Mode

