


| FAQ |
| Members List |
| Social Groups |
| Calendar |
| Search |
| Today's Posts |
|
#21
 07-26-2020, 12:51 PM
|
||||
|
||||
|
Quote:
__________________
"No replacement for displacement!" GTOAA--https://www.gtoaa.org/ |
|
#22
07-26-2020, 04:18 PM
|
||||
|
||||
|
Quote:
I've drained a bunch of Pontiacs blocks through the years through those holes that have had antifreeze in them, and it's probably a 50/50 shot whether they will plug up, or not while draining the block from sediment. After that fiasco I've always poked a piece of welding rod through the holes to be sure the block was in fact drained, and not plugged with sediment. I've had plenty of them that clogged partway through the draining of the block. Just for sake of argument, how would you truly know whether the block drained or not? I was sure it was drained until the next spring when I went under it to replace the drain plugs. YMMV, just spelling out my experiences as a service tech that specialized in Pontiacs over the last 50 years, hoping to save someone else the headache that I ran into when I assumed the block had drained, when in fact it hadn't............  BTW, replacing the soft plug behind the starter while the engine is in chassis, with RA III manifolds on it, is a real PITA.
__________________
Brad Yost 1973 T/A (SOLD) 2005 GTO 1984 Grand Prix 100% Pontiacs in my driveway!!! What's in your driveway? If you don't take some of the RACETRACK home with you, Ya got cheated    
|
|
#23
07-26-2020, 05:11 PM
|
||||
|
||||
|
Everyone's opinions and 2-cents are much appreciated - it's given me a lot to think about. Being unfamiliar w/Pontiacs, I'm not sure which holes penetrate the water jacket. I copied the picture from the service manual and circled the holes in question.
Working from the bottom up, the two holes using the locating sleeves should break into the crank case - no problem there. Moving up, the next two holes are the upper timing cover mounting holes - not sure f they're open to water or not. Next up after that, there are two larger holes just below the main water passages. They look open to the water jacket, but other pictures in the manual show a V8 block with those holes absent - making them a mystery. The car is on 12' cribs. If I drain the rad, etc., then drop the front of the car back on the ground and drain everything else, and then put the front back up and drop the rear back on the ground, might that be sufficient?
__________________
Larry |
|
#24
07-26-2020, 05:53 PM
|
||||
|
||||
|
Quote:
__________________
Brad Yost 1973 T/A (SOLD) 2005 GTO 1984 Grand Prix 100% Pontiacs in my driveway!!! What's in your driveway? If you don't take some of the RACETRACK home with you, Ya got cheated
|
|
#25
07-26-2020, 06:59 PM
|
||||
|
||||
|
Thanks, Brad. That's what I needed to know. Didn't think the conversation would go this far, but everyone's input was valuable and much appreciated. I'm learning more about Pontiacs every day. Bought the Service and assembly manuals as well as the Fisher Body manual. With the whole Covid thing, I now have time to read.
__________________
Larry |
|
#26
07-27-2020, 07:36 AM
|
||||
|
||||
|
It's a highly unwelcome way to have extra time to read!
__________________
Wernher Von Braun warned before his retirement from NASA back in 1972, that the next world war would be against the ETs! And he was not talking about 1/8 or 1/4 mile ETs! 1) 1940s 100% silver 4 cup tea server set. Two dry rotted 14 x 10 Micky Thompson slicks. 1) un-mailed in gift coupon from a 1972 box of corn flakes. Two pairs of brown leather flip flops, never seen more then 2 mph. Education is what your left with once you forget things! |
|
#27
07-27-2020, 09:47 AM
|
||||
|
||||
|
Yep, too true.
 My coffee (and beer) intake has increased dramatically. The latter because I'm a firm believer in disinfection from the inside out. My coffee (and beer) intake has increased dramatically. The latter because I'm a firm believer in disinfection from the inside out. 
__________________
Larry |
|
#28
07-28-2020, 01:39 PM
|
||||
|
||||
|
You don't want to hear this, but you'll have to change the oil again...if you get any coolant or gasket material from the pan into the sump. I can't imagine doing a timing cover R&R on one of these and NOT getting at least a little crap into the sump. YMMMV.
__________________
Jeff 
|
|
#29
07-29-2020, 12:13 PM
|
||||
|
||||
|
Well, it's all a moot point at the moment. I found the problem. It was only the timing cover seal -
. Then I found out why it failed -  . As to the cause - I haven't a clue. Now the front cover's coming off for sure, as I now have to see if anything else is damaged. . As to the cause - I haven't a clue. Now the front cover's coming off for sure, as I now have to see if anything else is damaged. It's only noon, but I'm having a beer anyway. I keep you all posted as to what I find. Thanks for all the help thus far.
__________________
Larry |
|
#30
07-29-2020, 01:41 PM
|
||||
|
||||
|
Quote:
|
|
#31
07-29-2020, 02:18 PM
|
||||
|
||||
|
Ben,
The first picture shows it to be a Chinese knockoff - don't know why the PO used it. I'd be willing to bet an original GM part would still be going even if the rubber between the rings had deteriorated a bit from age. I'm more worried about damage to the key slot on the crank. Won't know until I get everything apart and get eyes on it. That said, I noticed the seal that leaked wasn't properly installed either, so you may be on to something when you say it might have been hammered on rather than using the correct tool for the job (which I have). From what I'm learning about Pontiacs, slotted keys like what's used on the crank and cam can shift back slightly in the slot during installation if the cam sprocket or balancer are handled roughly. That was illustrated in a timing set install video by Spott's Performance. It actually chipped out part of the back side of the upper cam sprocket key way. Anyway, I'll know more as I get into it. I have a new timing set OTW as well as a water pump which I noticed had just started to leak.  So, it looks like the front of the engine is about to get a "whole lot of love". Now, where's that beer..... So, it looks like the front of the engine is about to get a "whole lot of love". Now, where's that beer.....
__________________
Larry |
|
#32
07-29-2020, 03:22 PM
|
||||
|
||||
|
Quote:
|
|
#33
07-29-2020, 03:57 PM
|
||||
|
||||
|
Yeah, I had found that out - thanks for checking anyway. I picked up two already. The passenger side doesn't look to be too bad, but I'll drop the starter to get a better angle in the driver's side.
__________________
Larry |
|
#34
08-01-2020, 02:51 PM
|
||||
|
||||
|
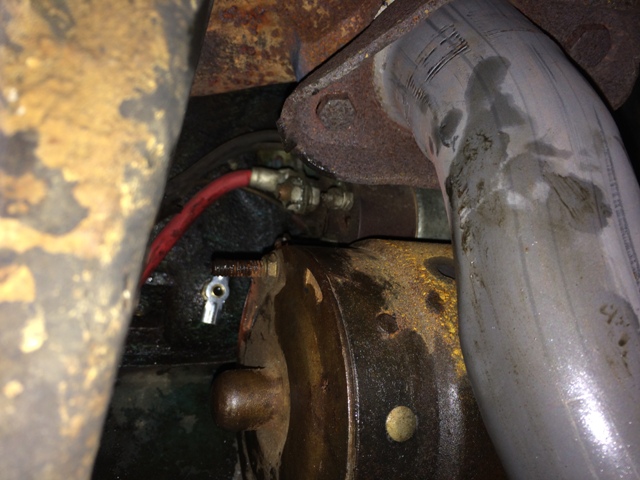
This is one on the engines Ben M. and I put together over the years and it's a good pic of where each of the petcocks was installed.
__________________
Nothing in the world can take the place of persistence. Talent will not; nothing is more common than unsuccessful men with talent. Genius will not; unrewarded genius is almost a proverb. Education will not; the world is full of educated derelicts. Persistence and determination alone are omnipotent. The slogan Press On! has solved and always will solve the problems of the human race. ― Calvin Coolidge |
| The Following User Says Thank You to SRR For This Useful Post: | ||
|
#35
08-01-2020, 04:19 PM
|
||||
|
||||
|
Thank you very much for the pictures - no doubt now as to where they are. I took a second look, and am sure I'll have to drop the starter to get at the plug behind it. On the other side, I should have enough room to work around the oil filter to manage. Thanks again.
__________________
Larry |
|
#36
08-02-2020, 12:20 PM
|
||||
|
||||
|
Quote:
 The passenger side is much easier: 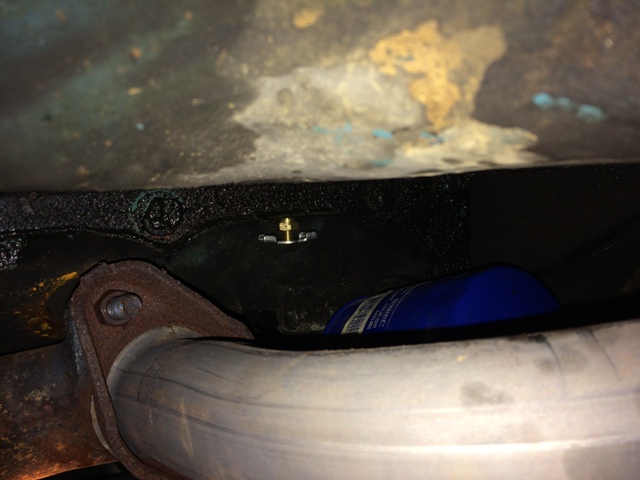 The hardest part of this is getting the original plugs out. |
|
#37
08-03-2020, 10:12 AM
|
||||
|
||||
|
I forgot to mention that I have the RAIII exhaust manifolds. Besides, it's just two bolts and some wires. I'd rather take the starter down just to have room to work.
All of the new parts showed up over the weekend and I'll be starting the work today. I'll keep you all posted.
__________________
Larry |
|
#38
08-04-2020, 10:25 AM
|
||||
|
||||
|
Well, yesterday I dropped the starter and got after the plug on the driver's side. Turns out it's a 1/4 " NPT and came out easily. I think it was drilled out and re-tapped to the larger size during the previous overhaul. The plug on the passenger side is a mess. It's still the 1/8" NPT, just like everyone thought. However, it is truly seized. With the oil filter and adapter where they are, I couldn't get as good a bite with my hex socket as I'd like. The result was that the hex stripped out.
So, I bailed on that whole idea and did as I had thought to do (and sirrotica recommended). I put the rear of the car a foot off the ground and let it drain. Then I put it back on the ground and raised the front a foot high. The front of the motor is as dry as a bone. What I may do for the future, is to incorporate an adapter in the lower radiator hose with a petcock it it. Then if I jack up the rear, that petcock will be the lowest thing on the whole car. Then, keeping the nose high, it would put me where i'm at now but without all the hassle. Here'a picture of what I'm talking about. This adapter has a temp sensor in the 1/8" NPT hole, but the petcock would work just as well, and I would get the appropriate size for the lower hose. Meanwhile, the work goes on.... Keep you posted.
__________________
Larry |
|
#39
08-04-2020, 10:56 AM
|
||||
|
||||
|
Having worked many years as a flat rate mechanic you tend to find all the shortcuts that are quick, and efficient. Any recommendations I make are usually from the many years of trying to make as much money from fast and efficient practices, well sidestepping the obstacles that slow you down.
The spliced sleeve in your pictures will probably work well for draining the majority of the water in the future. If you ever decide to try and remove the other block drain, you're going to have to heat the block red hot, and then try to get a grip on the rounded hex with vise grips, or one of the special sockets made especially for rounded bolt heads. Without heat you'll probably never be able to remove that plug. This is one occasion that penetrating oil will never loosen the grip of the corrosion. Hopefully the rest of the repairs go smoothly for you..... 
__________________
Brad Yost 1973 T/A (SOLD) 2005 GTO 1984 Grand Prix 100% Pontiacs in my driveway!!! What's in your driveway? If you don't take some of the RACETRACK home with you, Ya got cheated
|
| Reply |
|
|
The PY Online Forums is the largest online gathering of Pontiac enthusiasts anywhere in the world. Founded in 1991, it was also the first online forum for people to gather and talk about their Pontiacs. Since then, it has become the mecca of Pontiac technical data and knowledge that no other place can surpass.


 Linear Mode

