| FAQ |
| Members List |
| Social Groups |
| Calendar |
| Search |
| Today's Posts |
|
#21
|
|||
|
|||
|
That will be one nice cruiser.
|
|
#22
|
||||
|
||||
|
Did Pontiac use an 8.5" 10 bolt in 72? (assuming that is a 10 bolt rear) I have a '71 8.5" 10 bolt from an Olds and wanted to use rear discs but have been finding it somewhat difficult to get an answer whether the kits work with bolt in axles (most of the parts catalogs show kits for the corporate 10 bolt 8.5" c-clip rears)
__________________
1968 LeMans conv. 350 HO - 4 speed triple white (hear it idle here) https://www.youtube.com/watch?v=eVmq...ature=youtu.be 1968 LeMans conv. 350 - 4 speed Solar red/pearl |
|
#23
|
|||
|
|||
|
No 8.5 A body rears with c-clip axles til '73 Chevy built 8.5 A body rear came out.
No factory installed 8.5 A body rears in '71-72 Pontiac A-body's or GP's. I have not installed the above Baer rear disc setup, but since it bolted up on the '72 PONTIAC 8.2 rear, it should bolt up on either style bolt-in axle GM rear, providing they both have the small tapered axle bearing. The axle tubes between the '70-72 PONTIAC 8.2 & the most common version of '71-72 8.5 A-body rear are nearly identical. Both were built with the recess for the A9 tapered axle bearing & the 712146 external seal. I could lay out an '70-72 PONTIAC 8.2 axle next to one of the most common style axle out of a '71-72 8.5 Abody rear, & the main difference is in the pitch of the axle splines & the number of access holes in the axle flange.
__________________
Buzzards gotta eat... same as worms. Last edited by 'ol Pinion head; 11-16-2016 at 01:08 PM. |
|
#24
|
|||
|
|||
|
The Baer setup worked very well with the 8.2 rear. If you call Baer they can certainly address any questions about mounting and setup. One thing I did change was the I used 1/2 20 studs on the rear disc. I installed new axle shafts and had the holes drilled for the 1/2" studs. The reason I did this is because the front hubs with the Baer brakes have 1/2" studs.
Jim |
|
#25
|
|||
|
|||
|
Last week I got an alignment done after installing DSE suspension kits on the front and rear and also installing a 4 wheel disc setup from Baer. Since I have put about 150 miles on the car with the new suspension and brakes. Installing the suspension was very straight forward and really did not create too much of an issue. Really the only challenge was installing the rear arms. I had the car on jack stands and that required some patience and care. With a little bit of pre planning the work, everything worked out fine. The front suspension installed as expected , neither the front nor the rear had any fitment issues. If you have installed front suspension springs before installing the DSE suspension is pretty easy. The A arm bushings are installed and greased so that makes the install a little quicker. I used the Koni shocks included with the kit and they are excellent quality and install easy. The quality that DSE has is excellent, I was very impressed with the suspension kit .
As far as the brakes go, the install was straightforward as well. I decided to also add a 9" dual diaphragm booster with the Baer Re-Master master cylinder and Baer Proportioning valve. The original brakes were standard disc/drum. When I decided to install the new brakes I also decided to install new brake lines as well. One thing I had to change was the stock Proportioning valve. I changed it with a distribution block for a drum/drum setup. The block for a drum/drum setup does not function a prop valve, yet still has the sensor for the brake warning light. By using the Baer prop valve it would conflict with the stock prop valve in function. So with minor brake line modification, things will mount up fairly simple. The Baer brakes mount and install easily with no major issue. On the rear axle the mounting does require to remove the axle shafts is the only real challenge for a BOP axle. I ended up rebuilding the rear axle at the same time so in a way it was working in unison. The caliper and brake lines all mount quite well and fit excellent. On important thing to do on the install is make sure you have the calipers shimmed properly. It is a pretty easy thing to do and is not very complicating. Baer does supply an adequate set of shims to do this. It is important to make sure that there is adequate clearance of the brakes and rims. Baer offers a downloadable template and instructions to make sure of this. I checked them with the Year One 17"Honeycomb rims and they had plenty of space behind the rim for the front and back brakes. I used the T4 brakes on the front (13" rotors") and the rear has 12"rotors. They won't work with the 14" Rally II rims that I had on the car. The bleeding of the brakes is standard for any typical brake system and it is essential. The stock brake pedal hooks up directly to the new booster and pushrod with no major issue and only requires an easy adjustment to get the proper pedal height. So with everything thing installed and ready to drive I was really anxious to see how it all was going to do. My first impression of the brakes was quite surprising. The brakes worked exceptionally well and there was a significant and improved brake pedal feel. The brakes have a modern car feel, the pedal travel is less than the stock form but the brakes are stronger and have a more solid and smooth feel. The parking brake works excellent as well. The parking brake uses a brake shoe inside the rear rotors and is very effective and solid. I set the prop valve as recommended by Baer and utilizing those recommendations it works good. With bigger brakes the performance is excellent and outperforms the stock setup by miles. When I decided to change the suspension I wanted better handling but I didn't want the ride to be degraded. As it turned out the ride , in my opinion, is improved. The DSE suspension addresses and corrects the short comings of the stock A body suspension. The car handles light years ahead of the stock st up. It is a solid to the road feel and is a noticeable improvement. The ride quality is excellent. I drove on some of the rougher roads in Vegas and the ride remained smooth and staedy. Overall I am very happy with the DSE suspension and the Baer brakes. Both products are made in the USA and the quality is excellent. Although some may debate the respective costs associated, for me I feel it was worth the price. I have spoke with both Baer and DSE and they have very helpful and offer excellent customer service. So all in all, is it worth it? Yes, I think it is. I am very impressed with Baer and DSE on my LeMans. I am really looking forward to installing the 455 engine soon. Right now the 350 2V is fine (it's a bit tired with 198K miles), but I am really looking forward to having more torque and HP to go with the new suspension and brakes! Jim |
|
#26
|
||||
|
||||
|
Great write up. Thanks for taking the time to do so. I have a couple of questions regarding your posts.
Does the track width change much with the 4 wheel disc. We have the 17" Year One Rally II wheels ('68 Lemans) and they don't rub at all but if the track width were to get wider I'd be concerned that they would start rubbing. I really like the Dakota gauges. Any info you could share regarding fitment to the cluster, dash wiring and sending units? Thanks
__________________
1968 LeMans conv. 350 HO - 4 speed triple white (hear it idle here) https://www.youtube.com/watch?v=eVmq...ature=youtu.be 1968 LeMans conv. 350 - 4 speed Solar red/pearl |
|
#27
|
|||
|
|||
|
When I got the Year One Honey Comb rims I installed them with the stock suspension and I did not have any clearance issues. Both in the front and rear there were plea toy of clearance and they do not stick out anything excessive. I was initially concerned that they might have issues but after installing there was minimal difference. They were wider tires, but with 255/50/17 tires the overall diameter of the tires were very close to the 225/7014 tires I had already. The new tires were wider but had good clearance with both front and rear and had no steering clearance issues.
With the DSE suspension again this presented no clearance issues either. The only no noticeable difference was the overall stance. The front end lowered about 1 1/2" and the rear seemed to raise up maybe an inch or so. The original rear suspension had the original factory springs which after 44 years became very saggy to say the least. The front also still had the original factory springs and they too had aged gracefully. In my opinion whether the suspension is stock or modified ( i.e. a DSE suspension) the 17x9 " Honeycombs will fit without any issues. From my understanding convertible have less wheel well space in the rear due to the convertible top, however I did not see any issue whatsoever with the convertible. Jim |
|
#28
|
|||
|
|||
|
Dakota Digital marks an excellent set of gauges for the LeMans. The install is pretty easy but does require removal of the dash. Dakota digital has pretty good instructions and I mounted the gauges as per the instructions. They fit well into the stock locations with no issues.
The wiring to the gauges is simplified by using one short Cat 5 cable between the speedometer and oil, temp, volts fuel cluster and the tachometer . From the tach there is one output for a second, longer Cat 5 cable which goes to the main terminal box. The terminal box is mounted on the firewall ( or other suitable location) and essentially it is where inputs for the gauges come from. There are several advantages to this. First the speedometer cable is eliminated, second the wiring cluster the them instrument housing is also no longer mounted to the instrument cluster. This does free up the wiring space around the steering column and essentially makes life a bit easier. Having the wiring schematic for allows the stock input wires to be re. Routed to the terminal box. What I did was take each wire for the gauge inputs mark their function then separate the from the harness and re route them the the termianl box input. The wires I rerouted were for fuel, brake warning, instrument light, turn signals and high beam. Additionally a power feed ( constant and accessory) , and a ground. Input for oil, temp, and the speedometer use independent wiring harnesses that are provided. For the speedometer the Dakota gauges use an electronic speed sensor which mounts in the same location on the transmission where the speedometer cable goes. A sensor for the water temp and the oil pressure is also provided. Both of these sensors mount in the same location and manner as the stock sensors. I routed these three harness through the same location that the stock speedometer cable passes. Each harness is different but I still marked each one so that I would not get then confused. Each sensor mounted easily with no issue, however I chose to remove the oil filter housing to change the oil pressure sender. For me this seemed to make things easier but may or may not be required ( I did have to change the gasket in the process). The tach is simple, run a wire from the negative terminal on the ignition coil to the terminal box. Once I completed the wiring, I double checked the the function through a test function as per the instructions. The gauges also use two momentary switches included with the kit. These momentary switches allow you to set up the gauges, and set and calibrate the speedometer. They also serve a function to change information display on the LCD screens. I used a different set of momentary switches that were similar to the ones provided but chose them simply for looks and I mounted them on the dash console. One optional item I installed was a dimmer switch so I could manually dim the gauges as compared to a pre-programmed dim level. After the wiring changes and installation was done I simply re- bundled the wires neatly with electrical tape and a few zip ties. I re-installed the dash and double checked everything. Once I turned the key to power on, the gauges came to life and I went through the programming function as per the instructions. Pretty quick and simple. So how do they function? Outstanding! They gauges have a stock like appearance and look and function great once installed. They also light up quite well and have a great look during the day and the night. The gauges have some really cool information displays as well. You have option of displaying speed times ( 1/4 mile, 0-60 time) trip odometers, rpm warnings, Kmh display, clock and more. Ther is also optional accessories you can add on, Cruise Control,GPS, AIR TEMP and more. Dakota lists optional accessories on their website. My opinion on the Dakota gauges is quite positive. I love the new gauges and have nothing negative to say about them. There are several appearance options you can get. I chose the most stock like appearance and I am very happy with the looks. At night the gauges are clear to read and very neat in appearance. I feel these gauges offer quite a bit without taking away much of original appearance. Installation is simple and straight forward. Over all I spent a total of 5-6 hours from start to finish. I am very happy with the new gauges and feel they were an excellent choice. This is a fantastic way to go if you want new gauges with simple installation and easy to set up. I would like to say it is highly recommended to have a wiring schematic available for reference. The Dakota Digital VHX gauges are an excellent compliment for the car. The quality is excellent and the instructions are clear and concise. If you are looking for a new set of gauges I would highly recommend considering these gauges. Jim |
|
#29
|
|||
|
|||
|
If you want to see more detailed info on the gauges check out the Dakota Website. They have the installation manuals you download and see how they are installed and function.
Jim |
|
#30
|
||||
|
||||
|
Great posts but pictures would be a fantastic bonus! Some of my winter projects on my 71 include some of the things you write about.
|
|
#31
|
|||
|
|||
 [/IMG] [/IMG]Back in October I started doing the frame off restoration on my LeMans. Everything so far has been coming along quite well. I got the frame powder coated and re installed brakes and suspension. |
|
#32
|
|||
|
|||
|
Back in October I started doing the frame off restoration on my LeMans. Everything so far has been coming along quite well. I got the frame powder coated and re installed brakes and suspension.
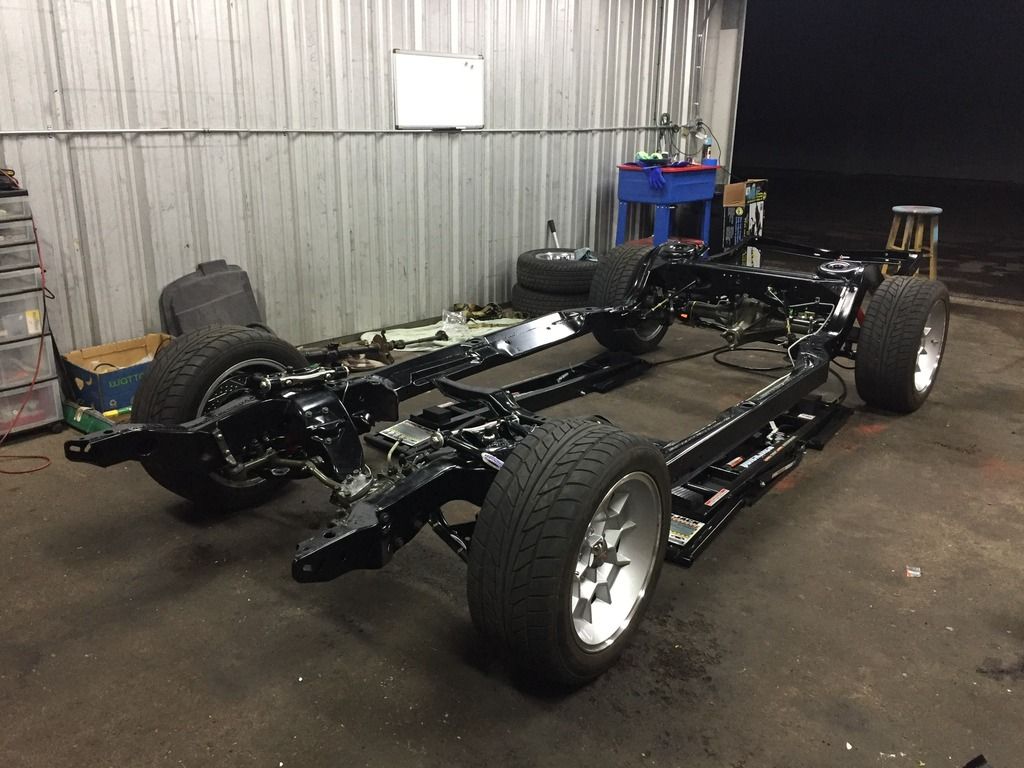
|
|
#33
|
|||
|
|||
|
I got the body off the frame and it was really great to see after being stripped there was no major surprises or underlying rust.
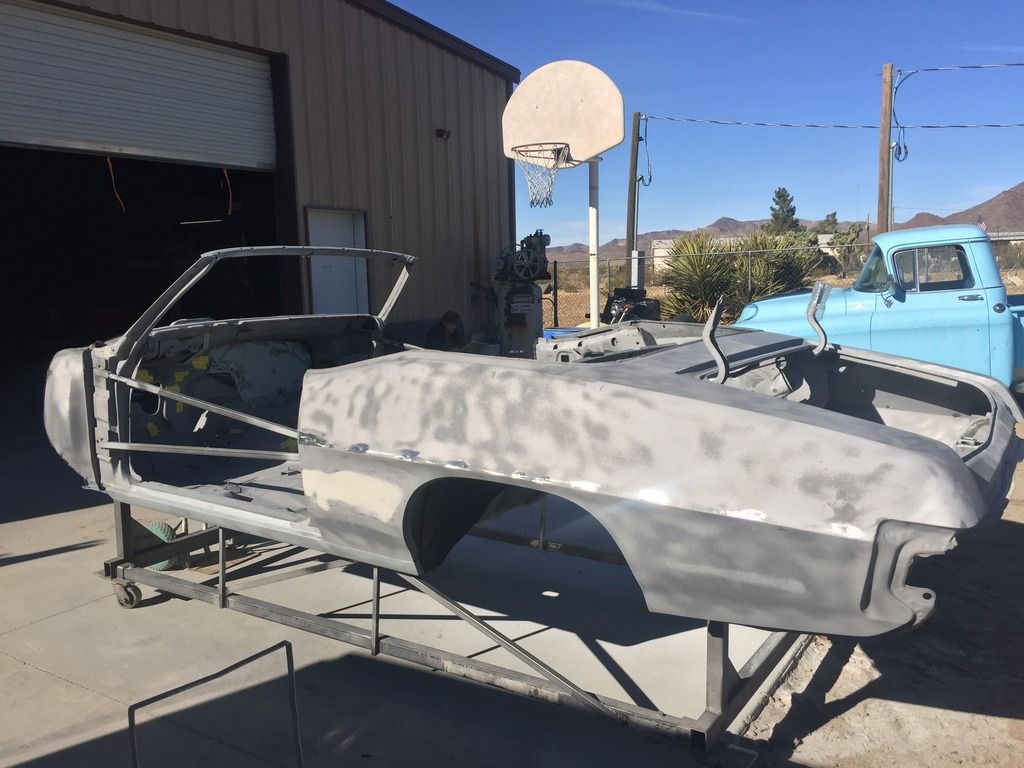
|
|
#34
|
|||
|
|||
|
|
|
#35
|
|||
|
|||
|
Before I had the car stripped I welded in a panel to cover the stock A/c opening. I am planning on installed an A/c unit from Old Air Productucts so i flattened out that side of the firewall
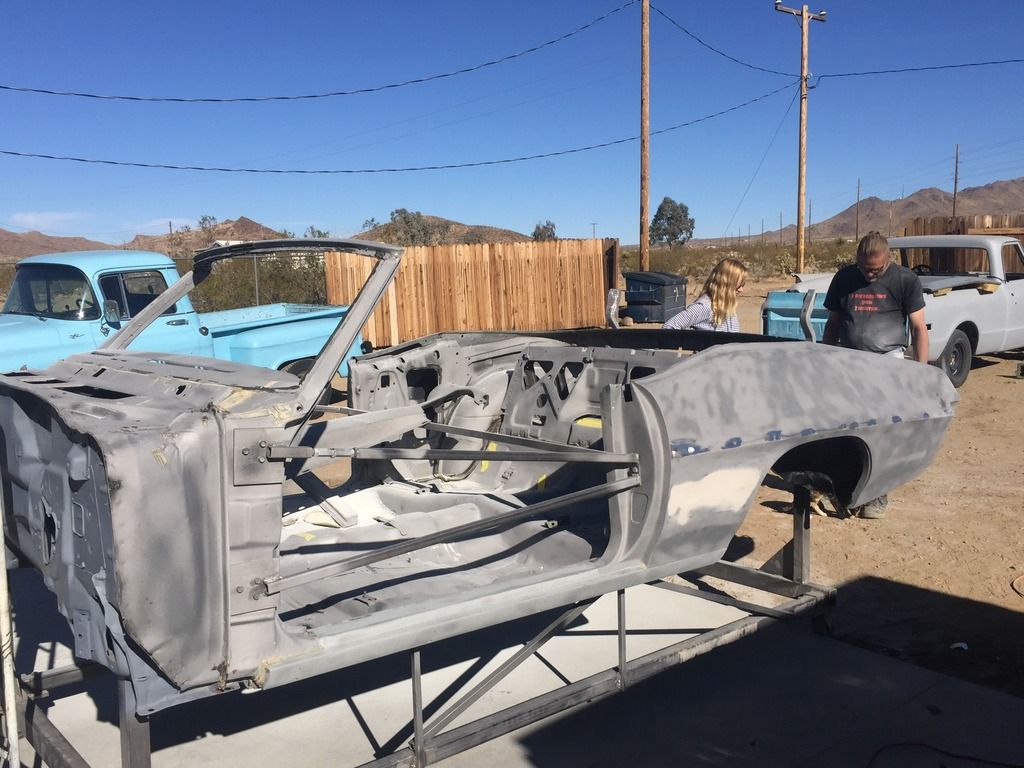
|
|
#36
|
|||
|
|||
|
|
|
#37
|
|||
|
|||
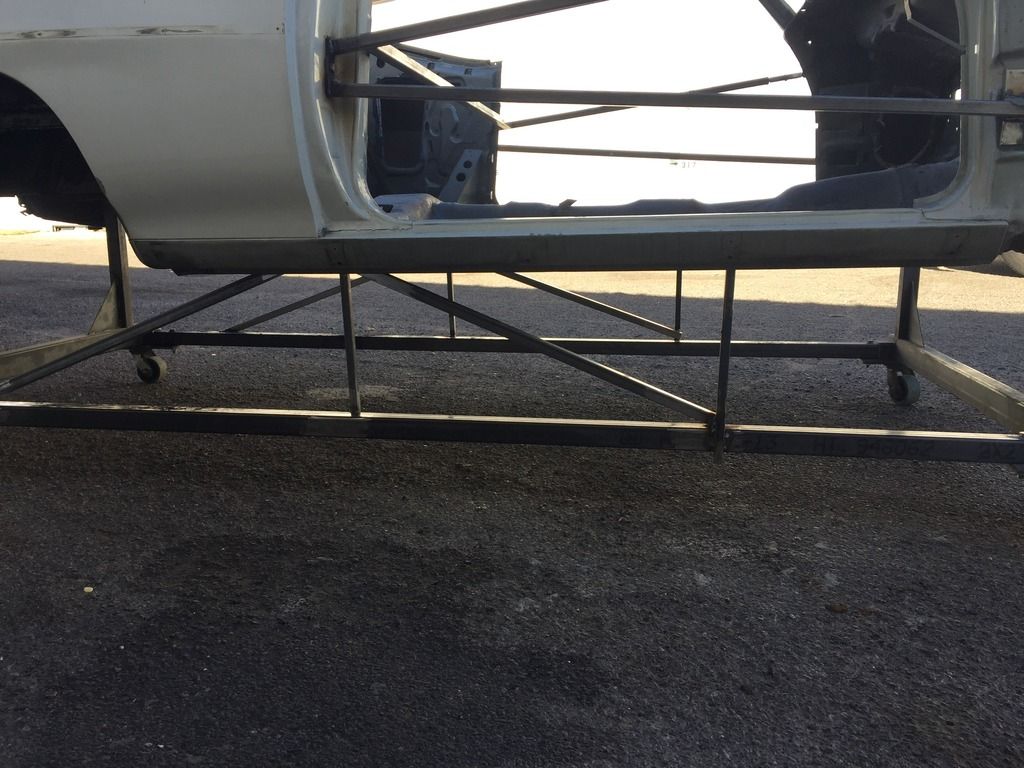 I made a sorta custom body stand which has been really easy to move the body around. I braced the doors as well as bracing the underside as well. |
|
#38
|
|||
|
|||
|
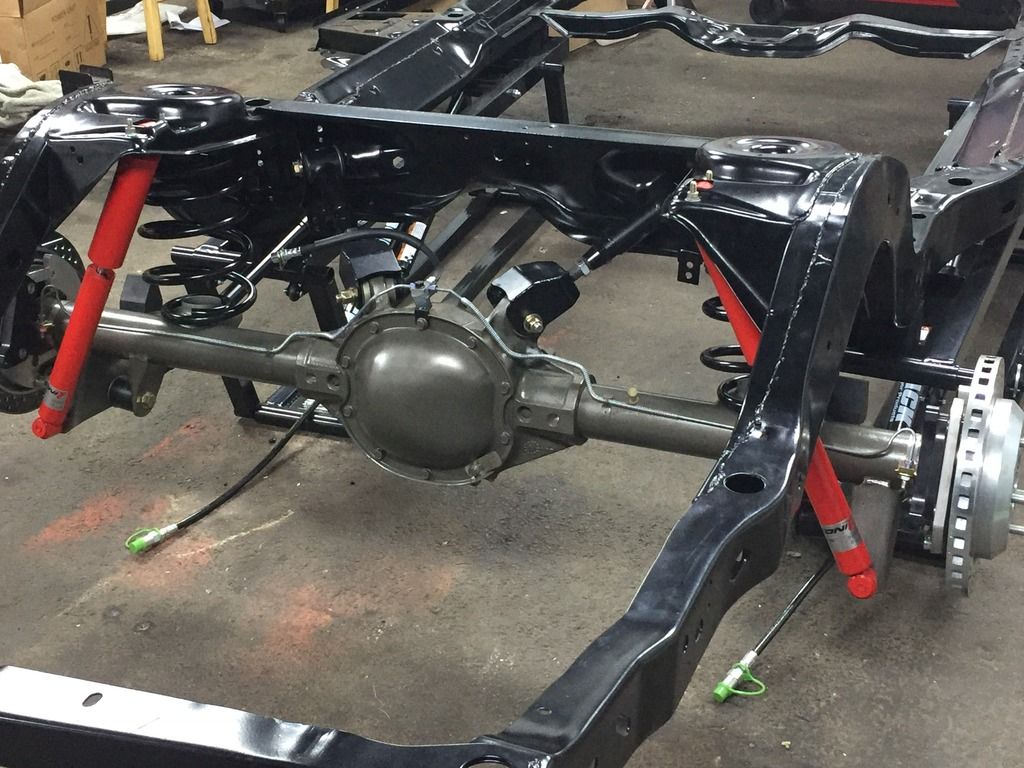
I used the DSE rear suspension kit. I rebuilt the rear axle last fall and put a Posi rear with 3:36 gears. I also installed Baer Brakes On the rear. I drove about 1000 miles with that suspension and brakes. It great improved braking and handling and I was very happy with it,
|
|
#39
|
|||
|
|||
|
|
|
#40
|
||||
|
||||
|
Wow! Looking great! I'm impressed with how much you're doing with the car, and how quickly it's coming along. I appreciate your posts as well, with all of the detail. It's great to see the car going thru all of these changes, and improvements.
Are you planning to keep it white with the black interior? Thanks for posting! 
__________________
Eric "Todd" Mitten '74 Bonneville 4dr Sedan (455/TH400/2.93 open) '72 LeMans GT (455/M-13/3.23 [8.5"] posi) '71 GTO Hardtop (400/TH400/3.07 12 bolt posi) ‘71 GTO Convertible (455HO/TH400/3.23 posi) '67 GTO Coupe (455/ST-10/2.93 posi) '67 Tempest Wagon (428/TH400/2.56 posi) Deuteronomy 8:3 
|
| Reply |
| Thread Tools | |
| Display Modes | |
|
|