


| FAQ |
| Members List |
| Social Groups |
| Calendar |
| Search |
| Today's Posts |
|
#261
 10-05-2011, 12:19 AM
|
|||
|
|||
|
I seem to be distracted by other car projects lately and not getting much done on the Lemans. I spent a couple of days putting 2005 STS buckets in my 96 Roadmaster Wagon. I have back problems and there is not many seats that I tolerate very well. The STS seats were a very difficult install but came out very well. There are 2 computer controllers in the seat and getting the seats to work without the BCM was difficult. If any one wants more information on this install just ask. This would apply to any GM full size RWD car from 77-96.
 OK back to the Lemans. About all I got done was to restore the passenger quarter window assembly. New glass, 2 rollers are new, new chrome and weatherstrip also cleaned and clear coated the metal part. 
__________________
68 Lemans - GTO appearance LS3 68 Eldorado - waiting for restoration 96 Roadmaster Wagon 2014 Infiniti Q50S Hybrid Marietta GA |
|
#262
10-26-2011, 09:31 AM
|
|||
|
|||
|
Anything new?
|
|
#263
10-27-2011, 12:32 AM
|
|||
|
|||
|
I been sick with flu like symptoms for last two weeks. Bummer being at home and too sick to work on car.
 I was working on a few things although none of them are totally complete. I had installed all of the passenger side glass and checked out the power windows and power door locks. But I realized that I should have done the work of making the passenger quarter align with the door before installing the rear passenger window, so I had to remove it. Welding around glass doesn't work too well. I was working on a few things although none of them are totally complete. I had installed all of the passenger side glass and checked out the power windows and power door locks. But I realized that I should have done the work of making the passenger quarter align with the door before installing the rear passenger window, so I had to remove it. Welding around glass doesn't work too well.There was a car show in Canton GA a few weeks ago, since I work in Canton 3 days a week and the show was only 1/2 mile from where I work, I couldn't resist checking out some of the local cars after work. In addition to 60's muscle cars there were a lot of unusual cars, including a Chevette ("Why restore this?" My girl friend's words) and a 60's vintage BMW, it goes without saying there were lots of trucks and 50's vintage cars present. A random shot of some of the cars.  A real nice GS.  And the only 60's Pontiac present.   And now back to the Lemans. The passenger door window. It's not too bad but not good enough.  New glass and restored mounting hardware.  A shot of all passenger side glass installed. I then realized I should have not installed the rear window.  I then removed the rear window so I could install a patch on the quarter panel, the contour was really off at the top.  Result of grinding and sanding the patch.  Filler applied. And this is where I realize a 3" DA would be a really nice tool to have.  This is the staring point. The quarter is about 1/4" too low at the top.  Filler work on door to fender edge. I also filled the antenna hole. I going to install a 70 windshield with antenna in the glass. I know these type of antenna's didn't work very well. I know this first hand since my 76 Grand Prix had one, but I not planning to use the radio to listen to radio stations. The only purpose of the Radio is to play my MP3's.  I had started putting filler on the trunk lid. This is far from complete. Still working with Rage, I have not got to the point of doing the final wipe with Rage extreme.  These are parts of the driver side windows that I am working on.  This is where the car was about two weeks ago. No new work since. I was looking at the the driver vent window parts yesterday and thought the frame looked a little off. Well it was. I was shipped a vent frame for a 64-65 Malibu. So I sent it back today to be swapped. I probably not going to do any more work on the car until the weekend.
__________________
68 Lemans - GTO appearance LS3 68 Eldorado - waiting for restoration 96 Roadmaster Wagon 2014 Infiniti Q50S Hybrid Marietta GA |
|
#264
10-31-2011, 01:35 AM
|
|||
|
|||
|
I started working again, maybe a bit slow. I buffed the roof rail stainless for the driver side and started to install it. I found a couple of rust holes that I had missed.
 I can't see cutting a patch 3/16" x 3" and installing it in this hard to reach place. The only thing that seems to make any sense is to build up the area with a bunch of short blasts with the MIG. Maybe not the best way to make the repair but it should work. The repair is kind of rough since there is no easy way to sand the metal. This is the result of grinding with a cutoff wheel. Good enough since it will be covered by the roof rail stainless.  The roof got too hot a popped the filler near the repair, so I had to grind a portion of the filler off. I now have to patch this.  While I looking a the quarter panel, it looks like the corner will require some work for the glass channel weather strip to install flush. Since I going to have some places to prime I might as well fix this while I'm going. This is the starting point. It looks like the corner was hand formed and finished badly. The corner sticks up about 1/8" so it would require the glass channel weather strip to be bent if this corner is not corrected.  This is the finished corner. I had to cut a slit in the corner, bend one edge down and used the MIG to fill in the gaps. 
__________________
68 Lemans - GTO appearance LS3 68 Eldorado - waiting for restoration 96 Roadmaster Wagon 2014 Infiniti Q50S Hybrid Marietta GA |
|
#265
11-08-2011, 12:53 PM
|
|||
|
|||
|
I hope when you get her painted she will be super straight, especially with all the work you have put into the body.
|
|
#266
11-08-2011, 01:01 PM
|
||||
|
||||
|
There is no doubt that the paint will be as meticulous as the rest of Mr. Brown's efforts? I hope he has some time to work on it as I am going from thread withdrawals.
|
|
#267
11-08-2011, 10:15 PM
|
|||
|
|||
|
Nothing really new, working on mounting driver side window glass. The driver door glass channel frame turned out too rusted to reuse. That is the U shaped channel that is riveted to the two end pieces. It looks like I will have to fabricate a new channel since I have been unable to find any used ones. I don't have the appropriate metal on hand (either 16 or 18 gage) to make this channel and so far all the easy to get to places like Lowe's or HD was out of stock of this thickness.
Quote:
I'm thinking of using this procedure for the prep and paint. 1 Correct all of the major problems where I either weld or add metal to make things line up. 2 Remove trunk lid, doors, fenders and hood. 3. Paint the jam areas, under side of the trunk lid, etc. 4. Reassemble the car and set all gaps. 5. Mask the Jam areas. 6. Apply final skim coat(s) of Rage extreme to problem areas and work until straight. 7. Apply Epoxy primer to entire car and continue applying until I have a uniform color. The filler tends to show under the gray primer. 8. Final sanding of primer. 9. Paint the car. My reason for this approach is that I won't have any help in putting the car together and the probability is very high that I would scratch something. Just when I think I done will all the rust repair, I find the bottom on the driver window channel is rusted. After removing the window setting rubber, I dumped a large amount of rust particles out of the channel. After going over it with a wire brush I have numerous pin holes. The channel has lost about 75% of its thickness. As you can see it's not very straight. It bends very easy and would not do a good job of holding the driver side glass.  Here is a shot of the completed passenger side glass. Power windows work and power door lock also works. Although harder to see, the door and quarter panel align at the top.  Here is a shot of the completed gap work on the upper passenger door. 
__________________
68 Lemans - GTO appearance LS3 68 Eldorado - waiting for restoration 96 Roadmaster Wagon 2014 Infiniti Q50S Hybrid Marietta GA |
|
#268
11-11-2011, 01:25 AM
|
|||
|
|||
|
I worked on the Rocker trim today. My car had the trim removed as well as any mounting hardware when I bought the car so I didn't have any photos of the trim. The new trim included a bag of hardware and no instructions, so I had to figure out where everything goes. The hardest part was the rear trim since there are no holes in the replacement quarters and I didn't think to save that part of the old quarter to use as a pattern.
With careful measurement I figured where to put the holes. These are hard to make since they are a rounded rectangle. These are hole patterns I drew.  Next I drilled small starting holes at each end.  Drill out the small holes with the final size drill bit.  While I didn't have the type of file I would have preferred for the next step, this round file did the job.  And the final result of my hole making.  The mounting clips fit good. I didn't install them, just put them in place to check the fit of the trim. I will wait until the car is painted before installing the clips.  A shot of the rocker trim. It's covered with a dark plastic. Looks like it fits good. It actually covers a small flaw at bottom of the fender. I think I will wait until after painting the car before I drill the holes for each end since I don't have wheel opening molding for the front. This would make it hard to center the molding.  A few shot of my work on the driver side door hardware/glass and quarter glass. Driver vent frame installed.  Quarter glass/power window unit installed.  Driver door covered with Eastwood Sound deadener. This makes a huge difference in the sound of the door. Bang on the door and you can hardly hear it.  
__________________
68 Lemans - GTO appearance LS3 68 Eldorado - waiting for restoration 96 Roadmaster Wagon 2014 Infiniti Q50S Hybrid Marietta GA |
|
#269
11-11-2011, 08:53 AM
|
||||
|
||||
|
Its really coming along nicely!
__________________
1969 Lemans vert, matador red, 462 CI, 3.07 12-bolt posi 1974 455 TA, admiralty blue/red interior HPP "cover car" - sold "The best way to show a car is to drive it" |
|
#270
11-14-2011, 12:57 AM
|
|||
|
|||
|
My next problem was the rusted out driver window support frame. I was unable to find a used one that was in better shape than the one I had, so I decided to repair what I had. Although channel is not hard to make on the grand scheme of things, it presented me with problems since my sheet metal brake is only rated for 20 gage metal. The original channel is 18 gage metal. I probably could had bent a 22" long piece of 18 gage but 16 was all I could find. Although there is a steel shop near me, they only sell 4x8 foot sheets, which was more than I cared to purchase. In addition the 16 gage piece was too short to make the channel in one piece, so I ended up butt welding two pieces together.
This is my staring point, 4 of the 6 spot welds holding the channel to the end pieces had totally rusted out.  I started the bends with my sheet metal brake, then inserted the piece in this form I make. Inserted the 3/8" thick piece metal in the partial bend piece and used my press to finish the bend.  After welding the pieces together, I used a vise grip set to about 1/8" less than the width of the channel and then bend the top of the channel to match the contour of the factory channel. Here is the finished piece.  After cleaning the end pieces, I'm ready to weld the channel to the end pieces.  This is the completed piece with a clear coat applied.  Since I used a thicker metal it was difficult to get the window inserted in the channel, but I finally succeeded.  Windows are now installed on the driver side.  I still need to make final adjustments for window position. One problem I'm having is the driver door power window goes down extremely fast, in fact it looks too fast. It also won't go up without being helped. I think I read somewhere that at least one person received a power window unit that the spring had been installed backwards. I getting the sinking feeling that I may have one. I will have to take everything back apart to get the power unit out. Even the vent window mounts have to be loose.
__________________
68 Lemans - GTO appearance LS3 68 Eldorado - waiting for restoration 96 Roadmaster Wagon 2014 Infiniti Q50S Hybrid Marietta GA |
|
#271
11-14-2011, 02:01 PM
|
|||
|
|||
|
I really appreciate how you share with us how you overcome each obstacle you run across in your project. I don't think Trepanier or Foose would be so revealing. Great work.
|
|
#272
11-17-2011, 11:33 PM
|
|||
|
|||
|
Quote:
There are no real secrets for the execution of the plans that Foose of Trepanier does. All the grunt work is done by fabricators and body men who work from drawings and renderings. In overhaulin' there was a different crew in almost every build. The only constant thing in the Overhaulin' builds were the renderings produced by Foose. The secret is in the design of the project, after that any well equipped shop should be able to build the project. I spent almost a day making making the channel, restoring the ends and assembling the frame to the glass. If I had access to better tools, like a foot operated sheer and a brake that could bend 16 gauge metal, the channel could have been made in about 10 minutes. Then another hour to finish the window assembly. Use of wood frame and forms to bend metal is an old time approach. One that sadly seems to be forgotten by most metal fabricators. There is nothing wrong with wood forms for making a few pieces. However wood forms do have their limitations, they will wear out quickly. This shows that with a little time and effort you can make one off parts that are not readily available. OK, back to the build. Not a whole lot to show. I am taking a break from glass and power windows and working on the trunk lid area. There are a couple of problem areas that need to be addressed. One the left quarter panel does not line up with the trunk lid very well. The other is the gap at the back of the trunk lid sucks ranging from 7/16" on one side to 9/16" on the other. This is the starting point for the quarter to trunk lid. 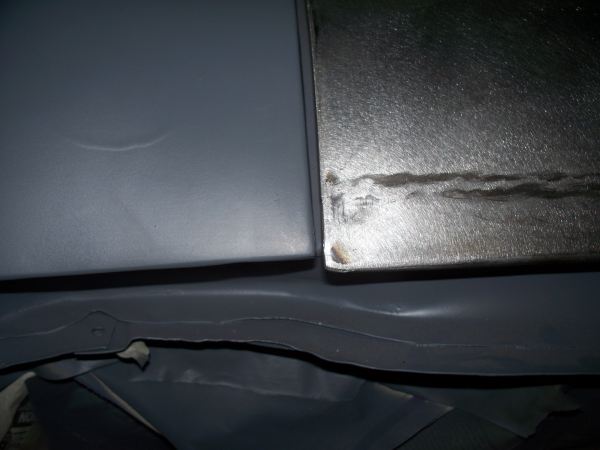 This is the roughed in work. I still need to cover the work with Rage.  The starting point for the trunk lid gap. The gap is really excessive. 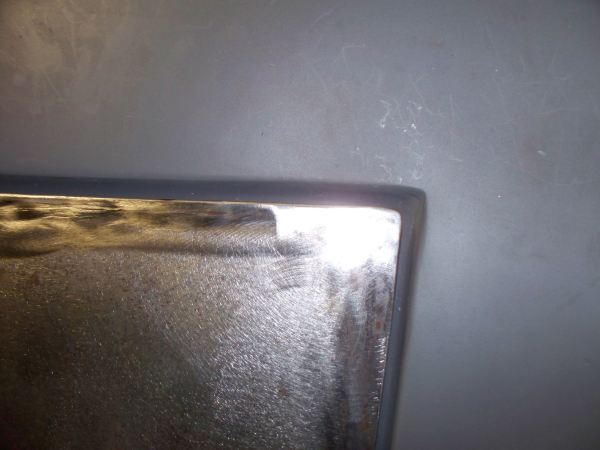 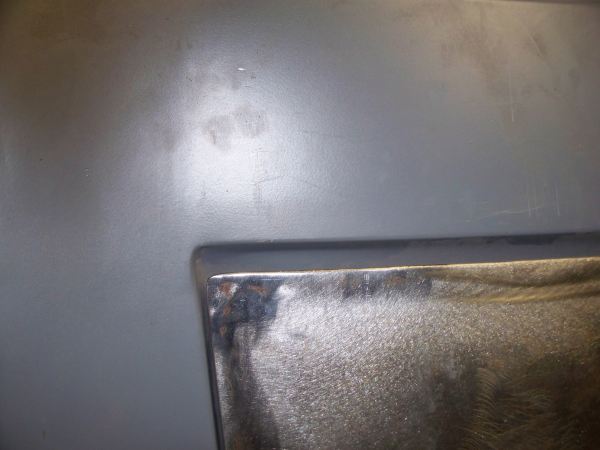 This is my work in progress. I still need to work the edge a little more.   I spend some time locating and drilling holes for the fender emblem. 
__________________
68 Lemans - GTO appearance LS3 68 Eldorado - waiting for restoration 96 Roadmaster Wagon 2014 Infiniti Q50S Hybrid Marietta GA |
|
#273
11-23-2011, 01:18 AM
|
|||
|
|||
|
I have been working on the trunk lid alignment and trunk lid gaps. I was unable to shift the trunk lid far enough to one side. It turned out that the washers on the trunk hinge bolts were stopped the lid from shifting to the position I needed. I ended up grinding about 1/8" off the side of the washer on all 4 bolts. I was only about 1/16" from being where I needed to be with the side to side alignment.
Alignment Tip During my many attempts to work things out I came up with a good way to save the front/back alignment. I put tape across the trunk lid and the quarter panel and marked a straight line across the tape. All I need to do check the front/back alignment is to place a filler spreader across the line to check that I have restored the back/front alignment. This makes for fast back/front alignment and leaves you free to work on the side alignment and know that the back/front alignment is still right.  I made minor adjustments to the latch and had to do minor filling to the rear of the right quarter panel to have a even line across the trunk lid and quarters. I used All- Metal filler to make up the alignment differences.  Next I remove the trunk lid so I can work on the inside part of the rear window panel. This gap work was also done with all metal filler. The gap filled by the filler is about 3/16" on one side and narrows to about 1/32" on the other side.  This is a work in progress picture, I did fill the voids before moving on. This is the side that needed 3/16" of filler.  All metal is hard to sand to a really smooth finish, so it will be top coated with Rage Extreme. This is my first pass with Rage Extreme. I will probably need two more filling sessions before this is complete. 
__________________
68 Lemans - GTO appearance LS3 68 Eldorado - waiting for restoration 96 Roadmaster Wagon 2014 Infiniti Q50S Hybrid Marietta GA |
|
#274
11-23-2011, 12:02 PM
|
||||
|
||||
|
I love this thread and always anxiously await more posts. I was wondering how many folks in the PY forum might be missing out on Mr. Brown's valuable insights and explanations regarding fabrication, rust repair, panel alignment, etc..because they might skip over the posts as they are in the "Non Pontiac Motors in Pontiac" section. This thread is way more than just that! Every PY member could take something from this thread. Guess it's my way of giving you kudos Mr. Brown.
Dave |
|
#275
11-24-2011, 11:53 PM
|
|||
|
|||
|
Quote:
I continued with my prep work around the trunk opening. It took only one additional coating of Rage to fill the imperfections. The trunk opening edges are ready for primer.  These areas don't photograph well. The work is very smooth but appears rough since it transitions from primer, bare metal, All-Metal and Rage Extreme. The curved area is very smooth although it is difficult to determine from the photos.    Some sanding Tips. To sand inside corners where you don't want a sharp edge. Wrap sandpaper around a 3/16" piece on brake line. Don't have brake line, then use a drill bit.  For sanding the vertical edges of the trunk gutter near the corner. Use a metal spreader and cut a piece of PSA sandpaper and stick it to the spreader. Paint stirring sticks can also be used.  For sanding curved surfaces that don't match any sanding blocks. Use a plastic filler spreader. It can be bent and can be used on the curved surface. I cut and stick PSA sandpaper to the spreader.  You will need to change the paper frequently since there is so little of it on the spreader and it will wear out quickly. 
__________________
68 Lemans - GTO appearance LS3 68 Eldorado - waiting for restoration 96 Roadmaster Wagon 2014 Infiniti Q50S Hybrid Marietta GA |
|
#276
11-25-2011, 10:33 PM
|
|||
|
|||
|
I Primed the trunk opening area today.
Masked and ready for primer.  Primed  Under side of trunk lid ready for primer  Primed Next will be to install the trunk lid and do the final prep work to the trunk lid.
__________________
68 Lemans - GTO appearance LS3 68 Eldorado - waiting for restoration 96 Roadmaster Wagon 2014 Infiniti Q50S Hybrid Marietta GA |
|
#277
11-25-2011, 11:22 PM
|
|||
|
|||
|
what primer are you using over the evercoat rage?
|
|
#278
11-26-2011, 01:11 AM
|
|||
|
|||
|
Summit Epoxy Primer - SUM-UP230
Epoxy Primer Catalyst - SUM-UP231 I had been using Kirker Epoxy Primer but ran out and needed to obtain more Primer before the re-coat window passed. Delivery of Kirker takes me two days vs one for Summit Racing. It has been suggested that Summit Primer is made by Kirker. While the primer is similar it is not identical. The Summit product dries to a much higher gloss than Kirker primer. By the way Rage Extreme is private labeled for Finishmasters and sells for about $35/Gal. I have compared "Rage Extreme" against the private labeled filler and found them to be identical. I had a little of the Rage Extreme left and did a side by side comparison with the private label product. Even the content list is identical. Finishmasters is a paint supplier and has locations in most large cities.
__________________
68 Lemans - GTO appearance LS3 68 Eldorado - waiting for restoration 96 Roadmaster Wagon 2014 Infiniti Q50S Hybrid Marietta GA |
|
#279
11-27-2011, 12:57 AM
|
|||
|
|||
|
This is the House Brand of Rage Extreme. Sells for about $35
 Cornering lights are hard to find and/or very expensive. A set just sold for $415 + Shipping on Ebay. I stumbled across these Buick parts that appear similar to the Pontiac cornering lights. I hope they work out. If not I can probably sell them for what I paid for them.  I started working on the passenger door today. The back bottom corner is pushed in about 1/16" but is even with the quarter a couple of inches up.  Rather than fill this, this is something that can be tweaked. I used a Crescent wrench to carefully bent the edge back into place.  Success, no additional work needed here.  The area around the door handle will need more work. I believe this is due to the dynacorn quarter not being quite right. The edge goes from even to about 1/16" too high.  This is the first filling attempt. On this work I am using Rage rather than Rage extreme. Rage extreme tends to run on vertical surfaces when applied thickly. I will probably need another application on Rage and then follow it up with Rage Extreme.  The front door edge has similar problems and also requires filler. This is the first application. Several more will probably be required. 
__________________
68 Lemans - GTO appearance LS3 68 Eldorado - waiting for restoration 96 Roadmaster Wagon 2014 Infiniti Q50S Hybrid Marietta GA |
|
#280
11-27-2011, 07:49 AM
|
||||
|
||||
|
Cornering lamps-
Yes nice ones are hard to find. Those should work as long as they fit the fender cutouts and you are happy with the look. I searched for Grand Prix cornering lamps since I knew they were the same, and only paid around $50. The lenses and housings were nice but I had to get the bezels re-chromed which added another $200 or so. If the car did not originally come with cornering lamps you will have to cut out the reliefs in the core support. You will also have to install a new turn signal switch with harness in order to make them work. I got a Wells switch from RockAuto for around $20. For some reason the harness connector didn't fit because it was slightly narrow. No problem though, I just re-used my original connector. And none of the parts stores stock the correct bulbs that go in them. I found some on e-bay cheap though. Not sure all the expense and work was worth it, but it is cool to see them work when I hit the turn signals at night. That's going to be one really nice car. Looks to me like the final results when you are fixing gap and alignment issues are better than the factory standards back then. Walt
__________________
1969 Lemans vert, matador red, 462 CI, 3.07 12-bolt posi 1974 455 TA, admiralty blue/red interior HPP "cover car" - sold "The best way to show a car is to drive it" |
| Reply |
|
|
The PY Online Forums is the largest online gathering of Pontiac enthusiasts anywhere in the world. Founded in 1991, it was also the first online forum for people to gather and talk about their Pontiacs. Since then, it has become the mecca of Pontiac technical data and knowledge that no other place can surpass.


 Linear Mode

