


| FAQ |
| Members List |
| Social Groups |
| Calendar |
| Search |
| Today's Posts |
|
#41
 10-11-2012, 01:15 PM
|
||||
|
||||
|
Brad, I received the template yesterday. Thank you very much. I'll get on that little project as soon as I'm done working on a friend's 55 Chev 150 2 door sedan (one family survivor!).
__________________
65 Catalina 2D Post |
|
#42
10-11-2012, 04:43 PM
|
||||
|
||||
|
Glad you got it, I must have put enough stamps on it this time around!! Try to hold onto it and pass it on if anyone else needs/wants to use it.
If anyone was wondering about the template, here is the thread that I have photos the z-bar bracket that is welded to the frame an it's location with the template. http://forums.maxperformanceinc.com/...=700014&page=2 Funny how things go, I find a great deal on the long branch manifolds and now I just got a great deal on a 65 Tri-power manifold.............I need to do more work and less purchasing of parts............. The tripower will likely not go on the car for years though as I will need to put parts together over time and absolutly do not have enough money for that with this project right now. I ended up going out of town for family and than was in IA for the week with work. I should get photos and an update on the rear this weekend.
__________________
Brad Hansen 65 Cat Ventura, 66 Cat Vert, 63 GP |
|
#43
10-11-2012, 06:36 PM
|
||||
|
||||
|
I'll save that template for other's future projects. I have to remove the brake line block and steering box in order to use it, but that's the way it goes.
So are those long branch manifolds made by RARE, or are they the ones PY et al sell? What's the outlet size? 2-1/4 or 2-1/2? I bought the RARE pipes 8 years ago and had them powder coated locally. They're still in the box...well, maybe they'll get installed next year.
__________________
65 Catalina 2D Post |
|
#44
10-11-2012, 07:14 PM
|
|||
|
|||
|
hi can you put me in line for the template thanks brody
|
|
#45
10-13-2012, 10:31 AM
|
||||
|
||||
|
Brody,
What's you timeframe for needing the template? This is something that can be duplicated, so if you're in a hurry, I can make a copy and mail it to you. Matt
__________________
65 Catalina 2D Post |
|
#46
10-13-2012, 11:25 AM
|
|||
|
|||
|
hi thanks that s what i was going to do take it to my fab guy and have him make one i think that will get me to doing it faster and not put it off thanks brody my email address is lab6564@aol.com and i will send you my address later brody
|
|
#47
10-23-2012, 02:30 PM
|
||||
|
||||
|
Been kind of crazy around here. I lost an Uncle to an accident and my wife lost an Uncle to cancer so the car was put on hold for a few weeks obviously.
I did get things put together but did not like how flat the rear housing paint was after I painted it, so I tore it down and should be able to paint and put things back together soon. I have been able to get the front suspension parts cleaned up though. Hope that goes smooth. Will be nice to have this thing on wheels! I was able to figure out where the sway bar was located. I did a mock up with the suspension after I cut the 1"x2" tube to fit (tight by the way) blasted, painted everything and welded them in. I located where the rear sway bar bolts should go, drilled all the way through, cut the top of the arm so that the bolt sits on the 1x2 stock, welded them in and painted again. I though about welding the nut on top, but chose not to. Thought they turned out nice. Should be a lot less movement in the rear once it is back on the road.....someday! Any Star Wars fans? The housing reminds me of the TIE Fighters. (I had to look up the name)
__________________
Brad Hansen 65 Cat Ventura, 66 Cat Vert, 63 GP |
|
#48
01-13-2013, 06:41 PM
|
||||
|
||||
|
So it has been a while and I have not been able to get a lot done. We had our 3rd baby on the 8th of this month (5 days ago) so that makes 3!!!!!! 2 boys going to be 6 and 3 in March and now a baby girl!! Very excited but the car has not been priority. I had my mother in-law here and was able to get some time to work in the garage and am putting the front end together and am running into troubles. I am going to post this in the susp area, but wanted to see if anyone here has thoughts.
I am putting together the front suspension and wanted to make sure everything was close prior to putting in the springs on the front. I noticed when I mounted the upper and lower that there looked to be a lot of neg caster going on. I put the same shims back in the way they came out prior to taking the front appart, but dont remember there being this much of a caster issue. The manual says -1 degree caster is what we are looking for and from what I have been reading that a little positive caster may be a good thing. The frame is not exactly level and the floors may not be either, but man this looks to be way way off. I did not adjust any of the shims and would doubt that I would even come close to w/in spec from what I am seeing here. The amout off is about the same on both sides and I measured the frame several times in several areas to make sure that it was right on prior to paint and assy of the suspension items. My questions are, does this look at all close to what you guys see? How can both sides be off this much if they are off? Am I looking at this the wrong way? Can and how should this be adjusted? Thanks 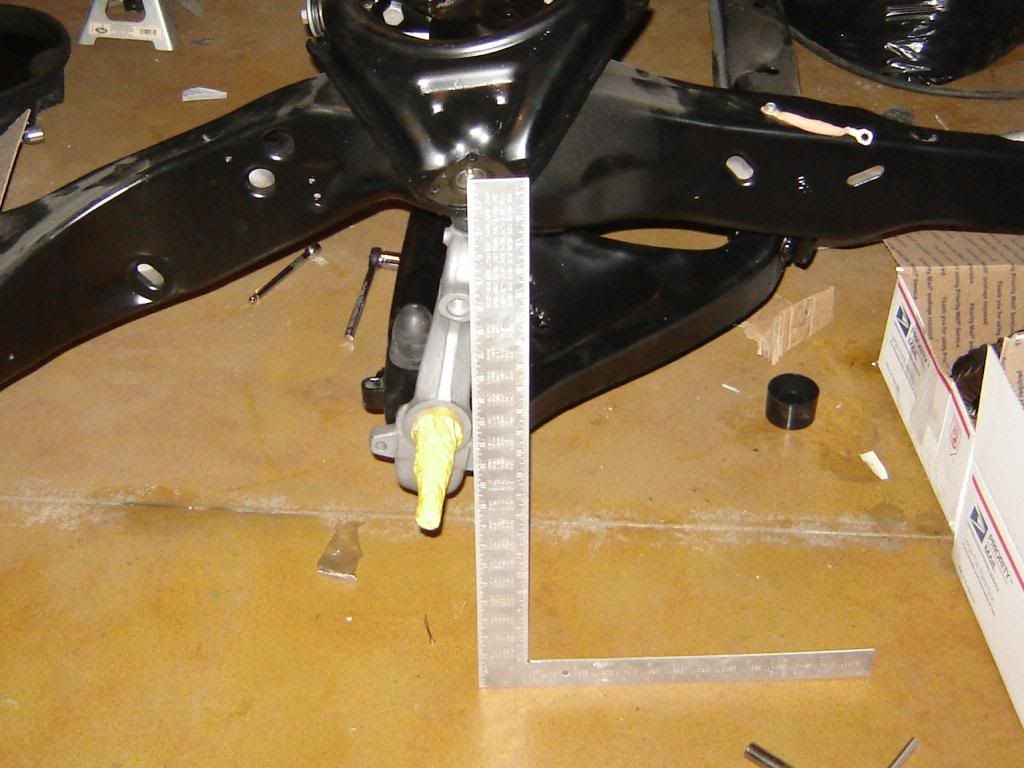 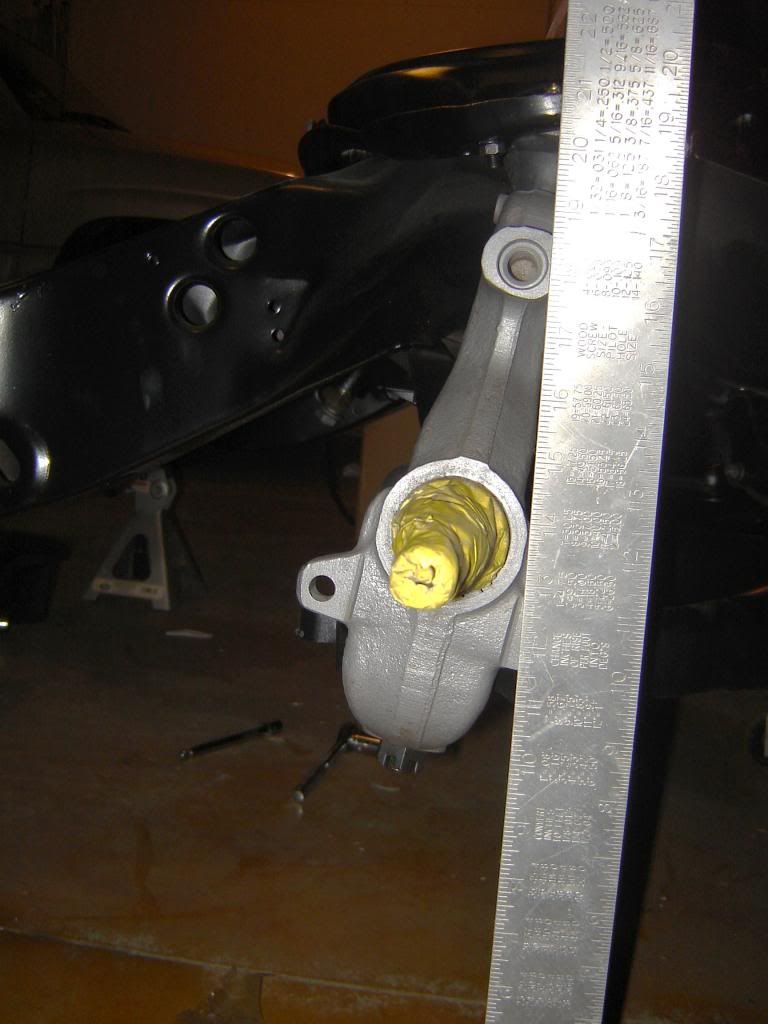 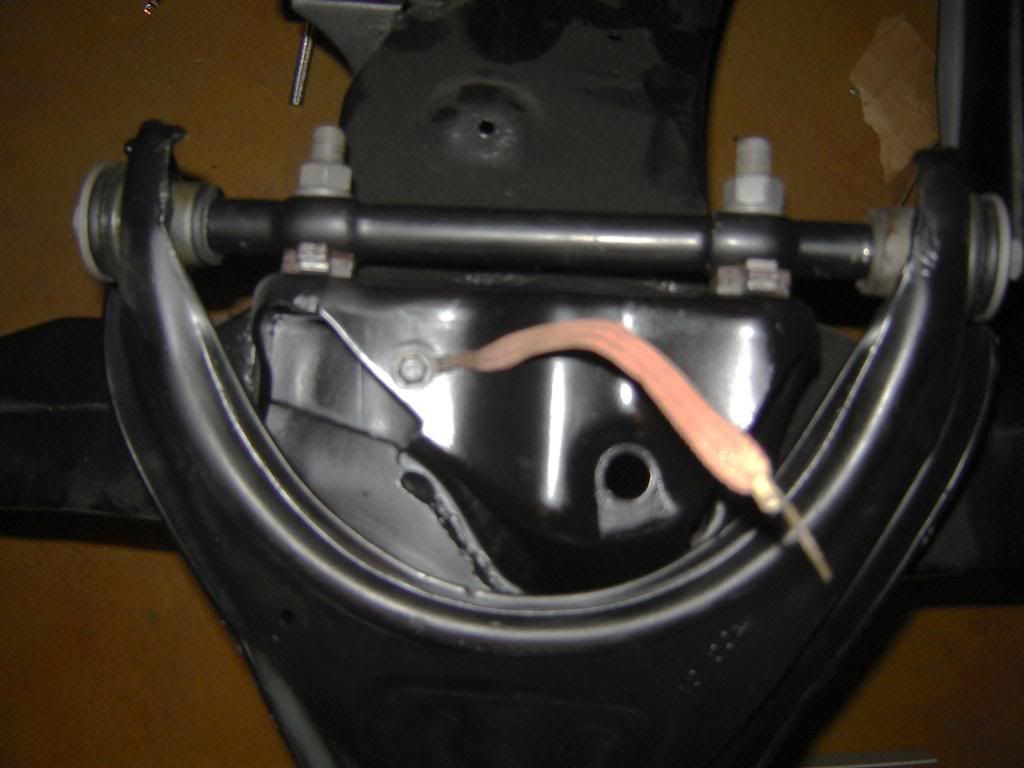 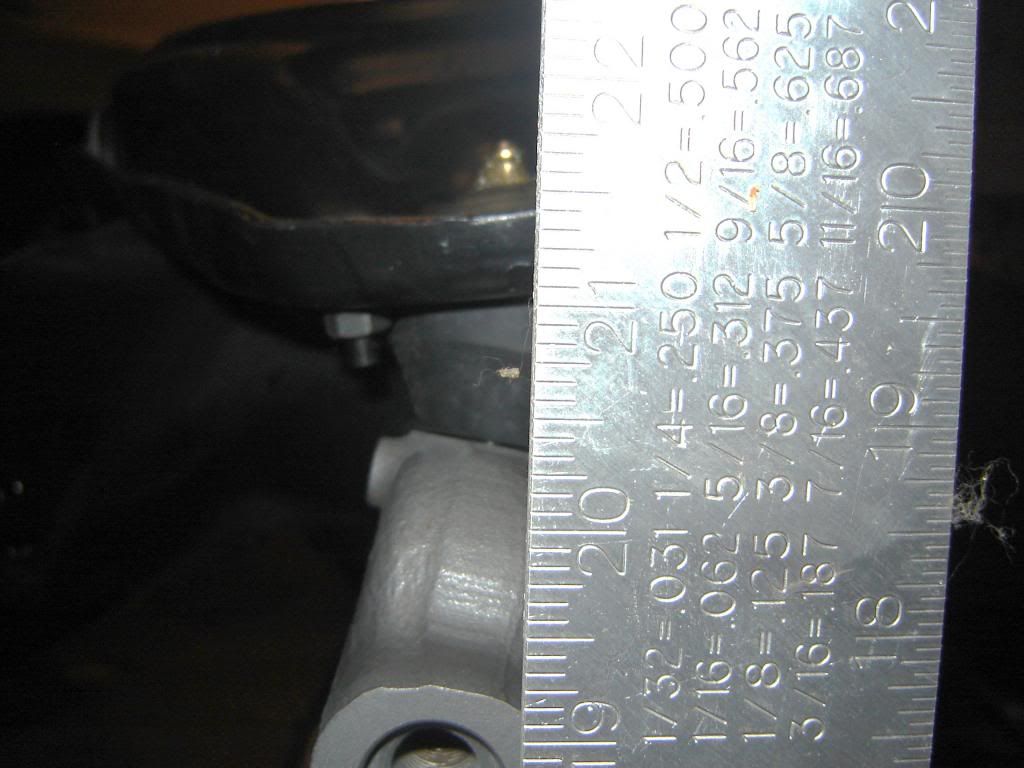 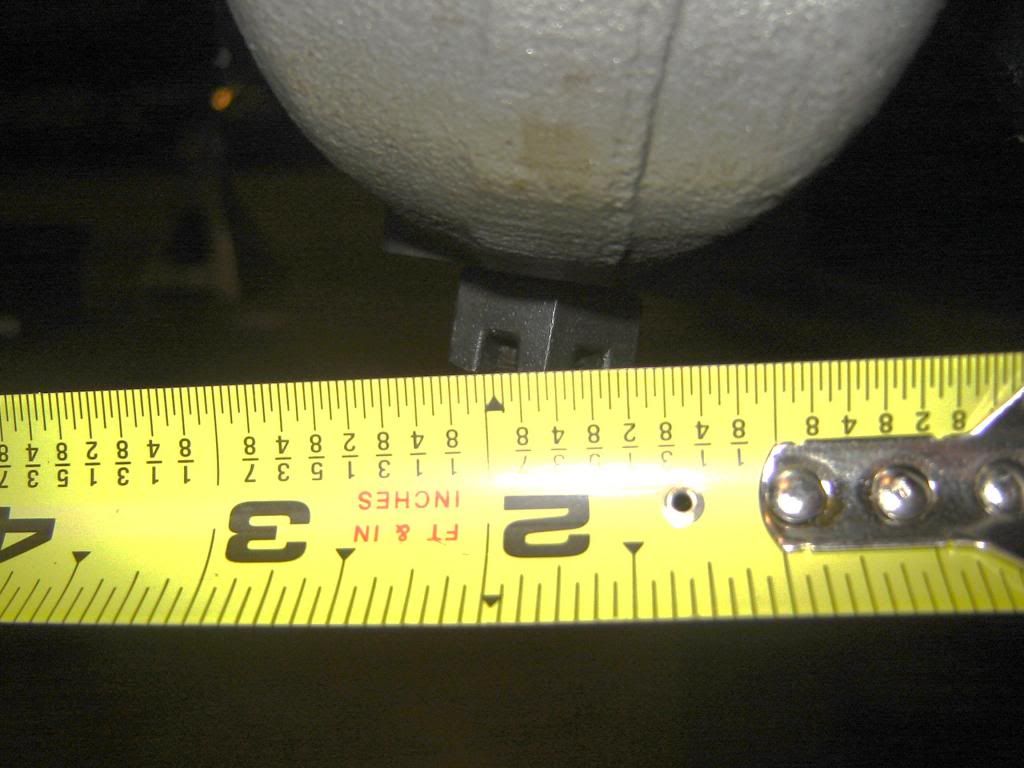
__________________
Brad Hansen 65 Cat Ventura, 66 Cat Vert, 63 GP |
|
#49
01-13-2013, 10:01 PM
|
||||
|
||||
|
It does look wrong, but it may not be. Knuckle seems to indicate a lot of negative caster. I tried to look at my '66 but can't really see in the dark or all together. Although I thought the upper control arms were the same, they have different part numbers. Could they be on the wrong side?
Very nice work BTW! Rob...
__________________
" Darksiders Rule "
|
|
#50
01-13-2013, 10:37 PM
|
||||
|
||||
|
The uppers actually have a L and a R on them for side to side, but do appear to work for either side as I did measure (Triangulate if you will) to make sure they were square and they were. I folllowed the Chassis manual on the replacement of the bushings and like I said, measured the frame so I have no clue what is going on. Obviously easier to fix things now prior to putting the springs in, I just have no clue if it is wrong or what. The spindles are the same side to side and the lowers are basicaly fixed in their position, so it is either correct (does not look that way) or something going on with the upper, but not sure how it can be that far off that the upper ball joint position would need to be moved almost 2 inches to get to 0 degrees caster (based on a non level frame or floor mind you)
Any thoughs..suggestions? Please feel free to throw them out.
__________________
Brad Hansen 65 Cat Ventura, 66 Cat Vert, 63 GP |
|
#51
01-14-2013, 01:22 AM
|
||||
|
||||
|
The frame and suspension parts are from a 66 Grand Prix. The only part that was used from my 65 cat were the spindles, but I checked them and they are the later production ones. I just can't figure it out.
Here are the suspension numbers that I was able to get off of my car. I did not see any other numbers listed on these parts. I tried to look up the uppers and lowers, but was not able to find anything on these numbers. The knuckle arms though appear to be from the later production based on a prior service news flash. right left knuckle arm - 9781854 9781855 Upper arm - 122DM 213NM Lower arm - 1215DP 1227DM 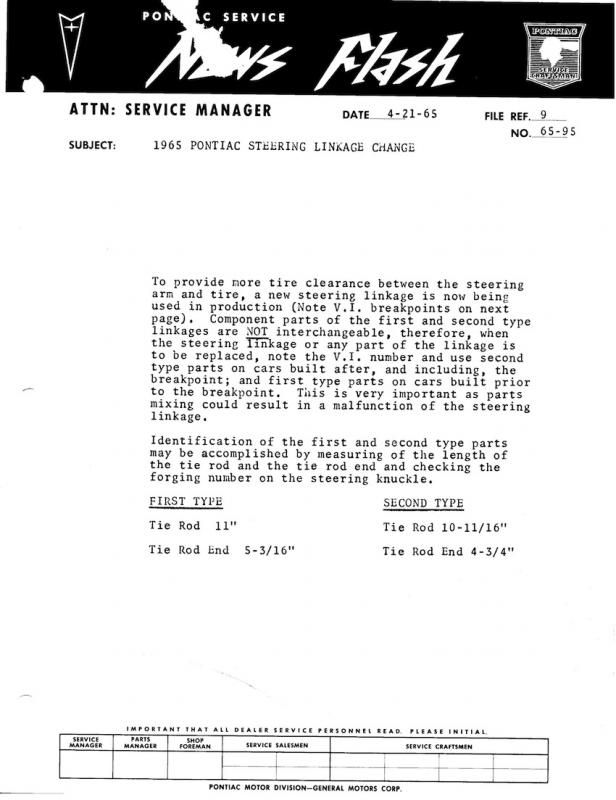 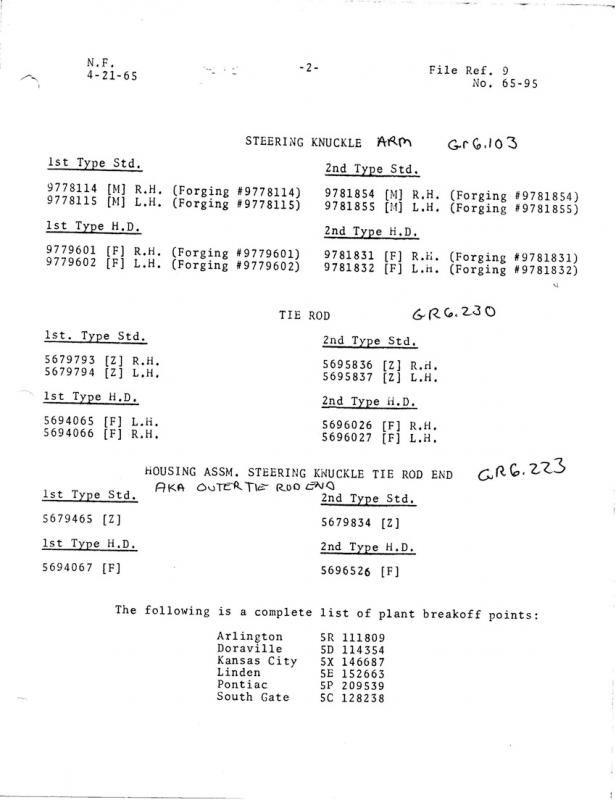
__________________
Brad Hansen 65 Cat Ventura, 66 Cat Vert, 63 GP |
|
#52
01-14-2013, 02:42 AM
|
||||
|
||||
|
I looked at the knuckles on my car and they are pretty much vertical. I don't have any shims in the front suspension, and it was assembled "finger tight". I won't tighten everything up until the full weight of the engine and front clip settle everything down. I know the frame rails can roll inward due to engine forces over time, but that doesn't sound like the problem. I have 66 lowers on my car, with 65 uppers and it's vertical.
__________________
65 Catalina 2D Post |
|
#53
01-14-2013, 08:46 AM
|
||||
|
||||
|
I don't know much about building a front-end, but could you have the upper ball joints reversed L&R? They are different for each side.
__________________
"If you do everything you'll win" -LBJ 13 Smiles per Gallon: 66 Bonneville wagon 66 Bonneville 2d HT - In perpetual progress |
|
#54
01-14-2013, 11:18 AM
|
||||
|
||||
|
Quote:
|
|
#55
01-14-2013, 11:38 AM
|
||||
|
||||
|
I saw a business selling some recently which were not L/R specific. I mentioned it, and they said, "We have sold many and have had no complaints."
Just sayin' in case you're the first. And... it does look amazing. I'm jealous and inspired.
__________________
"If you do everything you'll win" -LBJ 13 Smiles per Gallon: 66 Bonneville wagon 66 Bonneville 2d HT - In perpetual progress Last edited by Deadhead; 01-14-2013 at 11:52 AM. |
|
#56
01-14-2013, 11:48 AM
|
||||
|
||||
|
Very cool project!
I'm just spit-balling here because I'm not super familiar with 65, but a couple things to think about: - looks like you are looking at full droop, can you bump up arms to approximate ride height? Looking at pivot axis of lowers seems like caster will adjust through suspension cycle. - can you remove front shims entirely, and then shim rear until camber is about vertical? Then see where caster is. - is frame parallel to garage floor or adjusting for slope etc? - is the pivot rod in upper arm symmetrical? Picture sort of looks like front end of rod is a bit longer so if reversed would bring upper arm back a bit (although tiny amount compared to first 2 bullet points above) - left n right spindle can't get mixed up? Look fwd to progress. |
|
#57
01-14-2013, 12:12 PM
|
||||
|
||||
|
Good stuff so far. Thanks!!! I will check and level the frame to the floor when I get home. I did adjust the upper as you stated monkey and that did get it close. I did move the suspension through its whole travel up and down and did not notice much if any real change. The spindles are the same for both sides. I did switch them at one point. This all started when I put both the uppers and lowers on and could see before I even put the spindle on that there was an issue as the caster is measured from the center line between the upper and lower ball joints (per the chassis manual). I did look at the ball joints last night and from what I measured they appear to be the same rt to lt. I picked up the front end kit last year from a guy that was not able to finish his project and was liquidating his stuff. Unfortunatly they were from Kanter and not Moog, but got the entire kit for $100 so I can't complain at this point.
Things we know. 1. lowers are correct rt to left 2. uppers are correct rt to left (based on the L and R stamped on them) 3. both sides are off the same amount based on measurements 4. spindles are the same rt and left Things I am going to check tonight. 1. level the frame to the floor 2. check all ball joints 3. switch rt and left uppers arms to see if any change 4. if no change, will put on the old 65 uppers to see if any change (I still have them) Thanks for your help here guys. Good info so far, feel free to keep the thoughts rolling as I am at a real loss here.
__________________
Brad Hansen 65 Cat Ventura, 66 Cat Vert, 63 GP |
|
#58
01-14-2013, 02:17 PM
|
||||
|
||||
|
If you need to compare L&R ball joints, let me know. I have some NOS ones still in GM box here that I can easily get out. Different part #s etc.
__________________
"If you do everything you'll win" -LBJ 13 Smiles per Gallon: 66 Bonneville wagon 66 Bonneville 2d HT - In perpetual progress |
|
#59
01-14-2013, 04:20 PM
|
|||
|
|||
|
I had the same question regarding upper balls joints. (Not the question of geometery, no idea on that!) But, on my 68 the ball joints are different left to right. I mixed them up the first time and wrecked the first pair. Now installing new on both sides. The difference between them is pretty slight and you have to look very carefully at the pair side by side. The bottom "shell" that the stud projects from has a different contour, not much, but different. I got mine from Rare Parts.
10154 is the left and 10153 is the right. I applicationb is the same 65 - 70 according to their web site. |
|
#60
01-14-2013, 06:59 PM
|
||||
|
||||
|
So I switched the upper arms around and there was no change. I did level the frame to the floor and that did help by about 1/2" but still looks to be way off. When I say it looks off, I am saying that when I look at where the ball joints would go, (center of the arms) visualy you can see that they are not centered and has nothing to do with the joints themself. This is now with no shims in the upper. I checked the manuals and measured the frame in the front end and all is good there, so something has to be off on the suspension somewhere. The thing that is getting me is that it is off on both sides. I can understand having a bent arm or something not right on one side, but being off on both sides....WTF! I will get some more photos up here later and will check the old upper arm on the car to see if there is any change.
Thanks for your help guys, I was just not sure if I was seeing things right here or not.
__________________
Brad Hansen 65 Cat Ventura, 66 Cat Vert, 63 GP |
| Reply |
|
|
The PY Online Forums is the largest online gathering of Pontiac enthusiasts anywhere in the world. Founded in 1991, it was also the first online forum for people to gather and talk about their Pontiacs. Since then, it has become the mecca of Pontiac technical data and knowledge that no other place can surpass.


 Linear Mode

