


| FAQ |
| Members List |
| Social Groups |
| Calendar |
| Search |
| Today's Posts |
|
#61
 01-14-2013, 07:24 PM
|
||||
|
||||
|
Just wondering if someone can measure from some point on the frame to the grease zerk on the upper and lower ball joints so that I can compair them. Would be best with the wheels off the ground so that both suspensions are at the samelocation in travel. like from sway bar bolt to lower zerk? Just trying to think this through a little be more.
__________________
Brad Hansen 65 Cat Ventura, 66 Cat Vert, 63 GP |
|
#62
01-14-2013, 08:40 PM
|
||||
|
||||
|
Put the old ones on with no change. I think I need to step back for a day or so!
__________________
Brad Hansen 65 Cat Ventura, 66 Cat Vert, 63 GP |
|
#63
01-14-2013, 09:26 PM
|
||||
|
||||
|
Here's a pic of my '63 after rebuilding. With the scarebird brackets on it's a bit harder to see but it does look to be showing negative caster. No shims in, may not be perfectly level.
It looks like your upper arm is sitting on the bumper stop. Try lifting up on the arms. Due to the angle of the control arm mounting, I think the caster will go more positive as it goes up. My pic shows the suspension all the way down due to having the spring installed and no weight on the front end. Of course this is not a true measure of caster. Rob...
__________________
" Darksiders Rule "
|
|
#64
01-14-2013, 09:41 PM
|
||||
|
||||
|
I did lift them to what would be close to ride height and there was not much change in the caster. Some, but not much. Looking at the steering arm bolts in your photos, it does appear to have neg caster also. I just don't see how anything else can be off in my setup. I have measured everything, put it back the way that it was, same parts, same bolts, new bushings, followed the shop manual on all. I am starting to think I am chasing something that is not there.
Any other photos out there? Thanks again for your help guys!!
__________________
Brad Hansen 65 Cat Ventura, 66 Cat Vert, 63 GP |
|
#65
01-14-2013, 09:50 PM
|
||||
|
||||
|
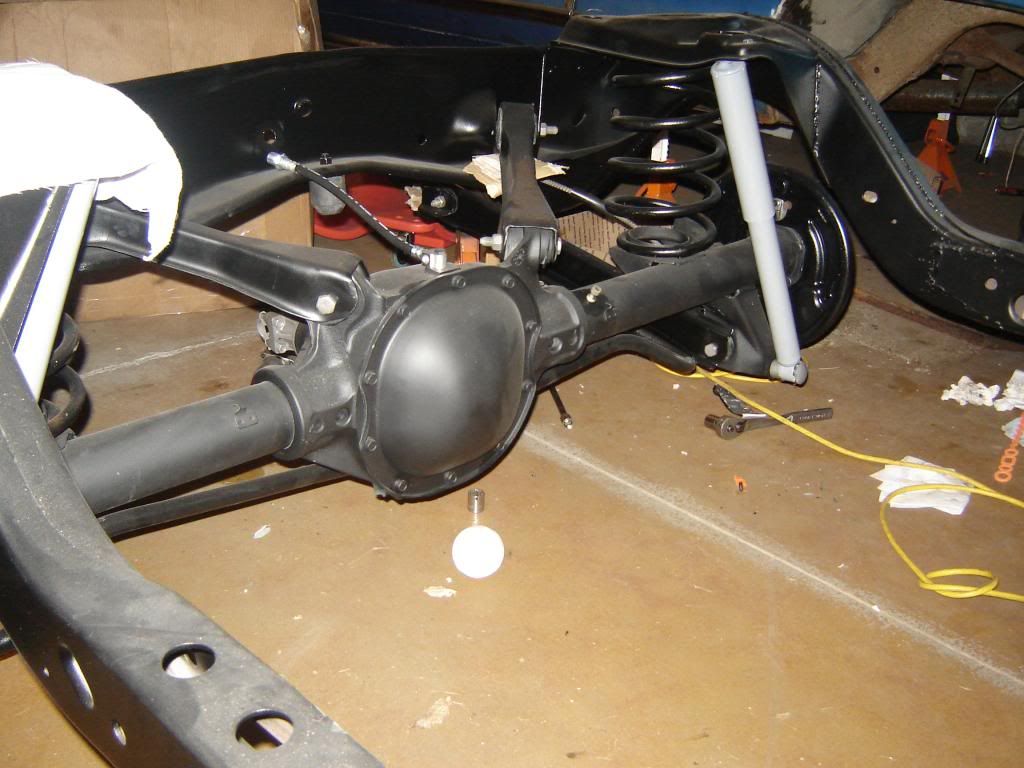
Just for fun, here is a photo of the rear! Little dusty, but almost put together, just have to do the brakes and put the posi tag back on. The rear bar worked out great. Should corner nice once she is back on the road with the rear bar, Jeep gear box, KYB shocks GR2 rear, gas adjust front and big front bar.
__________________
Brad Hansen 65 Cat Ventura, 66 Cat Vert, 63 GP |
|
#66
01-16-2013, 03:26 PM
|
||||
|
||||
|
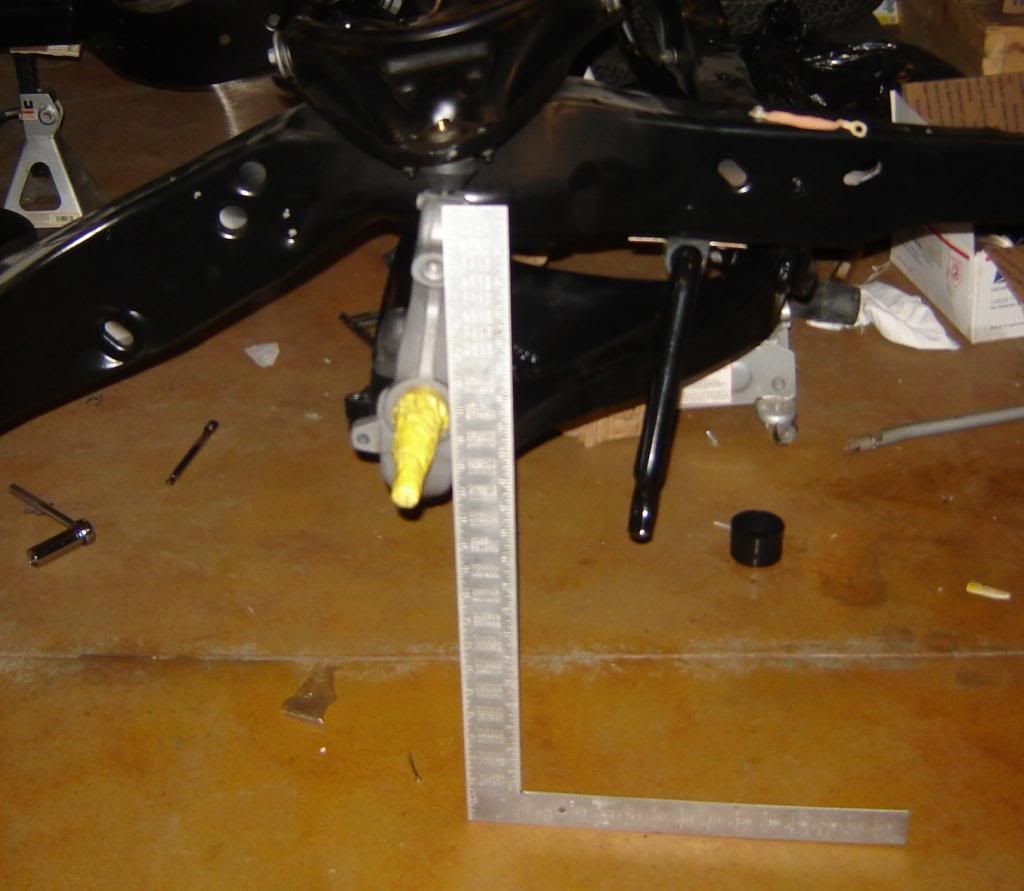
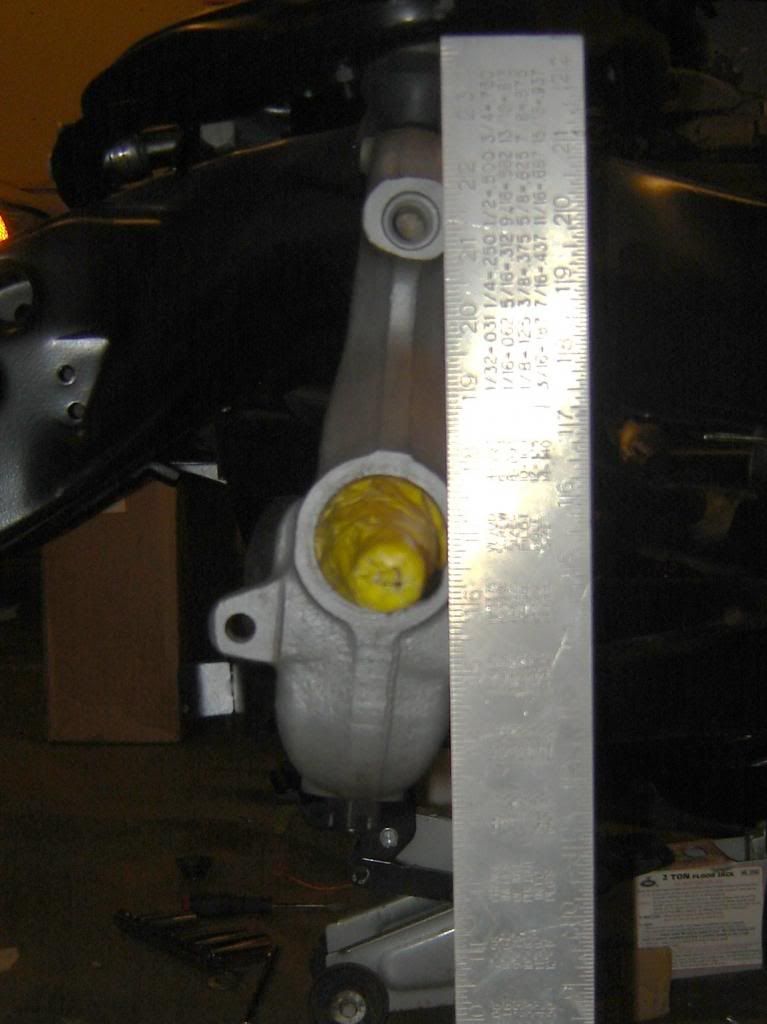
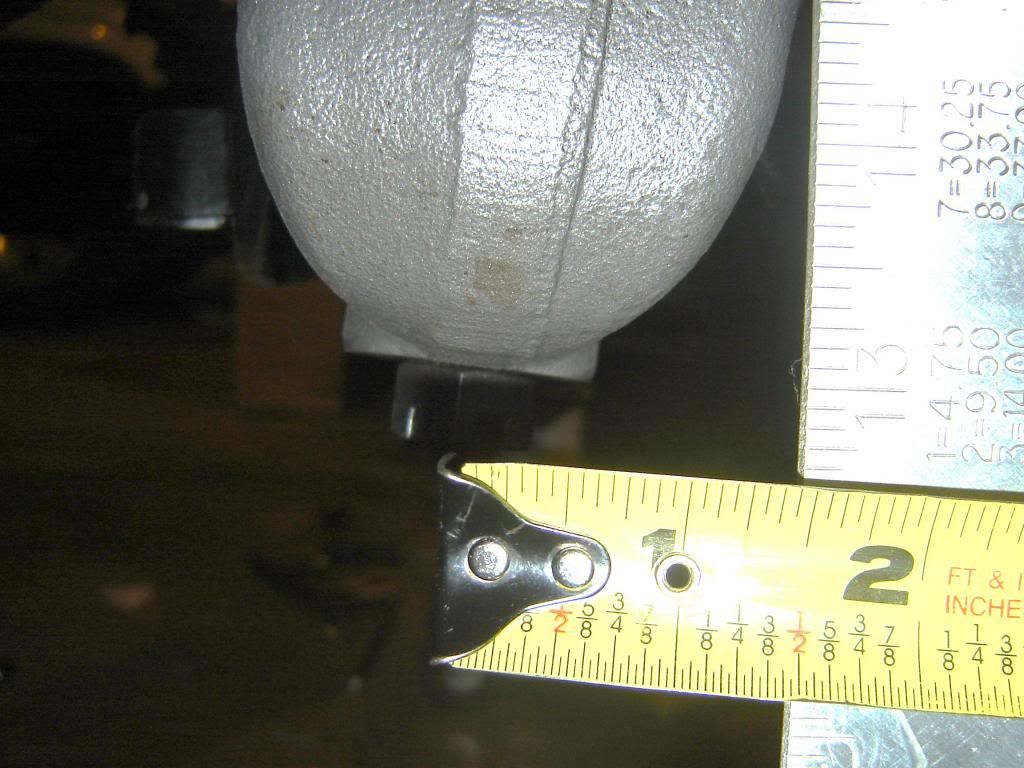
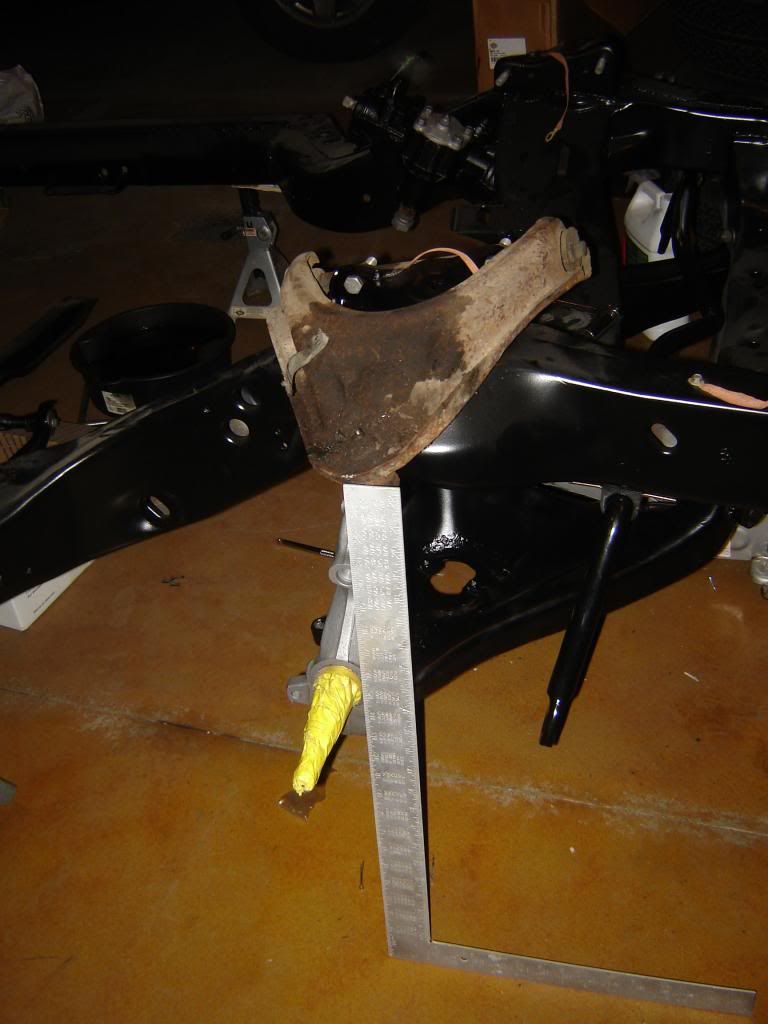
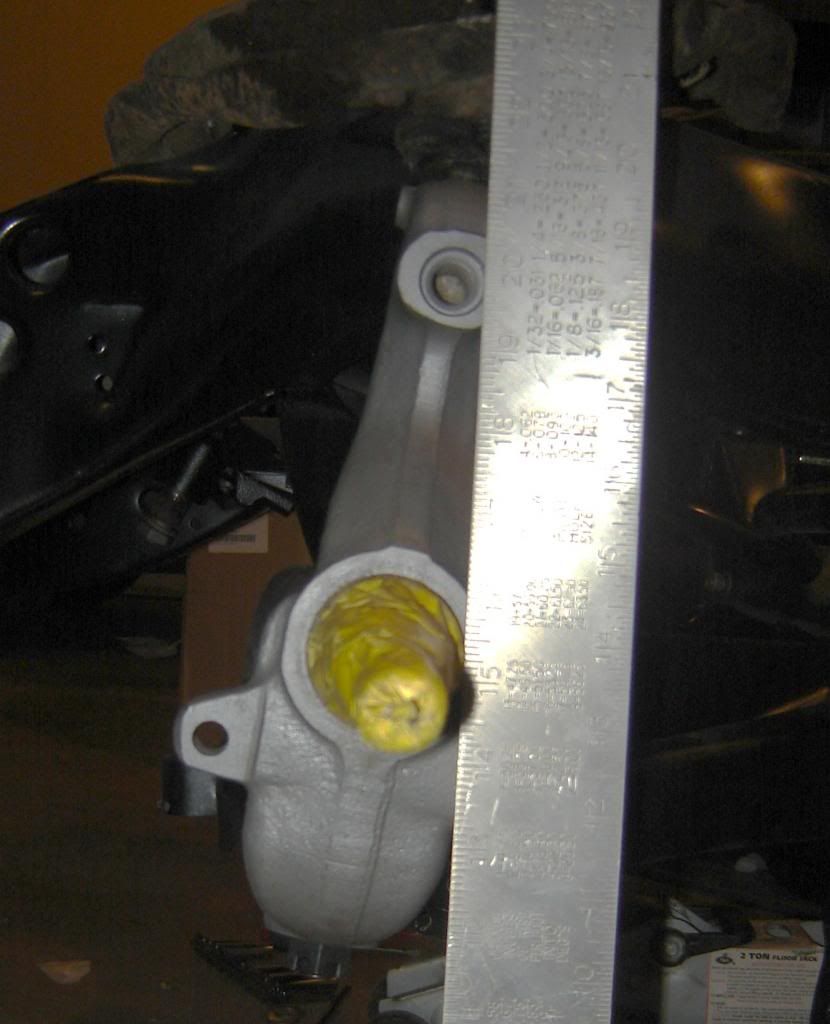
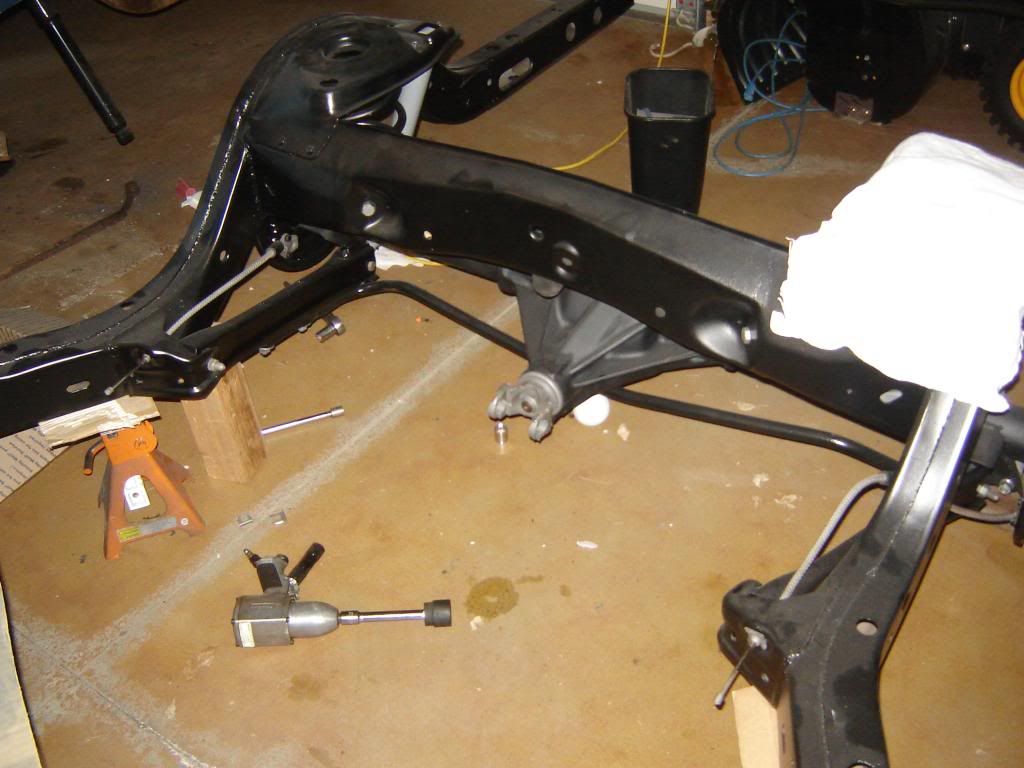
The back looks great. I remember when the frame was done on my car. It looked great until I lost storage for about a year and it sat outside for one winter. It still looks fine...just has some patina...HA! Here's some pics right after I assembled the frame in 2003.
I made measurements from the center of the zerks to the front end of the frame rails (meaning the vertical plane that intersects with the tips of the frame rails). I measured forward from the zerks parallel to the frame. Right Upper: 22-11/16" Right Lower: 23-5/16" Left Upper: 22-5/8" Left Lower: 23-1/4" I have a delta of 5/8" for each side. One thing to consider is that the upper control arm hinge is not parallel to the ground. What I'm getting at is that when there is no load on the frame, from the engine and front clip, you'll get a neg caster. As the load is applied, the upper control arm will not only travel up, but also the top location at the ball joint will travel rearwards. That may be enough to see the caster closer to what you're looking for. The rubber stops or the shims for the upper control arms may have something to do with the orientation of the knuckle. Also, the lower control arm hinge is slightly higher (1/8") at the rear relative to the front. It may be enough to make the lower ball joint to travel slightly forward at the same time the upper ball joint will travel rearward as a load is applied. I guess I wouldn't worry about it until the car is together and all the load on the front end is applied, but in the meantime you can compare my car to yours and see if that gives you any new ideas. Matt
__________________
65 Catalina 2D Post |
|
#67
01-16-2013, 05:21 PM
|
||||
|
||||
|
You must have the front of the frame agains the wall?
Photos look good!!
__________________
Brad Hansen 65 Cat Ventura, 66 Cat Vert, 63 GP |
|
#68
01-17-2013, 12:07 PM
|
|||
|
|||
|
Looks like you are making good progress. Should be a great car when finished.
|
|
#69
01-17-2013, 12:56 PM
|
||||
|
||||
|
Quote:
Matt
__________________
65 Catalina 2D Post |
|
#70
02-11-2013, 11:34 PM
|
||||
|
||||
|
So after taking a few measurements and putting the old lowers, uppers and spindles on the old chassis, it appears that the suspension is going to have some neg caster prior to doing a proper alignment. I switched ball joints, checked everything and based on what I am seeing with my rebuilt suspension, it is not far off from what I see on the old chassis. Ride height, leveling the frame and shims gets it to be just at 0 degrees from what I can see.
On a fun side note, things have been going well for me lately. My baby girl is just over 1 month old and doing great. My 2 boys 2 and 5 are getting big and can get the best of me at times. Took my 5 year old to a junk yard on Saturday and he had a blast. There was snow on the ground, but did not stop him or me from getting some needed parts for my car. Great time that I will always remember!!! Bonus on the car is that I ended up purchasing a 70 disc brake set up from a member. Funny, but I purchased a 4 wheel scarebird setup just after buying the car from a guy that lost interest but sold it to Teej so that I could purchase other items I needed. I have since started buying and selling items on ebay to fund my project and it has been going great! So much so that I have been able to buy some extras for the car, not enough to quit my job, but enough to purchase some additional items that I did not think was going to be able to! Hope all is well, I am going out to blast some of my new brake parts. 
__________________
Brad Hansen 65 Cat Ventura, 66 Cat Vert, 63 GP |
|
#71
02-12-2013, 02:04 PM
|
||||
|
||||
|
Did you ever make the same measurements that I did? How'd they compare?
__________________
65 Catalina 2D Post |
|
#72
03-21-2013, 07:19 PM
|
||||
|
||||
|
Hey Matt,
I did take the measurments, but I did not write them down. They were not far off from your measurments. I will do it again when I get time and update this thread for any future readers. Things are going slow, been doing an interior for a friend that has a 64 sport fury. I did get the brakes on, and had a local guy rebuild my trans. Not much needed other than a standard rebuild kit, reverse gear and one fork, everything else looked great. Cost was not bad $435 for labor and parts. Well worth it looking at the reverse gear. Was odd, had 1 tooth that was rusted, no water line or anything like that, just a single tooth that was rusty. Odd. I am working with PUI to send in my seat covers to have them reproduced. I know the grain may not look right, but they sound willing to do this. The guy I am working with said that in a meeting earlier this year that they were not going to reproduce any new covers, but he thought he could get it through. He said that it takes around 7 months to do this as it is not a priority to them. That should work fine with my timeframe. I will keep you updated on that. Hope to have the Fury interior done soon so I can get back on the Cat. Next up, putting the heart back on the Cat chassis!
__________________
Brad Hansen 65 Cat Ventura, 66 Cat Vert, 63 GP |
|
#73
04-23-2013, 01:01 AM
|
||||
|
||||
|
Took me some time, but I got the interior (headliner, Seat covers and such) put in on my friends Fury. Turned out nice. Now back to my project.
Not much to update, things are taking longer than I want them to, but I guess not much longer than I though. I got the front end mostly buttoned up. The front brakes are from a 70 Bonneville. They cleaned up very nice and appear to be an exact swap. I found some reman calipers on ebay for $25 each shipped, was hard to pass up vs rebuilding the ones that I had. Rotors turned nice and should be in good shape there. Sway bar fit tight from RARE, but as stated earlier, it is simply the Addco bar shipped from RARE. Got some more parts in and now on to the cleaning of the Engine. Have had a hard time trying to figure out what to do. I purchased some heads that were already done that I was going to put on, but now I am not sure. Thinking I am just going to run what I have for now and build another engine down the line. I did decide to put in a dual quad setup. I took a photo of the start of that. I have got a lot of good advice from John 61-63 here on the forum on how to clone them to look like a super duty setup. Getting my dizzy sent out to suntuned shortly and should be ready to drop in! Next update will be with the engine and trans in the chassis!!! Here are some pics to look at.    
__________________
Brad Hansen 65 Cat Ventura, 66 Cat Vert, 63 GP |
|
#74
04-23-2013, 01:04 AM
|
||||
|
||||
|
I should also note that every part that comes off that is not going back on is getting cleaned up and ready to be put back on if down the line I want to change things back. Including the intake, sway bar, manual box, front brakes and so on. This way, if I do sell the car, change my mind or whatever, these parts should stay with the car.
__________________
Brad Hansen 65 Cat Ventura, 66 Cat Vert, 63 GP |
|
#75
04-23-2013, 01:24 AM
|
||||
|
||||
|
Looking gooooooood !!
Jim
__________________
65 Catalina sedan. Allen Thomas Performance 495. KRE Heads at 310cfm ported by SD Performance, ProSystems Dominator carb on ported Victor intake, P-Dude custom grind hydraulic roller, MSD ignition, 3.50 Moser/Ford rear. F-Glass front bumper by son Rob, rear by the old man and joint effort for trunk lid. 3950# w/driver. Best of 9.5761/139 on 175 shot, 6.01 /114 in 1/8. |
|
#76
07-02-2013, 12:12 AM
|
||||
|
||||
|
Been a little while so here is some car porn for ya. The intake is not bolted down, but you get the idea. working on the power steering set up now along with the carbs. Should be able to run the brake and fuel lines soon.
 
__________________
Brad Hansen 65 Cat Ventura, 66 Cat Vert, 63 GP |
|
#77
07-02-2013, 12:49 AM
|
||||
|
||||
|
What did you end up using for the front and rear springs?
__________________
65 Bonneville Brougham 4DHT 65 Grand Prix 2DHT......now parts 65 Catalina 2+2 2DHT 65 Catalina Safari 4DSW |
|
#78
07-02-2013, 10:04 AM
|
||||
|
||||
|
I need a cold car wash after these pix -- porno, indeed.
Great to see a big car going together so well, very inspirational. BOB |
|
#79
07-02-2013, 11:39 AM
|
||||
|
||||
|
Beautiful. Keep plugging. Love this thread.
Jim
__________________
65 Catalina sedan. Allen Thomas Performance 495. KRE Heads at 310cfm ported by SD Performance, ProSystems Dominator carb on ported Victor intake, P-Dude custom grind hydraulic roller, MSD ignition, 3.50 Moser/Ford rear. F-Glass front bumper by son Rob, rear by the old man and joint effort for trunk lid. 3950# w/driver. Best of 9.5761/139 on 175 shot, 6.01 /114 in 1/8. |
|
#80
07-02-2013, 12:48 PM
|
||||
|
||||
|
The springs are stock springs. The fronts came off of a AC car and were slightly thicker than what was on the car before. I checked with a spring calculator and shows to have about 12% increase in rate vs the OE ones that were on the car prior. The rear springs are stock from the AC car also, not sure that there is going to be any rate change and not sure exactly how it is going to sit. I figured that once I have it back together, I may end up taking things appart and ordering springs from CSS but am ok waiting on that for a project down the line some winter. Manifolds were painted with POR manifold grey, z bar was painted with a silver paint and cleared, other items were simply cleared to protect. Engine paint is PlastiKote 208, trans was simply cleaned, no coating, Wheels painted with Krylon metalic silver and rustoleum metalic charcoal and clear coated. I did not want to mount these wheels yet and was going to roll the car arround with the old wheels and tires, but found out quick that 14" wheels will not clear the Disc Brakes so on these went. Also had a tough time deciding if i was going to mount them with the white letters out or not, saw a few pics with them out and liked it. Who knows, it's an easy change if I don't like it when done.
Thanks for the comments guys!! Next update should be with the chassis complete and then onto the body!!
__________________
Brad Hansen 65 Cat Ventura, 66 Cat Vert, 63 GP |
| Reply |
|
|
The PY Online Forums is the largest online gathering of Pontiac enthusiasts anywhere in the world. Founded in 1991, it was also the first online forum for people to gather and talk about their Pontiacs. Since then, it has become the mecca of Pontiac technical data and knowledge that no other place can surpass.


 Linear Mode

