


| FAQ |
| Members List |
| Social Groups |
| Calendar |
| Search |
| Today's Posts |
|
#61
 07-01-2014, 07:39 PM
|
||||
|
||||
|
Quote:
Quote:
1. If you take a look @ your engine bay photo above you can see the remnants of the "insulation foam" sleeve on your car @ the "elbow bend" of your fuel line. 2. A possibility - It was very common to have a intake vacuum leak and/EGR valve plunger plug up with carbon requiring the EGR and sometimes the intake to be removed, Passages cleaned out, and new gaskets installed... |
|
#62
07-01-2014, 10:58 PM
|
||||
|
||||
|
Alvin - thanks again for all the information and help. I've already got the replacement carb to pump line covered, along with replacement radiator and heater hoses, and radiator cap. However, now would probably be a good time to buy stock in UPS and FedEx. I've been doing a little more shopping and laying in supplies for the Gold Car, and those guys are going to be a little busy. Here's what's coming...
1) Wheel paint - someone pointed out when the car was on Ebay that the wheels looked a little dark. That's even more true in person and that's going to get attention before the new Polysteels get mounted. I got the OER Placer Gold paint. 2) Exhaust system - I went ahead and ordered the Pypes 2.5" X system, splitters and Dynomax mufflers. 3) Replacement A/C compressor hoses 4) Air cleaner fresh air intake hose 5) Preheater shroud - this was missing on the Gold Car and all I could find was a used one. Does anyone repop these? I checked with at 8 different vendors and no one carried this piece. 6) Front endlinks and sway bar bushings, and rear end link bushings and sway bar bushings 7) New center caps and lug nuts 8) 1978 Service Manual and 1980 Assembly Manual The one thing I am still looking for is the blue TVV thermal vacuum switch. If anyone has one they are willing to part with please let me know. A couple of questions I have are: 1) What is the correct finish on the sway bars? I'm thinking natural steel, but want to make sure. 2) Should this engine have an idle stop solenoid? There isn't one and I don't see any electrical connection for one, but I am not sure. Again, thanks to everyone for their help. BWB |
|
#63
07-01-2014, 11:07 PM
|
||||
|
||||
|
Do you have a picture of the preheater shroud?
PY carries P/N RPE651H for $85, plus shipping. 
|
|
#64
07-01-2014, 11:49 PM
|
||||
|
||||
|
See link below which I believe pictures the correct shroud.
http://2.bp.blogspot.com/-cKQ2b0_1i6...W72+engine.jpg Here's an Ebay link for the same shroud which I bought from restoreamusclecar, but they then informed me they couldn't find it and did not exppect to get anymore. I ultimately found a used one at FirebirdCentral, but it is pretty crusty. I take the fact they are selling a used shroud as a bad sign on the repop availability. http://www.ebay.com/itm/310292805223...%3AMEBIDX%3AIT Do you have a book with the PN for the thermal vacuum switch? |
|
#65
07-02-2014, 06:50 AM
|
||||
|
||||
|
I forgot to include bellhousing inspection cover and center dash vents on my shopping spree list. The dash bezel is also going to need restored and I have a message left for Randy Combs to see if he has any swap units available.
Another issue I have is the door keeper on the drivers side is broken. I have the spring, but the piece I'll call the detent roller is missing. Does anyone know if this part is available separately or do you have to replace the entire hinge assembly? |
|
#66
07-02-2014, 08:13 AM
|
||||
|
||||
|
For the caliber of car that you are working on,replacement of the complete hinge is probably a better idea than attempting a repair........
However....getting at the front bolt on the cowl can be challenging with the fender still on the car,especially working around a nice paint job. I may have a decent used preheater shround here for you,but it will likely be the weekend before I can check....
__________________
 Eye Candy......garage band? https://www.youtube.com/watch?v=QUPcHxHRx3s Go full screen & turn it UP! |
|
#67
07-02-2014, 11:12 AM
|
||||
|
||||
|
EFE/EGR valve is PN 3039491. Looked in garage and the shroud you're picturing is correct. Hopefully it will clean up in the parts washer.
|
|
#68
07-02-2014, 11:20 AM
|
||||
|
||||
|
Thanks Mike.
|
|
#69
07-02-2014, 01:14 PM
|
||||
|
||||
|
Quote:
Here's a link to a nice forum piece from Nasty Z28 on this subject. http://www.nastyz28.com/forum/showthread.php?t=186475 I bought these pieces on Ebay and will keep everyone posted once I actually get far enough down the list to tackle this project. http://www.ebay.com/itm/360964611186 |
|
#70
07-03-2014, 09:51 AM
|
||||
|
||||
|
Excellent Bob. I'd like to know what the "correct" engine paint code, P/N and source you use.
|
|
#71
07-03-2014, 10:31 AM
|
||||
|
||||
|
Alvin,
You've got me spoiled with all the information you have been providing me. I was hoping that you might be able to hook me up with a code or recommendation. I'll probably start by calling Scott Tiemann to see if he has a paint formulation that he has settled on for 1978. If he does I will call it good and move on. Does anybody have any very low mileage 1878 engine part (valve cover, oil fill cap, valley or oil pan, to use as a guide for comparison. My current plan is to just drive the Gold Car until late fall and then yank the engine and do a real underhood clean up. Also replace the rear main seal, oil pan gasket, and paint the engine. I have also been toying with the idea of installing an 068 cam and 1.65 rockers. We'll see. BWB |
|
#72
07-03-2014, 11:36 AM
|
||||
|
||||
|
Just an FYI,.....if you didn't know already........on your oil leak.
If somebody put "plastic" oil in your engine...it MAY be causing the problem. You might want to try a "drain and flush" with dinosaur oil prior to removing your crankshaft.... Also,just read in my last HPP that BOP has come out with a one piece rear main seal for Pontiac V8's.....could be a winner.
__________________
Eye Candy......garage band? https://www.youtube.com/watch?v=QUPcHxHRx3s Go full screen & turn it UP! |
|
#73
07-03-2014, 03:46 PM
|
||||
|
||||
|
Brian,
Thanks. An oil change is definitely on the near term list with "dinosaur" oil, but I'm not sure that will help much. Based on the amount of oil on the under carriage and the fact this car was in a 15 year hibernation I think it's probably time for a change. Besides the engine needs to come out anyway for paint and a new oil pan gasket. We'll see. I'm just happy to have a new project - I was running out of work on the Black Car. Best Regards, Bob |
|
#74
07-04-2014, 02:28 AM
|
||||
|
||||
|
Nice ride Bob!. I have owed one, mine was white and auto, hard top, tan inside and Gold bird.
Quote>"7) New center caps and lug nuts" End quote. Make CERTAIN that the lug nuts have the correct flange with enough surface area. many repops look ok, but fall short of the factory on safety. I have a nice heat shroud. can take pics this weekend, or just send it on out if you want? Looks like fun!! TC, FB
__________________
"The Future Belongs to those who are STILL Willing to get their Hands Dirty" .. my Grandfather |
|
#75
07-04-2014, 03:12 AM
|
||||
|
||||
|
In 79 when I worked at a Pontiac dealer the undercoating/rustproofing was done by the dealer. In fact that was my last job there before I left.
We were trained to just hit certain spots, not a full treatment like Zebart did. |
|
#76
07-04-2014, 06:16 AM
|
||||
|
||||
|
Bruce - I hope you are doing well. Thanks for the comments. Glad you found me over here. The center caps and lug nuts I bought are new GM labeled pieces and hopefully will be of high quality.
David - thanks for sharing the information. The undercoating certainly looks hit or miss, and thankfully it was not applied in a overly generous fashion. It's pretty thin and hopefully will remove fairly easily - all things considered. I plan to move one of the lifts out to the driveway and attack it with solvents and a pressure washer. I' m not looking forward to that, but at least I'll be able to do it standing up and I have hot water already plumbed to a hose bib. |
|
#77
07-04-2014, 10:47 AM
|
||||
|
||||
|
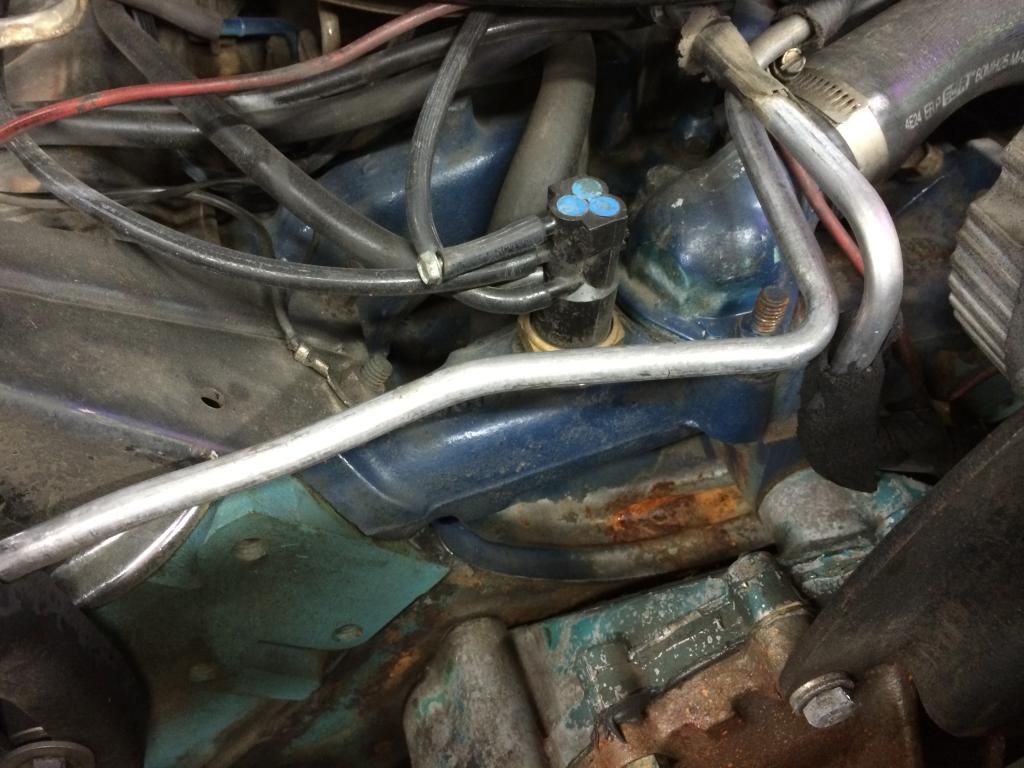
Ok heres some pics, the dark/black is BBQ motor oil as the valve covers were loose and bad gaskets when I got the car.
The One ABOVE linked to is posted first, not mine but for comparison
__________________
"The Future Belongs to those who are STILL Willing to get their Hands Dirty" .. my Grandfather Last edited by Formulabruce; 07-04-2014 at 10:53 AM. |
|
#78
07-04-2014, 02:12 PM
|
||||
|
||||
|
Quote:
Still looking for the elusive EFE/EGR valve..... |
|
#79
07-05-2014, 11:23 AM
|
||||
|
||||
|
I'm replacing the heater hoses on the Gold Car as they are at least 15 years old, hard, and incorrect. To get at the lower heater hose do you have to completely remove all the bolts for the inner fender or can you just remove a few select bolts and loosen the others and get enough play in the inner fender to accomplish the task?
|
|
#80
07-05-2014, 11:57 AM
|
||||
|
||||
|
From my MOTOR AUTO REPAIR MANUAL 1978:
Under Heater Core Removal section 1973-78 Firebird... 4. Jack right front area of car and place on safety stand. 5. Remove rocker panel trim on right side and remove screws holding forward of panel trim to attaching bracket. 6. Remove three lower fender bolts at rear of fender. 7. Remove four fender to skirt bolts at rear of wheel opening. 8. Remove two fender skirt bolts near blower motor area. 9. Pry rear portion of fender out at bottom to gain access to hose clamp on lower core hose and disconnect hose. ---------- My note & tip below... Note: Be careful removing the Baked on heater hose from the htr core. It is easy to bend and/or fatigue the pipe to core solder area being overly aggressive with the removal process. Tip: If you ever need to replace the heater core in the future you will need to remove the nut (engine compartment side) from the blower motor case hidden stud the is near the lower heater core case hose. You will have all others removed and or loose and not be able to remove the case W/O removal of this hidden stud nut. |
| Reply |
|
|
The PY Online Forums is the largest online gathering of Pontiac enthusiasts anywhere in the world. Founded in 1991, it was also the first online forum for people to gather and talk about their Pontiacs. Since then, it has become the mecca of Pontiac technical data and knowledge that no other place can surpass.


 Linear Mode

