


| FAQ |
| Members List |
| Social Groups |
| Calendar |
| Search |
| Today's Posts |
|
#1
 03-30-2015, 09:05 AM
|
||||
|
||||
|
I am replacing the carpet in my '68 and have the upper carpet in place and it seems the finished edge is going to be just a bit close to where the retractable seat belt mounts when I install it. Are you supposed to trim the upper edge on the replacement carpet to get it right and how far up the firewall is it supposed to sit, I have it tucked under the flap hanging down on the firewall. Could someone send me a picture of where your heel pad sits. Thanks
__________________
'68 GTO 4 speed Life is short, don't waste time worrying about the small stuff! |
| The Following User Says Thank You to TxGoats For This Useful Post: | ||
|
#2
03-30-2015, 01:24 PM
|
||||
|
||||
|
Here's where it was on my 70 convertible.
__________________
Some guys they just give up living And start dying little by little, piece by piece, Some guys come home from work and wash up, And go racin' in the street. Bruce Springsteen - Racing In The Street - 1978 |
|
#3
03-30-2015, 01:43 PM
|
||||
|
||||
|
Thanks for posting Boss, did you cut some off the top edge that lays on the firewall when you installed it?
__________________
'68 GTO 4 speed Life is short, don't waste time worrying about the small stuff! |
|
#4
03-30-2015, 01:52 PM
|
||||
|
||||
|
Very little, I set it in there where the molded hump fit the best and that's where it went.
If your finished seam is all the way back at the seat belt, they sent you a lot of carpet!
__________________
Some guys they just give up living And start dying little by little, piece by piece, Some guys come home from work and wash up, And go racin' in the street. Bruce Springsteen - Racing In The Street - 1978 |
|
#5
03-30-2015, 02:10 PM
|
||||
|
||||
|
Yes sir, both pieces were very large, I notice your back piece goes all the way up to right behind the forward seat mounts, I trimmed mine back some, I think I'm going to pull it back out and take a couple of inches off because the underlayment is over the hump into where the front of the seats bolt down. Thanks for the info sir.
__________________
'68 GTO 4 speed Life is short, don't waste time worrying about the small stuff! |
|
#6
03-30-2015, 02:12 PM
|
||||
|
||||
|
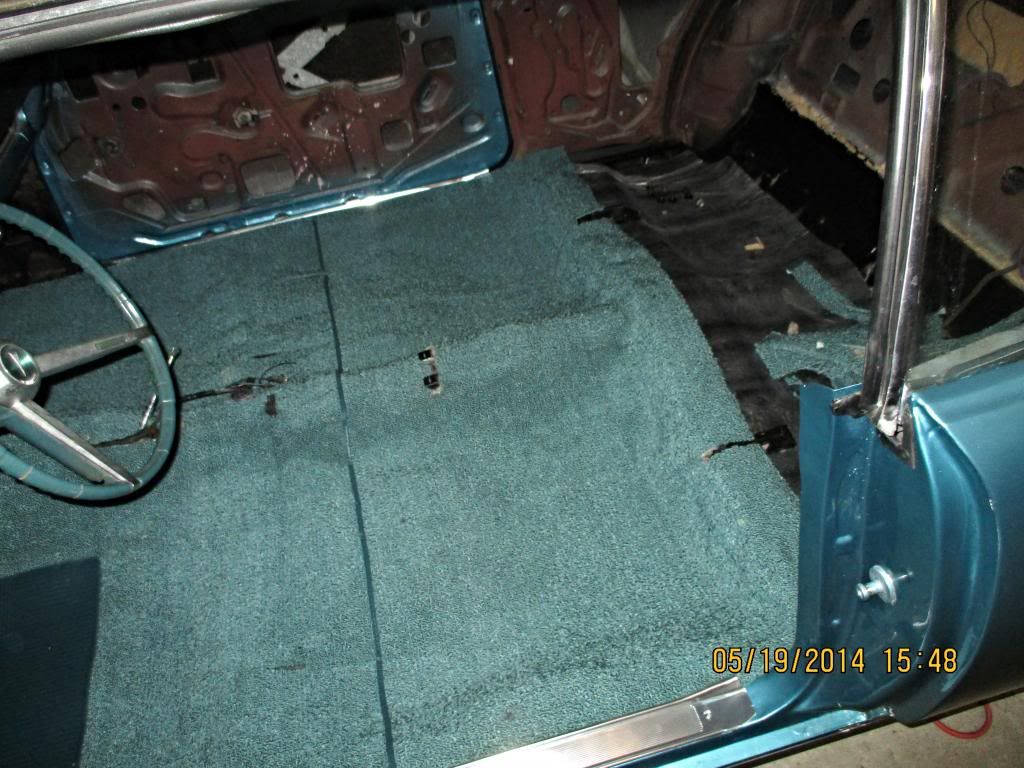
I fit mine pretty much the same way Chris did. Put it where it fits the best and cut away the excess (not much). Poor pic but you can see where the demarcation line is and how far the carpet extends under the rear seat area (not far).
__________________
Greg Reid Palmetto, Georgia |
|
#7
03-30-2015, 03:10 PM
|
||||
|
||||
|
By the way, something else you may be interested in...Most folks just punch a hole for the seat mount studs but there is actually a procedure for cutting the carpet for the seat tracks... Just in case you're interested...
http://forums.maxperformanceinc.com/...ghlight=carpet A drawing I made to show it more clearly is below. The stud remains hidden under the carpet along with the seat 'foot'. This method also allows you to remove the carpet later without removing the seats- 
__________________
Greg Reid Palmetto, Georgia |
|
#8
03-30-2015, 03:21 PM
|
||||
|
||||
|
I just cut about 2" off the front carpet and everything seems to fit better, thanks guys. This all started with wanting to repair my cigarette lighter to plug my phone in, after adding Fatmat, new vent knobs, brake handle, carpet and new shifter my interior should be good to go.
__________________
'68 GTO 4 speed Life is short, don't waste time worrying about the small stuff! |
|
#9
03-30-2015, 07:57 PM
|
||||
|
||||
|
It's called mission creep & we're all familiar with it.

__________________
Some guys they just give up living And start dying little by little, piece by piece, Some guys come home from work and wash up, And go racin' in the street. Bruce Springsteen - Racing In The Street - 1978 |
|
#10
04-01-2015, 10:30 AM
|
||||
|
||||
|
Got er done, horn works, lighter works and new carpet looks great but after taking the wiper switch and light switch out to replace the wood grain, all of the sudden my fuel gauge stopped working, any idea where to start looking. I had quite a time getting that wiper switch reinstalled, might have disturbed a wire, any ideas?
__________________
'68 GTO 4 speed Life is short, don't waste time worrying about the small stuff! |
|
#11
04-01-2015, 03:58 PM
|
||||
|
||||
|
Well, considering what you've done, it's probably in the dash on the gauge end of the circuit but typically, you start with the easier end to troubleshoot. That is, check the wiring between the sending unit and the gauge and also at the same time verifying the gauge is working by applying a voltage and ground back at the tank.
There is a 'sticky' in the Electrical forum explaining in detail how to check the entire circuit.
__________________
Greg Reid Palmetto, Georgia |
|
#12
01-25-2019, 07:35 PM
|
||||
|
||||
|
Who carpet did you guys go with? I have been testing fitting my ACC rug & the fit is quite horrible. I actually went & looked at the box again to make sure it was the right one for my car.
__________________
 68 GTO 4-spd Convertible 78 S/E Trans am L78, WS6 Auto 78 S/E Trans am W72, WS6 Auto 79 10th aniv W72 Trans am 80 Indy pace car Trans am 89 Trans am GTA |
|
#13
01-26-2019, 01:45 AM
|
||||
|
||||
|
ACC was what I used. I have no complaints about it.
__________________
Greg Reid Palmetto, Georgia |
|
#14
01-26-2019, 03:14 AM
|
||||
|
||||
|
ooops.... I did not realize that I had posted the same photo into this thread 4 years ago.
__________________
Greg Reid Palmetto, Georgia |
|
#15
01-26-2019, 06:56 AM
|
||||
|
||||
|
I bought ACC for my 68 about 10 years ago. It's still in the box, hope it fits well!
__________________
 be a simple...kinda man. be a simple...kinda man.
|
|
#16
01-26-2019, 08:40 AM
|
||||
|
||||
|
After test fitting, I found the The front of mine has some creases that won't come out with heat, vacuuming, et. Its been sitting out of the box for several weeks.
Last night I decided to test the rear & its worse. Not only does it not fit the foot well to hump area, the insulation pad is glued waaaay of center. This is likely affecting how its fitting. I put an ACC matt in another car about 10 years ago that fit like a glove. This one, not so much. If I push the carpet down into the foot wells, it wrinkles up big time where the hump meets the rear seat. Also been fighting with the oe style paper backed sound deadening mats, but thats another story.
__________________
68 GTO 4-spd Convertible 78 S/E Trans am L78, WS6 Auto 78 S/E Trans am W72, WS6 Auto 79 10th aniv W72 Trans am 80 Indy pace car Trans am 89 Trans am GTA |
|
#17
01-26-2019, 10:11 AM
|
||||
|
||||
|
Hoping mine was just Monday made by a new employee. Not sure the process on how they are assembled but this one is subpar & not going to work for the level I am restoring at. Bums me out. So many parts I have had for years that are not fitting very well. The Orignal stuff is the only thing that brings a smile to my face lately. I was too looking forward to finally assembly my car after owning it for 18 years & never driving it once, Now that I am finally there, there have been a lot of disappointments with the parts I am try to install. I can deal with a lot of it, as its part of the restoration process, but there have been issues like this that there is no way to correct.
__________________
68 GTO 4-spd Convertible 78 S/E Trans am L78, WS6 Auto 78 S/E Trans am W72, WS6 Auto 79 10th aniv W72 Trans am 80 Indy pace car Trans am 89 Trans am GTA |
|
#18
01-26-2019, 02:26 PM
|
||||
|
||||
|
Very helpful to those of us who are getting to the point of buying things like carpet .... to know what is working and what isn't.
|
|
#19
01-26-2019, 03:02 PM
|
|||
|
|||
|
Ive got a sorta off topic question for you guys with carper experience. Do all carpets come without the dimmer switch grommet installed? Why is this & how hard is it to get it in right?
Thanks Murf Sent from my iPhone using Tapatalk |
|
#20
01-26-2019, 04:48 PM
|
|||
|
|||
|
Quote:
Grommet pops right on once the hole is cut to the correct size. iirc mine was an ACC carpet also but I had no issues so I did not make note of it. I did set in out in the sun for a couple of hours to heat it up before installation though. |
| Reply |
|
|
The PY Online Forums is the largest online gathering of Pontiac enthusiasts anywhere in the world. Founded in 1991, it was also the first online forum for people to gather and talk about their Pontiacs. Since then, it has become the mecca of Pontiac technical data and knowledge that no other place can surpass.


 Linear Mode

