


| FAQ |
| Members List |
| Social Groups |
| Calendar |
| Search |
| Today's Posts |
|
#121
 06-06-2008, 07:01 PM
|
||||
|
||||
|
Quote:
Yesterday I got the new coilover kit and finished installing the control arms. I used the springs that came with the kit, which were 450 lb/in. In retrospect I should have stuck with the 550s. Oh well. Here is the final ride height. It's pretty low, probably too low, but it look really good. I am leaving it for now.   This morning I got the car aligned. The show here in town dabbles in circle track racing so they have a very nice Hunter laser alignment rack. We aligned the car with me in it with the following final specs: Left -.5 camber +5.5 caster Right -.5 camber +6.0 caster zero toe Now here is the cool part. The initial alignment was done with the control arm cross shafts right up against the frame. So with the street alignment settings in place, we did a second alignment using shims. With the shims in place I now have an auto cross alignment with the following specs: Left -1.5 camber +6.0 caster Right -1.5 camber +6.5 caster slight toe out So now when I got to an event I can take a wrench and in about 5 minutes install my shims for a more aggressive alignment. When I am done, just take them out and drive home on the street alignment. Andrew |
|
#122
06-06-2008, 07:03 PM
|
||||
|
||||
|
Quote:
The idle is very smooth. Almost too smooth. Sounds like a new ZO6. Just a little louder. Andrew |
|
#123
06-06-2008, 08:08 PM
|
|||
|
|||
|
Very nice, Andrew.....
My buddy has an alignment shop in Visalia, CA. I have them set my Firebird up to my specifications: Left Camber 0.0° Right Camber 0.0° Left Caster 4.0° Right Caster 4.0° Toe In 1/16" to 1/8" Negative camber is better for handling, but I think tire wear is better at 0° on both sides. You are sharp to have the adjustments done with the driver in the vehicle. I also have the tank full of fuel and the tire pressures set at 40 psi when the wlignment is performed. I use Moog Offset Upper Control Arm Shafts and stock control arms. My front end has been lowered by cutting the springs 1.5" from stock. The front of the car is slightly lower than the rear...Robert Last edited by Z Code 400; 06-06-2008 at 08:30 PM. |
|
#124
06-06-2008, 08:34 PM
|
|||
|
|||
|
Quote:
|
|
#125
06-07-2008, 12:10 AM
|
||||
|
||||
|
Better shot of the stance.
 Andrew |
|
#126
06-09-2008, 11:55 PM
|
||||
|
||||
|
On Saturday morning I headed out towards Chicago. My journey started out on a beautiful, sunny morning. The temperature in Bowling Green was in the low 70s at 7:30am and it looked like the perfect day for a road trip. I was making good time but that quickly changed when I got to about 50 miles south of Indianapolis. The forecast called for thunderstorms but I had no idea what as about to hit. Keep in mind that up until this point my car has never been driven in the rain.
 Notice the large hole in my hood, later to be filled again by my shaker. i really wasn't worried about the engine getting wet, because I have hosed down the LS6 in my RX7 many times and it has never complained. All of the connectors are water tight so a little water on the intake won't hurt. In this next picture the rain line can actually be seen. See how the pavement in front of me is dry, but just up ahead the semi going in the other direction has the giant rooster tail of water behind it. The sky was about to open up on me.  The rain was unbelievable. With the wind gusting, it was actually raining sideways.  Then as if it wasn't raining hard enough, it started coming down in sheets.  More dirty little secrets about my car. It seems that it is not entirely water tight. After about 20 minutes of driving in the rain I noticed that both the driver's and passenger side carpet was soaking wet. I am not talking about just damp, but sopping wet. I suspected that the water was coming down the cowl and getting inside through the kick panel area. A few days ago I discovered that to be exactly the case. No names will get mentioned, but the passenger side cowl vent panel was installed by the same shop that installed my Vintage Air system. The panel where the hoses come through wasn't sealed against the body at all. Like I said before, the reputation of the shop doesn't mean s**t. It all boils down to that guy, making 15 bucks an hour, wrenching on the car. In about a week I am going to drive the car from Chicago to Colorado for my (cough....cough...) 20th high school reunion. Andrew |
|
#127
06-10-2008, 01:47 AM
|
||||
|
||||
|
That must have been an interesting road trip!
 Thanks for the update. Keep 'em coming; this is one of my favorite threads (along with the "Blown GTO Updates.")
__________________
Mike 
|
|
#128
06-10-2008, 09:07 AM
|
||||
|
||||
|
cool write up andrew, you have a knack for the finer points, i can relate!!
too bad about the wet carpet deal, that sucks. i know the pain of having someone else do a portion of a project, and that's one of the only portions that have issues....... i have driven my blower car many many miles in the rain, glad to say, no inside leaks, but man, cleaning all that aluminum back up under my 'half hoods' is a pain. people really give me second looks driving my car in the pouring down rain here, cracks me up. i live two blocks from a very rude co-op market, so i make sure to drive that way everytime i go out. i get lots of shaking heads, looks of disgust, you name it. builds character i guess.... keep it up, love your attention to detail, much kudos to you my friend.......... davey
__________________
1968 Lemans/GTO clone, 6-71 blown 474ci 1969 Ram air III, Hardtop (sold it to my dad!! still care taking for it) |
|
#129
06-10-2008, 12:15 PM
|
||||
|
||||
|
Quote:
I have been reading your thread and following your rear main seal saga. What a pain, but I am glad it is fixed. I am driving to Colorado next week and I will stop at my friends house in Lincoln, NE. He is the one that did the body and paint on my car. Hopefully we can get the water issue resolved at that time. When are you taking your car to the track? Andrew |
|
#130
06-18-2008, 12:15 AM
|
||||
|
||||
|
Yesterday and today were two very exciting days. Monday morning I showed by to Schwartz Extreme Performance in Crystal Lake, Illinois. Jeff Schwartz and his crew were waiting for me so they can begin to adapt my shaker scoop to the new engine. One of Jeff's fabricators, Ken, was responsible for the project.
After looking things over and mocking up my old shaker base it as decided that a whole new base would need to be made. So Ken rolled a new base and bottom.  The only part of my old base that was reused was the upper lip that attached to the shaker top.  Ken also fabricated another piece that was welded to the inside of the base and held the air filter element. I picked this filter element because it is as large as the base will allow. The filter is also rather thick which gives it more area for better flow. It also happened to be in stock at the local AutoZone, which means I can get a replacement just about anywhere.  Another one of Jeff's fabricators, Kyle, helped out with the TIG welding of the 4" pipe that connected the base and the throttle body.  Today everything was starting to take shape. The MAF was mounted inside the pipe towards the the top, just after the rubber coupler.    Tomorrow morning I am heading out to Colorado. I will be stopping in Lincoln, NE to visit my friend Brian. Brian did the body and paint on my GTO. We will smooth out all the welds on the base and paint everything a semi-gloss black. Thanks again to the crew at Schwartz Extreme Performance for a job well done! Andrew |
|
#131
06-18-2008, 01:00 PM
|
||||
|
||||
|
I like it!!
Will the base and the bottom be sealed with some sort of seam sealer or will it be welded completely??
__________________
1965 GTO, 408 tri-power, 4 speed, Currie 12 bolt w/3:42's, Hurst wheels |
|
#132
06-20-2008, 12:28 AM
|
|||
|
|||
|
Andrew,
Very nicely done....a fine mix of old and new, with the very best of modern technology. GM has put so many different engines in their cars over the years its ridiculous...Kind of like Chevy heads with the 'Pontiac' logo cast into them. The 1975 Pontiac shop manual shows a Buick production V8 in the Pontiac Ventura. What Andrew has done is very tasteful and I don't think it detracts in any way from the original charater of the car. As for me, I like the traditional cars too, but there is no argument what he has done with this GTO is impressive...Robert |
|
#133
06-20-2008, 12:17 PM
|
||||
|
||||
|
Andrew, I really like the new shaker set up, very cool way to have an old school cold air induction on a LSx motor.
Are you going to leave it as is, or paint, polish or powder coat it? |
|
#134
06-20-2008, 11:56 PM
|
||||
|
||||
|
cool scoop action! your getting too much positive attention andrew, maybe i should tell you to jack it up in the back, cut that hood hole a little bigger, and stuff a 6-71 topped poncho there like a real man.....
  (sorry, couldn't resist!!!!) once again, looks awesome andrew, clever work with the scoop, i dig it...... davey
__________________
1968 Lemans/GTO clone, 6-71 blown 474ci 1969 Ram air III, Hardtop (sold it to my dad!! still care taking for it) |
|
#135
06-22-2008, 10:46 AM
|
||||
|
||||
|
Quote:
Thanks for the kind words Davey. My road trip is going pretty well. The car is running great and it is really a blast to be driving it all over the place. I put about 1800 miles on the car since I left Kentucky. Here is a shot of the car taken in Laramie, WY after being cleaned up a little bit. 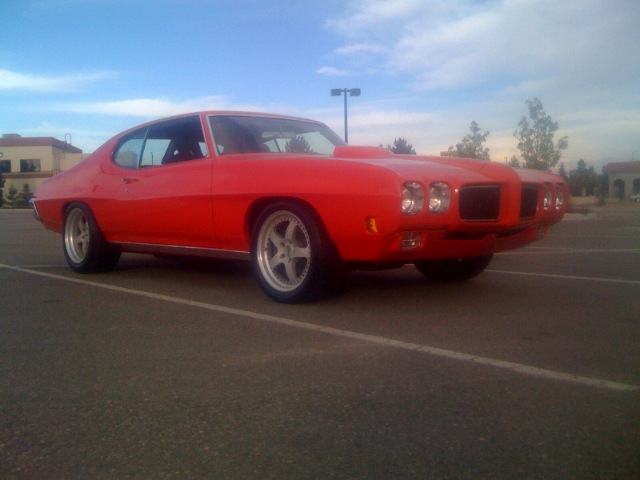 Andrew |
|
#136
06-22-2008, 11:10 AM
|
||||
|
||||
|
Looks great. I'd like to see more exterior pics with better views of the hood scoop.
You headed somewhere in particular, or just out cruisin'?
__________________
Mike
|
|
#137
06-22-2008, 04:03 PM
|
||||
|
||||
|
Quote:
I have many more pictures that I took along the way, but I can't post them yet because I didn't bring my lap top. If you go to the first post of this thread there is a link to the Popular Hotrodding website. There are a bunch of exterior shots showing the scoop. My destination was Colorado, but I'm thinking about extending my trip further west. Andrew |
|
#138
06-22-2008, 07:27 PM
|
||||
|
||||
|
Very, very nice car Andrew. Fantastic work. Thanks for sharing it all, too.
Glad you're out having fun! |
|
#139
06-30-2008, 02:12 AM
|
|||
|
|||
|
Andrew,
Any issues running those upper control arms without bump stops???? |
|
#140
07-01-2008, 11:56 AM
|
||||
|
||||
|
Quote:
|
| Reply |
|
|
The PY Online Forums is the largest online gathering of Pontiac enthusiasts anywhere in the world. Founded in 1991, it was also the first online forum for people to gather and talk about their Pontiacs. Since then, it has become the mecca of Pontiac technical data and knowledge that no other place can surpass.


 Linear Mode

