


| FAQ |
| Members List |
| Social Groups |
| Calendar |
| Search |
| Today's Posts |
|
#201
 07-01-2011, 11:57 AM
|
|||
|
|||
|
The door to quarter will require filler to make match. The dynacorn quarter doesn't quite match the contour of the door. I am trying to get the whole front end assembled so I can determine what needs to be done. The hood is dynacorn and the fenders required repair so there will be a lot of work to make everything line up good. The bad thing is I will have to take everything apart to paint the jams.
__________________
68 Lemans - GTO appearance LS3 68 Eldorado - waiting for restoration 96 Roadmaster Wagon 2014 Infiniti Q50S Hybrid Marietta GA |
|
#202
07-01-2011, 12:14 PM
|
||||
|
||||
|
Quote:
As for taking it back apart, I've had mine together and apart 4 or 5 times while doing the bodywork. Just comes with the territory. Biggest mistake you can make would be to do all the repair work and wait until you're ready to paint before you find out if it fits right...and just like you, I'm working alone here. The hood is really a pain to install by yourself! Once you get it where it all lines up to your satisfaction, install the trim too. Same reason: How else are you going to know if it still fits?
__________________
Greg Reid Palmetto, Georgia |
|
#203
08-01-2011, 01:36 AM
|
|||
|
|||
|
It's been almost a month since I posted anything to this thread. I wish I could say all has been going well, but this is not the case. At times during the month I would have sent the car to a body shop to resolve the problems. But no shops around here want to work on my car.
These are some of the problems I have been dealing with over the last month. 1) Found out the Endura bumper I had was bent. 2) Passenger fender mount to body (the one you open the door to get to) was not positioned correctly. I did not have enough adjustment. It was nearly 1/4" off. 3) Driver fender still had plenty of twists and bends and would not align with the bumper. 4) Hood/Driver fender - Hit the side of the hood hard. Bolts couldn't be inserted. 5) The top of the passenger fender is not shaped correctly on my fender. It does not match the contour on the Endura Bumper. 6) Valence panel was bent up more that I thought. 7) Aligning the front sheet metal has been a nightmare. Bumper Starting condition 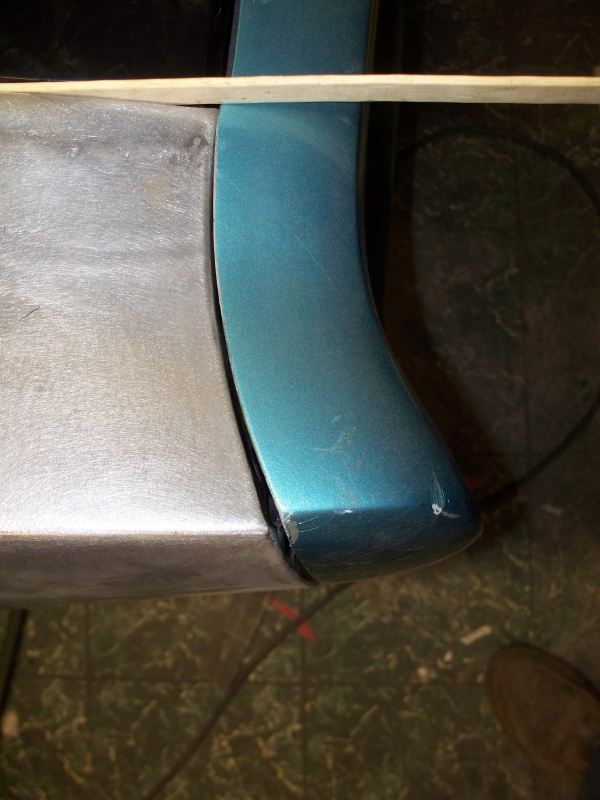 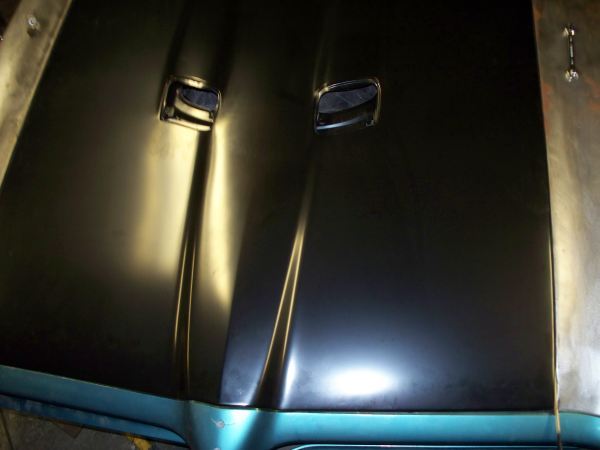 I spend several days working on this. This is the end result. 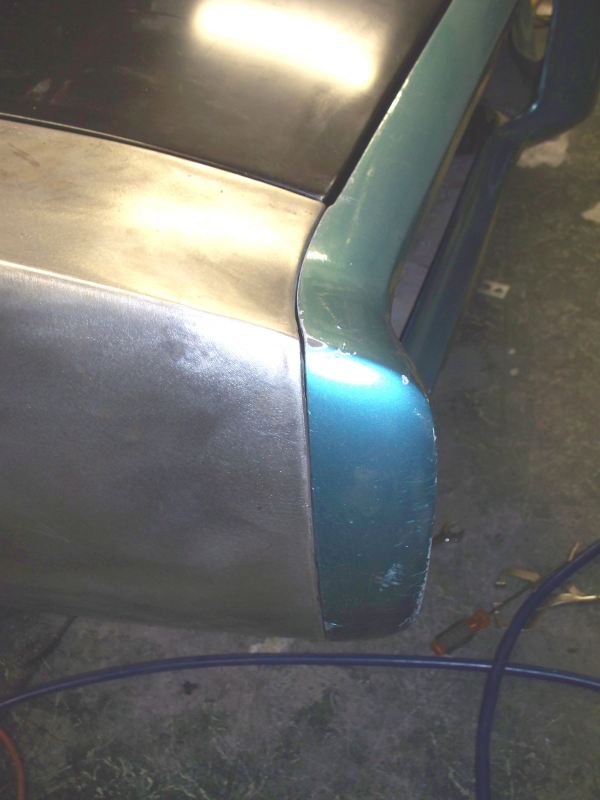 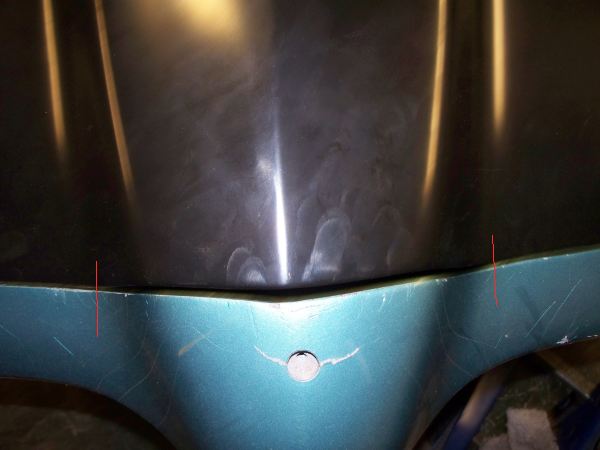 Passenger fender I ended up removed the mount from the inner bracing and relocating it to the correct position. That is based on measurements of three other fenders. I also had to fix the incorrect contour. The profile gauge shows the shape of another fender. The profile gauge also matches the contour of the bumper. 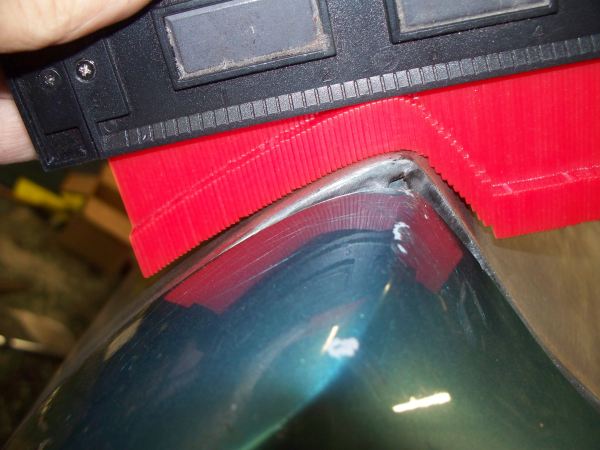 The results of splitting and re-welding the fender 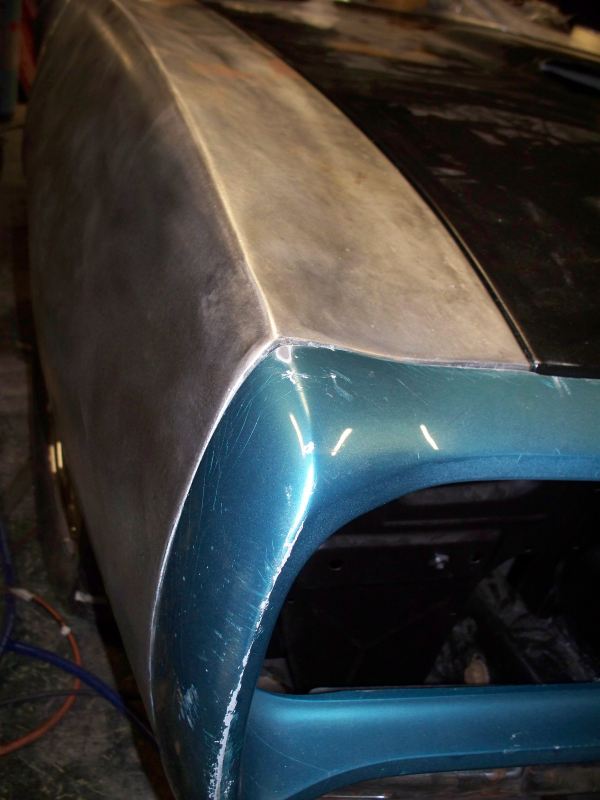 Driver Fender There was still numerous problems that were not apparent until trying to install and line everything up. The hood channel was bend near the Front of the fender. It should be about 90 degrees but was maybe about 80. This meant the slots on the fender ran out of adjustment before the fender was aligned with the bumper. This was my solution when a BFH is just not good enough. The 2x4 distributes the force of the jack so as not to bend the passenger fender. With a little jacking the hood channel was moved back into position. 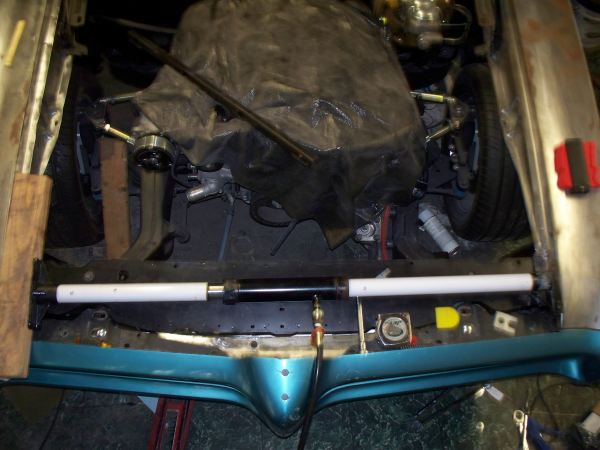 Hood No pictures here but I had to add 1/4" of spacers between the driver fender and the hinge in order to insert bolts into the hood. I then found there was not enough adjustments in the slots and had to add 1/4" of spacers between the hinge and the hood. Everything aligns now, but I don't think its proper to use shims between the fender and the hinge. Valence Typical restoration issues, it was beat up more than I though. Driver's turn signal opening was also bend. Not obvious until trying to install turn signal. In the end I spend about 5 hours beating numerous dents out. You can see one of the bends here. This thing was also caked full of filler. Some of it a 1/2" deep. 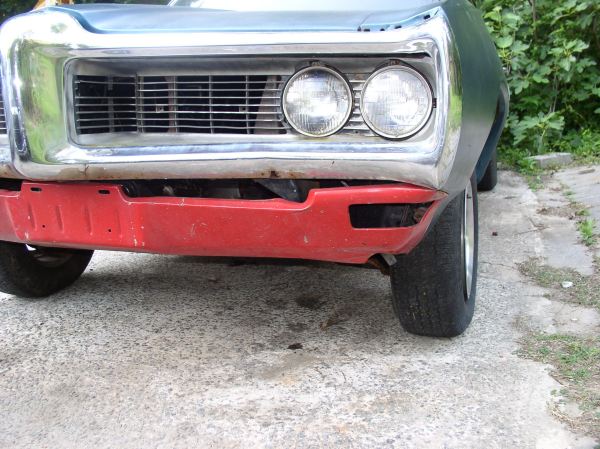 The passenger turn signal fits fine. 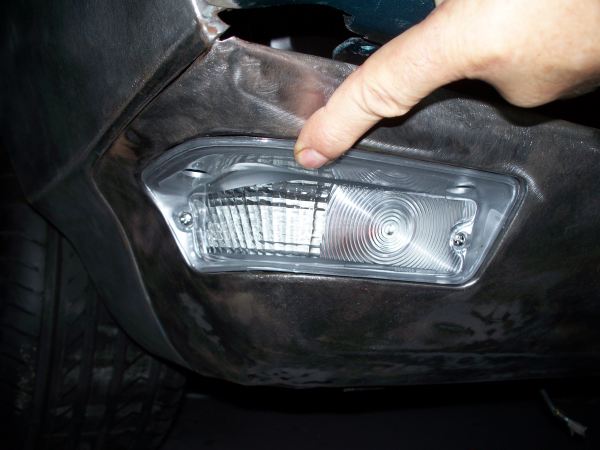 The driver turn signal not so good. It looks better in the picture than it really fit. 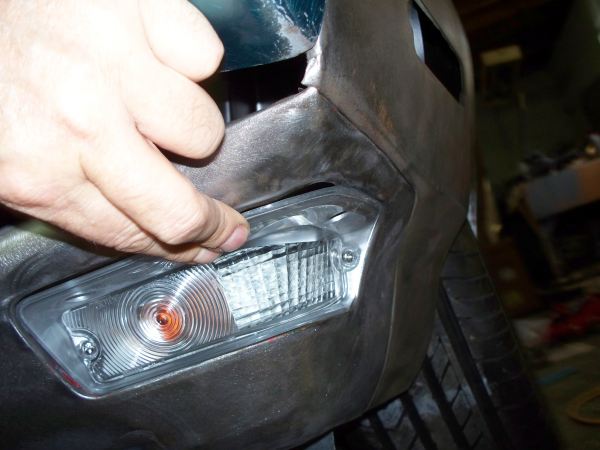 This should be flat. 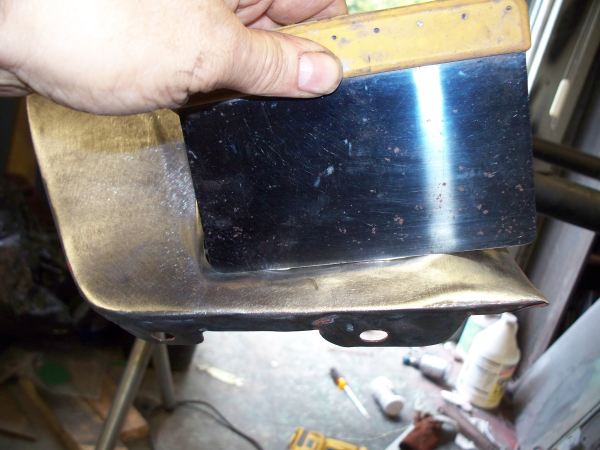 And how do you flatten this. Clamp it to a thick piece of metal at tap it flat with body hammers. 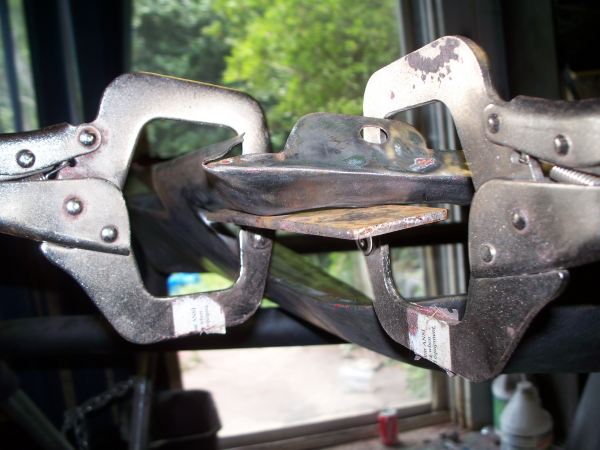 Fits as good as factory now. Not great but this how they all seem to fit. 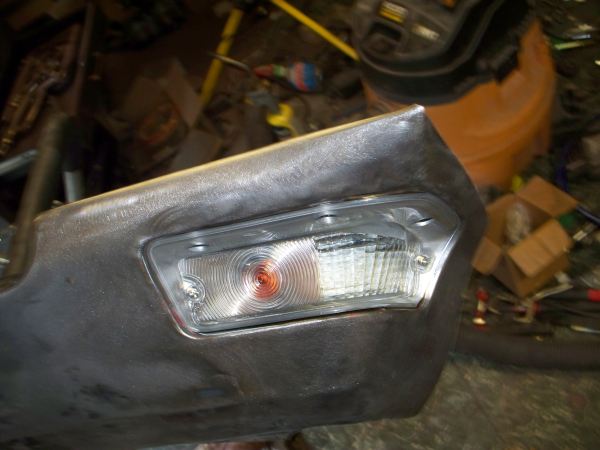 I didn't take a picture of the valance panel but you can see it pretty good here. Dents removed and back to original shape. It shouldn't take more than a light skim coat of filler. Nothing is off more than the thickness of card stock. It's too late to post more tonight. I will post my pictures of the final gaps tomorrow.
__________________
68 Lemans - GTO appearance LS3 68 Eldorado - waiting for restoration 96 Roadmaster Wagon 2014 Infiniti Q50S Hybrid Marietta GA |
|
#204
08-01-2011, 04:23 AM
|
||||
|
||||
|
Well, it looks like you're going in the right direction. Looks good. You pushed the front end of the fenders out to correct that problem...you may have to pull the rear end of the fender in to correct the shimmed hinge problem.
__________________
Greg Reid Palmetto, Georgia |
|
#205
08-01-2011, 06:54 PM
|
||||
|
||||
|
I wondered where you went.
X2 on the progress made, we knew it wasn't going to be easy! I went through a lot of the same sort of stuff on a 67 Firebird I did myself years back and I didn't have near the tool collection that you have to work with. After all the messing around there was no way the hood was going to line up correctly with the bumper, and in a stroke of brilliance I built a cardboard form at the front of the hood and filled it with bondo-glass. Then shaped it to get the gap perfect. I am NOT recommending this, but funny thing it still looked great the last time I saw the car at least 10 years later. Where there's a will, there's a way.. Keep up the good work!
__________________
1969 Lemans vert, matador red, 462 CI, 3.07 12-bolt posi 1974 455 TA, admiralty blue/red interior HPP "cover car" - sold "The best way to show a car is to drive it" |
|
#206
08-01-2011, 08:03 PM
|
|||
|
|||
|
Thanks for the update! You know some of us are hooked on this build like women on soap operas.
|
|
#207
08-01-2011, 11:57 PM
|
|||
|
|||
|
Driver fender update
Quote:
This is how much I shimmed the hinge. Each washer is 1/8" thick. I also placed two more washers between the hood and the hinge. 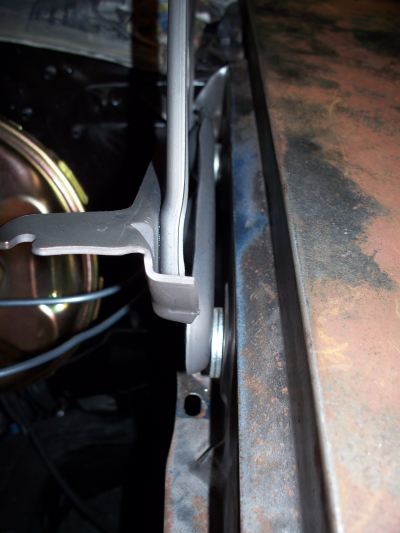
__________________
68 Lemans - GTO appearance LS3 68 Eldorado - waiting for restoration 96 Roadmaster Wagon 2014 Infiniti Q50S Hybrid Marietta GA |
|
#208
08-02-2011, 12:49 AM
|
|||
|
|||
|
I ended up buying a shrinking dolly. I seem to have too much stretched metal and find I need such a tool. I had been using a MAP gas torch to shrink small spots but the torch has its limits. I will find out in the next few weeks if this tool was worth while. Since I have been unable to find a trunk lid I am going to try and repair the one I have and put the shrinking dolly to good use.
This shrinking dolly is made by "Martin Tools"  Unfortunately I will probably need a better Hammer and Dolly set. The cheap set I was using is more than adequate to install patch panels and even do some minor body work. The metal on the cheap set is too soft and the shape of the hammers could be much better. There are also no truly flat hammers in my set so you end up stretching metal if you do much hammering (That is light taps). Every hammer has a slight crown so it is difficult to straighten creased metal without creating more problems. I did not anticipate that I would be doing what I call hard core collision body work on this project so my hammer and dolly tool set is turning out to be inadequate. The cheap HF or Northern Tool hammer and dolly sets serve a purpose and may be all most of you may ever need but they do have their limits. My set was purchased from Northern Tool and has served me well in the 19 years that I have owned it.
__________________
68 Lemans - GTO appearance LS3 68 Eldorado - waiting for restoration 96 Roadmaster Wagon 2014 Infiniti Q50S Hybrid Marietta GA |
|
#209
08-02-2011, 05:11 AM
|
||||
|
||||
|
How sure are you that the problem is in the fender and not the hinge?
I noticed that you don't have the inner fenders in place..Correct? You may find a whole new set of challenges when you add them into the mix. Quite a bit of flexing neccessary to get all the screw holes lined up between the fenders, the lower cowl, core support and the inner fenders. PS- I just re-read your previous post and you explained how you know it's the fender. Looking at the picture again, it occurred to me that you might be able to rig up a good, heavy slide hammer to pull that portion of the fender out.
__________________
Greg Reid Palmetto, Georgia |
|
#210
08-02-2011, 07:04 AM
|
||||
|
||||
|
Quote:
I remember having the same problem when I disassembled all my front-end sheet metal a few years ago (to restore my engine bay and cowl area) and then put it all back together again. The hood wanted to hit the drivers side fender, but since I didn't replace or re-work the fenders or hinges I knew they weren't the problem. I just gave the hood a few shoves from the side and that took care of it. Also agree with Greg that its time to get the inner fender wells installed if you haven't done so already. If the trunk lid has waves/dents you may find it quite a challenge to get it really right. The steel on the deck is flat and doesn't have much strength so its hard to work. The resto shop put a lot of time in on mine before we finally gave up and I found a straight one. Walt
__________________
1969 Lemans vert, matador red, 462 CI, 3.07 12-bolt posi 1974 455 TA, admiralty blue/red interior HPP "cover car" - sold "The best way to show a car is to drive it" |
|
#211
08-04-2011, 12:51 AM
|
|||
|
|||
|
Quote:
I don't have the springs on since I can't remove or install the hood with the springs installed. I seem to be frequently removing the hood right now. Quote:
The point will come where I need to install the inner wheel wells and hood springs but I'm not there yet. My efforts to move the hinge mounting point was not worth the trouble, while I did get the mounting point moved out a little, I still need 1/16" of spacers between the hinge and the fender. The hood to hinge spacing got worse. I now need 3/8" worth of spacers. I going to give up on moving the mounting pad to the correct position and just shim it. However I found more problems, I was unable to get the hood to align and determined that there is still a bend in the fender. When the hood is in the over all best position, it sticks up about 3/16" at the bumper to fender junction. Using a profile gauge I was able to determine there is still a bit of damage to the fender. For those of you who are wondering why I didn't spot this sooner I have some vision problems. I require very strong lens for my glasses and my sight is distorted, making it very difficult for me to look at a body panel and see alignment problems or damage. While my sight has been corrected to 20-20, no-line bifocal distortion makes sighting panels very difficult. I end up measuring everything, holding straight edges against the surface etc. Until tonight I just though I just had an alignment problem on the driver side. 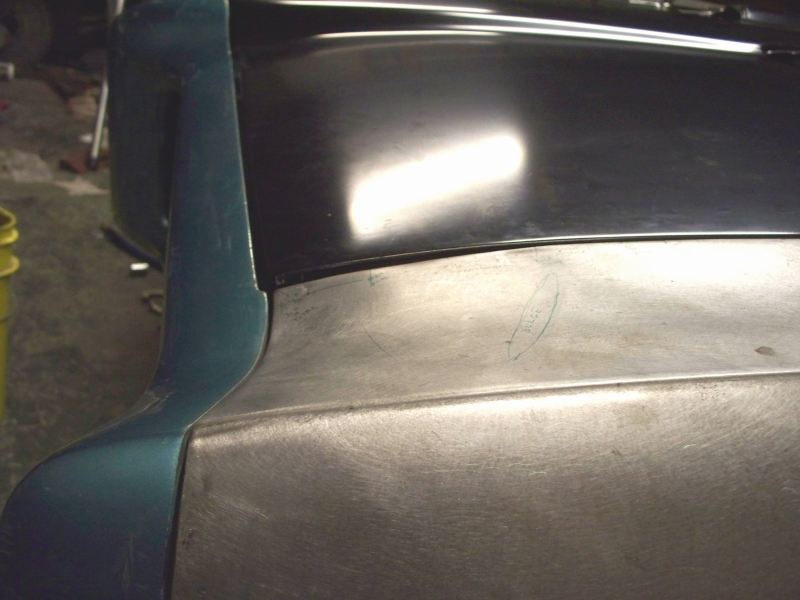 I marked the fender as I measured, this is what I found. While I can't see any problems, my hand tells me there are many high and low points from the area marked bulge to the front of the fender. From the start of bend mark to the corner of the fender there is 3/16" of drop. 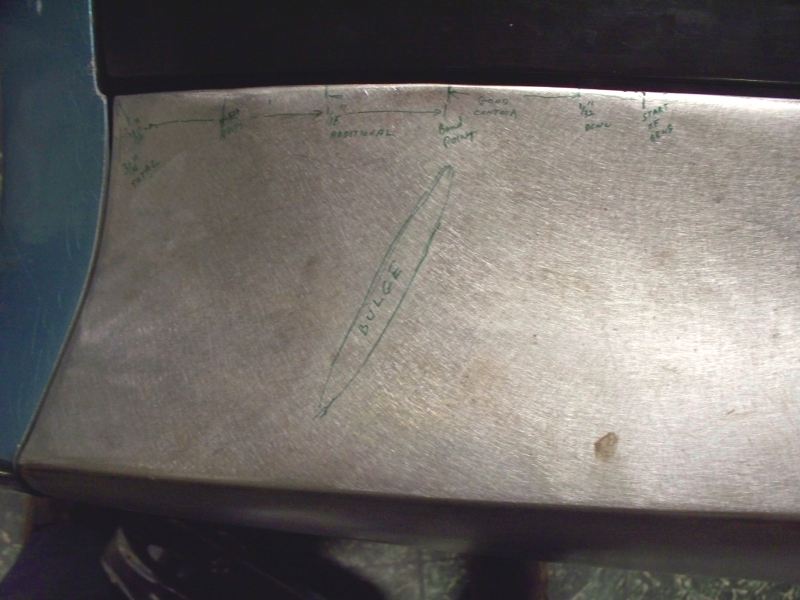 My mission tomorrow night is to try and straighten this. And of course this means the bumper is mounted 3/16" too low on the driver side and I will have to realign the bumper.
__________________
68 Lemans - GTO appearance LS3 68 Eldorado - waiting for restoration 96 Roadmaster Wagon 2014 Infiniti Q50S Hybrid Marietta GA |
|
#212
08-04-2011, 10:20 AM
|
||||
|
||||
|
You don't have to have severe vision problems to have trouble aligning sheetmetal. A bunch of us have been through this.
Too bad you can't find a known good fender to try there...just to see the difference...but I guess if you had that, you wouldn't be trying to straighten this one out.
__________________
Greg Reid Palmetto, Georgia |
|
#213
08-04-2011, 10:11 PM
|
|||
|
|||
|
Quote:
I really think I should have been able to tell there was more of a problem with front corner being to low before I got to this stage. I think my sight failed me. Tonight I tried to push the corner up with my 10 ton body jack placed between the floor and the corner of the fender. This was a totally useless exercise. I all ended up doing was to lift the corner of the car off the ground. Didn't push anything back into shape. While looking at the bulge and bend measurements, I marked force vectors on the fender to predict where I thought the start of the bend is. At this point I remembered I had pictures of the fender when I first received it. Here is a picture of the fender as received, the pink arrow is where I predicted the start of the bend is. Looks like I need to take the fender off and beat it some more in the area of the pink arrow with a BFH. Looks like I stopped beating a little too soon.  Well I'm about to go pull the fender and see if I can beat it into shape.
__________________
68 Lemans - GTO appearance LS3 68 Eldorado - waiting for restoration 96 Roadmaster Wagon 2014 Infiniti Q50S Hybrid Marietta GA |
|
#214
08-04-2011, 11:01 PM
|
|||
|
|||
|
I got the fender off, decided to call it a night. Now that I know where and what to look for I can see the bends on the inner brace when holding a straight edge against it. Beating these bends flat should remove the 3/16" drop at the front corner.
__________________
68 Lemans - GTO appearance LS3 68 Eldorado - waiting for restoration 96 Roadmaster Wagon 2014 Infiniti Q50S Hybrid Marietta GA |
|
#215
08-06-2011, 06:26 AM
|
||||
|
||||
|
You know, looking at that photo, I can clearly see the downward bend at the front. I'm surprised I didn't notice it the first time. It is very clear that the downwared curve is too severe. In fact, I'm surprised the top edge of the bumper lines up with it.
Compare it to my fenders- You might consider putting upward tension on the inner front corner (where it meets the hood) with a winch or comealong and beat down on the area of the pink arrow. This you could do with it on the car.
__________________
Greg Reid Palmetto, Georgia Last edited by Greg Reid; 08-06-2011 at 06:34 AM. |
|
#216
08-06-2011, 08:37 AM
|
||||
|
||||
|
Looking at all the pics it does look pretty obvious now. But I think you are close and hopefully will be able to get the contour right without too much hassle.
Watching your thread is a little painful. This same sort of unforeseen trouble is why the 3 month estimate that my resto shop gave me turned into 9 months in reality. But in the end it was well worth it. Hang in there and eventually you will work your way through. A little history- I don't remember if I showed you this, but here is one of the pictures I have of your fenders just before they were packed up and shipped across the country to me by bus. I think that the damage to the drivers front happened during transport. 68/69 fenders are a real PITA, especially if you live in the SE like us. It seems there are none around here to be had and my experience is that buying used sheet metal from across the country is a crapshoot. But the resto shop guys all say that you are better off starting with rough originals than the currently available re-pop fenders. Makes me wonder how bad could they could really be. Walt
__________________
1969 Lemans vert, matador red, 462 CI, 3.07 12-bolt posi 1974 455 TA, admiralty blue/red interior HPP "cover car" - sold "The best way to show a car is to drive it" |
|
#217
08-06-2011, 11:39 AM
|
|||
|
|||
|
Quote:
Quote:
After seeing the before shipped photo of the fender it seems the fender was hit from above, not bent as the result of a frontal impact I'm having a tough time getting the 3/16" bend out. I have made the bending harder since I had welded around the edge of the fender where it mates with the bumper. I had to to this to recreate the edges since they were rounded from the hit. This makes the front of the fender much stiffer than it would have been otherwise. I have straighted the inner frame about as far as I think I can. However this did not take the extra curve out and the front. I tried drilling out the first few spot welds at the front where the skin is welded to the inner frame. I am still unable the bend the front part up. The only options I can see are: 1) cut relief cut(s) in hood channel area so the metal can bend up. This will likely result in a crease at the point of the relief cut. 2) Heat the area with a touch so it can be bent easily. This is out since I don't have an acetylene torch and I think it should only be attempted by someone who has done this before. 3) Graft in a small section of new metal at the front corner. I could use the original fender to donate a section in this area. I think I will use option 3 since the reformed edges make the metal almost impossible to bend. As it turn out the section of metal I need is about the only part of the original fender that is not bent, dented, creased, rusted or generally out of shape.
__________________
68 Lemans - GTO appearance LS3 68 Eldorado - waiting for restoration 96 Roadmaster Wagon 2014 Infiniti Q50S Hybrid Marietta GA |
|
#218
08-06-2011, 01:33 PM
|
||||
|
||||
|
Quote:
I think one cut in the right spot would do it.
__________________
Greg Reid Palmetto, Georgia |
|
#219
08-06-2011, 01:52 PM
|
|||
|
|||
|
I postponed working on fender this morning to cut grass while it's cloudy and overcast and not one the usual 98 degree days.
I reconsidered number one while cutting grass. If it doesn't work or look good enough I can still graft in a section of my old fender. The relief cut would take considerably less time than grafting a whole section of fender. I also think one relief cut might work with only a slight possibility of needing a second cut.
__________________
68 Lemans - GTO appearance LS3 68 Eldorado - waiting for restoration 96 Roadmaster Wagon 2014 Infiniti Q50S Hybrid Marietta GA |
|
#220
08-06-2011, 03:43 PM
|
|||
|
|||
|
It looks like the relief cut is going to work. I need to totally reinstall the fender, including the hood before I make the finial adjustment. The alignment is very good. The pink arrow is where I made the relief cut.
 Another shot 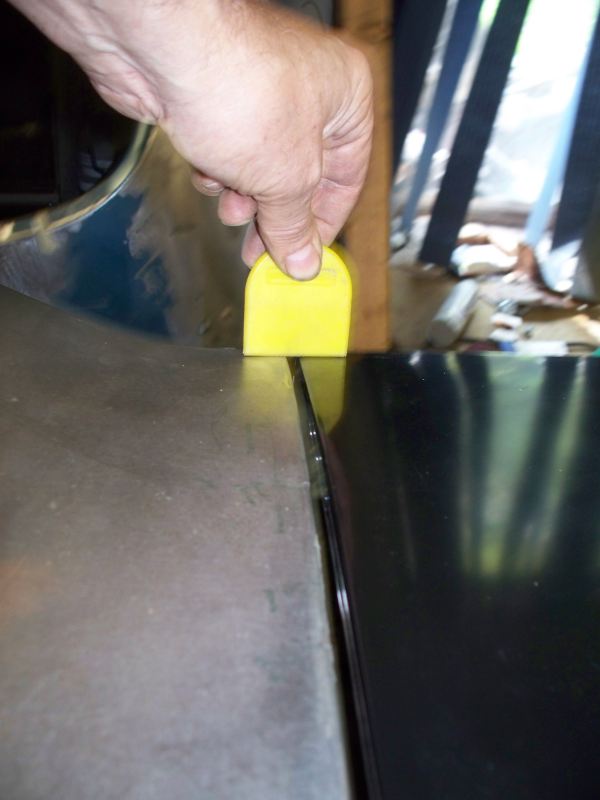 It is still very hard to move the corner. I still can't move it with my bare hands. I needed the jack to move it. 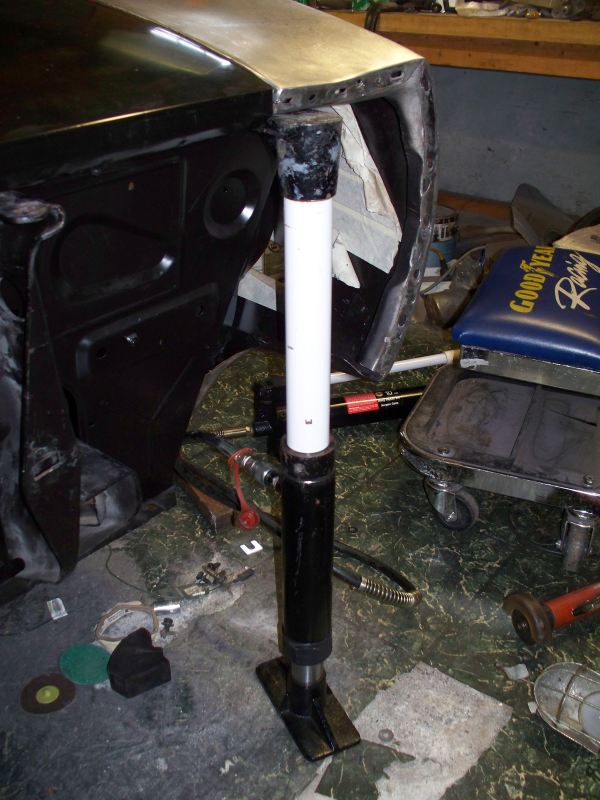
__________________
68 Lemans - GTO appearance LS3 68 Eldorado - waiting for restoration 96 Roadmaster Wagon 2014 Infiniti Q50S Hybrid Marietta GA |
| Reply |
|
|
The PY Online Forums is the largest online gathering of Pontiac enthusiasts anywhere in the world. Founded in 1991, it was also the first online forum for people to gather and talk about their Pontiacs. Since then, it has become the mecca of Pontiac technical data and knowledge that no other place can surpass.


 Linear Mode

