


| FAQ |
| Members List |
| Social Groups |
| Calendar |
| Search |
| Today's Posts |
|
#481
 04-18-2014, 10:18 AM
|
||||
|
||||

Looks nice. You may want to check on replacing the driver's side visor bracket. Both were very loose when I had the car and I did replace the passenger side one as it would flop down every time you hit the gas. I think the driver's side bracket was a bit tighter.
Kind of scary when you stomp on the go-pedal and an automatic blindfold comes down in front of your eyes! |
|
#482
04-18-2014, 03:23 PM
|
||||
|
||||
|
The roof insulation must have been removed at some point.
__________________
" Long may we DRIVE !" |
|
#483
04-18-2014, 03:29 PM
|
||||
|
||||
|
Looking good, how's it going?
__________________
Some guys they just give up living And start dying little by little, piece by piece, Some guys come home from work and wash up, And go racin' in the street. Bruce Springsteen - Racing In The Street - 1978 |
|
#484
04-18-2014, 03:52 PM
|
||||
|
||||
|
Quote:
Quote:
Here's a few pic's after it was attached to the clips.   
|
|
#485
04-18-2014, 04:28 PM
|
||||
|
||||
|
So while the upholstery guy guy has been doing his thing, I polished up the the rear side marker lights and grills (?). I spent most of yesterday buffing, polishing, shining, et cetera the rear of the Black Car. It needed to be done, and I decided that this should take place before the new bada_s bumper and bumper guards were installed. I removed the side marker lights to get a better job, and thought it only made sense to polish them while they were out. They cleaned up nicely.
     
|
|
#486
04-18-2014, 04:34 PM
|
||||
|
||||
|
What did you use on them Bob?
__________________
Some guys they just give up living And start dying little by little, piece by piece, Some guys come home from work and wash up, And go racin' in the street. Bruce Springsteen - Racing In The Street - 1978 |
|
#487
04-18-2014, 05:25 PM
|
||||
|
||||
|
Quote:
Well, the upholstery guy has called it a day. i guess I should have had steak for dinner and then maybe he might have stayed and finished. Actually, I don't blame him. He has been wallowing around in the interior all day since 8:00am. He is pretty much done with the exception of reinstalling the trim, sail panels, shoulder belts, et cetera. He wants to let the top sit overnight and dry out from all the steaming, let the wrinkles relax, and see what the adhesive is going to do. I think that is a wise decision. He'll be back in the morning to make adjustments as necessary and install all the trim pieces and parts. Here's the pic's...    
|
|
#488
04-19-2014, 01:34 PM
|
||||
|
||||
|
00
So the headliner is done and it looks great. He only charged $200, and I gave him a healthy tip. The cleaned up sun visors look fine. I switched out the visor hardware and put the new bracket on the drivers side since as NJSteve pointed out it is tighter. I have also ordered a new mirror for the passenger side, and a new dome light as the base on the existing one was pretty badly scorched inside.
Lots going on here today and I have some questions that I will post up separately. Here's the headliner.... 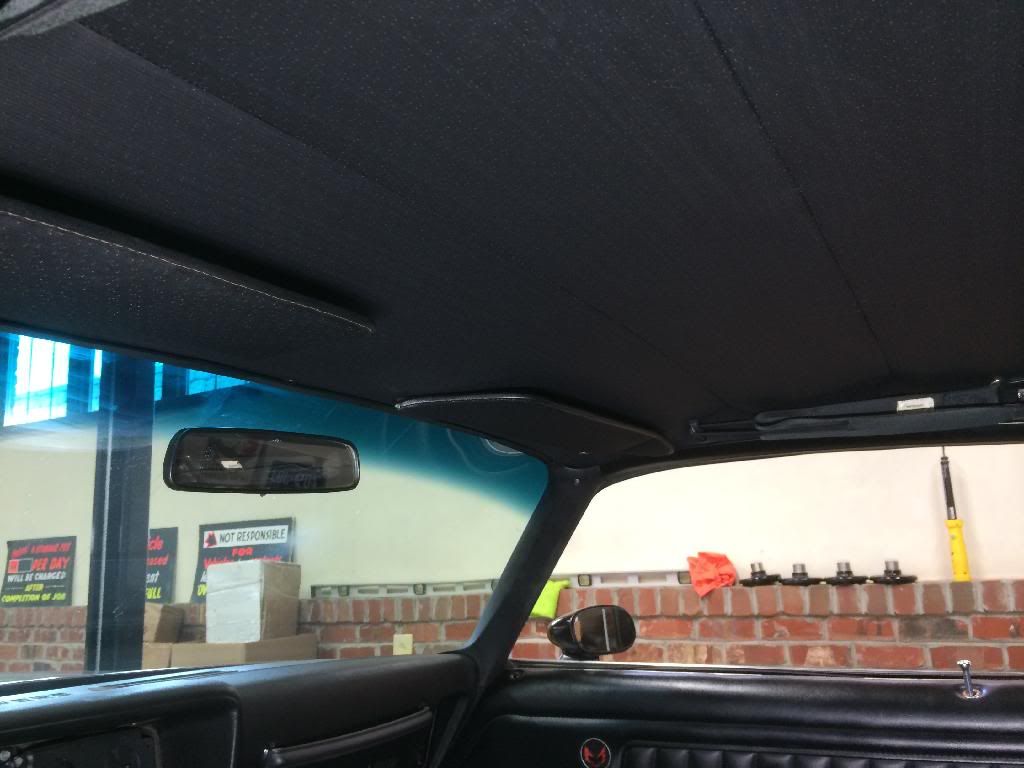  
|
|
#489
04-19-2014, 02:43 PM
|
||||
|
||||
|
Man o man, that's a nice upgrade!
__________________
Mike/Illinois |
|
#490
04-19-2014, 06:18 PM
|
||||
|
||||
|
Bumper and Guards
OK, where to start...
The bumper and the guards have been united. I was not looking forward to this. Too much shiny chrome, too much money, and too many previous threads talking about how the guards didn't fit the bumpers. Well, everything turned out well despite the worries. MPD was over today and his help was critical. No way one person could have done this. To protect the bumper while the guards were being aligned we wrapped it with stretch wrap. This worked really well. It was a bit of a pain to remove once everything was lined up and locked in, but the protection it offered was worth the extra effort. We also used a framing square to make sure the guards were plumb to the horizontal plane of the bumper. There were no real surprises. At first it seemed like there was no way the guards would suck down to the profile of the bumper, or vice versa, but we slowly tightened everything up and voila it ended up being a great fit. As we installed the rear bumper brackets we measured center distances on the mounting holes on the back of the Black Car and it looks like everything should line up. That's right - I don't know yet if it will line correctly when mounted, but that's another story. Here's more than a few bumper pictures.  My Pal Dave    Pretty cool the bumper was chromed on my daughters 6th birthday    
|
|
#491
04-19-2014, 07:19 PM
|
||||
|
||||
|
VERY nice!
__________________
Some guys they just give up living And start dying little by little, piece by piece, Some guys come home from work and wash up, And go racin' in the street. Bruce Springsteen - Racing In The Street - 1978 |
|
#492
04-19-2014, 08:11 PM
|
||||
|
||||
|
Wow! Looking good
|
|
#493
04-19-2014, 08:35 PM
|
||||
|
||||
|
Amazing! So did Keystone actually have the bumper in stock?
|
|
#494
04-19-2014, 09:41 PM
|
||||
|
||||
|
Quote:
Quote:
Quote:
Quote:
|
|
#495
04-19-2014, 10:18 PM
|
||||
|
||||
|
Sign of the coming apocalypse
Ok, so here is a sign that the world may jump off the rails and go headlong into an unsynchronized orbit....
So before the bumper got installed I wanted to buff out the rear end of the car. Over the last few days I got everything but the tail panel and rear portion of the spoiler buffed and looking pretty good. Today MPD started on the tail panel and spoiler. I decided that it would be easier to do the tail panel if it was removed. Well once it was removed and brought out into the light of day it was obvious just how bad it looked and what bad shape it was in. On the back side is a big fiberglass patch, and the front had multiple areas with extremely bad finish. After a little indecision I decided that before I took the tail panel to the body shop for repainting, I would take a swipe at it myself. So I wet sanded it with 400 grit, laid on multiple coats of high build rattle can primer, wet sanded again with 400 grit and then painted it with Rustoleum Gloss Black rattle can paint. If I do say so myself, it looks pretty bitc_in. I'm going to take inventory tomorrow and might do a light wet sand before applying a final coat of Rustoleum - or I might leave it just like it is. I've also ordered new letters for the tail panel, because the old ones just weren't in keeping with the new "high dollar" finish. Does anyone know if you can color sand and buff out Rustoleum? Here's some pictures. Regrettably, I did not get pictures of the tail panel prior to the initial wet sanding.        
|
|
#496
04-19-2014, 10:28 PM
|
||||
|
||||
|
Quite impressive
 ala DaVinci ala DaVinci
|
|
#497
04-20-2014, 08:15 AM
|
||||
|
||||
|
....since I've gone this far I might as well.....
 BTW - $200 was a killer price on that headliner installation - no matter where you live!
__________________
Some guys they just give up living And start dying little by little, piece by piece, Some guys come home from work and wash up, And go racin' in the street. Bruce Springsteen - Racing In The Street - 1978 |
|
#498
04-20-2014, 08:39 AM
|
||||
|
||||
|
My GT -37 headliner was installed by two guys. Dan and Scott, and I wish I was there to witness that. I did not look at that invoice....
But, that's a great price and the guy came to you? Was that like 20 bucks and hour?
__________________
Mike/Illinois |
|
#499
04-20-2014, 08:44 AM
|
||||
|
||||
|
I think you'll have to wait quite a while for that Rustoleum to cure since it is an non-hardened enamel, before you can attempt sanding it.
BTW you can see where I used the propane torch to clear out all the brazing from the valance to lower quarter seam. The original installer of those NOS quarters thought the gap was not supposed to be there, and filled it full of brass after installing the quarters. One side was mostly body filler but the other was a brazed up solid. I gently heated the area with a propane torch and used a wire handbrush to brush it out. It made me real nervous when I originally saw it as I thought they used steel wire to fill it and that would have taken serious grinding to get it out. The repair on that fiberglass tail panel is common- it comes from non-Firebird people trying to remove that panel and not knowing there is a single stud on the end, at the tip, holding it in place. One pull and the thin section snaps off. |
|
#500
04-20-2014, 09:08 AM
|
||||
|
||||
|
Boy, if those tail panels could talk.
The story on my Formula was after my car was painted probably 10 years ago. It was painted black and no letters popular with the Camaro crowd I heard. The guy I bought from got letters and painted it. It's close but not exact....
__________________
Mike/Illinois |
| Reply |
|
|
The PY Online Forums is the largest online gathering of Pontiac enthusiasts anywhere in the world. Founded in 1991, it was also the first online forum for people to gather and talk about their Pontiacs. Since then, it has become the mecca of Pontiac technical data and knowledge that no other place can surpass.







 Linear Mode

