


| FAQ |
| Members List |
| Social Groups |
| Calendar |
| Search |
| Today's Posts |
|
#601
 03-13-2015, 07:47 PM
|
||||
|
||||

|
|
#602
03-13-2015, 07:51 PM
|
||||
|
||||
|
The two-wires in the middle of the vacuum hoses are the same blue & white striped washer motor power wires...hard to get any good pic without pointer obscuring the wiring...
|
|
#603
03-13-2015, 08:00 PM
|
||||
|
||||

But my "BIG MISTAKE" was stating we have "PULSE" washer assembly seems with a bright light illumination the switch actual Sez "PUSH" so my "EXPERT Membership Card" will have to be forfeited
 yes? yes? (http://youtu.be/zANvYB93u2g)  |
|
#604
03-13-2015, 08:03 PM
|
||||
|
||||
|
So, in review - did any of this help you Bob?
PS: Just wanted to bump my post count to 2400 
|
|
#605
03-13-2015, 08:12 PM
|
|||
|
|||
|
Quote:
 Quote:
 . .
__________________
Steve F. |
|
#606
03-13-2015, 09:19 PM
|
||||
|
||||
|
Alvin - Thanks. Two questions:
1) Are the wires Blue and Black with a yellow stripe? 2) Can you look inside the convoluted tubing back toward the master cylinder and see if these two pump wires are wrapped in tape with the rest of the wires, or are they separate from the rest of the wires and just tucked loosely into the convoluted tubing. Have you gotten your car out on the road since you got it started? |
|
#607
03-13-2015, 09:25 PM
|
||||
|
||||
|
Quote:
Yes, TA is on the road
Last edited by Alvin; 03-13-2015 at 09:35 PM. |
|
#608
03-13-2015, 09:38 PM
|
||||
|
||||
|
PM Sent
PM sent rec'd error msg, resent for your convience |
|
#609
03-14-2015, 07:50 AM
|
||||
|
||||
|
Quote:
__________________
Some guys they just give up living And start dying little by little, piece by piece, Some guys come home from work and wash up, And go racin' in the street. Bruce Springsteen - Racing In The Street - 1978 |
|
#610
03-14-2015, 09:53 AM
|
||||
|
||||

|
|
#611
03-14-2015, 11:20 PM
|
||||
|
||||
|
Alvin - Thanks for the pictures. I'll give you a call tomorrow.
Got a few things done today. The radiator is now pretty much finished. The original radiator was a replacement, so I found a correct FD radiator with good tanks and had it re-cored. The cost of the new core and labor was $325 and the guy did a pretty good job and didn't get a lot of solder slopped around. I painted it with temp engine paint. I started with semi-gloss black, but it just didn't look right so I switched to gloss black which looked more correct. I also got the choke heat tube cleaned and up and finished. Actually I got two of them done since the extra intake I bought had one with it. I used high temp clear on the tubes and manifold gray on the base. Does anyone know if this part was mounted on the intake prior to the engine being painted? Here's some pictures.        
|
|
#612
03-15-2015, 11:38 AM
|
||||
|
||||
|
Nice work there.
|
|
#613
03-15-2015, 09:50 PM
|
||||
|
||||

While you were making more headway on the Y88 Bob; I was "loafing" on the F150 w oil change @ dealer then 4-wheel brake job in my driveway yesterday & washed two daily drivers, ; then taking advantage of our spring weather here today literally drained our koi pond, removed mega leaves & sludge, worked on flushing filters and pumps, freshwater fill, just in time to cleanup to attend Ama Luna w my lovely wife...so no TA Time for me this weekend other than installing electronic "trickle charger" on the new battery Friday evening...
You know; if I just cut out sleep, I might be able to do about 1/2 of what you're doing here on this awesome TA thread
|
|
#614
03-15-2015, 10:35 PM
|
||||
|
||||
|
You always find things the last place you look...
.....and the Corollary "You never remember what you forgot until you need it". Well this weekend was a lot about the things I forgot. We were hoping to get the engine advanced pretty well this weekend, but it didn't happen. First it turns out the pickup on the oil pump got crushed in shipping. Then there was no cam key for the camshaft. No dowel pins for the timing cover. No front crank seal. No mechanical lifters to check valve clearance. It was like a James Bond movie and I was Dr. No. All well, parts are coming and the finish line is in sight.
A few other things got done on the engine, The cam is in place and the end play on it and the crank checks out. MPD got his rigging set up to get the cam degreed (SD recommended 110 degrees). The parts are all sorted and ready, and once the missing pieces arrive this thing should move along quickly. A few other things got done as well. The exhaust crossover and runners on the intake got painted with POR 15 manifold paint so that once the engine paint burns off it will have protection and look good. The last load of stuff also got prepped and ready for powder coating including the air cleaner. I'm not sure what to do with it, but I was able to peel off what I think is the original AC Delco sticker from the air cleaner intact. I'm holding onto it trying to figure out what to do. It's a little confusing as the sticker had clearly shifted from it's orgonal position, but I can't imagine someone would have replaced this sticker 15 years ago when it was parked in long term storage??? Lastly, I got a bunch of stuff cleaned up and packaged to send out to Aero Propeller for plating. I'm sending the idle stop hardware, the EGR hold down bracket, and the exhaust shroud. I hope they come out well. Craig - thanks. Alvin - Wow, sounds like you had a busy day. You'll be so happy with the trickle charger. Nothing like not having to kook a battery charger every time you want to drive your car. Here's a few pictures.   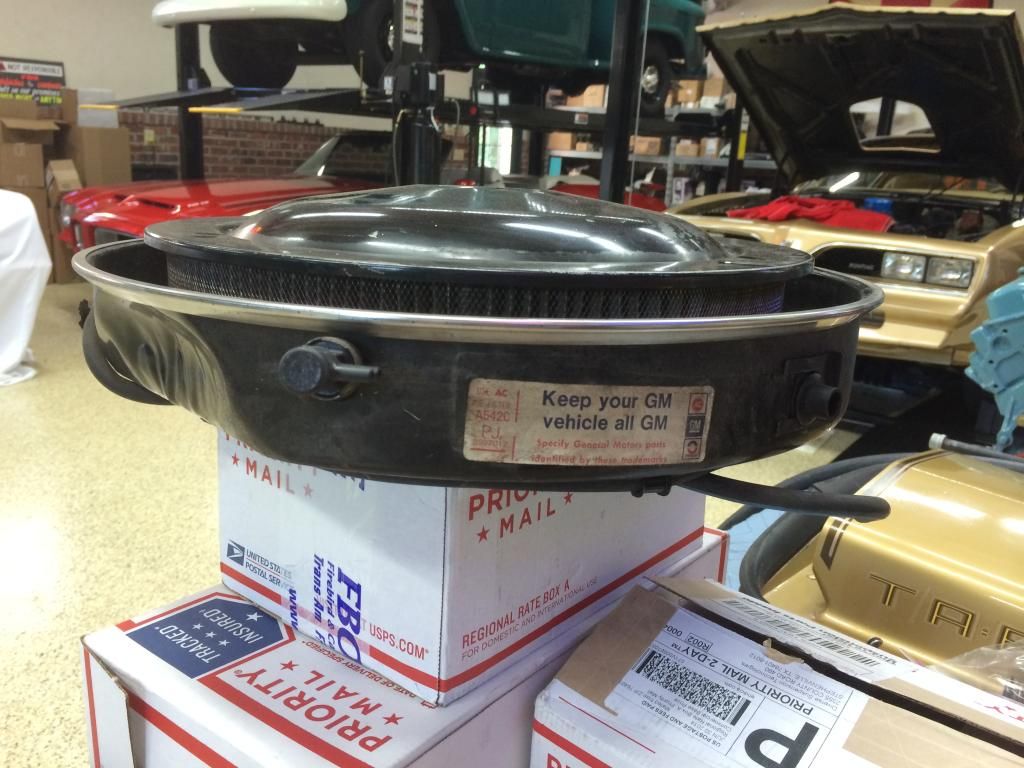 
|
|
#615
03-15-2015, 11:08 PM
|
||||
|
||||
|
For me - It is always tempting to remove the foundry extra casting slag like shown on those intakes.
What say you? |
|
#616
03-16-2015, 06:11 AM
|
||||
|
||||
|
I wasn't aware that POR15 was a high temp coating. I guess its not too surprising as it can withstand sandblasting to some degree. I have always used high temp silver paint under the blue for the same reason. The rust underneath the inevitable paint peel looks poor otherwise for sure.
Did you find your blue yet? I believe I have some 78 blue valve covers boxed up somewhere, I need to check..... Unfortunately my Y88 survivor cars engine has been touched up with an incorrect blue. Can't blame anyone but myself for that. When I bought the car, I detailed the engine compartment. Wish I wouldn't have now, but at the time it seemed like a no brainer to do. I also threw away the original spark plug wires & took zero pictures......  Never thought I would care years later. Never thought I would care years later.
__________________
 68 GTO 4-spd Convertible 78 S/E Trans am L78, WS6 Auto 78 S/E Trans am W72, WS6 Auto 79 10th aniv W72 Trans am 80 Indy pace car Trans am 89 Trans am GTA |
|
#617
03-16-2015, 06:35 AM
|
||||
|
||||
|
Quote:
http://www.firebirdcentral.com/1979_...p/sti-2029.htm |
|
#618
03-16-2015, 12:21 PM
|
|||
|
|||
|
My 79 has a PH sticker, not PJ. Maybe because it's a Formula, not TA, but I think this has been discussed before. Box 53 on build sheet confirms PH. Bob, your level of detail is amazing. I can't wait to see it all together.

__________________
 1972 Formula 455HO 1979 W72 Fire Am 1975 455 4 speed TA Last edited by dreamn69; 03-16-2015 at 12:47 PM. |
|
#619
03-16-2015, 01:26 PM
|
||||
|
||||
|
The 8997016 PH is indeed a '78-9 Formula air cleaner assy.
|
|
#620
03-16-2015, 02:04 PM
|
||||
|
||||
|
Quote:
Alvin - probably a good idea. I did that on my 455 HO intake, but hadn't really though about it here. It's a beautiful day here so I might just grag it outside this evening with the die grinder and clean it up some. Quote:
On the engine paint I have pretty much defaulted to OER paint since I couldn't find anything to use as a baseline for getting something mixed. If you have an original valve cover I could borrow that would be great. I would gladly pay shipping. Alternatively, you could take it and try to get it paint matched locally. I have used the OER paint to paint several of the bolts on this car that were originally painted blue. I would post a few pictures, but I think photobucket is on the fritz. I was planning on spraying the timing cover this evening. I'll add a picture of it later. |
| Reply |
|
|
The PY Online Forums is the largest online gathering of Pontiac enthusiasts anywhere in the world. Founded in 1991, it was also the first online forum for people to gather and talk about their Pontiacs. Since then, it has become the mecca of Pontiac technical data and knowledge that no other place can surpass.







 Linear Mode

