


| FAQ |
| Members List |
| Social Groups |
| Calendar |
| Search |
| Today's Posts |
|
#341
 08-23-2012, 09:25 PM
|
|||
|
|||

Quote:
Quote:
The corners of the reproduction quarters don't fit very well. I ended up cutting that section out and making new ones. I have heard that some have fixed the problem entirely with filler. I would use one of the metal fillers if solving the problem with filler only. Use the rear window molding as a guide for shaping the rear section. I didn't take pictures of everything, so sometimes I show the right side, sometimes the left, but you can get a general idea of what I did. The transition at the bottom of the rear window channel is also bad. That is the portion from the rear deck filler extending for several inches. If you don't correct this you will need alot of sealer to keeper water out. As you can see the fit is terrible. 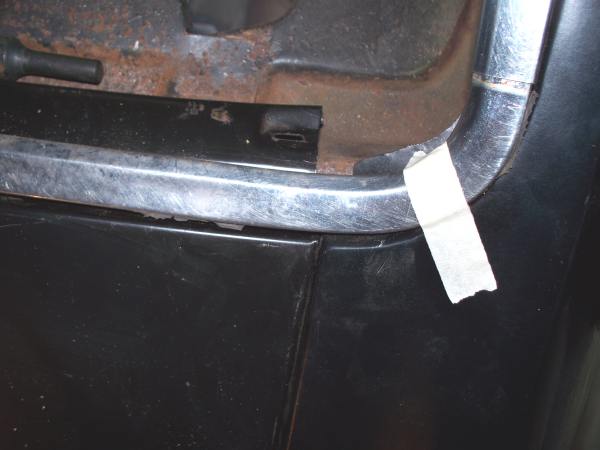 First I marked where the curve should have been using the rear window molding and cut the problem area off. 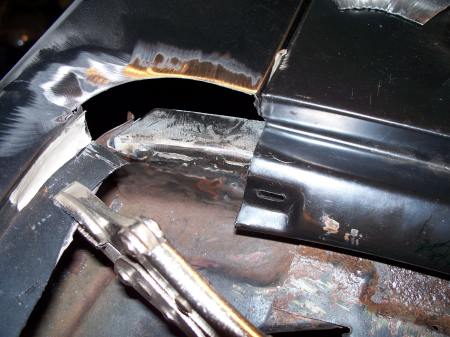 I made a new piece using a stretcher/shrinker. You could make this piece out of two pieces of metal and weld them together. 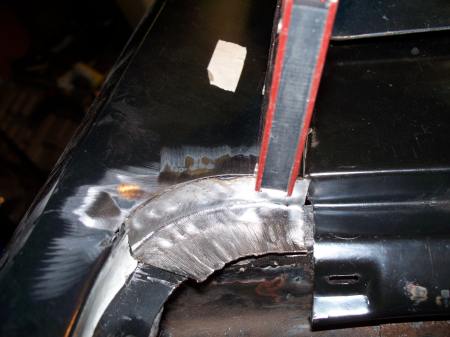 The finished result after welding. Later I did apply a thin layer of "All Metal" to smooth the work. 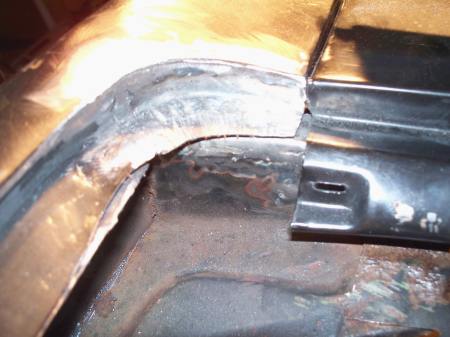 Molding after rework. 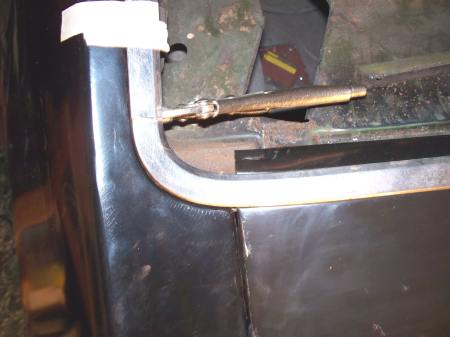 When making these modifications you should test fit the rear window to make sure the rear window fits the channel properly. Another warning. There seems to be some variation from quarter to quarter. You may not have the same problems I did. So just because I had to make these sections, doesn't mean you will. Some people have said they fixed the quarters using only filler, I see no way that would have worked on the passenger side. The driver side mod only corrected for the bottom of the rear windshield channel not mating with the rear windshield properly. The passenger side didn't mate with the rear windshield or mate properly with the molding.
__________________
68 Lemans - GTO appearance LS3 68 Eldorado - waiting for restoration 96 Roadmaster Wagon 2014 Infiniti Q50S Hybrid Marietta GA |
|
#342
08-23-2012, 10:06 PM
|
||||
|
||||
|
Thank you sir. It is a rot issue on mine. Corner is clear gone. I have a very nice rear panel from donor.
I thing the issue on the Warwick blue car is pic is in shaded shot. I seen car in full sun and is darn close to your test. Just what I saw.. Thanks again and great work.
__________________
Send it! It’s going home on a trailer. |
|
#343
08-23-2012, 10:42 PM
|
|||
|
|||
|
There wasn't much of mine left either.
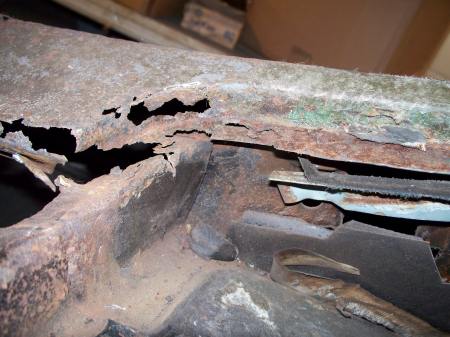 Since you have OEM metal it should be an easy repair. Just keep trimming the metal on your car till you get to good metal, cut your donor metal slightly larger, hold it in place, mark. Make the final cut carefully, so you have a gap about the thickness of a CD. Butt weld, use a copper backing plate to keep from blowing holes while welding. I make copper backing plates out of copper pipe. Just beat it flat with a hammer and cut to size. Very cheap and can be made to any size and shape needed.
__________________
68 Lemans - GTO appearance LS3 68 Eldorado - waiting for restoration 96 Roadmaster Wagon 2014 Infiniti Q50S Hybrid Marietta GA |
|
#344
08-28-2012, 12:34 AM
|
|||
|
|||
|
Work on the LeMans going slow. Life still getting in the way. Between complications on moving my dad to a new assisted living place and a large order at work, I don't get home until really late. Still . . . .
I did manage to work on the cluster a little each night. Getting closer to being able to install it. 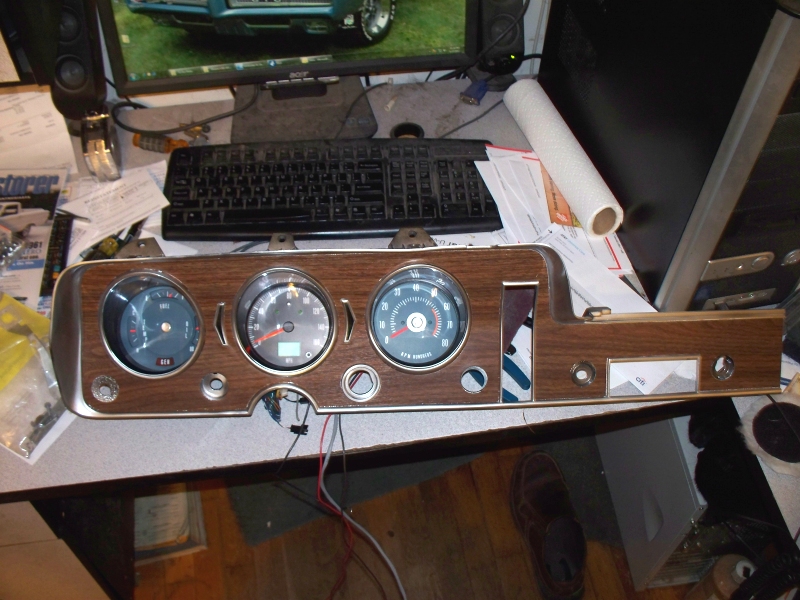 The speedometer is a SpeedHut unit, uses VSS signal from PCM, has digital odometer and trip, can be calibrated separately from the PCM. It's still best to have the PCM read correctly though. Tach is one of the aftermarket in dash replacements. Gauges are aftermarket stock appearing replacement. Oil pressure will read from a stock sending unit adapted to fit the metric fitting at the back of the block. PCM doesn't read the oil pressure. Fuel gauge is feed from a stock type sending unit mounted in the Rick's gas tank. Water temperature. I have yet to decide on how the solve this. There are several options. 1) OP amp circuit to convert a LS1 type sender to feed a 68 style gauge. There is a dual temperature sender available that one part would feed the PCM and the other feeds the gauge. In the original application, this would be a 2002 Camaro gauge. This is probably the easiest solution. 2) Custom BCM to read the OBDII signals and convert the PCM water temperature to a signal compatible with the 68 gauge. This solution adds the possibility of custom calibration to make the gauge positions actually mean something. Like calibrate it so that the gauge is in the middle position when the car is at normal operating temperature. There are single chip controllers and OBDII interface chips that make this solution fairly easy. However if I go this way I would program more functions in the computer. Functions such as delayed accessory power, control for the cornering lights. A small display could show any of the PCM parameters, speed, Tach, temp, O2 sensor, intake temperature and probably a dozen more. I think Painless is working on a similar gauge controller. It might be available by the time I need one. 3) I list this just to be complete, but I don't consider it to be very good. There is a plug in the back of the passenger side head. Some have stacked a series of adapters to allow the stock sending unit to be screwed in. The problem is the size of the stock sending unit. The sending unit will be located outside of the cylinder head and will not be in flowing water. Of course it is possible to get an aftermarket gauge and sending unit that will work in the passenger head, but I wanted the stock gauge to work. 4) While I'm not considering this option, I list it for others. SpeedHut is about to release CAN Gauges. These Gauges connect to the OBDII diagnostic port, and reads out the PCM value. There are Gauges for speed, Tach, water, voltage, etc.
__________________
68 Lemans - GTO appearance LS3 68 Eldorado - waiting for restoration 96 Roadmaster Wagon 2014 Infiniti Q50S Hybrid Marietta GA |
|
#345
09-11-2012, 01:18 AM
|
|||
|
|||
|
It seems like there is non stop bad news in my life. About a week ago my girl friend's mother fractured her back. She's 93 and was living alone at that time. Helping my girlfriend deal with her mother pretty much put any real work on hold.
On top of that I injured my foot, apparently pulled tendons, so I don't walk so well. My doctor thinks it will take 6 to 8 weeks to heal. This leaves working on things that don't involve much moving around. So installation of the instrument panel wins, so here is a work in progress picture. 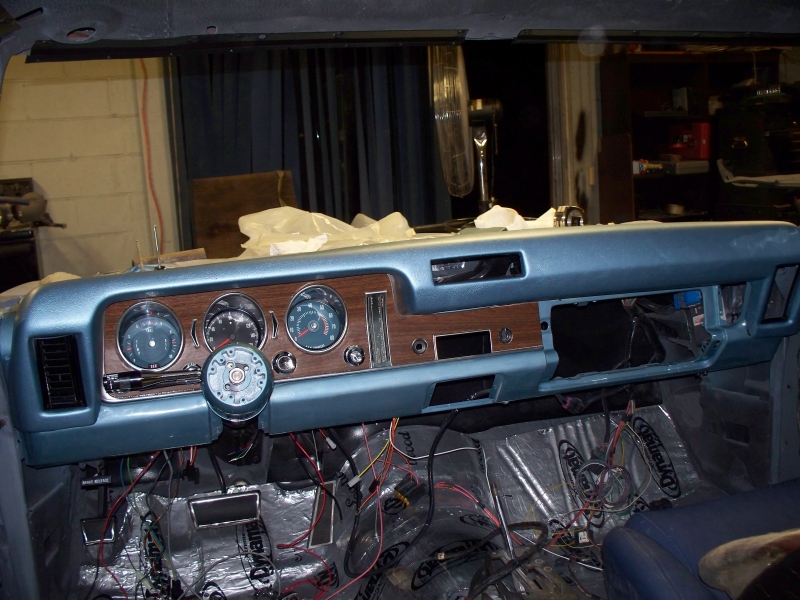 Current problems so far, reproduction headlight knob/shaft too long, reproduction cigarette lighter receptacle is made wrong. The dash pad is being a real pain. The studs that hold the AC vent deflectors at each end of the dash as not positioned correctly and the opening is slightly too small. The middle vent opening appears to be OK. I have managed to install the driver side vent so it looks good, but the passenger side will take a lot of work. The pad came from OPG and is not too good. It looked OK when I received it, but installing has proved to be a very difficult task. I wish I had sent my original pad to "Just Dashes". Wiring is progressing slowly, but I am making progress. Part of slowness is due to the car being partially disassembled so I don't have pictures/notes of how it was wired. At least there are pictures/diagrams in the service manual. The wiring harness I am installing came for American Autowire. I hope someone makes a correct length headlight knob. My original is missing chrome on the front. 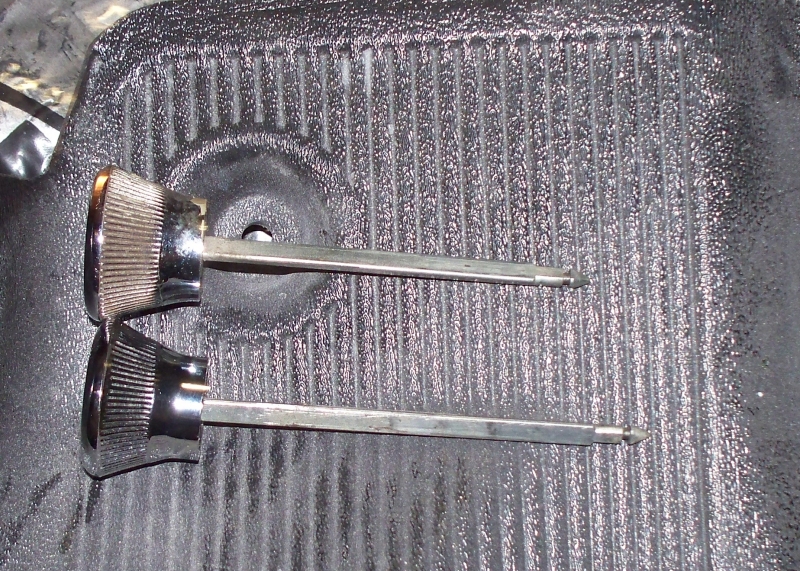 Problems with the cigarette lighter. This is original, the connection point gets fatter along the pink line, this is where contact is made by the wiring harness. The reproduction unit I have has the same diameter (green line) along the entire length. I didn't discover this until attempting to connect the power lead to it.  Driver side vent installed turned out good. I had to carve foam out from around the opening to make the vent deflector fit the opening, the studs that hold the deflector in were only off about 3/16" on this side. On the passenger side, the studs are at least 3/4" out of position. 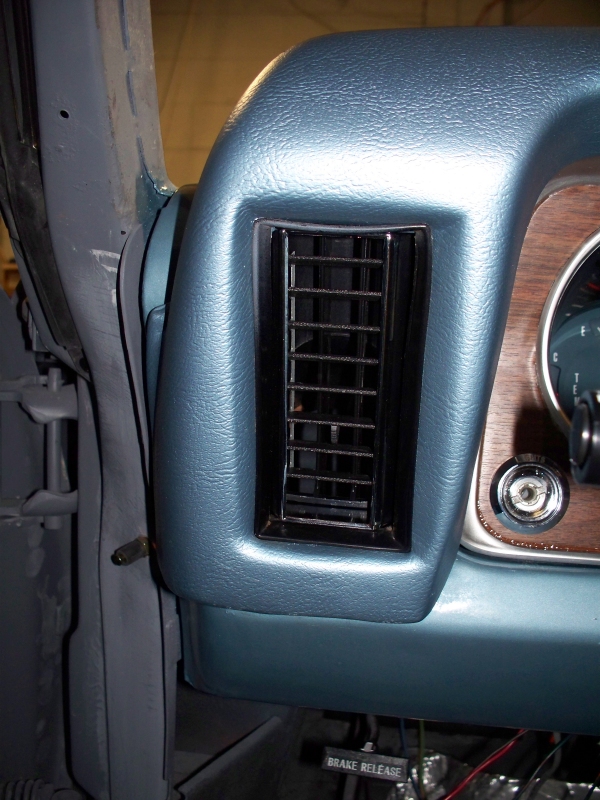
__________________
68 Lemans - GTO appearance LS3 68 Eldorado - waiting for restoration 96 Roadmaster Wagon 2014 Infiniti Q50S Hybrid Marietta GA |
|
#346
09-13-2012, 12:14 AM
|
|||
|
|||
|
Cigarette lighter problem resolved. When I managed to get my head up inside the dash I was able to see that the power connection shaft did have a fat part, but it was very short, maybe about 1/4 of the length of the OEM part. It was also larger and the transition from the small to the fat was not tapered like the OEM part. By cutting the thin part of the power connection shaft so that is was much shorter, it was possible to get the power connector to reach the fat part of the shaft. The connector still wouldn't push in due to the fat part being larger in diameter. By cutting the plastic insulator off and spreading the connector out a little it was possible to install the connector. I used some heat shrink tubing to insulate the power connection.
While I don't care for the cigarette lighter to function, I do want to be able to charge cell phones, cameras and other electronic devices. Since it doesn't look like the courtesy light has been reproduced, I spent some time cleaning up and polishing the plastic part. Originally this part was yellow and very dirty. Sorry the before picture was too blurred to post. While I'm not a big fan of LED lights, I think I will convert to courtesy light to LED. The heat of the bulb has already cracked a piece of the plastic. I'm also planning to use a LED light in the dome light, the incandescent light melted the original housing and dis-colored the cover. 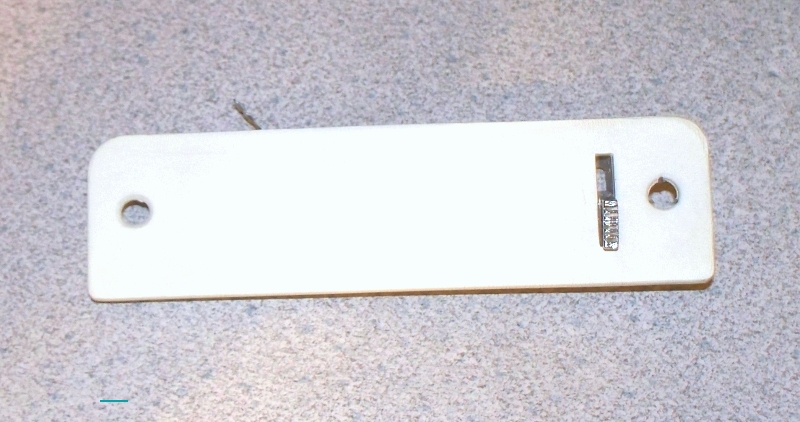 Also got a few more wires connected in the dash, put a little more of the dash together. I should be able to do some testing with power applied in another day or two. 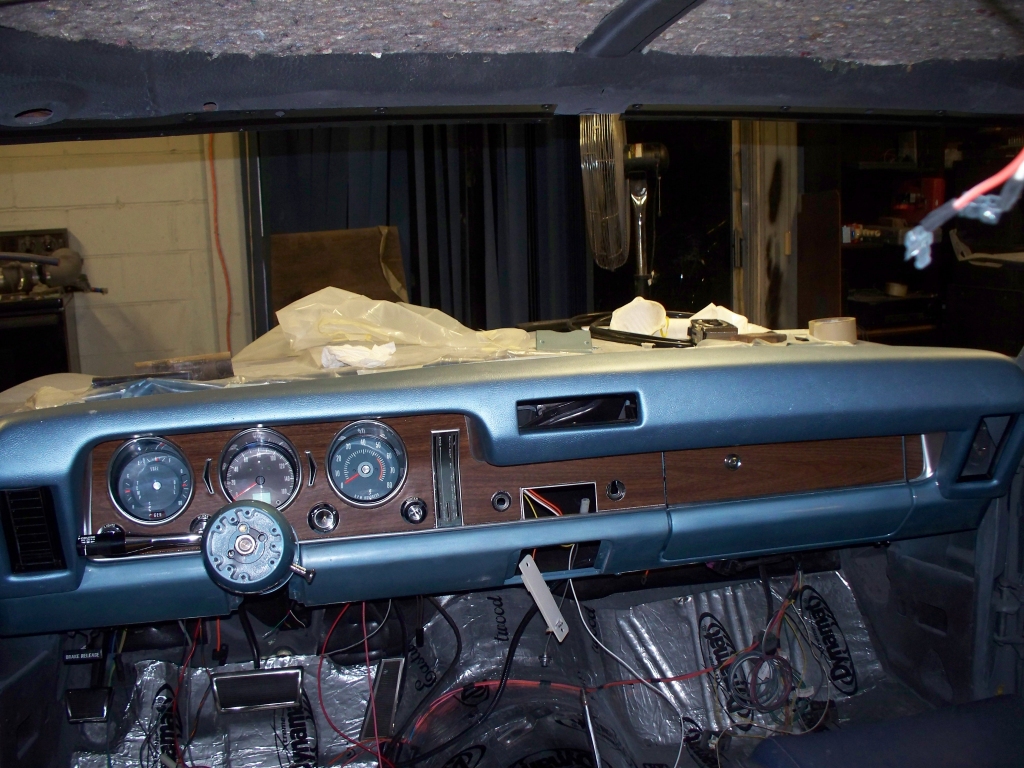
__________________
68 Lemans - GTO appearance LS3 68 Eldorado - waiting for restoration 96 Roadmaster Wagon 2014 Infiniti Q50S Hybrid Marietta GA |
|
#347
09-13-2012, 07:10 PM
|
||||
|
||||
|
What color is the wire going to the dash courtesy light?
I found one in the junkyard the other day. Been looking for years. According to the prints, it's red with a double black stripe. I haven't seen that wire but I do have a loose yellow wire with, I believe, a green stripe.
__________________
Greg Reid Palmetto, Georgia |
|
#348
09-13-2012, 11:12 PM
|
|||
|
|||
|
From what I can find out the drawing below is what should connect to the light.
 I don't have any White/Black stripe wires in either the old harness or the new. There was no wire connected when I got the car. The White/black wire connection could be spliced in to the wire that connects to the passenger door light switch. The passenger door light wire should be close by. (White). I don't know how the metal tab was grounded by the factory. I can't believe that the metal core in the dash pad would be a good ground. I'm simply going to attach a clip to the back of the screw and ground it since I don't know how the factory did it and can't find any drawings. A yellow wire near the radio opening would be power for the radio.
__________________
68 Lemans - GTO appearance LS3 68 Eldorado - waiting for restoration 96 Roadmaster Wagon 2014 Infiniti Q50S Hybrid Marietta GA |
|
#349
09-13-2012, 11:49 PM
|
||||
|
||||
|
I just went back out and looked....I was mistaken. The wire I thought was yellow and green was actually a faded orange and black. I have it working now.
I didn't even see a black/white wire in that circuit on the prints.. Just going to ground that side. BTW, that dash is looking great!
__________________
Greg Reid Palmetto, Georgia |
|
#350
09-13-2012, 11:59 PM
|
||||
|
||||
|
Uh, oh...I just realized that if I wired it the way I just said, it would be on all the time. I have to ground the tab as you have it marked.
The only way the black/white wire would work would be in an 'applied ground' situation. Maybe it works that way on another application like convertibles? At any rate, the last '68 I had was over 25 years ago...but I do not recall that light coming on with the doors open or any other way except with the switch. I think that prong is not used.
__________________
Greg Reid Palmetto, Georgia |
|
#351
09-14-2012, 12:21 AM
|
|||
|
|||
|
It looks to me like the courtesy light should light for the following conditions.
1) either or both doors open 2) the headlight switch rotated to the extreme left. 3) the switch on the courtesy light activated. It also appears that the dome light would come on anytime the courtesy light is on. This is based on my studies of the diagrams and schematics. I have already concluded that the schematics don't exactly match to car and can be only a guide at best. Here is the drawing of the instrument panel in case it helps. If you add a wire that I show as a green line, you should get it working. If you want the switch to work, you must connect a ground the metal tab that the screw hole passes through. Quote:

__________________
68 Lemans - GTO appearance LS3 68 Eldorado - waiting for restoration 96 Roadmaster Wagon 2014 Infiniti Q50S Hybrid Marietta GA |
|
#352
09-14-2012, 12:44 AM
|
|||
|
|||
|
If you look at the drawing above the black wire coming out of the courtesy light makes its way back to a connector near the head light switch. The RH door jam switch also makes it back to the head light switch. I'm baffled as to how this wire was run in my car since neither the OEM harness or the Autowire harness has such a connector. However the splicing into the RH door jam wire would had the same effect.
The White with Black stripe color that I listed came from another post. I was unable to find any reference to the color of the wire in any of my documentation. BTW the wiring in my car was really messed up, wires cut, spliced etc, it looked like a rats nest, so that fact that parts of the wiring is missing is not surprising.
__________________
68 Lemans - GTO appearance LS3 68 Eldorado - waiting for restoration 96 Roadmaster Wagon 2014 Infiniti Q50S Hybrid Marietta GA |
|
#353
09-14-2012, 09:20 AM
|
||||
|
||||
|
It works fine now with the one wire attached and the ground plane connected to ground with a jumper. Switch opens the connector to the ground plane so it goes off.... As for the second wire, well it's a mystery to me. That drawing clearly shows wires on both prongs...Yet the schematic just shows a ground connection and a power connection.
I may ask someone who has an original untouched one to take a look. The car I pulled this one out of was very original, but the dashpad had been removed and was lying in the floor. I took the light out when I noticed it was still in place. Like I said, I don't recall that light coming on in my other car unless I switched it on. It was an untouched original car. Just doesn't seem like a map light should come on with the doors open....but I've forgotten more important things than that in the last 25 years...lol By the way... I believe the light will get a good ground just with the screw in the dash. I checked that metal hardpoint where courtesy light mounts into and it's got good continuity with the exposed metal parts of the dash over the instrument panel.
__________________
Greg Reid Palmetto, Georgia Last edited by Greg Reid; 09-14-2012 at 09:34 AM. |
|
#354
09-14-2012, 11:06 PM
|
||||
|
||||
|
I got to the bottom of the wiring question I think...
http://forums.maxperformanceinc.com/...d.php?t=708779
__________________
Greg Reid Palmetto, Georgia |
|
#355
09-15-2012, 01:32 AM
|
|||
|
|||
|
It would make sense that the courtesy light to light with the door switch in a convertible since there is otherwise no interior lighting. I was looking at the diagram show below to make my assumptions. Unfortunately no mention is made of convertible only wiring.
There had been a connector pushed on the secondary ground point on my car, so I assumed I had missing wiring. Of course this wire was missing when I took the car apart so I have no idea as to where it had been connected. 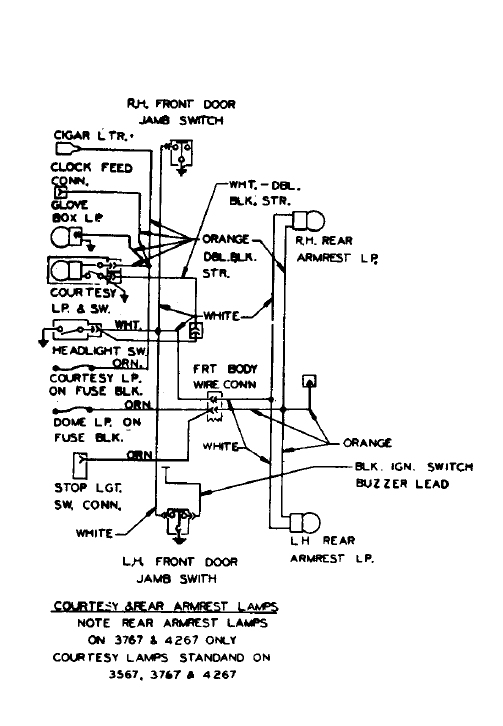 Oh the joys of assembling a car when lots of it was missing, you don't know how it worked originally, or how it was put together. Quote:
__________________
68 Lemans - GTO appearance LS3 68 Eldorado - waiting for restoration 96 Roadmaster Wagon 2014 Infiniti Q50S Hybrid Marietta GA |
|
#356
09-15-2012, 10:03 AM
|
||||
|
||||
|
Yeah, an extra ground never hurt anything, that's for sure.
The print appears to apply to convertibles only...that is, cars with model numbers that end with '67'.
__________________
Greg Reid Palmetto, Georgia |
|
#357
09-16-2012, 02:57 PM
|
||||
|
||||
|
Greg,
GM door switches ground the light circuit to turn the dome light on. You could run an extra wire to the terminal that yo speak of and have it work both with the doors and with the switch.
__________________
Tod Hoffmann 1966 GTO Montero Red Hardtop - Holley EFI'd 462, KRE DPorts/Muncie 4spd 1990 Chevy 454SS pickup - Accel DFI/T56 6spd - Hot Rod Power Tour Long Hauler 1996 Chevy K2500 ECSB 'Poopy' 2002 Honda VTX1800C 2016 Cadillac CTS Premium My project thread: http://forums.maxperformanceinc.com/...d.php?t=516826 
|
|
#358
09-16-2012, 02:59 PM
|
||||
|
||||
|
Yep, that's pretty much what you see on the convertibles print above.....since converts are dome light challenged I guess.
__________________
Greg Reid Palmetto, Georgia |
|
#359
09-17-2012, 01:56 AM
|
|||
|
|||
|
I worked on the nightmare dash pad today. Lots of work, not sure if there was a better way, but interior trim is not my strong point.
The trim ring slips in and then part of the air vent get fashioned to the studs on one end and screwed into the dash on the other. Not even close to aligning. The green arrows show how much farther it needs to go and the slot is out of adjustment. 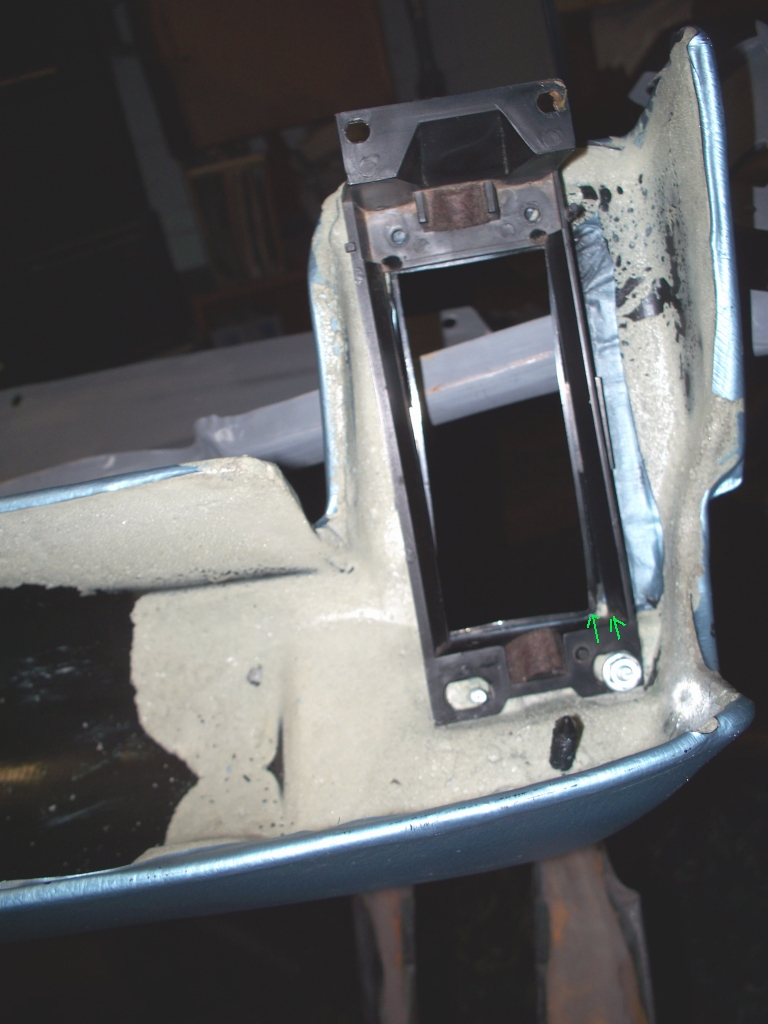 This is a mock up as it is. Vent can't even be adjusted. 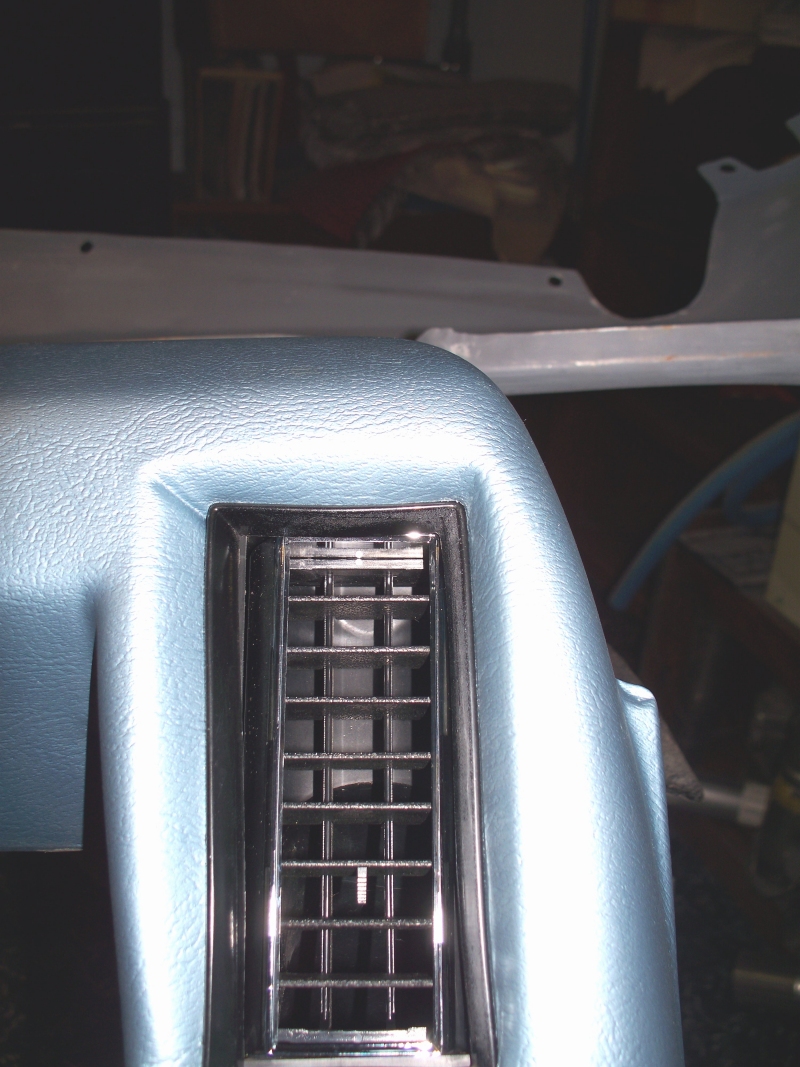 I had to carve away the foam as well as lengthen the slots in the dash vent retainer. 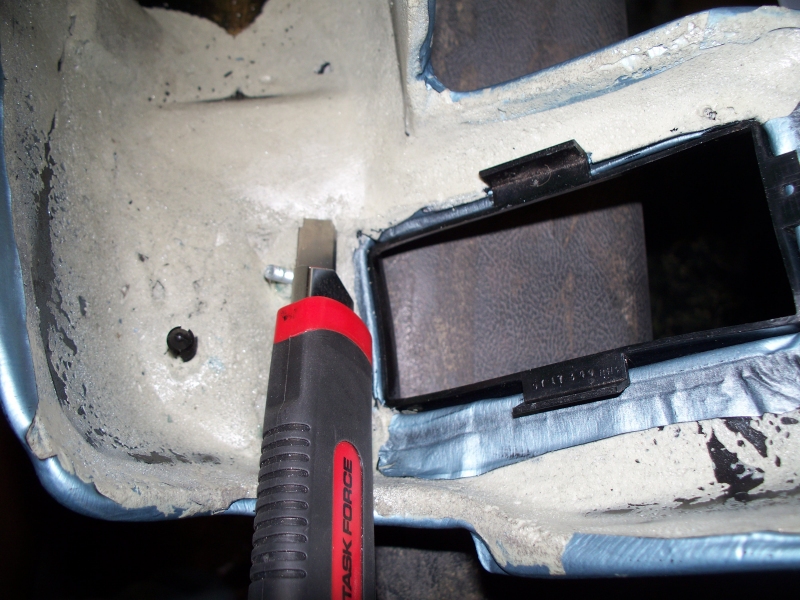 Not centered perfect but much better. This is as good as it gets without moving the mounting studs, which is beyond my ability.  The vent is likely to point toward the passenger anyway, so the alignment problem is even less noticeable. This guy was painful to install, the cutout was not marked properly and took a lot of cutting and trimming to get it to fit well.  Cut slots in the pad for the metal retaining clips. Since the pad is foam and plastic, these clips are not retained too good, but will work. 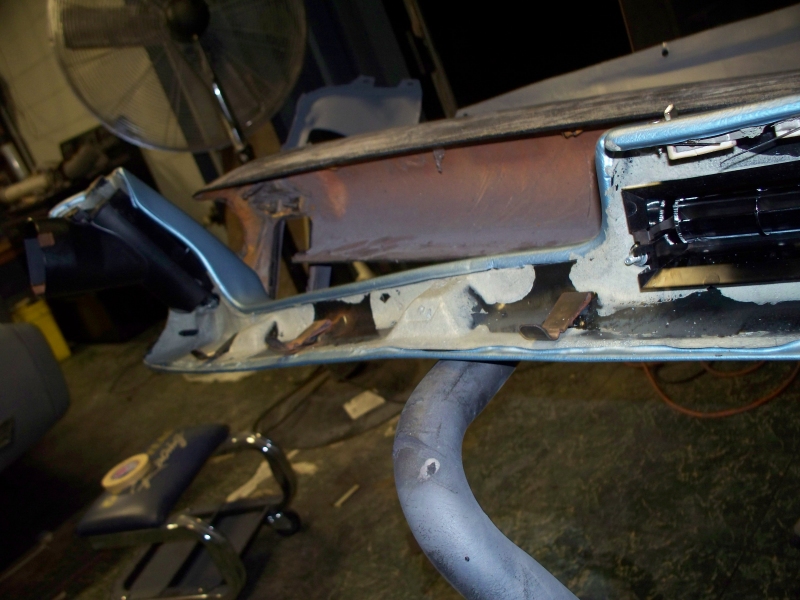 It appears that will all the clips installed and with screws installed, the pad will stay in place and will look good, but is not nearly as secure as the factory pad. It appears that the dash pad sold by OPG is not the same one sold by Performance Years and AMES. The PY/AMES listing talks about a fiberglass core. This dash is simply foam pressed between two thick sheets of stiff plastic that was molded into shape. If I had know how bad the repro dash pad was, I might have sent my original dash to "Just Dashes". Still when bought on sale, this dash was only $249. I hear "Just Dashes" gets about $1000 to rework a 68 GTO Dash. 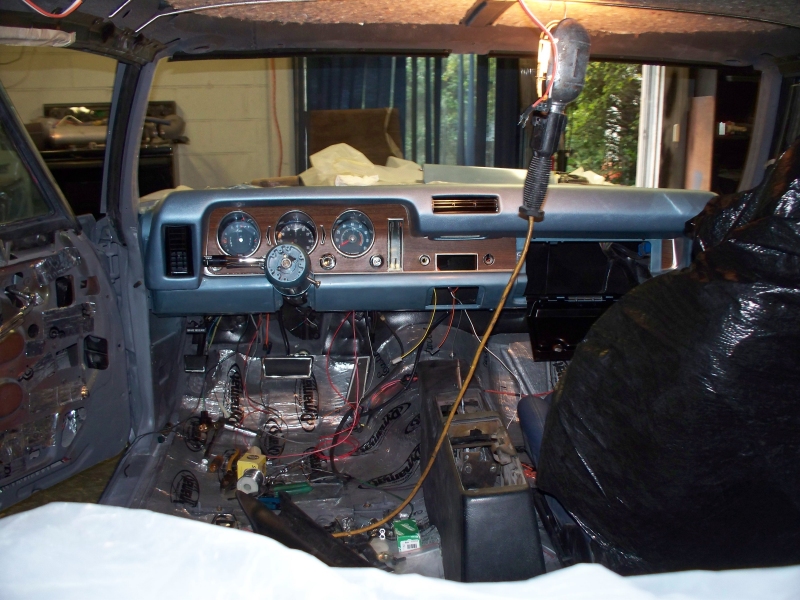 I failed to paint the retaining clip for the glove box door. I guess its just a well since I ended up grinding away part of the bracket to keep it from scraping. Every attempt to bend the bracket just didn't quite work. I removed about 1/32" along the blue line. I also ground a little bit on the dash opening. I think this flaw probably existed since the car was built. 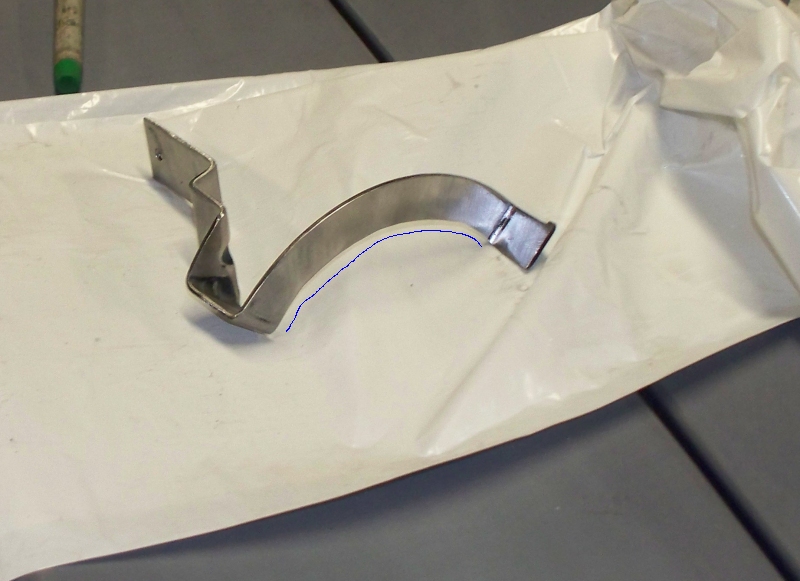 I guess I should mention that the center AC Vent installed without problems. 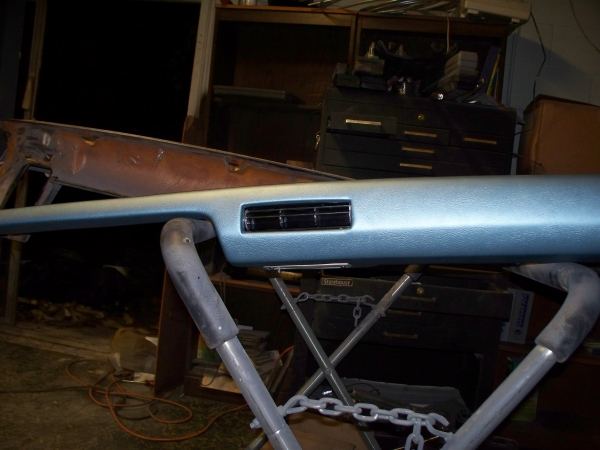
__________________
68 Lemans - GTO appearance LS3 68 Eldorado - waiting for restoration 96 Roadmaster Wagon 2014 Infiniti Q50S Hybrid Marietta GA |
|
#360
09-17-2012, 10:38 AM
|
||||
|
||||
|
Even with all the trouble you went through with the pad, it looks fantastic. Funny, I just had to bend my glovebox door stop yesterday. Same thing.....scraping since I first got the car.
__________________
Greg Reid Palmetto, Georgia |
| Reply |
| Thread Tools | |
| Display Modes | |
|
|
The PY Online Forums is the largest online gathering of Pontiac enthusiasts anywhere in the world. Founded in 1991, it was also the first online forum for people to gather and talk about their Pontiacs. Since then, it has become the mecca of Pontiac technical data and knowledge that no other place can surpass.




 Linear Mode

