


| FAQ |
| Members List |
| Social Groups |
| Calendar |
| Search |
| Today's Posts |
|
|
|
#1
 05-23-2020, 01:08 AM
|
||||
|
||||
 frame
frame
This is where any idea of a schedule just starts to fade out of sight. Not necessarily due to the nature of the fix but more from my indecision on how far I want to go with it all. We all suffer from it to some degree I'm sure.
For years now, I could lean on the drivers side front fender and get a very audible squeak from the front end. Through the course of time, I had replaced shocks and springs, but the squeak was still there. I just assumed it was a poly bushing I hadn't lubed enough. I was told they were noisier that stock, so I was resigned to live with it. Amazing what you discover when removing 20 years of history. This is the inside frame rail, behind the engine cross member, drivers side. I think I just found the source of my squeak:  Well, %^^/ . Add another setback to the list. So in cleaning this up, I couldn't help but be astounded how shoddy the factory weld was in such a critical location. Take a look. Do these edges have any evidence of good weld penetration? No wonder it cracked. As a matter of fact, I cant believe its not worse considering what I put this car through.  Don't worry, I got the angle and die grinder in there to fully dig out the crack before welding it up. A little too much splatter, but this ought to hold it together. This is pass 2, over a narrower bead in pass 1.  Trying to control the heat so I didn't melt the paint and still get a solid weld was a balancing act. The passenger side of the cross member was almost as bad - here is the fix for that:  Now I wish I could say I thought to check the rest of the welded joints after this discovery, but I was so angry about being further behind schedule and scraping off sealer now in TWO friggin spots, I couldn't really see straight. The focus was getting these locations sanded, blended and resealed as quickly as possible, which I did, so I could move on to color. Then it kept gnawing at me over the week. Eating, digging and grinding away in my head - check those other welded joints. Eating breakfast; check those other welded joints... Brushing my teeth: check those other welded joints... In a meeting at work: Check those other welded joints! ME: Do I really need to? They're probably fine. They were on there for almost 50 years! ALSO ME: Just take a look at them...... ME:But setting up to weld and repaint is a royal PITA...masking, sanding, cleaning.... ALSO ME: You only want to do this once, right? ME: Maybe?? Friggin ME. Fine, I'll look at them. You tell me - good decision? Passenger side, rear lower control arm bracket:  I understand for a passenger car in the 70s, this was probably fine. Heck, it stood this long, so it cant be all that bad. Did I really need to "fix" it though? Considering the hard hits on the pavement the front end may see going forward, I thought it best to put a full bead both inside and out on every suspension bracket that didn't have one, which was pretty much all of them. After -  BTW, don't be concerned about that washer welded to the backside of the bracket or all that metal on the inside. That is finely crafted, precision work done by me to clean up an elongated hole in the mount from a previous transgression. Remember, this car went though the entire family before it got to me~! I don't have pictures of the other locations but they were all pretty bad. The only suspension locations that didn't need reinforcement were the upper control arm mounts, and the engine cross member to frame on the radiator side of the car.
__________________
. Mark S . Who needs nice and pretty, when you can have mean and nasty? KRE Aluminum headed 463CID 73 LeMans. Used to run 10.6x @ 124.55. 3700lbs . So much for 2020...shootin for 9s in 2021...and in 2022 apparently.....and 2023....and 2024.....and 2025.....who am I kidding? there will be no 9s with this engine! >>My 73 Build thread |
|
#2
05-23-2020, 09:54 AM
|
|||
|
|||
|
Glad you mentioned that. It's something I'll look for when I do mine. Thanks!
__________________
Steve F. |
|
#3
05-24-2020, 01:49 AM
|
||||
|
||||
|
Rinse. Lather. Repeat.
The real problem with any of these issues was only having 2 days a week to address them. Even then, those would never be full days - too much other stuff to do when you're the only one on the job. Painting issues are the worst because as anyone who ever picked up a spray can knows, they require a process each and every time to ensure a decent outcome. If you skimp, it'll show.
When it came to painting the sealer for instance, each time I could only bite off what I could complete in a reasonable time frame, and then I'd use that time to strip, clean, weld, clean again, sand, mask, clean yet again, and finally, reseal. This is why a couple of pictures could easily be the result of two weeks in time. When I look back and ask myself 'why did it take me so long', its easy to forget. Seeing these pictures brings it all back. With the sealer finally complete, I knew all of these painting issues would just fade away. <<little paint joke there for ya. Fade? If I only knew what lie ahead... ================================================== ================================================== ==================================== My goal for the front end was to look more factory 'type' in appearance. I researched this board almost exclusively for what folks were using for chassis and firewall paint and I looked at a ton of pictures. The effect I was going for wasn't necessarily what GM did in 73, just something in general to mimic the factory contrast between a shiny frame rail and a semi gloss firewall. I didn't want flat paint, and I didn't want multiple shades/sheens of black. All I needed was something that looked good, was tough, and would clean up easily. (without fender wells, dust happens just looking at it) There is a lot of paint out there for restoration and many places claim to have the correct GM sheen for any piece you may want to color up. Of course they will gladly charge you a premium for such correctness, so I decided on something a little less extravagant. Ta-dah!!!  Yup. Same stuff I used on the core support. I wasn't convinced a spray can could get me the consistent results I needed for this large area, but the core did come out pretty good, so I was willing to give it another shot. I guess its nice not having a good memory sometimes, right? The pain fades, the results stay and you eventually say to yourself, "yeah, Id love to do that again!" Why does that happen? Is it a coping mechanism? I suppose without it, we'd never fall in love, trust, build another car or get back up on that proverbial horse, right? I hope you like these pictures. Took me 3 rounds of paint and wet sanding (400) to get the finish to feel smooth.    Danny LaRusso never did this much sanding, I can guarantee you that. This time around, I think it was more a lack of proper lighting than anything paint or condition related. There isn't a ton of room to get lights up and under along with me, and most of the issues I had were either on the inside, or under the rail. On to the firewall!  The firewall only took two rounds of paint with a wet sand (400) in between to get good. I guess that's progress??   In retrospect, I wont say I wont use the MS paint again, but lets say I was fully appreciating the Rustoleum in these shots. Don't get me wrong - I love the way it came out, but over a wide range of conditions that I never gave any mind to, Rustoleum came out exactly as I planned. This stuff? I guess I need to be more of an expert to figure it out, or at least commit the proper technique to memory. OK, what technique was that again? You mean TECnique paint? Ooohhh, frame rails you say? Sure! Let me get my tools....
__________________
. Mark S . Who needs nice and pretty, when you can have mean and nasty? KRE Aluminum headed 463CID 73 LeMans. Used to run 10.6x @ 124.55. 3700lbs . So much for 2020...shootin for 9s in 2021...and in 2022 apparently.....and 2023....and 2024.....and 2025.....who am I kidding? there will be no 9s with this engine! >>My 73 Build thread |
|
#4
05-26-2020, 02:43 AM
|
||||
|
||||
|
someone told me this would be fun - it isnt.
With the painting it done, its time to figure out where all this stuff goes -
 In the upper right part of the table, you can see the steering box - same one I used before, just cleaned up and painted. Its a manual box, but I'll be damned if I can remember from what. Here is a better shot.  Its done in a metallic oil rubbed bronze. (happy trees! Prussian Blue, Burnt Umber, Cadmium Yellow etc) I thought it would be a nice accent against the boring black. Did the tie rods, center link, and idler arm in the same color, but used these to tie the rods together. (see what I did there - tie the rods?)  . . I wanted to replace the bushings this time around too. The polys had a good run of 23 years, but I figured its time to give the Global West Del-a-Lums a shot. That blue sure is pretty.  Man, this internet thing makes things go together real fast!!  Rumor has it these calipers get sticky. I guess ill find out.  The reason there are so few words to go with these pictures is because there wasn't much to tell. The passenger side was uneventful. Nothing we all haven't done a 1000 times. The problem, along with a 2 month delay, came when I tried to put the drivers side together. Grab a coffee - this might take a while. I was the one to assemble the front end when I made the switch to polyurethane bushings all those years ago. I recall the passenger side lower control arm being slightly easier to assemble than the drivers, but it all went together in the normal way - brute force and ignorance. (drift pins, some persuasion tools, and BAM, when stuff lines up, send the bolt) I remember the drivers side LCA being slightly more stubborn, but it dropped in and moved freely - it just took a bit more time to install. Fast forward to now - er, last February - and I have a problem. The LCA wont go in. Its too wide. You heard me - its not fitting in the hole. Lots of banging, lots of swearing, and it still ain't going in. Lots of paint removed, lots of scuffing to the nylon bushing, but still no dice. Its almost as if something had moved. Check it out - I've got a ton of pictures showing how far off the arm is from the pocket - not sure which ones to choose, so I'll go with these from the "I'm Sending This Car Over a Cliff" collection. Rear bracket bobs   Well, that's a bit odd, wouldn't you say? Its seems I cant even draw line through the holes in the rear frame bracket. Not sure why since the same arm came out of this slot. It an easy enough fix, I just don't understand why I have to make it. Did the bracket get tweaked when I welded it? I was very careful to control the heat. Remember, I only took off as little paint as possible. so if heat was high, melted or bubbled paint would have been a clue. There was none. Did the arm get tweaked at the powder coater? Possible, but unlikely. Regardless, moving this bracket back to where it belongs ought to make it all better, right? Yeah, no. Front bolt hole - I can get the extension through the cross member, but if you can look closely enough (pic sucks for it tho) I'm centered on the rear hole, but hitting the bottom of front hole. Translation - no bolt fitty.  If I wanted to drive around with a punch acting as my LCA bolt, I can make this work! (I wouldn't recommend it though). And while I have no alignment shims present in this pic, this doesn't seem like the right ball joint path either-  There was no way of getting front bolt to drop in. Focusing on the arm, I took a lot of measurements and everything seemed to be in factory spec. (ear angle, spacing between the bushings, center of joint to bushing etc) Maybe if I changed the angle on the ears ever so slightly, I could get it to work? Tried that in a buddy's press. No pics and worse, still no dice. May be If I change the angle of only the front ear? You can see how little it needs to go in this pic -  Gotta be careful though - too much angle and the hole centers will never line up. And if I'm going to apply heat (and I am) I have to be concerned about losing the taper on the bushing cup. I know this because I lost the taper on the bushing cup.  Plan B - New control arm! Same problem.(at least now I knew it wasn't the arm)  I had some drastic Ideas - cut, move, weld?  Ok, ok, coffee is running low, so gotta wrap this up. In full disclosure, this car had a hard life. Its been hit in this corner 5 times and in the picture below, you can see how hard the cross member on this side hit a set of railroad tracks way back in 78. My welder welded this plate on there about 10 years ago.  This has been like this for the entire time I've had the car - why would this now be a problem? The frame is straight. I know this because it was a on a rack 12 years ago, and as soon as it went up on stands for this past makeover, I bobbed and lasered all the factory frame points. This frame is within a 1/4" of factory specs. Its good. In all likelihood, this cross member certainly wasn't helping the situation, but I'm finding to hard to believe its the sole source of my problem. Regardless, on the consultation of folks with far more experience than me, the idea they had was a solution with which I was not happy -  That was the result of a lot of heat and a bolt with two thick giant washers on either end drawing the cross member closer. After all this, the the arm still didn't fit 100% (albeit closer). It was only after I swapped out the ZERO deflection Del-a-Lum bushing for something softer (poly) that I could work the arm into position. Then I got to experience the joy of masking off the car for paint. Again. Then I got to experience the joy of applying sealer to the cross member. Again. Then I got to experience the joy applying color to the cross member. Again. Then I got to experience the joy of being able wet sand (400) the cross member. Again. Then I got to experience the joy applying color to the cross member. Again   On the plus side - I only lost the taper for the Del bushing. The poly bushing I put in its place went in nicely and is sitting tight. We'll see what future issues that brings. AND my powder coater redid the LCA for nothing. Its the little things. Man, this internet thing makes things go together real fast!! 
__________________
. Mark S . Who needs nice and pretty, when you can have mean and nasty? KRE Aluminum headed 463CID 73 LeMans. Used to run 10.6x @ 124.55. 3700lbs . So much for 2020...shootin for 9s in 2021...and in 2022 apparently.....and 2023....and 2024.....and 2025.....who am I kidding? there will be no 9s with this engine! >>My 73 Build thread |
|
#5
05-30-2020, 12:58 AM
|
||||
|
||||
|
vacuum pump
Vacuum. One c, two u's. Got it.
On the last go 'round, under spirited driving, the valve cover breathers would always emit an oil mist that would just make a mess of everything I spent hours trying to keep clean. (no pcv system) Coupled with the factory oil dipstick making a bottle rocket out of itself at the track, I knew I needed to somehow relieve the growing crankcase pressure. Rumor has it, the cure for my woes, plus any weeping seal one might have, would be a vacuum pump. I could probably have gotten away with an exhaust scavenging system, or even tying rags to the breathers, but I never really liked the way any of that looked. Plus the vacuum pump was super shiny. Butler makes it real easy when choosing a thought out system. I had to educate myself in vacuum pump-ology, pulley ratios and pump speeds, so the last thing I wanted was to spend additional time sourcing all the right parts. Plus, I sold my previous set of Butler sheet metal covers to The Raven's brother and knew I was going to purchase the same again, sans breather holes, so why not make it all happen in one place? I made a few calls to ensure fitment with my very old balancer and bought the kit.  Tip#10 If you're going to put engine parts on the dining room table, make sure the wife isn't home to see it. Installation was straightforward as it uses the same lower case H pattern standoff many of us are used to. In addition, because its from a Pontiac source, it has a very well thought out adjustment arm that may or may not be on upside down in this pic, that connects to a water pump bolt -  To connect it to the crank, the supplied mandrel is drilled for a stock Pontiac 4 bolt and 3 bolt Chevy pattern. I simply enlarged the 4 holes in the mandrel to accept the bolts I was using with my Fluidamper and Ram Air Restoration pulley and got to mounting it up. That did NOT go as planned. (does anything?) I'm starting to think its me. The holes in the mandrel didn't line up with the pattern on the Fluidamper. It wasn't even like a flexplate thing where they would line up a certain way (at least this you cant attempt to put on backward!), these were way off. Well %$&. Tip#11 Always check to see if parts fit before modifying them Unfortunately, this style mandrel doesn't register on the damper pilot - it relies on the bolts to get it concentric. I can't just elongate the holes and now expect it to work. So to catch you up, yeah, I just ruined an integral part of my vacuum pump kit.(in record time!) And this is where it gets good. I called Butler to ask if they had any other mandrels for the kit. Nada. They had a blank one they offered to send me, but this was the only type available. You know, I love all things Butler - except this piece. Don't get me wrong, I've dealt with the Butler family on many occasions and always received top notch service and quality parts. These guys are class acts and I'm proud they are a part of our Pontiac community. But after looking at the mandrel, knowing it was rather heavy, didn't register on the balancer , and didn't quite spin true in my drill press, I decided I had to go another route. Here the thing, and I know we didn't discuss anything technical yet, so bear with me >>> Because I had already spec'ed out the pulley sizes of this system based on the 3.5" crank pulley in this kit and am now returning it along with the mandrel, that now meant the 4.5"pulley on the GZ pump had to be swapped out, because the new supplier I found, didn't have any 3.5" pulleys. (pump speeds are important dontchya know) Here is why its good - Butler allowed me to return it all - the crank pulley, the GZ pulley, the v-belt, AND the modified mandrel I drilled. On top of that, they even changed the wording on their web site to make sure this doesn't happen again. Sure, I called them prior to all of this and they said it would fit my Fluidamper and yes, the wording was somewhat misleading, but those are mistakes and they happen. Its what they did with that mistake that makes all the difference. Class acts indeed. While dealing with all of that, I was also researching who could make me a mandrel I could deem acceptable. In order to do that, I had to figure out what I had to work with. Break out the measuring slide thingy!   I got a bunch more pictures of me taking every measurement of that damper, but I wont post them. (you're welcome) It does remind me of a tip that might actually be useful however- Tip#12 - A lot of companies are more than happy to share their technical drawings with you, should you ask. Much easier having all of the measurements in a digital format like pdf, than to transcribe all my crummy scribbling that may or may not be 100% accurate. (Some companies even supply 3D models if you're capable to handle them) Armed with the tech diagrams, I could now start to have an intelligent (at least I thought it was intelligent) conversation with the pump vendors. I talked to a handful them - Star Machine, Aerospace Components, and GZ Motorsports. I had some requirements for this mandrel - - it needed a 4 bolt, 3.3" bolt circle configuration - it needed to register on the damper pilot - The mandrel shaft size to be the racing standard, (1.000" bore / 0.125" keyway) so pulley selection would never be an issue - it needed to be long enough to allow a belt center line 3.8" off the face of the balancer (or somewhere close) to be in line with the pump. As luck would have it (Ive been sort on that lately!) the Fluidamper has a bolt pattern just like the internally balanced big block Ford. (4 bolt, 3.3" circle). Well, that will certainly broaden my search, wont it? I finally settled on Jones Racing Products.   As with most of these mandrels, you can put that pulley anywhere you want and as long as you have the right spacers to take up the slack, its a simple and quick method to move things around, or even add on to later. (pump bracket definitely on backwards here!) I had to open up the recess on the back just a tad so it would register on the Fluidamper, but my machinist made quick work of that on his lathe.  As alluded to earlier, each spinning component has a speed at which you DONT want to spin it, so making sure each component's speed at max engine RPM (7200 for me) stays within its comfort range, can only be dictated by the pulleys in play. They are critical to get right. GZ says no more than 6K rpm with this pump, but also prefers it spin at 64% -75% of engine speed. It makes your head explode until you realize there is a useful calculator for all of this on the GZ Motorsports Tech Page. I also found this page super helpful when trying to make this information sink into my thick skull - Helpful pulley calculations All this pulley talk actually got me thinking about the alternator. What would that be spinning at peak engine RPM? I know I wont spend a lot of time at 7200, but if I want my alternator to survive, I should probably get an idea of what its going to be turning. Here is the difference between the new pulley from Jones, and the stock v-groove I was running prior. 2.6" vs the new 3.0".  This brings the alternator down from almost 17K+ rpm (@7200) to 15K, which is more acceptable. It does drive the alternator a tad slower, so hopefully it still generates some voltage at idle.
__________________
. Mark S . Who needs nice and pretty, when you can have mean and nasty? KRE Aluminum headed 463CID 73 LeMans. Used to run 10.6x @ 124.55. 3700lbs . So much for 2020...shootin for 9s in 2021...and in 2022 apparently.....and 2023....and 2024.....and 2025.....who am I kidding? there will be no 9s with this engine! >>My 73 Build thread |
|
#6
05-30-2020, 01:25 AM
|
||||
|
||||
|
misc
New fuel gauge almost looks factory in its stock location.
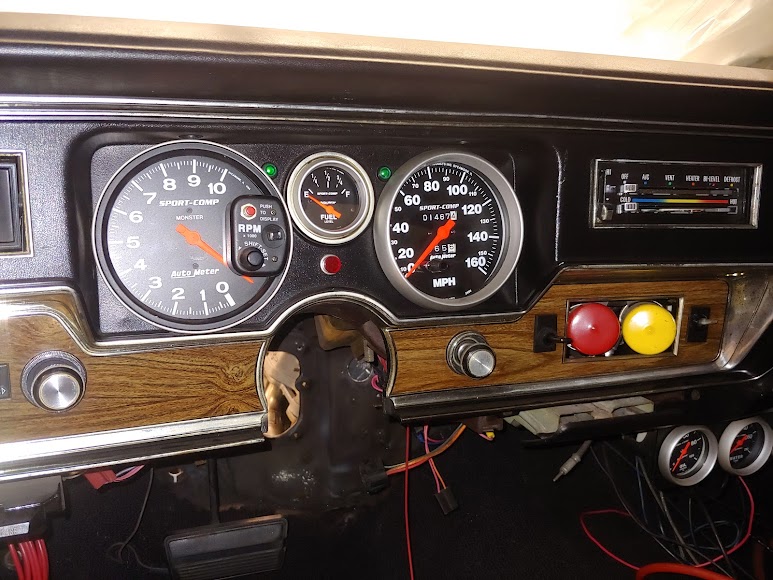 Green LED turn signal indicators. Red light below them is confirmation line lock is engaged. In the space where the radio once was are the old school oil pressure and shift lights. I may replace these with LEDs in the very near future and find a different spot to mount them. I'll just need a stock looking radio to fill the void. The switches on either side are obsolete now, but ran fuel pump and fans prior. I took out the 2 5/8 gauge for fuel because I needed a spot for my new wideband meter.  I'm hoping this helps me tune the carb a bit easier. Its either this, or a handheld with O2s.
__________________
. Mark S . Who needs nice and pretty, when you can have mean and nasty? KRE Aluminum headed 463CID 73 LeMans. Used to run 10.6x @ 124.55. 3700lbs . So much for 2020...shootin for 9s in 2021...and in 2022 apparently.....and 2023....and 2024.....and 2025.....who am I kidding? there will be no 9s with this engine! >>My 73 Build thread |
| Reply |
| Thread Tools | |
| Display Modes | |
|
|
The PY Online Forums is the largest online gathering of Pontiac enthusiasts anywhere in the world. Founded in 1991, it was also the first online forum for people to gather and talk about their Pontiacs. Since then, it has become the mecca of Pontiac technical data and knowledge that no other place can surpass.




 Hybrid Mode
