


| FAQ |
| Members List |
| Social Groups |
| Calendar |
| Search |
| Today's Posts |
|
|
|
#1
 01-23-2010, 05:03 PM
|
||||
|
||||
 Securing the signal housing to the column
Hello again, Last year I replaced my directional switch and reassembled my steering column and wheel. I either lost a part or im doing something wrong because even with everything installed and the wheel mounted, I still have movement at the base of the housing. I can even rotate it some, it doesnt seem to lock securely. The only thing i am fastening is the three screws from the swith into the housing and then rotateing the housing onto the column. The manual is very vague in this area, am I missing something or a part? Any help would be appreciated, I wrote in last year on this issue but either I didnt understand something or Im missing some parts. Thanks Neil
|
|
#2
01-23-2010, 06:00 PM
|
||||
|
||||
|
You seem to be short on a bunch of peices.
See below from 67 manual. 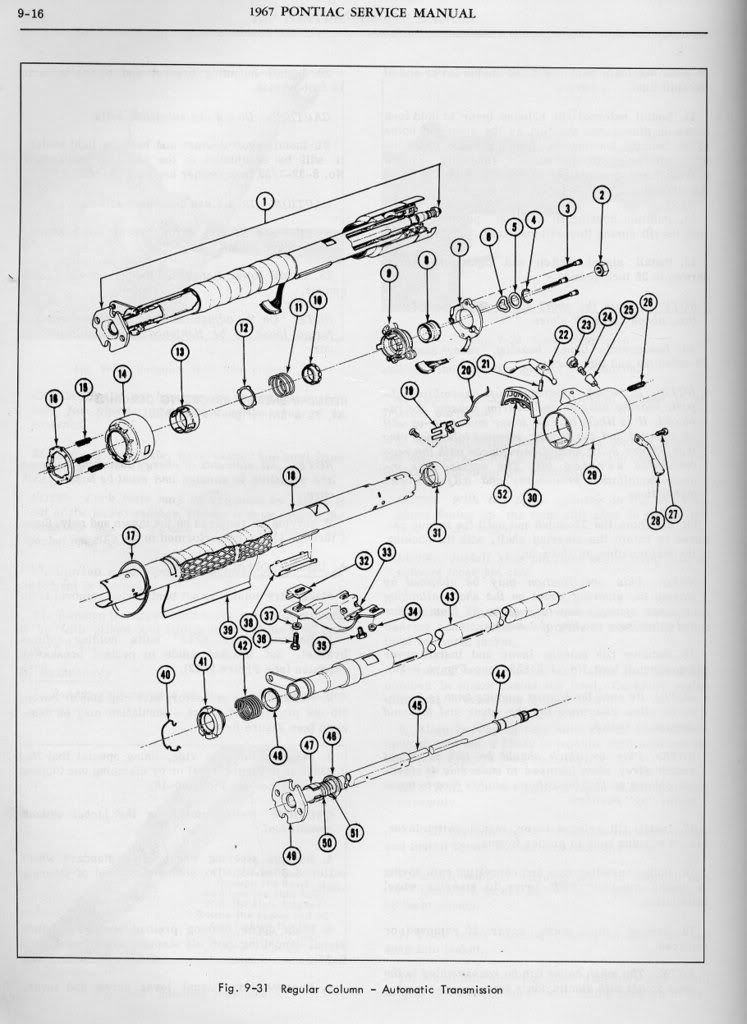
Last edited by Old Goat 67; 01-23-2010 at 06:09 PM. |
|
#3
01-24-2010, 03:18 PM
|
||||
|
||||
|
Quote:
Do tell, I said that in the first post. Just trying to help, what's yours? |
|
#4
01-23-2010, 06:22 PM
|
||||
|
||||
|
Still giving you hell ah.
I see the lower housing screws so the bottom is secured to the upper pc. You then have to clock/twist the whole 2pc housing up until it hits the tabs/stops. The three switch screws are what hold it in place. Basicly pulling upward against the tabs/stops. I can't tell for sure from pictures but the tabs appear there. That is all that holds it. So if you can pull the upper further while the sw is screwed down then the tabs are not out enough. If the whole thing moves downward/toward the dash while screwed in then it's not clocked in the exact spot for the tabs to work. I'll try to get some pics of the one I have finished so we can compare yours to mine.
__________________
When I die, I want to go peacefully like my grandfather did, in his sleep. Not screaming like the passengers in his car. 
|
|
#5
01-23-2010, 09:35 PM
|
||||
|
||||
|
O.K. I'm not sure if these will help, but here goes.
1st pic is with the upper & lower sw housing & sw off. 2nd pic is a close up of shaft tube (Note the tabs) 3rd pic is sw feed though but before pulling up housing pcs. 4& 5 just show the sw screwed in. Once the lower pc is screwed to the upper the 2 pcs are now one assy'. You clearly have that. With the sw wires slipped into the housing you then slide the housing over the shaft tube. You will need to turn it L&R to slip past the tabs and line up the sw lead to the correct location (Flat section on shaft) If you have it correct it should be semi locked within the tabs. Then the 3 screws secure it as stated above by pulling it upward. Man I hope this make sence  Now with that said, there is some movement, however you should not be able to pull off the housing. Oh yea, You don't appear to be missing anything. Most of the pcs shown #4-13 from the manual appear to be parts of the sw.
__________________
When I die, I want to go peacefully like my grandfather did, in his sleep. Not screaming like the passengers in his car.
Last edited by Jeff Hamlin; 12-07-2011 at 07:34 AM. |
|
#6
01-24-2010, 11:37 AM
|
||||
|
||||
|
Thanks for the reply guys, I appreciate it. the blowup of the parts is a little hard to follow, I will have to study that one. Jeff, thanks for the pics and info. It sounds easy enough i wish there had been something missing so I could say thats what I did wrong. well I will just have to try it again although ive been through it several times.
|
|
#7
01-24-2010, 11:49 AM
|
||||
|
||||
|
The blowup and pics above are of a '67 column, which is different from a '66 column (no hazard switch). nodwyer - it looks like you have a '66.
I had the same trouble with mine. I was not putting it on the column far enough. When you push the housing down, it will rotate clockwise (I think) into position. Also I found that if you put the housing on the column & then put the 3 screws in, it will fit better. I was fighting with this last summer on my car & finally got it correct. However, that has been a while, so I forget what direction to turn it. This statement from Jeff makes the most sense in explaining it: Quote:
__________________
Tod Hoffmann 1966 GTO Montero Red Hardtop - Holley EFI'd 462, KRE DPorts/Muncie 4spd 1990 Chevy 454SS pickup - Accel DFI/T56 6spd - Hot Rod Power Tour Long Hauler 1996 Chevy K2500 ECSB 'Poopy' 2002 Honda VTX1800C 2016 Cadillac CTS Premium My project thread: http://forums.maxperformanceinc.com/...d.php?t=516826 
|
|
#8
01-24-2010, 11:50 AM
|
||||
|
||||
|
nodwyer,
This may help you to see how it goes together and how to put it in. Chrles |
|
#9
01-24-2010, 01:29 PM
|
||||
|
||||
|
FWIW
That also is 67, But also column shift which has different parts in the assy'.
__________________
When I die, I want to go peacefully like my grandfather did, in his sleep. Not screaming like the passengers in his car.
|
|
#10
01-30-2010, 10:52 AM
|
||||
|
||||
|
GOT IT!!!!! Thanks again for the help guys, I reassembled the column yesterday. I think i just wasnt pushing the housing down far enough to be on the back side of the tabs. ITs locked in pretty good now. On to the next repair. Neil
|
|
#11
01-30-2010, 11:03 AM
|
||||
|
||||
|
Hooray for you!
|
|
#12
01-30-2010, 12:20 PM
|
||||
|
||||
|
Good deal, I'm glad you got it.
Without seeing first hand it's always hard to give advice. O.K. Whats next? 
__________________
When I die, I want to go peacefully like my grandfather did, in his sleep. Not screaming like the passengers in his car.
|
|
#13
01-30-2010, 04:08 PM
|
||||
|
||||
|
Ah lets see, Finish fixing the am radio. I got it to work but I have to jiggle the antenna wire where it goes into the radio . Sometimes it works fine.
Fix my backup lights, they stay on all the time and when I get the time and money... remove the motor and trans, fix some leaks and a clutch |
| Reply |
| Thread Tools | |
| Display Modes | |
|
|
The PY Online Forums is the largest online gathering of Pontiac enthusiasts anywhere in the world. Founded in 1991, it was also the first online forum for people to gather and talk about their Pontiacs. Since then, it has become the mecca of Pontiac technical data and knowledge that no other place can surpass.




 Hybrid Mode
