


| FAQ |
| Members List |
| Social Groups |
| Calendar |
| Search |
| Today's Posts |
|
#1
 11-09-2009, 01:14 AM
|
|||
|
|||
 Fired the 455...Mostly successful
Photos to follow. Assembled and fired the engine for my Father-In-Law's 77 TA.
Started immediately on the "test stand"; so far we have 10 minutes of 1800--2500 rpm run time. Good oil pressure, good vacuum. Sounds nice. Hyper-responsive to throttle because there's a flexplate but no torque converter--so almost no added flywheel effect. Lifted each valve cover, one pushrod isn't spinning. Bummer. Had to install the original stock stamped rockers; apparently I didn't grind the pushrod holes quite enough to provide clearance for the 1.65 Comp Cams roller-tip jobs. Found that when setting the zero-lash point. Harsh language ensued. Far as I can tell, the stamped sheetmetal pushrod guide plates will have to be trimmed a bit to clear with the 1.65 rockers, too. I wasn't expecting problems with the guideplates. 1. Anyone else have to trim the pushrod guideplates? Is it better to trim each pushrod opening, or to elongate the rocker stud hole and just move the whole plate a little bit? 2. Ideas on why one pushrod isn't spinning? All of the lifters will drop in the bore under their own weight--so this one doesn't seem to be binding in the lifter bore. The cam lobes seem to be properly offset from the lifter bores...I'm a little mystified. Mild Lunati "VooDoo" cam; 213/219 at .050; a more-mild cam than I was expecting to use; but it's what UD Harold recommended for the application. Yanking the heads starting tomorrow; will grind the friggin' pushrod holes some more; will touch the guideplates; and I think I'm gonna add some Somender-Singh grooves to the quench pads. Then examine the cam lobes and lifter bottoms especially on the one that didn't spin. If it's wiped--I spend more money. If it isn't--I'll polish the lifter bottom and hope for the best. I expect to complete the cam break-in later this week--unless I have to get another cam 'n' lifters. |
|
#2
11-09-2009, 03:07 PM
|
||||
|
||||
|
I had that same problem on #7 Exhaust. Put in second lifter and it started to rotate like 90 degrees but no more. After carefully looking at the sides of the two lifters that wouldn't rotate I noticed scratch marks up and down on sides of lifters. Very small scratches but noticable. Now lifters are like RC 56 which is hard compaired to the cast iron block, so it would take a lot to leave scratch marks. Felt lifter bore with my finger and could feel slight burr on bottom of lifter bore. Used some 240 sandpaper on a 3/4 wood dwl and hand cleaned the lifter bore, careful to trap all the grindings. Put in new lifter and re-broke in that one lifter. It doesn't take much to keep them from turning. Thats all it took to get mine rotating. But it cost 2 extra lifters.
|
|
#3
11-09-2009, 11:44 PM
|
|||
|
|||
|
Thanks for the reply, 69Customs. I've had a PM from Geoff as well. I appreciate the input and will be verifying that stuff.
Photos--as promised. 1. Engine connected to my test stand. I have a radiator mounted to an exhaust-tube framework, with a gauge panel attached. The gauge panel is hinged, and the legs swivel so it all folds up reasonably flat for storage. I just move the engine stand up to it--connect some hoses and cables--add oil and coolant--and "vroom"! When I fired up the Olds 455, I just let it hang off the engine stand. Ran it for almost 4 hours. This time, I decided to chain the front of the Pontiac to my engine hoist for safety. That made it more stable than the Olds.  2. I use some flex-pipe and flanges (and some mechanic's wire) and some scrap exhaust tubing 'n' muffler, and most of the nasty fumes go outside. Quiet enough to hear any mechanical problems with a fresh engine, too.  3. Another view of the radiator cart. The fan doesn't do a lot of good, it's too far away and there's no shroud. But it's better than nothing, and I always have a garden hose handy to mist the radiator if the engine gets too warm.  4. Carbon build-up in 10 minutes running time. I wasn't expecting that. I did ABSOLUTELY NO carb tuning, the carb came from a running 455 core engine that idled pretty good. #2 cylinder was similar. None of the other cylinders had that carbon shadow as noticeably, but it was evident if I looked closely. Since I have the heads off, I'm going to try the Somander Singh grooves and see what happens. Supposed to be good for reducing carbon build-up, among other things. The pistons wiped up nice and easy, the carbon didn't stick at all.  5. Decided to trust Steve Barcak at the last minute. Drilled 'n' plugged 3 holes in both decks, (plugs below deck surface, and not "tight" since I'd already had the block honed with torque plate) Also drilled an additional hole in each block deck and cylinder head to cool the Siamesed exhaust ports. That "421 cooling hole" between the center two cylinders drilled easily in the right deck, but the left deck was a pain. Had to sharpen the drill bit three times, and never did get a clean break at the bottom of the hole. It did connect to water jacket, just not completely. Strange. Can't explain it.  6. Had one lifter that wouldn't spin. Well, it wasn't spinning when I popped the valve cover to check. All the cam lobes have an interesting mark at the peak of the lobe, though. The lobes look rougher than they are--an artifact of the camera flash, maybe.   This is a photo of the one that wasn't spinning, but I could have taken a picture of any of them and they'd look the same. The lifter must have been spinning at some point, 'cause all the lifter bottoms look identical. Nicely polished around the circumference, with some "original machining marks" in the very center. I'm putting the bitch back together with some fresh moly-paste and I'll complete the cam break-in. 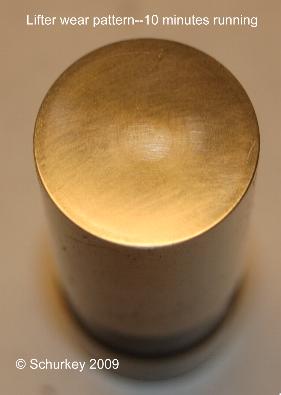 7. Oh, yeah. I beat and smacked the stamped-steel water pump plate to close up the gap between it and the pump impeller--but--I'm thinking that the FlowKooler pump makes that a wasted effort. What the hell, beating the sheetmetal plate is cheap and easy... 
Last edited by Schurkey; 11-10-2009 at 12:19 AM. |
|
#4
11-10-2009, 01:46 PM
|
||||
|
||||
|
Nice post! I never thought of that... Using the Engine stand and a simple separate assembly for the Radiator and gauges!
Gas out of a gas can with some tubing? Damn good idea.. I MIGHT have to try that! Looks just a LITTLE scary but...
__________________
-- James Work '67 GTO Convertible "Koerner Built 413 500 hp with a Victor!.. I'll run a stock intake." '75 Formula 400 - Daily Driver - Running with my Home Built 455 and TH400 Details here: http://forums.maxperformanceinc.com/...d.php?t=588372 |
|
#5
11-10-2009, 01:56 PM
|
|||
|
|||
|
Very danergous to run that engine up so high in the air.
I am familair with Steve's eextra hole between the center two cylinders, but I see no purpose to plug the other cooling ports in the deck on a street engine. Steve, You care to chime in on this one???? |
|
#6
11-10-2009, 05:53 PM
|
||||
|
||||
|
Quote:
Quote:
Quote:
Having this one supported by the chain to the hoist took care of all that. Ran nice 'n' smooth, no jiggling, not much of a torque reaction (but I AM careful about opening/closing the throttle suddenly.) Short Story: It's a big sweetheart. Quote:
http://forums.maxperformanceinc.com/...=Coolant+Holes |
|
#7
11-10-2009, 06:41 PM
|
||||
|
||||
|
Schurkey,
I did two engine break-ins just like that in 1992. Mine was a very heavy duty engine stand. I was worried about flopp'in the thing over (as Steve states), no problem.... I got to watch my engine builder friend, assemble almost an entire engine, (flat tappet cam Chevrolet) got to ask a lot of questions, learned alot............ The first thing he did to block, after making sure all internals (oil passagess and crankcase) of the engine were sterile clean, was trial fit a lifter in each bore to make sure the lifter would spin freely. After installing crank, rod/piston assy's, oil pump, pan heads, and cam, he preoiled the engine without the pushrods to make sure oil would come out of the lifter. (if oil doesn't come out, another lifter gets installed...) As each lifter (w/ liberal amounts of oil on them) they are spun in lifter bore. To make sure that EACH lifter spins freely in it's bore. After installing all of valve train (of course cam and lifters have moly paste on them...) preoil engine again w/ intake off. Someone is turning crank by hand. As preoiling is taking place and crank turning, you watch for oil coming through pushrods/rocker arms. AGAIN watching to see if lifters are spinning. This has been my cam procedure for the last 20 odd years, have not had enough opportunities to put it to use.......... The cam lobe/lifter patterns look good to me also. I used a box fan in front of my radiator... The only things that can cause the lifter not to spin are, lifter problem , lifter bore problem, pushrod problem (bent, I know, not likely), guide plate binding. Don't be afraid to try another new lifter in that hole. Keep up the good work!!!
__________________
1977 Black Trans Am 180 HP Auto, essentially base model T/A. I'm the original owner, purchased May 7, 1977. Shut it off Shut it off Buddy, I just shut your Prius down... 
|
|
#8
11-18-2009, 10:44 PM
|
|||
|
|||
|
Quote:
Read in Jim Hand's book that the pushrod holes have to be augered oblong an additional 1/3 of the diameter toward the rocker stud boss; and about an inch down the hole. I did THAT the first time. The heads have been removed, augered some more, reinstalled...removed, augered some more...and of course each time they need to be cleaned of the metal filings and air-tool oil. I finally had the bright idea of painting the pushrod, shoving it in the lifter socket, and then rotating it while leaning it toward the rocker stud boss. Then I can SEE where the pushrod rubs the hole, because there's a paint trail "witness mark" inside the pushrod hole. EVERY ONE of my pushrod holes has had to be ground the FULL LENGTH right down to the bottom. (but at an angle, so not very much is coming off the bottom of the hole, a fair amount is coming out of the middle of the hole, and I'd already taken plenty from the top.) So much for the "one inch down" advice. At the point where I get the bottom of the hole ground out--the contact point moves up about one inch. So then I grind there. Overall, the upper part of the pushrod holes have PLENTY of clearance since that first reworking--all my problems since then have been in the middle and lower part of the hole. At this point, I've got the first head ground out enough that I think it's going to work with the 1.65 rocker arms. Re-grinding of the second head commences tomorrow. If you hear cursing, it's probably me. Another reason to buy a drill press, or to have this done in a seat 'n' guide machine. Boring the hole at an angle would have been so much better than this hand-held die grinder nonsense. |
|
#9
11-18-2009, 11:12 PM
|
||||
|
||||
|
Was that block shotpeened? If so, that can form a burr at the top and/or bottom of the lifter bore which can stop lifter rotation. Also, are you lubricating the side of the lifter with engine oil or moly lube. Moly lube on the side can cause the lifter not to spin. Moly should only be on the bottom of the lifter. Use oil on the side. If you don't get that lifter spinning, cam destruction is not far away.
__________________
Paul Carter Carter Cryogenics www.cartercryo.com 520-409-7236 Koerner Racing Engines You killed it, We build it! 520-294-5758 64 GTO, under re-construction, 412 CID, also under construction. 87 S-10 Pickup, 321,000 miles 99Monte Carlo, 293,000 miles 86 Bronco, 218,000 miles |
|
#10
12-02-2009, 05:11 PM
|
|||
|
|||
|
Made smoke today. Felt very good to have it running again.
All the pushrods are verified to spin. Have pushrod clearance with the 1.65 rocker arms--finally. More photos to follow later today, perhaps tomorrow. |
|
#11
12-02-2009, 07:08 PM
|
|||
|
|||
|
FIRST TIME I EVER SAW THE HOLES PLUGGED LIKE THAT! ok why?? and extra hole is for???
|
|
#12
12-02-2009, 07:51 PM
|
|||
|
|||
|
Quote:
Quote:
Adding the hole to the deck and the head allows a "geyser" of coolant to get up near the two siamesed exhaust ports, and the center of the head runs cooler. That's the theory, anyway. Having looked at the water jacket in the head, I don't see that drilling the holes is going to make a bit of difference--there was already coolant there from the nearby holes. But--what the hell. Can't hurt... Quote:
[PHOTO COMING] Evidence of pushrod clearance issues at the bottom of the pushrod holes. This is AFTER I've already ground them out some. [PHOTO COMING] This is how I verified that the pushrods spin this time. Old valve covers, ventilated with a nibbler. Engine runs--I see pushrods spinning. Happy Me! Yes, oil does leak out and makes the exhaust manifolds smoke. What you don't see is that I painted a red stripe on all of the pushrods near the guideplates, it was very easy to watch the stripe rotate as the engine ran. 
|
|
#13
12-02-2009, 08:23 PM
|
||||
|
||||
|
Good Job Shurkey. I hope you drive and enjoy soon!
|
|
#14
12-02-2009, 09:34 PM
|
|||
|
|||
|
Ran out of "edit" time on my previous post...
Somender-Singh grooves on the quench pad. Both grooves aimed at the spark plug. There is considerable debate on whether or not this does anything useful. Nobody seems to think it's harmful, though. I have done this to this one engine; and it's not in the car so I have nothing worthwhile to add to the debate except to say that "someday" I'll have some experiences to share. The goal is 87 octane/smooth idle (very mild cam) while running 9.2:1 compression--and as much power as we can conveniently get. 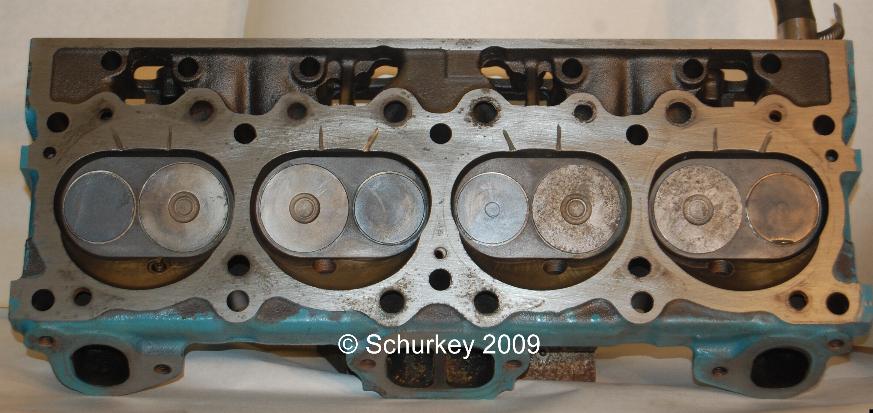 Evidence of pushrod clearance issues at the bottom of the pushrod holes. This is AFTER I've already ground them out some.  Quote:
Any job worth doing is worth doing four or five times (until I get it right.) Last edited by Schurkey; 12-02-2009 at 09:45 PM. |
|
#15
12-02-2009, 11:50 PM
|
||||
|
||||
|
Hey Schurkey...
Great photos of your pushrods, I appreciate seeing this level of detail on the cooling mod hole locations. I have wondered about those Somender Singh grooves too, some say they are great, others don't !~ Will you fire the motor again soon?
__________________
Knock Knock Knockin' on 11's Door '70 Judge, Palladium Silver w/Red Interior Powered by SD Performance, Ported 6X Heads 501 HP, 554 ft lbs TQ 12.14 ET @ 114 MPH , Supercase Muncie M22, 3:55 Suspension: HO Racing, BMR< Sykorat, and Bilsteins Narrowed 12 bolt , 16x8 VintageWheel Works, Comp T/As on street, MT Drag Radials @ Strip http://www.sdperformance.com/custome...1.php?carID=42 |
|
#16
12-03-2009, 02:00 AM
|
|||
|
|||
|
Quote:
That's the plan. You already know how my plans go... |
|
#17
12-03-2009, 06:41 PM
|
|||
|
|||
|
I had one of those flowkooler pumps and my engine still ran hot, even with the divider trick done. I switched to the style of pump you have on the left with the vanes, and the issue went away.
|
| Reply |
|
|
The PY Online Forums is the largest online gathering of Pontiac enthusiasts anywhere in the world. Founded in 1991, it was also the first online forum for people to gather and talk about their Pontiacs. Since then, it has become the mecca of Pontiac technical data and knowledge that no other place can surpass.




 Linear Mode

