


| FAQ |
| Members List |
| Social Groups |
| Calendar |
| Search |
| Today's Posts |
|
|
|
#1
 03-16-2010, 08:35 AM
|
|||
|
|||

great thread! finding information on these motors in Australia is incredibly hard. most people usually say " put a Chev in her instead" , which is something i myself would never do.
im curious with the rear main seal still though, is there any further information about avoiding the leaking ? |
|
#2
03-16-2010, 07:07 PM
|
||||
|
||||
|
Quote:

__________________
"Pay no attention to the planet Mopar. It is a strange and confusing place." ~Chiphead |
|
#3
03-25-2010, 06:30 PM
|
||||
|
||||
|
Here’s a better description of several points that I made earlier in this thread on how to rebuild a Pontiac V-8. Some of you asked how to check thrust bearing clearance. Others wanted to know about the potential for rear main seal leaks due to machining errors.
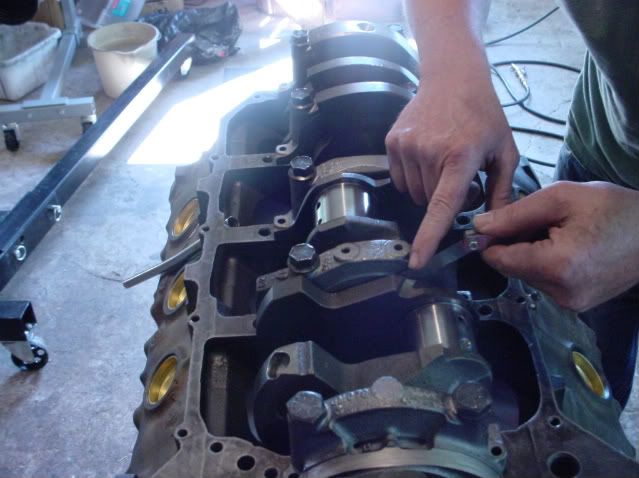 This first picture shows how to check thrust bearing clearance using a feeler gauge. The concept is the same no matter how you do it; you need to rock the crank back and forth to make sure you have enough, but not too much, free play in the crank. Measure between the face of the bearing insert and the crank. In case of Pontiac V-8s, you are looking for .003 to .009 thrust bearing clearance. On Pontiac motors, the thrust bearing is installed in the #4 main bearing bore (not all V-8s are the same.) 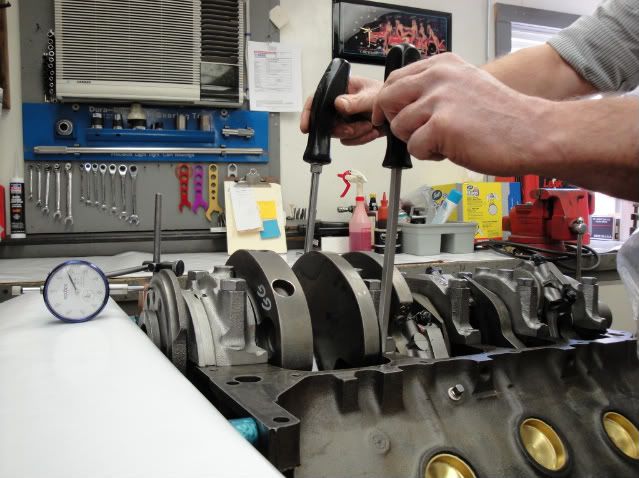 Here's another way to check thrust bearing clearance. This method is a little more precise. What you need to do is set up a dial gauge that is zeroed out when the crank is pressed all the way towards the back of the block. When you pry (gently) the crank back and forth, you can directly read the clearance value off the dial gauge. 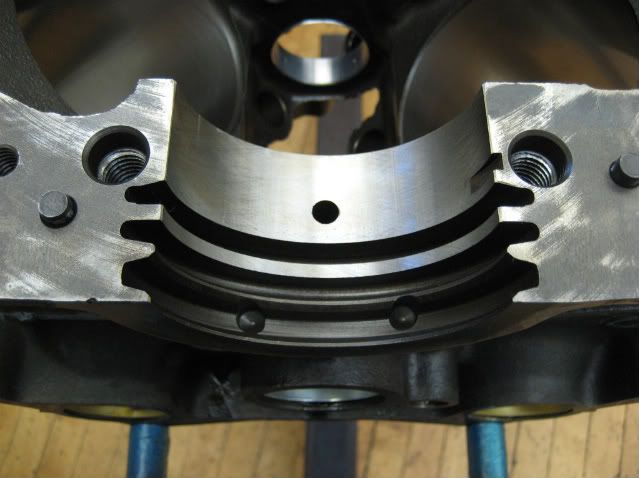 This picture shows the machine work around the rear main. You can see the groove where the rear main seal fits. In some cases, the factory didn't get the machine work perfectly concentric around the crank, and I’ll explain why this can cause a problem. 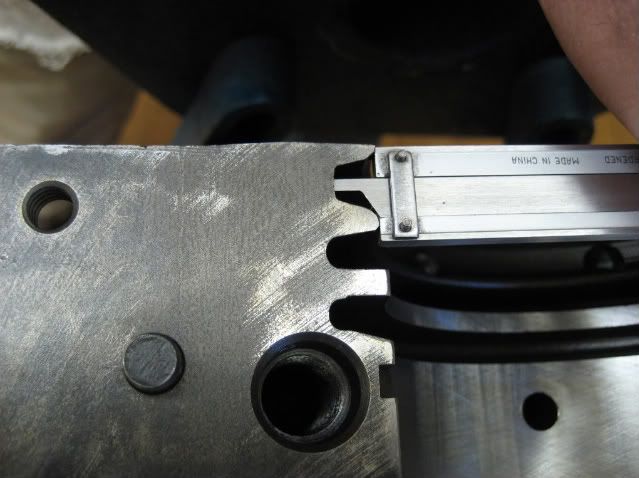 In this picture, you can see the use of a vernier caliper to measure the depth of the rear main seal groove on the driver’s side of the block. The next picture shows the same measurement on the passenger’s side of the block. 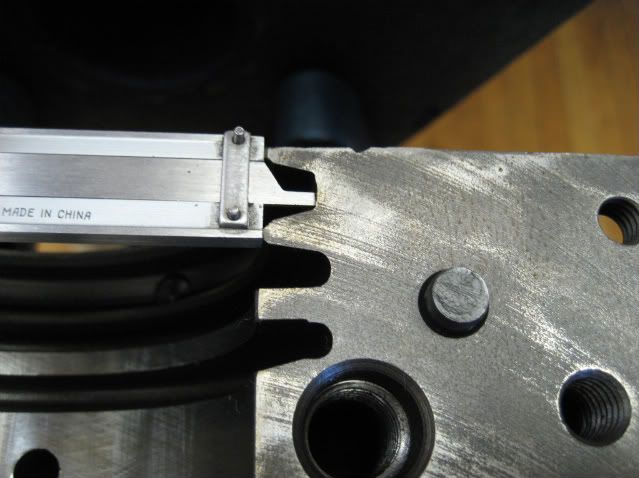 If the rear main seal groove was not concentric around the center line of the crank, the two readings will be different. Apparently when the factory installed the original asbestos style rear main seals back in the 60s and 70s this was not a problem. With the newer style seals, the ability to compensate for variations in machine work isn’t as good, and this problem can lead to a nasty leak. My machinist says he has only seen this error on 455 blocks. Nonetheless, once burned, twice shy, so he always checks when working on a Pontiac motor.
__________________
"Pay no attention to the planet Mopar. It is a strange and confusing place." ~Chiphead |
|
#4
03-25-2010, 07:25 PM
|
|||
|
|||
|
Minor corrections/additions to a wonderful post:
Quote:
Better measure top 'n' bottom, too. You'd have four measurement points that better all be about the same. Quote:
Of course, you aren't going to buy an asbestos seal any more; I think the modern rope seals are a fiberglass material. And they don't seem to work as well as the genuine asbestos material--but--the EPA and OSHA frown on asbestos. Even so, if you have a block/cap that has the seal groove not concentric with the crank centerline--rope seals are your best friend. I don't like rope seals except for agricultural or industrial use where the seal has to deal with abrasives--such as a pump used on "contaminated" liquids. (So I avoid using them on automotive engines where there shouldn't be any abrasive in the oil) Sometimes there's no choice, though--either the seal groove isn't concentric (some Pontiacs and perhaps others) or the crankshaft isn't smooth enough for a lip seal to rub against and live. |
|
#5
04-02-2010, 11:37 AM
|
|||
|
|||
|
great photos and info! thanks !
if the crank was freshly machined would that mean it would have a smoother surface for the lip seal ? |
|
#6
04-02-2010, 06:25 PM
|
|||
|
|||
|
Quote:
Some cranks are deliberately stamped with a pattern of "hash marks" that looks like / / / / / / / / / / / / all around the sealing surface; that helps the rope seal do it's job; but it's not good for lip seals. I polish the hash marks (if they exist) with emery cloth to smooth them some. You'll never polish them completely away. Other times, the rubber lip wears a groove in the crankshaft just like the front seal can wear a groove in the hub of the damper. Then you either need a special seal that has a re-positioned lip; or you're back to packing rope. |
|
#7
04-25-2010, 09:50 AM
|
||||
|
||||
|
When you broke in the cam did you only use a single valve spring ?
|
|
#8
11-05-2012, 03:22 PM
|
||||
|
||||
|
Jeses !
Port the heads !!
__________________
Greg Merrick |
|
#9
11-06-2012, 05:56 AM
|
|||
|
|||
|
subbd for future refrence
Nice post! |
|
#10
11-06-2012, 11:25 AM
|
||||
|
||||
|
Using any type of sealant or surface prep on head gaskets depends entirely on the type of gasket used. Most go dry these days, FYI.
Ring Gaps - Follow the ring manufacturer's recommendations, and check for any notes that came with the pistons. Most rod bearings for Pontiacs are now chamfered on both sides. Here's the one thread I recall, Chiphead made a good post: http://forums.maxperformanceinc.com/...+assembly+tips Now I exclusively use assembly lube during assembly. Not sure if I commented on cleaning cyl walls with WD-40 or not. Trans fluid works too. Floating pins get oil. Gasket surfaces get wiped with thinner or acetone prior to assembly. I do the same for block and rods prior to inserting bearings. Use lint-free rags. Anti-seize on timing cover studs. .
__________________
. 1970 GTO Judge Tribute Pro-Tour Project 535 IA2 http://forums.maxperformanceinc.com/...d.php?t=760624 1971 Trans Am 463, 315cfm E-head Sniper XFlow EFI, TKO600 extreme, 9", GW suspension, Baer brakes, pro tour car https://forums.maxperformanceinc.com...ght=procharger Theme Song: http://www.youtube.com/watch?v=7zKAS...ature=youtu.be |
| Reply |
|
|
The PY Online Forums is the largest online gathering of Pontiac enthusiasts anywhere in the world. Founded in 1991, it was also the first online forum for people to gather and talk about their Pontiacs. Since then, it has become the mecca of Pontiac technical data and knowledge that no other place can surpass.




 Hybrid Mode
