


| FAQ |
| Members List |
| Social Groups |
| Calendar |
| Search |
| Today's Posts |
|
#701
 01-19-2012, 12:55 AM
|
||||
|
||||

Hey, now a face to go with yor name. Nice to meet ya. Got the ladderbars all tacked together today. Have to take them to the welder and add the front emergancy catch bracketry. I think I might see how much to have them chromed. Boy I'd love to see that???
 Mark L
__________________
My Gasser '63 Catalina build. Oh sorry, it's a Street freak. Either way it's a fun build. |
|
#702
02-07-2012, 01:24 AM
|
||||
|
||||
|
OK. I've been playing with every conceivable location/installation of the radiator and fan shroud for the trunk of the '63. Because of that I haven't gotten anything really done on it. Just set there putting it in, taking it out. Measuring, thinking about it etc. It's done. I just went ahead and cut the floor open.
 Placed the fan/shroud up under the floor.  This is the shroud underneath.   And the radiator in its place (just laying in the trunk) with the fuel tank in its place.  Still have to reinforce the opening and use foam to line the shroud and radiator edges for sealing. Now I have to find an inlet for air to the trunk. Then run all the water tubing.
__________________
My Gasser '63 Catalina build. Oh sorry, it's a Street freak. Either way it's a fun build. |
|
#703
02-07-2012, 01:24 AM
|
||||
|
||||
|
Made the duct to seal the radiator to the trunk floor.It was mentioned to add a tilt tot he radiator so it fills and is more efficient, thank you Bruce, I hadn't given it any thought and probably would not have thought of it. This is he rough opening sealed with pipe foam, slit and slid over/against the edge. I still have to do more cutting back on the front edge (top of pic) to fit the shroud, then I'll glue the foam seal in.
 This is the angled duct.  Duct in place.  Duct in and sealed.  And the radiator on the sealed duct ready to be bolted/clipped down.  I was thinking of using springs to hold the radiator in place. That way the radiator could float a little above the seal and not have any strain in it. Mark L
__________________
My Gasser '63 Catalina build. Oh sorry, it's a Street freak. Either way it's a fun build. |
|
#704
02-07-2012, 01:37 AM
|
||||
|
||||
|
Still playing with options for building and or making a dash board. I still have the original dash in place cut up to fit around the steering support. I want to build or use something to bring the speedometer and gauges closer to the driver. So I found this at the last swap. It's actually a fiberglass motorcycle headlight nacelle. I mocked it up kind of in place, but it would end up be more towards the driver. The other pics show what I would do with the gauges with the other opening holding a 5 inch speedometer.
   Once the bezel is on place I will use sheet metal to fair the bezel back into the dash to cover the steering support and run the wires etc. I like this better than the pevious idea of using the '63 head light bezel. Mark L
__________________
My Gasser '63 Catalina build. Oh sorry, it's a Street freak. Either way it's a fun build. |
|
#705
02-07-2012, 09:51 AM
|
||||
|
||||
 Front nose flip
Hey Mark, GR8 project! Any detail photos of your flip up nose mounting? Thxs.
|
|
#706
02-07-2012, 10:48 AM
|
||||
|
||||
|
Thank you Alvin. I used the original '63 hood hinges flipped them upside down with the firewall mounting surface towards the front. This placed the top hood ounting surface on top of the frame rail and the firwall mounting towards the front for an upright mount.
 This pic shows the hinge inverted and mounted on an angle iron welded onto the frame horn. The first time I did it was back in '74-'75. I used it by bolting it right onto the original '63 frame horn on a '63 I owned back then. The inverted firewall mount (then facing forward) was bolted to the back side of the radiator core support. That allowed the eniter front end to tilt as an assembly using all factory stock parts. Heavy but it worked. This time I have the custom frame clip so I mounted the hinge down lower along the side of the frame horn. More to get it out farther for more room (radiator etc if needed) than to place it lower. It would have worked fine on top and farther in if I had placed it there. The next two pics show the hinge in various raised positions so you can see the transition as it goes thru it's travel. But at this pooint they were not attached to the front end assembly. 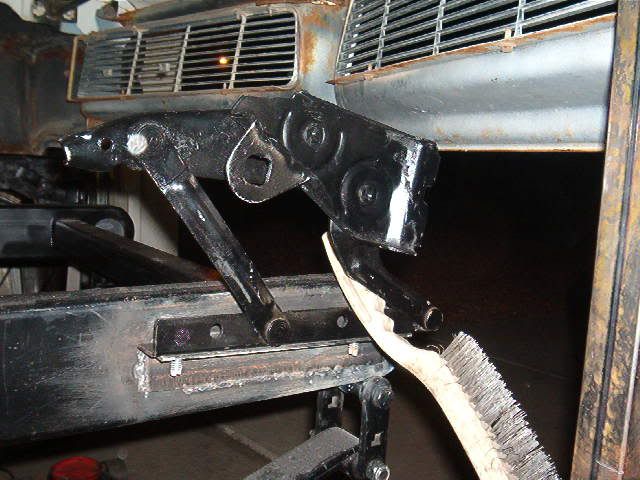 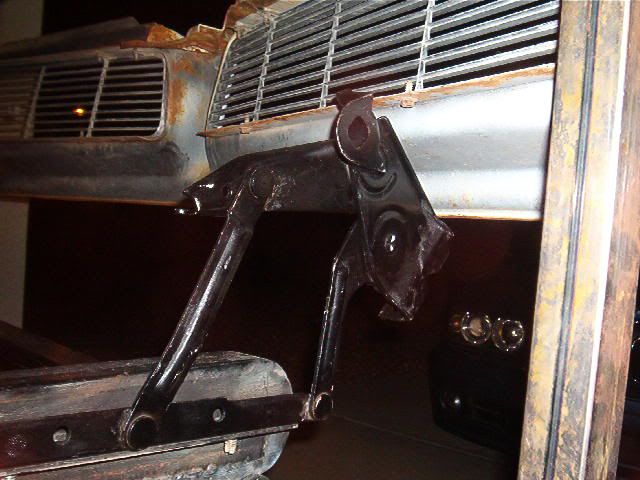 The thing that I really liked back then was, I still had the front bumper in place. But any normal tilt would have made interference points between the back side of the bumper and the grill apron that closes up the space between the grill and the bumper. If you look at the progression of the hinge it actually lifts the whole front end assembly straight up during the first part of the lift and then tilts the assembly. I found that it worked perfectly wih the full factory front end assembly to clear the grill apron around the bumper as it lifted. With the gasser front end there are no interference points like there are using the full factory assembly. But I wanted to use this same inverted hinging because I had it. I knew it worked, and by using the hinges, the hood spring help the tilting/lifting and also has a built in stop so the front end can't fall too far forward. It is limited on how far it can go, and if you look you'll see the hinge is mounted on a slight forward rake to get a little more tilt to the front with out compromising the down position. Mark L
__________________
My Gasser '63 Catalina build. Oh sorry, it's a Street freak. Either way it's a fun build. |
|
#707
02-07-2012, 11:02 AM
|
||||
|
||||
|
If you look at the pics you can see that, after inverting the hinges, I also used the drivers side on the passenger side and the passenger side on the drivers side. I did that only to get the L shaped hood mounting flange to the outside so the hinge axle pins were away from the side of the frame. If you mount on top of the frame that would not be neccessary. This is the front end all bolted up and hung off the firewall and the cross support that I welded to the original fender mounting points.
 Then I ran uprights straight down form the crossbar to the front of the hinge front mounts (originallly the firewall mounts). This pics is not really clear but you can see the uprights inside the tilted front end. 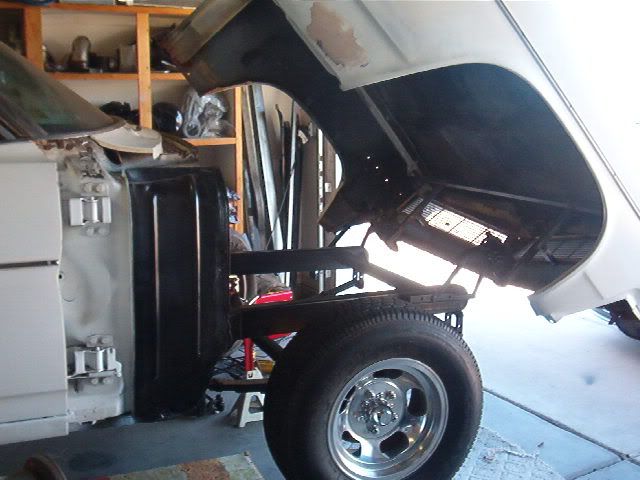 I then tied the uprights off going straight forward to the bottom of the grill sheet metal to lock it all in place.  I still have some additional gusseting to add but even at this point it is very solid. Mark L
__________________
My Gasser '63 Catalina build. Oh sorry, it's a Street freak. Either way it's a fun build. |
|
#708
02-07-2012, 11:52 AM
|
|||
|
|||
|
Quote:
Mike
__________________
so many pontiacs, so little time.................. moderator is a glorified word for an unappreciated prick.................. "Only two things are infinite, the universe and human stupidity, and I'm not sure about the former." --Albert Einstein "There is no such thing as a good tax." "We contend that for a nation to tax itself into prosperity is like a man standing in a bucket and trying to lift himself up by the handle." - Winston Churchill |
|
#709
02-07-2012, 12:23 PM
|
||||
|
||||
 Convert slips to hinged or combo slip & hinged ideas?
Quote:
Reason I asked as I want to convert our glass nose slip joint mount (circled below) to a flip nose or dual slip joint/flip hinge mount. Perhaps I could modify some light weight hood hinges w springs in a similar manner as you have done (photo below). Any ideas would be greatly appreciated. A local welding shop had the car for several weeks and couldn’t figure it out…I even provided the Glass Front-end Hinge website info for their use. 
|
|
#710
02-07-2012, 05:12 PM
|
||||
|
||||
|
I just layed the radiator on the duct face up, it is not done and in final position yet. I will be running the in/outs down and under when I'm done, for the very reasons you've mentioned. Good catch on the up/down positioning.
Lookin at your set up. Could you keep the slip joint but use a straight tube inside the tube you already have, slot it for a stop pin, with a axle/rod end to form a pivot? Then you can pull the front end straight out enough to clear the firewall and then tilt the assembly? You can still pull the stop pin and remove the entire front end like before. Mark L
__________________
My Gasser '63 Catalina build. Oh sorry, it's a Street freak. Either way it's a fun build. |
|
#711
02-07-2012, 05:23 PM
|
||||
|
||||
|
Quote:
http://www.usbody.com/Pages_Cars/68-Lemans.htm |
|
#712
02-17-2012, 08:03 PM
|
||||
|
||||
|
I've seen a version of that on a '55 Gasser and it worked sweet. I finally decided on and ordered new front rims. Ive decided to go old school Cragar 15X6 with 2 inch back spacing.
 Still unsure about the rears. I want to go to a 14 inch wide rim but not many of the older design rims go that wide. I would like to go to a reverse chrome at 15X14 (backspacing to be determined) but having a problem finding someone that will go that wide. I seem to be hitting a dead end at 12 inch wides. If I have to go to a 15X12 then I will probably get the matching 15X12 Cragars, IF, they can match my backspacing needs. If not I know I can get a chrome reverse 15X12 with the backspacing where I want it. I've also finally bought a nodular iron center section for the 9 inch. Just got back from having it all assembled. 35 spline Detroit Locker, 3:50 gears.   I had to make a modification to the ladder bar brackets so the axle housing is there getting modified. Once that is done, I get the axles and this same guy is going to build me a pair of disc brake caliper brackets to use the 2009 front Mustang GT brack set I've been sitting on, attach the ladder bars and weld it all in. Simple right?? HA! Mark L
__________________
My Gasser '63 Catalina build. Oh sorry, it's a Street freak. Either way it's a fun build. |
|
#713
02-18-2012, 04:18 PM
|
||||
|
||||
|
I know they can be hell to keep balanced etc., and they are not for everyone's taste - but the slotteds looked good on there. Always like them with a lot of fat meat around them on a gasser.
Those, the Cragars or reverse chromed rims would all look fine on that beauty IMO.
__________________
"If you do everything you'll win" -LBJ 13 Smiles per Gallon: 66 Bonneville wagon 66 Bonneville 2d HT - In perpetual progress 2005 GMC L-33 |
|
#714
02-18-2012, 05:50 PM
|
||||
|
||||
|
A few years ago, a friend of mine did his front end. He used hinges like the ones you have on there. They where welded to an angle iron piece that slid forward. He used 4 small electric rams. You pushed the button, two of the rams pushed front end foward on a custom track piece, about 10", hit a mirco switch, then the other two rams raised the front end. then it did the same thing in reverse. It was very cool. I wired it up for him. It was a 63 Impala SS gasser, with a steel front end. It was destroyed about 10 years ago at the track and he got rid of what was left of it, and quit racing.
__________________
1962 Catalina 421 Tripower 4-speed "Red" 1962 Grand Prix 389 Tripower 4-speed "White" 1962 Corvette 402hp 350 4-speed 2009 GMC Yukon Denali 2011 GMC Yukon Denali |
|
#715
03-10-2012, 07:37 PM
|
||||
|
||||
 In a barn since 1985. Once it's running, it will look the same. I have no plans for paint. Interior is mint.  Here's my best helper. She likes making things shiny. |
|
#716
03-12-2012, 03:45 PM
|
||||
|
||||
|
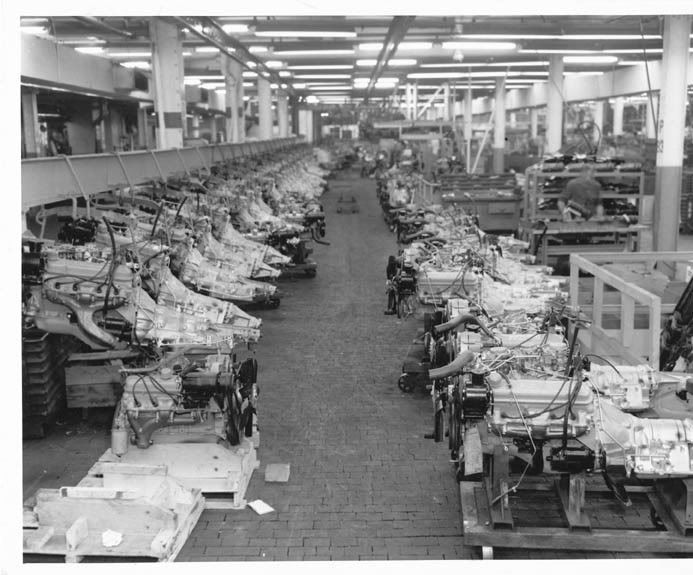
Steve, from Pontiac heaven , posted this in the old pics thread in Lobby, Thought you might like it ..
__________________
" Long may we DRIVE !" |
|
#717
03-12-2012, 06:00 PM
|
|||
|
|||
|
coil springs ..
nice..I love to see stuff like that.. i need rear coil springs 1966 GP 389 no air. Do you have any ideas???
|
|
#718
03-12-2012, 08:26 PM
|
||||
|
||||

Quote:
__________________
RediRad circuit designs, branding and intellectual property are for sale. Serious inquiries only. |
|
#719
04-09-2012, 10:59 PM
|
||||
|
||||
|
Took the '64 for a 400ish mile trip today. Had some business at the Tomahawk Railway.

|
|
#720
04-10-2012, 11:39 AM
|
||||
|
||||
|
Quote:
Question: Curious what that trip cost you in gas $ ??? Perhaps $ was covered by your business trip? |
| Reply |
|
|
The PY Online Forums is the largest online gathering of Pontiac enthusiasts anywhere in the world. Founded in 1991, it was also the first online forum for people to gather and talk about their Pontiacs. Since then, it has become the mecca of Pontiac technical data and knowledge that no other place can surpass.




 Linear Mode

