


| FAQ |
| Members List |
| Social Groups |
| Calendar |
| Search |
| Today's Posts |
|
#1
 10-28-2012, 01:00 AM
|
|||
|
|||
|
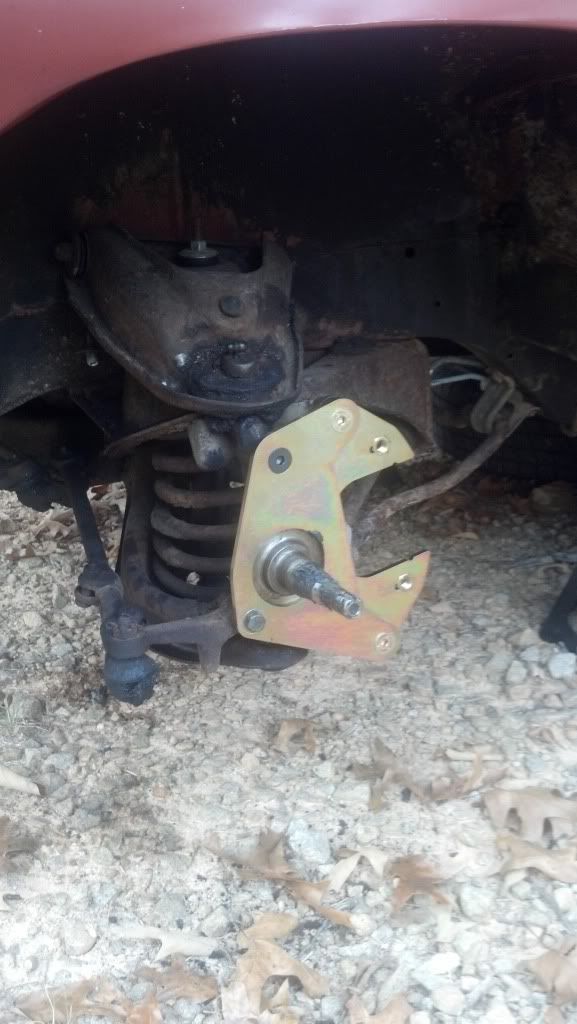
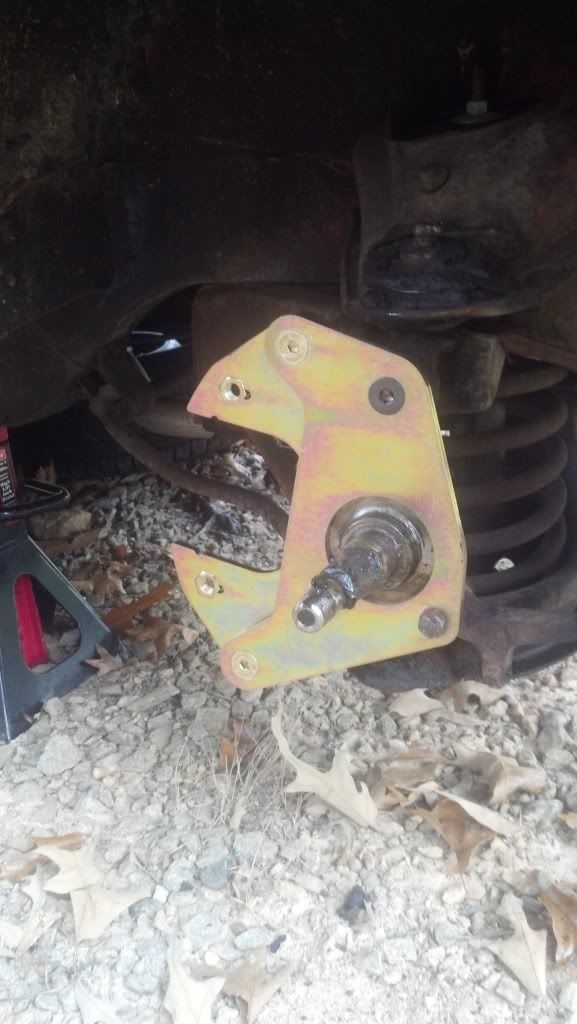
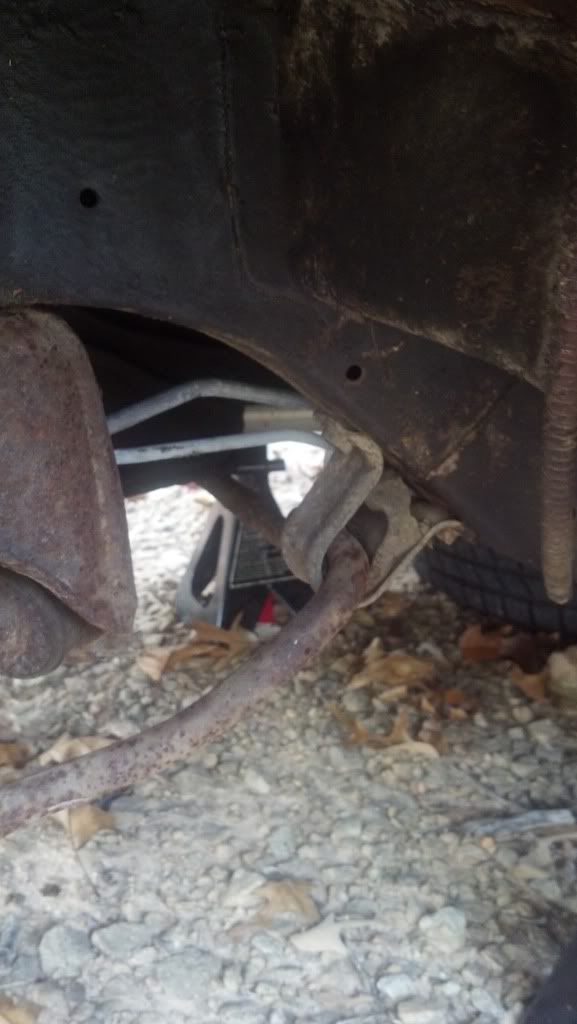
Hey everyone. I got started on my scarebird conversion today. Here are some pics. I do have a few questions though. I want to put a factory GM style proportioning valve on mine. How do I route the lines into and out of the valve? I also noticed I need some sway bar bushings. Are these made? Can I get a generic replacement?
__________________
Andy 1962 Tempest Lemans 4 cyl auto 1967 Camaro 1969 C/10 1969 D300 1972 K/5 1974 'Cuda 2005 2500HD Duramax |
|
#2
10-28-2012, 09:43 AM
|
||||
|
||||
|
2 things to check when you take the hubs in to the machine shop. 1. You need to turne down the outside of the hub to fit inside the new disks. 2. You may need to turn the face of the hub there the studs are. Some of them have a slight taper that will not allow the disk to turn true. Level the face of the hub and that wobble is gone.
|
|
#3
10-28-2012, 12:15 PM
|
||||
|
||||
|
Looks like you are missing the metal "backer" inside U shaped clamp. I might have a photo of what it looks like all together.
__________________
Peter Serio Owner, Precision Pontiac |
|
#4
10-28-2012, 03:48 PM
|
|||
|
|||
|
Quote:
As to the rubber bushing part, I doubt there is a specific "Tempest" part available at the parts stores but I believe that with a little bit of sorting through some pieces they have for other cars you could find sustitutes, probably even in polyurethane. I seem to recall the stabilizer bar is 11/16" in diameter. Notice the bracket has "grooves" in it with the U-shaped piece having similar patterns that fit into the bracket. These grooves probably serve a dual purpose of holding the stuff in line and "cinching down" the rubber. |
|
#5
10-28-2012, 09:00 PM
|
||||
|
||||
|
I am thinking 62 and 63 sway bars are the same as far as that rubber bushing goes.
__________________
Peter Serio Owner, Precision Pontiac |
|
#6
10-28-2012, 10:14 PM
|
|||
|
|||
|
Thanks for the pics and info everyone. Anyone installed a proportioning valve on their car?
__________________
Andy 1962 Tempest Lemans 4 cyl auto 1967 Camaro 1969 C/10 1969 D300 1972 K/5 1974 'Cuda 2005 2500HD Duramax |
|
#7
10-28-2012, 11:59 PM
|
||||
|
||||
|
mounted mine forward, away from all that heat, its all painted black now and doesn't look this crude anymore. wilwood prop valve. and line lock. Dan
__________________
63 Lemans ride along and drag race. https://www.youtube.com/watch?v=XMJHMPx7KAQ Gear Jamming https://www.youtube.com/watch?v=mw7KPRASomg At the track |
|
#8
10-30-2012, 07:54 PM
|
|||
|
|||
|
Thanks for the picture. I have another question. I just finished opening up the holes for the fairmount master cylinder. However, my master cylinder doesn't have a push rod on the back of it? Do you simply swap the one out of the factory tempest master cylinder and lengthen it so that the proper stroke length is achieved? Thanks.
__________________
Andy 1962 Tempest Lemans 4 cyl auto 1967 Camaro 1969 C/10 1969 D300 1972 K/5 1974 'Cuda 2005 2500HD Duramax |
|
#9
10-30-2012, 09:27 PM
|
||||
|
||||
|
Sounds like you have a master cylinder for a "power brake" set up. My Fairmont MC had a rod attached and was for a non power application.
|
|
#10
11-01-2012, 12:06 AM
|
||||
|
||||
|
I used a non power MC as well. If the boosted Fairmont MC does not have a very deep (we are talking at least 2 or 2 1/2") "pocket" in the push rod area I would not use it. If the push rod ever slipped out you would be in terrible trouble. The non power Fairmont MC I ended up getting had a pre-attached push rod (as I recall) that ended in a loop. I sawed off the loop, turned down the rod into 3/8"X24 threads and attached my junction. First 2 photos below are my mock-up of that prior to putting it back underneath the dash. Keep in mind that my car(s) are '63s so a '62 may have some minor differences in the firewall form or shape.
Hopefully what worked on my '63 would most likely work on your '62 with some minor tweaks here and there.
__________________
Peter Serio Owner, Precision Pontiac Last edited by Peter Serio; 11-01-2012 at 12:19 AM. Reason: added some more info |
|
#11
11-01-2012, 02:49 PM
|
||||
|
||||
|
Nice pictures Peter. I did the same thing with a Fairmont MC. I wish that I would have removed the MC surround sheet metal like you did when I had everything apart. It just keeps getting in my way! Although I used an InLine Tube adjusting valve for the rear I'm not sure that I needed it, as the Fairmont's had drum brakes in the rear? John
|
|
#12
11-02-2012, 11:00 PM
|
|||
|
|||
|
My car has the conversion with no proportioning valve and works fine. But the inline kind are easy to install then adjust away.
|
|
#13
11-03-2012, 01:33 PM
|
|||
|
|||
|
Fine Lines makes it so nice, Valve bolts right to master cyclinder, they supply lines and all. Super nice set-up!!
|
|
#14
11-04-2012, 01:31 PM
|
||||
|
||||
|
My car has the conversion with no proportioning valve and works fine aswell.
__________________
"If you aren't first, your last." Ricky Bobby 2006 |
|
#15
11-04-2012, 07:07 PM
|
||||
|
||||
|
I have the Wilwood disc and used porportioning valves on both cars. Never have messed with them and I race my cars. No front stabilizer bars because of headers and don't know there not there.
|
|
#16
11-04-2012, 09:40 PM
|
||||
|
||||
|
Although I have pedal, I would like to have it higher and more firm. Does anyone have a modified setup for pressure bleeding these dual master cylinders in the limited space? It just doesn't work with my wife helping me anymore! John
|
|
#17
11-05-2012, 12:31 AM
|
||||
|
||||
|
use this at the receiving end:
http://www.harborfreight.com/brake-f...der-92924.html works very well, buy a gallon of fluid and go. best to get a couple extra bleed screws and drill them thru. use them to bleed so caliper threads do not leak air. |
|
#18
11-05-2012, 01:44 AM
|
|||
|
|||
|
Okay guys, I got the setup installed today but I have some questions.
When I had the hubs machined, they fit the rotors great. I got everything installed today and it seems like the rotors are sticking out about 1/4" too far and the outer brake pad is pressed against the surface of the rotor. The rotor was hard to turn by hand. I also got the master cylinder installed and the brake lines routed. I didn't install the proportioning valve. I drove the car and it stops better, but the pedal is not really that firm. I extended the the length of stroke of the master cylinder push rod by using the photos posted by Peter. I mocked everything up on the pedal assembly while it was out of the car so the master cylinder is being depressed fully as far as I know. I started bleeding by getting the air out of the calipers on the front, then I went to back right, back left, front right and front left.
__________________
Andy 1962 Tempest Lemans 4 cyl auto 1967 Camaro 1969 C/10 1969 D300 1972 K/5 1974 'Cuda 2005 2500HD Duramax |
|
#19
11-05-2012, 06:31 PM
|
||||
|
||||
|
I had to do a little grinding on my calipers
so they would slide in there location. If you didn't that might be holding up the way there suposed to move, Plus it would make it hard to install. GT. |
|
#20
11-05-2012, 09:12 PM
|
||||
|
||||
|
You should be able to apply the brakes by hand. Remove the rim and spin the rotor (Use 3 lug nuts installed backwards) to hold the rotor tite to the hub. Then pull out or push in (sideways) on the caliper and the rotor should stop.
There is a transfer lug on most calipers that you need to grind down, if you do not the caliper hits Mark's new bracket on the inside lower edge. Normally you can't even get the 2 bolts installed if you don't grind that down first. NOTE: Grind on the caliper only NOT on your new Scarebird bracket! If you managed somehow, to get both bolts in, I think the caliper's outboard pad would be jammed up against the rotor! As far as getting all the air out I highly recommend Russell Speed Bleeders. Once you use these one time, you will never go back. Fronts: http://www.jegs.com/i/Russell/799/639580/10002/-1 Rears: http://www.jegs.com/i/Russell/799/639600/10002/-1 The sequence of bleeding, as I recall, is to begin at the wheel cyl furthest away from your MC and work in progression one wheel at a time closer. That would be: RR-LR-RF-LF. If you have added front disc brakes and you kept the original rear drums you need a combination valve plumbed into the system as the fluid and pressure requirements demand it. I don't see how it's possible to get all 4 wheels to stop evenly without one.
__________________
Peter Serio Owner, Precision Pontiac Last edited by Peter Serio; 11-05-2012 at 09:33 PM. Reason: added some more info |
| Reply |
|
|
The PY Online Forums is the largest online gathering of Pontiac enthusiasts anywhere in the world. Founded in 1991, it was also the first online forum for people to gather and talk about their Pontiacs. Since then, it has become the mecca of Pontiac technical data and knowledge that no other place can surpass.


 Linear Mode

