


| FAQ |
| Members List |
| Social Groups |
| Calendar |
| Search |
| Today's Posts |
|
#721
 02-20-2013, 10:48 AM
|
||||
|
||||

I probably can't afford an "Original Aron", but at least the shipping should be cheap, LOL. Dammmmnnn, that thing should really spool fast??? Light weight an' all.
Hey, if it works for mockup, then that's all that matters. It's actually a good idea. Look how many hernias you can avoid. MArk L
__________________
My Gasser '63 Catalina build. Oh sorry, it's a Street freak. Either way it's a fun build. |
|
#722
02-20-2013, 08:24 PM
|
||||
|
||||
|
MArk,
Is your midplate replacing the Lakewood plate or are you using both? Do you have pics of the midplate? Rob...
__________________
" Darksiders Rule "
|
|
#723
02-21-2013, 12:06 AM
|
|||
|
|||
|
It actually worked great Mark. I was able to get the turbo placed to within about 1/4-1/2 an inch. From there building flanges and supports is much easier. Wasnt even the hernia issue......there was just NO way to block up the real thing or hold it, WHILE rotating the 2 sides and measuring carefully for all the pipes going into it AND measuring for the support pieces I need to make. Now if I had 4 arms.......
|
|
#724
02-21-2013, 01:43 AM
|
||||
|
||||
|
Rob, I still used both plates. The early blocks are shorter to the bellhousing face by 1/4 inch versus the later blocks but the crank flange is the same. Both plates are only 1/8 thick so I needed both to get the thickness. This allowed me to attach the starter adaptor (angle iron) to the first spacer but not the motor plate. Not a big thing but it help make things easier. This is the spacer. I used a readily available trans adaptor and modded it to work.
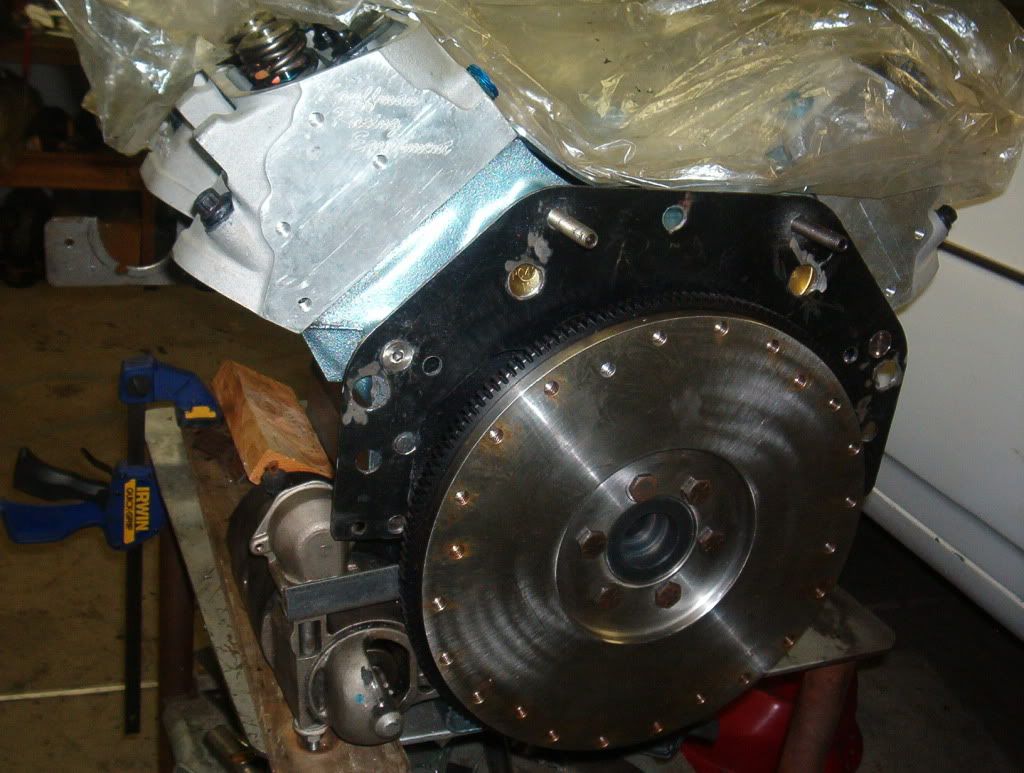 The starter is adapted to the spacer. It still needs to be welded to the plate here. 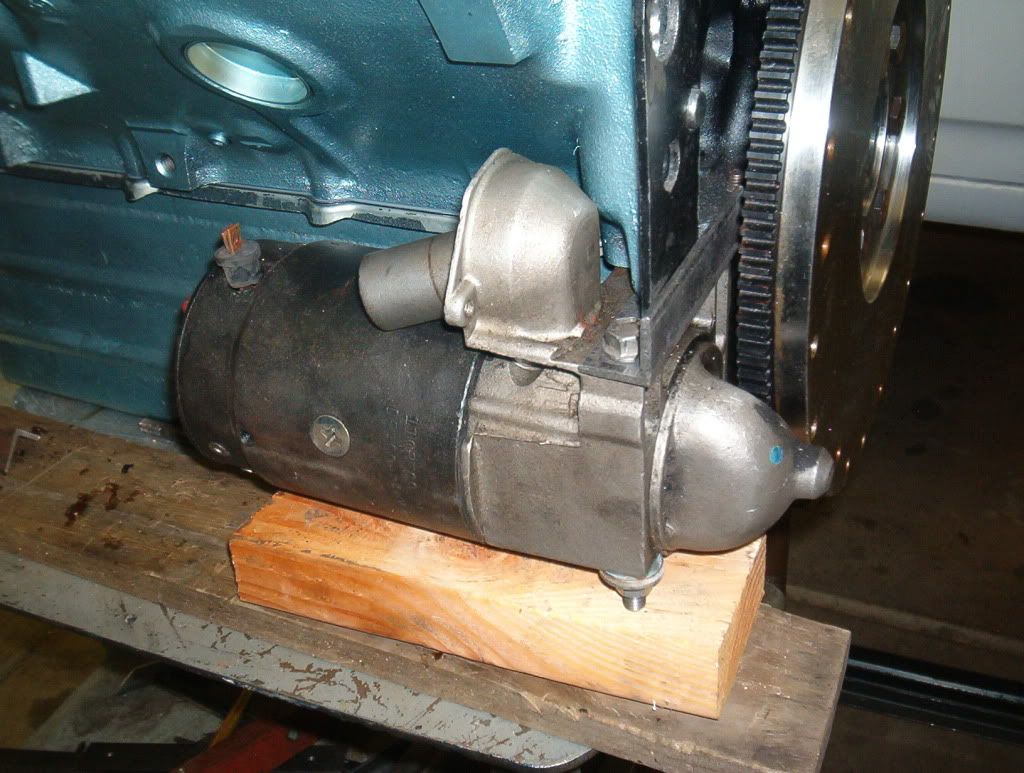 Then the motor plate was modded to fit everything and bolted to the block thru the spacer. 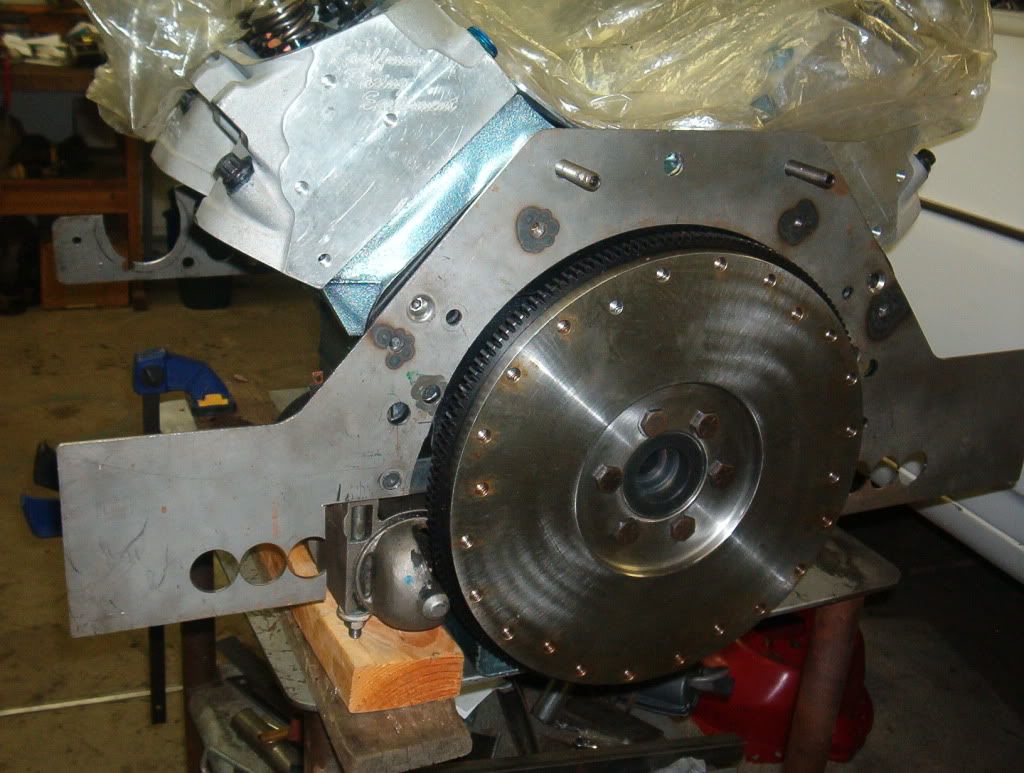 Then the block saver plate was installed with the bellhousing right over that. Everything lined up nicely and the tran slid right in. Mark L
__________________
My Gasser '63 Catalina build. Oh sorry, it's a Street freak. Either way it's a fun build. |
|
#725
02-21-2013, 12:30 PM
|
||||
|
||||
|
It all looks good Mark. You are really making progress. I would still support the front of the starter though to that motor mount bolt. The factory did that so, you could use one of them instead of fabbing one if you choose to.
I can't wait to see Catalina on the streets!
__________________
Hundreds of Pontiacs in Az "Real Pontiacs only..no corporate nonsense!" Facebook- Pontiac Heaven Hosting- 23rd annual Pontiac Heaven weekend- Phoenix pending due to covid Pontiac Heaven Museum in process Phil 2:11 |
|
#726
02-21-2013, 03:15 PM
|
||||
|
||||
|
Hey Mark, where did you get the trans adapter you are using?
|
|
#727
02-21-2013, 06:57 PM
|
|||
|
|||
|
Mark i just noticed that Butler is offering the starter mount plate for 64-earlier Pontiacs.
Just thought i would post it even though you are already fabricating one. I was surprised to see Butler offer one. Car looks Great!  http://butlerperformance.com/new_products.html 
|
|
#728
02-21-2013, 08:23 PM
|
|||
|
|||
|
Quote:
I built my own... uses a 58 starter... may build another because mine is ugly(pitted corroded plate was a freebie so I used it). May mod mine for 61-64 starter. Mark and I needed adapters for modern bell pattern... I got my 58 starter from Mark... I shared tid bits on what to watch for if he built his own. I probably have a dozen posts and several pictures on it in this thread lol |
|
#729
02-21-2013, 10:43 PM
|
|||
|
|||
|
Quote:
Butler site gives a generic description. "Adapter to mount starter on 1964 and earlier blocks when using a later transmission" Interesting thread though,i have been following it for some time now,just haven't kept up with all the details. I'm watching you:  http://www.youtube.com/watch?v=xkWTKwwpUhA Last edited by gene simmons; 02-21-2013 at 10:50 PM. |
|
#730
02-22-2013, 03:14 AM
|
||||
|
||||
|
Steve, I still have to make that support, I forgot while I still had the motor out. Not hard to still do. Lots of room down there.
Fast 69. I used a plain old readily available BOP to Chevy adaptor plate for the first plate, and the second plate is an AllPontiac rear motor plate. I redrilled them to match the early block bellhousing bolt pattern and put them altogether and used a piece of angle iron to mount he starter to the early factory block flange. The inside starter bolt is into the block flange, the outside bolt is into the angle iron, and the angle iron is welded to the first plate adaptor. This way I can get a starter at NAPA if I have to. Well I dropped the power plant in it's final resting place today. Then threw on the carbs and the scoop. It sets perfectly up into the cowl. I have to make the rear motor plate framerail mounts now. This is the motor all installed with the pipes inserted into the shotgun scoop. Somewhat the way they will be.  I cut and fit a front crossmember today to carry the radiator. I've finally given up on installing it in the trunk. You can see the crossmember setting between the framerails inthat previous picture. I have to heat and mould a small depression in the crossmember to clear the steering shaft/coupler, clean the paint off of the frame, and then weld it in. This is the radiator in it's new location.  I've given up installing it in the trunk. It causes too many problems with making it work. Mounting it back there, getting good air flow to and away from it, and all the piping to move the coolant to and from the front of the car. Not to mention having a big enough water pump to move all that water against the G-force during acceleration contests. The cost of a good strong pump alone makes it something to forget about. I'll get an electric BBChevy pump and mount it up above or below the front mounted fuel pump. Then use hose to run the water from the pump to the block. I also got the first set of plates welded into the shotgun scoop.  The first set will get gaskets, and I'll drill and tap them for bolts. This is the second set of plates.  These will get welded to the pipes that come from the intercoolers and aligned bolt holes in them to match the first ones in the scoop. The pipes from the intercoolers will go thru these second plates, get welded to the pipes in a correct orientation to match up with the intercoolers. The pipes will go thru the first plates in the scoop into the scoop cavity, and the first and second plates will all be bolted together. I installed the V-Gate shifter so I can start building my shifter porch. It now falls into a pretty good location.  I started mapping out the front brake lines and line lock etc to get that all together. Speedway sells a nice 18 circuit wiring harness so that may get on the list too. It would be nice ot get the wiring all in. I'm starting get more stuff done now. It's a great feeling. Mark L
__________________
My Gasser '63 Catalina build. Oh sorry, it's a Street freak. Either way it's a fun build. |
|
#731
02-22-2013, 04:53 AM
|
|||
|
|||
|
Good work Mark. I'm very impressed. Are you welding the aluminum yourself?
|
|
#732
02-22-2013, 10:14 AM
|
||||
|
||||
|
Lots of progress. Keep the updates coming. It has to be nice to see the engine sitting in place. That's gonna be a wild-looking engine compartment!
Jim |
|
#733
02-22-2013, 11:13 AM
|
||||
|
||||
|
Good work Mark...
Going to be a beast when done.. Guess I need some PED's to keep up..!!
__________________
 ECM member. 2008 Outlaw Pontiac Drag Series Champion MANDRA Do it now fool! Life is short. 69 Grand Prix/3163lbs / IAII 535 w/ Tiger heads by Gaydosh....9.35@ 144 so far..  through mufflers. 1.26 60'. through mufflers. 1.26 60'. Going back to track with pump gas engine.... My 60 Ventura retired to street/strip duty.. |
|
#734
02-22-2013, 11:22 AM
|
||||
|
||||
|
Thanks again Jim. To bad you can't cruise in your Tempest (or can you??). We could really have a great cruise with iur cars. Is there a cruising scene down in Tucson? I never though to ask you before.
Aron. I have my friend that added on my front clip do all my aluminum welding and my structural integrity welding. I would like to attempt some aluminum welding but I've not taken the time to run my spool of aluminum wire thru the welder to try it out. Although. One time I ran out my spool of wire and grabbed the next spool on the shelf. I started welding again and the sound was weird, like a phizzle sound instead of a nice strong crackle. Plus the weld just puddled up. My son had found a spool of aluminum wire and just placed it on me shelf, without telling me. SOOO. Now I do know I can't weld aluminum to 1/16 inch steel. LOL. MArk
__________________
My Gasser '63 Catalina build. Oh sorry, it's a Street freak. Either way it's a fun build. |
|
#735
02-22-2013, 11:30 AM
|
||||
|
||||
|
Hey Troy, long time no type! I know I'm going to kick myself for not knowing, but what is PED's? I see you're sliding from the "Darkside" to the "Lightside", lol. That is a nice GP and losing a 1000 lbs will heighten the experience 10 fold. I'm looking forward to seeing more about "The Adventures of Troy". Are you retiring the '60 for street and cruising duty? Or are you finally giving into all my crying and whining and just sending it to me??? LOL. OK, I'll pay shipping. MArk
__________________
My Gasser '63 Catalina build. Oh sorry, it's a Street freak. Either way it's a fun build. |
|
#736
02-22-2013, 12:31 PM
|
||||
|
||||
|
Mark, You're doing a great job!
Can't wait to see more progress....... |
|
#737
02-22-2013, 02:45 PM
|
||||
|
||||
|
Mark you make me feel lasy, I'm headed out to the garage right now!! When I grow up and then retire, I'm going to be just like Mark...............
|
|
#738
02-22-2013, 06:17 PM
|
||||
|
||||
|
Quote:
I'm not sliding from the Darkside...just have a lighter Darksider.. Figured it was best way to do what I wanted to do without chopping up 60.. GP is still a full size in my book..60 is going to be a street/strip car later on.. Already talked to Gaydosh about a pump gas motor.. Almost sold it...Yikes..  One of my friends told me that would be like a peanut butter & jelly sandwich...with out the peanut butter,,
__________________
ECM member. 2008 Outlaw Pontiac Drag Series Champion MANDRA Do it now fool! Life is short. 69 Grand Prix/3163lbs / IAII 535 w/ Tiger heads by Gaydosh....9.35@ 144 so far.. through mufflers. 1.26 60'. Going back to track with pump gas engine.... My 60 Ventura retired to street/strip duty.. |
|
#739
02-22-2013, 10:52 PM
|
||||
|
||||
|
Don't ever sell it. It just would not be the same. I'm usually lazier than anyone. Just in the mood right now.
I spent the day in the garage, getting a lot of things done. I decided to tackle the rear motor plate mounts. I used some of the scrap 2X3 .120 wall heavy tubing, the same as the new frame rails I put in the car. These mounts will hang off the side of the new frame rails so I made them with a loop over the top of the frame rail for more strength. This is the first cut.  Then I bent the extension over other scrap pieces of 2X3 so it went over and down the other side.  Then I cut them out so the motor plater will set inside of the 2X3 tubing and rest on the bottom flange.  These are the finished (short of grinding to clean them up) mounts laying on the scrap 2X3's to emulate how they set in the frame rails. The rear motor plate will set between them on the flanges. Then I'll drill the locating bolts, add a little paint and it'll all be done.  I also clearenced the cowl piece to set around the back of the scoop.  A little clean up and it'll be ready to get painted and bolted in. MArk L
__________________
My Gasser '63 Catalina build. Oh sorry, it's a Street freak. Either way it's a fun build. |
|
#740
02-22-2013, 11:42 PM
|
||||
|
||||
|
I also got the radiator crossmembver clearenced (BFH) for the steering shaft and knuckle and a fresh coat of paint on as much of the front end that I could.
  I also did a little cutting on the dash center piece. I wanted to find a three gauge Grand Prix dash insert, but they are too expensive. So I took th eone that came with the car, an original air vent center piece.  I cut out the center of the oval and I will make a new sheet center filler with 5 holes for 2 1/16 gauges.  MArk L
__________________
My Gasser '63 Catalina build. Oh sorry, it's a Street freak. Either way it's a fun build. |
| Reply |
|
|
The PY Online Forums is the largest online gathering of Pontiac enthusiasts anywhere in the world. Founded in 1991, it was also the first online forum for people to gather and talk about their Pontiacs. Since then, it has become the mecca of Pontiac technical data and knowledge that no other place can surpass.




 Linear Mode

