


| FAQ |
| Members List |
| Social Groups |
| Calendar |
| Search |
| Today's Posts |
|
#1
 01-22-2016, 04:28 PM
|
||||
|
||||
|
Can anyone provide photos and/or comments to illustrate the potential issues below?
I am going to order a dash cap for my 70 w/ AC. I have read in other postings that there is only one manufacturer, and people are very happy with the product. I then noticed this comment in PY/Ames listing: "**THESE COVERS HAVE A SLIGHT DEPRESSION ON THE LEAD EDGE OF THE DRIVER'S SIDE IN VARYING DEGREES PIECE TO PIECE. THEY ALSO FALL ABOUT 1/4" SHORT OF COVERING THE LEAD EDGE AS WELL.**" Can anyone explain, or better, illustrate what the depression and 1/4" shortness look like after the cap is glued on? |
|
#2
03-08-2016, 10:55 PM
|
||||
|
||||
|
i have done three of these. the 70-72 ones fit better than the '66 one i've done.
i know nothing about a depression. mine doesnt have it or i've never noticed. when you are sitting in the car, you cannot really see any imperfections. i recall having to spend a little time re installing the a/c vents, but turned out ok. if you are standing outside of the car, looking thru the windshield, you can see about 1/8" of the old dash under there, but only on the corners. its best to remove the dash for install, but on my '66 i did it in the car. on my 71's, if the car sits in the sun, the dashtop will expand and bend a little; and goes back after it cools. basically, you scuff your existing dash, clean w/ alcohol, and glue w/ silicone..i wrapped bunji cords around mine and left overnight. mine are black. texture is very close to original. i'm happy with mine. they are inexpensive. if your dash is beat, and you cant afford a dash resto, you cant go wrong. maybe i have a photo handy... |
|
#3
03-08-2016, 11:26 PM
|
||||
|
||||
|
pics. you can see the corner there; and the mess they made replacing my windshield.
in the camera flash you can see the difference between the dash cover and the glove box door; but in normal light or sunlight you cannot really notice. thats the color, out of the box. i guess you're supposed to dye it or paint it to match, but i liked it ok, so i just installed it. the white-ish stain in the second photo is actually a reflection. Last edited by F ROCK; 03-08-2016 at 11:38 PM. |
|
#4
03-09-2016, 12:30 AM
|
|||
|
|||
|
if you dont care about the old dash in the car..i can help..ive done dozens..
the secret is get a nice serrated knife and saw 1/4 inch of the leading edge facing to the driver, off...the reason you see the old pad is because theres so much old pad it cant slide back before it bottoms out..just take it easy...trim a little..trial fit if theres an issue..saw off a little more...ive put them on and really fooled real sharp GTO guys..til they touch it i trim off a little little but of anything pointing at me if i sit in the seats..or that i consider a high spot...it doesnt take much...if your pad is cracked and erupting..take a box cutter and trim off all the erupting material..thats where you start with the silicone and a spreader..you gotta get some in there to fill the void..or it will sag when it gets hot and then it there forever.. i turn the cap facing down and run a good bead in the areas i cut off the old pad..it will fill the voids and help adhesion..then follow the rest of the rules..pull or loosen the dash bezel..and pull the glove box door and vents..it will go on easy..if youre using a cap..the pad shouldnt matter..just go easy...you want to cut the vinyl and just a bit of the foam..done go so deep youre sawing metal..it will be ugly then..
__________________
Mark.. The Goat whisperer "I spent a lot of my money on booze, crazy women, and fast cars. The rest I just squandered." 
|
|
#5
03-09-2016, 02:32 AM
|
||||
|
||||
|
Great advice from you both. Makes sense.
Thanks for taking the time to respond and share your experience. I bought one, haven't pulled it out of the box to look yet. I will take this project on sometime in the next couple months after I work on cleaning up the dash bezel. |
|
#6
03-09-2016, 08:02 PM
|
||||
|
||||
|
FWIW I managed to get the cap to fit on my 72 by going a little nutz with the clamping.
After it dried I used a heat gun, some tubing, and sockets (for different radius) to reform a couple of the corners around the bezel, glove box, and a/c ducts. The vents had some very very small gaps even after massaging. I felt the end result was worth the extra effort. 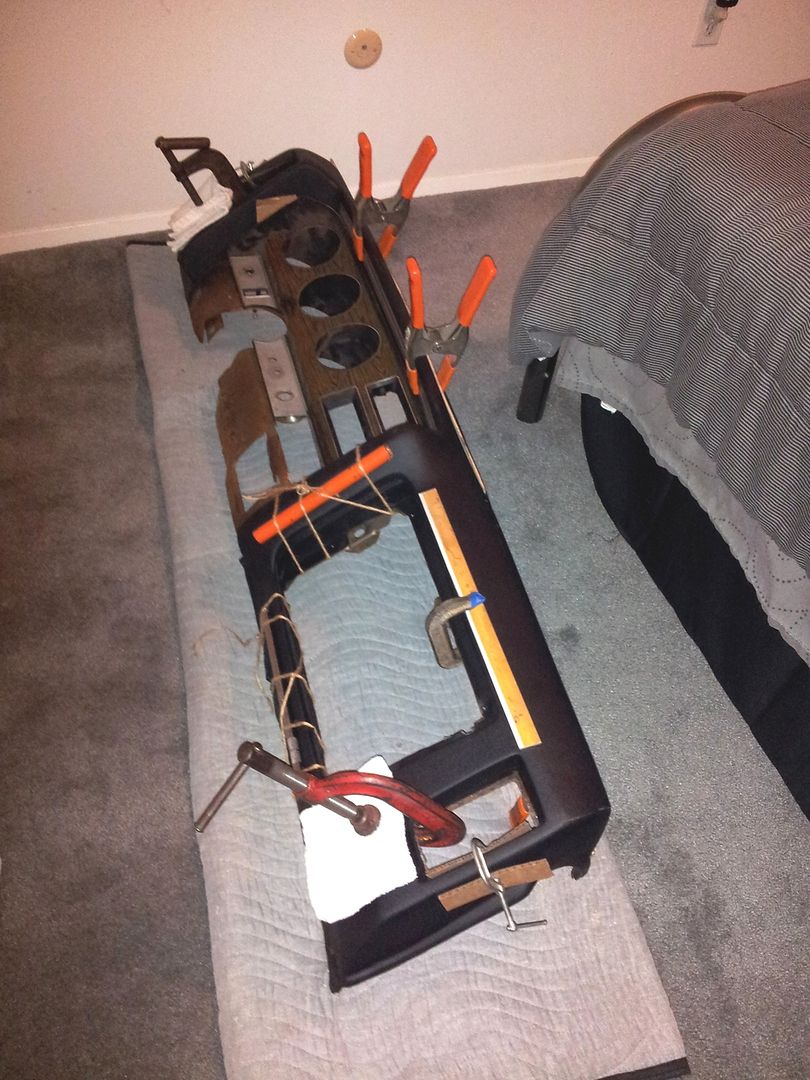  I think the depression they refer to is along the windshield edge. It looks perfectly normal to my eye. This is not my photo, but an uncapped dash that has a similar depression. You can also see it in F Rock's pic above. 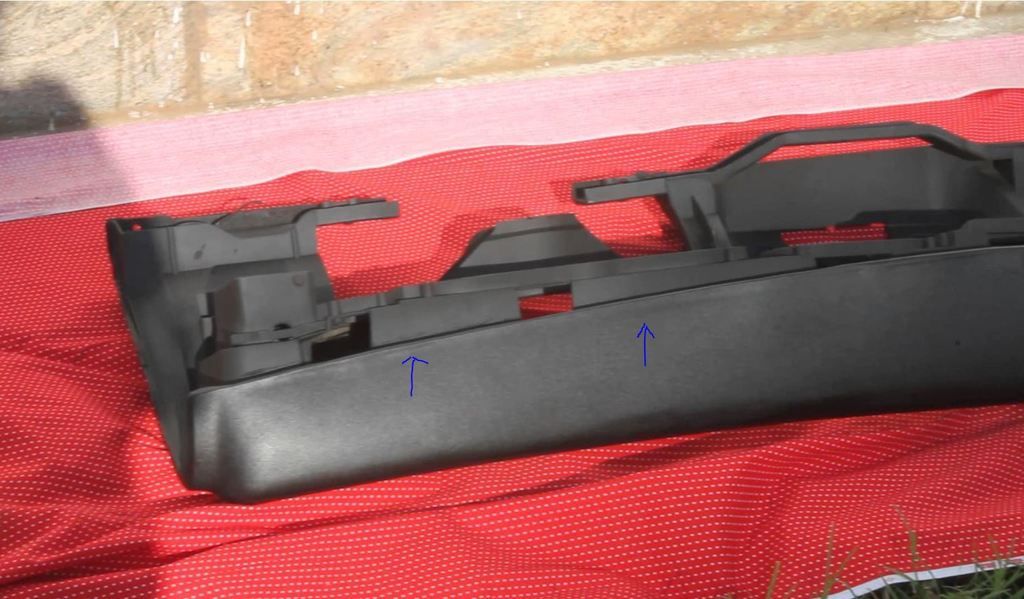 Good luck with yours, it's a very worthwhile fix.
__________________
68 Tempest Conv  06 GTO SRM A4 06 GTO SRM A4  462 Ram Air VI-LXXI motor in progress 462 Ram Air VI-LXXI motor in progress 
|
|
#7
03-09-2016, 09:51 PM
|
||||
|
||||
|
What is the best cap available?
|
|
#8
03-09-2016, 10:58 PM
|
||||
|
||||
|
Quote:
As always YMMV.
__________________
68 Tempest Conv 06 GTO SRM A4 462 Ram Air VI-LXXI motor in progress
|
|
#9
03-10-2016, 02:01 AM
|
||||
|
||||
|
Thanks for adding your experience and taking the time to post the pics, Blowd. Looks great, I'm sure you feel good about what you accomplished!
Also thanks for pointing out the "depressions". I have now put that in the perfection bag I'll try not to carry too far. I would never notice it. Please help me understand your process better. Did you glue the cap on with a silicone, let it cure, then "adjust" the molded cap with the clamps or did you clamp like that while the adhesive cured? I would not think you could move cured silicone with heat or pressure, so I'm assuming you were "re-shaping" the molded cap. Was this needed because the cap was off contour as you received it or because the gluing process distorted it? I'm also now wondering whether to paint before or after gluing it on. It seems there is a good chance to mess up the paint with clamps. I could also imagine excess adhesive being extruded around edges and trying to cut it off without messing up paint. Anyone have experience either way? Mine has to be painted... |
|
#10
03-10-2016, 01:08 PM
|
||||
|
||||
|
Quote:
__________________
'71 Formula 455 HO Ram Air - Future Project '64 GTO 389 4bbl 4-Spd. - Nice Driver '71 Lemans Sport Conv. Modified-350/350 3.23 Posi - Driver/Project |
|
#11
03-10-2016, 02:11 PM
|
||||
|
||||
|
Quote:
Not all dashes are exactly the same, and I'm sure not all caps are. Many might not have been bothered by a small corner overlapping a vent bezel, but my glove box door definitely rubbed on the corner. As per the instructions the adhesive is applied near the perimeters of the cap, but far enough back as to not squeeze out. It is to hold the cap in place but allow it to expand and contract independently. I would definitely paint after if you have the dash out of the car. Quote:
__________________
68 Tempest Conv 06 GTO SRM A4 462 Ram Air VI-LXXI motor in progress
|
|
#12
05-10-2016, 03:40 PM
|
||||
|
||||
|
Quote:
Did you fill the dash pad cracks with some filler after you cut that area out? What did you use? Also did you use the supplied adhesive? I've been told to use better adhesive, but not sure what that is. Thanks |
|
#13
05-10-2016, 07:20 PM
|
|||
|
|||
|
if its a sharp edge i trimmed it with a bread knife.
ive never used any thing but clear slicone..and never had one come loose.. i filled all the cracks..i V-ed it out with a box cutter..trimmed it back if it was a high spot took a spreader and after a time or two of running over it with the spreader..i wanted it flat but still low..and it got a coat of new a for glue.. trim and check..then check and trim again.. tried it 3 or 4 times til i was happy and glued it on with the silicone.. i dont know of the other glue types..all ive had came with a tube of silicone..some clear some black.
__________________
Mark.. The Goat whisperer "I spent a lot of my money on booze, crazy women, and fast cars. The rest I just squandered."
|
|
#14
05-11-2016, 08:34 AM
|
||||
|
||||
|
Quote:
|
|
#15
05-11-2016, 10:44 AM
|
||||
|
||||
|
Quote:
Also - I noticed the cap fits very good, however I'll have to trim-up the original pad to some degree, as stated above, so it will fit all the way to the back without a gap. So to confirm - It appears that the consensus is - the "silicone-glue" that came with the cap/cover is good enough?
__________________
'71 Formula 455 HO Ram Air - Future Project '64 GTO 389 4bbl 4-Spd. - Nice Driver '71 Lemans Sport Conv. Modified-350/350 3.23 Posi - Driver/Project |
|
#16
05-11-2016, 02:08 PM
|
||||
|
||||
|
Quote:
|
|
#17
09-05-2016, 12:48 PM
|
||||
|
||||
|
pggto, AJD1964, did you finish your cap installs?
I'm finally close to gluing mine. Any more advice? Did you fill in v'd out areas with silicone as advised by marxjunk? I'm concerned about the silicone setting up too fast if I end up having to clamp around the vents and glove box. Any issues with the silicone setting before you could get it spread? I have a Palco cap from Ames, did you use the same? How did your vents and glove box fit? Did either of you paint yours after? Any more advice on that? |
|
#18
09-07-2016, 01:13 PM
|
||||
|
||||
|
AJD1964, did you finish your cap installs?
Hey Shiny! I was wondering where you were at with that Yes got it done. This was my experience as a 1st shot at it, so other guys may have better detail. I tried to do what was shown here on this site. Knowing what I know now I believe these caps are a good solution for a driver/cruiser, but for a serious show car or high value car, I would send out the dash. I'm finally close to gluing mine. Any more advice? Make sure you trim off as much of the old foam as possible, so the cap lip on the back of the top will curve over top the old one, so you dont see a gap. I got it pretty good, but if I had to do it again, I would have trimmed more of the old one off. If you dont, that gap will be right on top by the windshield and will stick out like a sore thumb. Did you fill in v'd out areas with silicone as advised by marxjunk? Yes, but its not as easy as it seems. In my case I had some valleys that were quite deep, which took a lot of the adhesive, and I did not want to run out. It sets up VERY fast. I used the 1 tube that Ames supplied. If I had to do it again, I probably would have done the valleys as a separate stage, as a fill n shape, before doing the cap, but I did it all at once, and I had to move quickly. I'm concerned about the silicone setting up too fast if I end up having to clamp around the vents and glove box. Any issues with the silicone setting before you could get it spread? Again It sets up fast, but it needs a full 24 hrs to completely cure, so clamping is not a problem. It just gets difficult to spread into valleys when it sets up. Thats why if I do it again, I would do the valleys as a separate step in the process. I have a Palco cap from Ames, did you use the same? How did your vents and glove box fit? My cap was from Ames, so I assume it is the same as yours. Vents were tight, but fit. The better you can draw the cap in as close to where the original vinyl was the better. Clamps put around this area are key. The glove box door is tricky, because the cap takes up some of the original gap and spacing around the door. I had to do a lot of adjusting within the glovebox door hinge. Mine is very tight on the upper right corner. I did not want to trim it out there, at least not yet. I got the box door to work ok, with an acceptable (but not perfect) gap, but now Im still having trouble pushing the box-light switch in all the way, so the bulb is out for now. Did either of you paint yours after? Any more advice on that? Painting was a smooth process, and since I have a blue interior I had to paint it obviously. Make sure you wash it before painting. I used mild soap & water, and the paint covered nicely. I got the paint from the Parts Place in aerosol cans. They had on-line color samples to select from. The GTO Blue was the best match for my interior. I bought a few close versions of blue on a trial basis to find the best match. I had to do the metal dash all the way to the windshield, since the previous owner painted it body color (sheesh). Sanding & taping that off took 2 whole nights after work, but it came out very nice I think, and very close to what original was. How does it hold up? (Surprised this wasnt asked) The sun through the windshield will IMMEDIATELY bring out any weak points in adhesion on the top of the dash. Even though the instructions say to not put any glue within ¼ of the edge, you still have to glue it close or the sun will warp it, and lift it right off the old dash. To fix this, I had to get back inside the two layers, where it warped, with 3M black adhesive (that stuff works great), and then re-clamp it for 24 hours. I was able to fix it in the car. But I recommend covering it with a white towel or something to reflect the sun/heat off of it if you leave it out in the hot weather. Other than that, it seems very solid. I will post some pics as soon as I can find them.
__________________
'71 Formula 455 HO Ram Air - Future Project '64 GTO 389 4bbl 4-Spd. - Nice Driver '71 Lemans Sport Conv. Modified-350/350 3.23 Posi - Driver/Project |
|
#19
09-07-2016, 05:11 PM
|
||||
|
||||
|
__________________
'71 Formula 455 HO Ram Air - Future Project '64 GTO 389 4bbl 4-Spd. - Nice Driver '71 Lemans Sport Conv. Modified-350/350 3.23 Posi - Driver/Project |
|
#20
09-07-2016, 05:15 PM
|
||||
|
||||
|
__________________
'71 Formula 455 HO Ram Air - Future Project '64 GTO 389 4bbl 4-Spd. - Nice Driver '71 Lemans Sport Conv. Modified-350/350 3.23 Posi - Driver/Project |
| Reply |
|
|
The PY Online Forums is the largest online gathering of Pontiac enthusiasts anywhere in the world. Founded in 1991, it was also the first online forum for people to gather and talk about their Pontiacs. Since then, it has become the mecca of Pontiac technical data and knowledge that no other place can surpass.


 Linear Mode

