


| FAQ |
| Members List |
| Social Groups |
| Calendar |
| Search |
| Today's Posts |
|
#41
 12-14-2018, 02:24 AM
|
|||
|
|||
|
I'll get a dimension for you for comparison. Got to clamber up into the garage loft.
|
|
#42
12-19-2018, 12:13 PM
|
|||
|
|||
|
66sprint6, you can disregard I ordered what I need from Eklers. Was able to find the parts sold through Eklers via Amazon. Save a few bucks that way.
But I still have the question of the seatbelt listing. Does your front seat have them? Any chance you can take a few pictures? |
|
#43
12-27-2018, 06:20 PM
|
||||
|
||||
|
Rohrt, thanks for all your effort in getting PUI to make Tempest Custom covers. Unfortunately they dont offer red, or they didnt a year ago when I was looking for covers. I was able to source the correct material from SMS and found a great upholstery guy to sew them together.
|
|
#44
12-27-2018, 09:04 PM
|
|||
|
|||
|
Wow those covers look great. So, SMS did the embossing and sent you yardage of that?
Rohrt, I'll get some pics for you as soon as I can of the seatbelt listings. I've got a whole bunch of stuff in the garage and all of this Christmas stuff is keeping me pretty busy. Cheers |
|
#45
12-28-2018, 12:34 AM
|
||||
|
||||
|
SMS did the embossing of both colors; horizontal stripes on the burgundy and vertical stripes on the rose colored vinyl. Fortunately my tired original covers were mostly there for patterns. And my upholstery guy is a miracle worker! I highly recommend;
http://www.marksautoupholstery.com He built these covers from yardage and used the old covers as patterns. The back of the front seats have a third type of embossing, simple horizontal single stripes an inch or so apart, but I dont have a picture. Original Auto Interiors in Michigan also has both colors of vinyl, but they dont emboss. Speaking of patterns I sent my old back seat material to PUI so the should soon be able to offer convertible rear seat covers. |
|
#46
12-28-2018, 02:04 PM
|
|||
|
|||
|
Quote:
Your seats look great. I was tempted to do the SMS route in the beginning but I didn't have the original covers to work with. |
|
#47
12-30-2018, 08:27 PM
|
|||
|
|||
|
Spring work is all finished.
I doubled up the kicker springs and doubled up every other spring in the front. 
|
|
#48
01-28-2019, 03:55 PM
|
|||
|
|||
|
I got the seats done. I couldn't be happier with how firm they are now. Before I would sink to the floor now they are very firm, hardly sink in at all. The Upholstery guy siadi it took 3 people to get the base seat hog ringed.
The front seat backs are also very firm. Not much of a surprise since the replacement springs are a bit thicker then original. He also pointed out the pleats on the passenger side didn't take very well in one spot. Easy to see in the picture. Its a driver not a show car so I'm not too upset about it. I will post up more pictures once I get them in the car. The upholstery guy also knew exactly what to do about the plastic seat belt guides. I have not flipped the seat over yet to see how it was done. He also supplied me with the cardboard needed for the back seat. $5 from him vs the $86 I would have had to pay through the suppliers. I had spare vinyl so had him glue it for me. Saved a nice chunk of money. So the last steps are getting the sliders bolted back on, getting the plastic hinge covers on and getting that back seat filler panel on. I will try and get a few shots once its in the car. 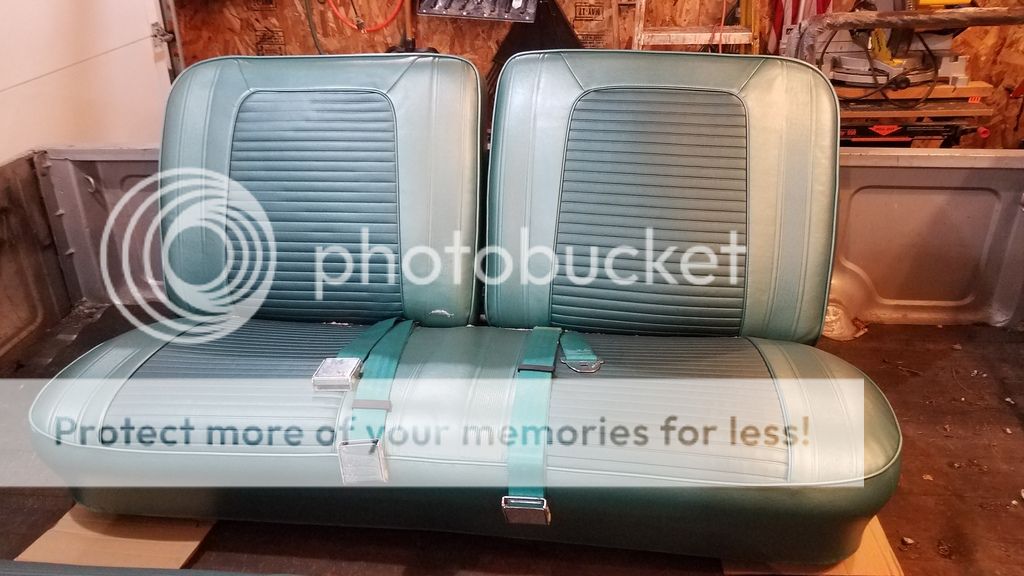
|
|
#49
01-28-2019, 05:55 PM
|
|||
|
|||
|
Looks great!. I'm resigned to the fact that mine will be a while before I get to it. Iv'e got a foot of snow in front of the garage in back. Besides, the covers aren't even arriving for a few weeks. I'm looking forward to seeing yours in your car.
|
|
#50
01-28-2019, 06:26 PM
|
||||
|
||||
|
Very nice work Ryan. Great tutorial thread too. Seats look awesome
|
|
#51
01-29-2019, 07:36 PM
|
|||
|
|||
|
Got a picture of the back of the seat?
|
|
#52
01-30-2019, 08:25 AM
|
||||
|
||||
|
Hope this helps...
|
|
#53
03-10-2019, 08:17 PM
|
|||
|
|||
|
Thanks for the pics. It's a relief to see that the seat backs are authentic looking from PUI.
I'm still waiting for my seat covers. I ordered on Nov 26 and they are telling me Apr. 10 ship date. I hope they stick to that. I'm looking forward to seeing pics of your seat installed. Cheers |
|
#54
05-19-2019, 12:27 PM
|
||||
|
||||
|
so is that for a 65 or 66 i can't tell
|
|
#55
05-19-2019, 12:42 PM
|
||||
|
||||
|
My photos were of my ‘64. Rohrt has a ‘64 also. Maybe this thread was about a ‘65 or a ‘66. Now I’m confused! Lol
|
|
#56
06-10-2019, 11:04 AM
|
|||
|
|||
|
I really hate photobucket. Not sure If these images will work or not.
So a few things I learned here. The extra springs I put on the deck. NOT NEEDED? When I first got in the seat didn't compress at all. I could hardly get my legs between the seat and steering wheel. I'm 6'4 and now my head is hitting the top bow. Plenty firm I'm basically looking at the top of the windshield piller sitting up. I pulled the seat out and removed the extra springs I put in. I did leave the extra kicker spring reinforcements on the side. This maybe helped bring me down an 1". I'm hoping it will settle a bit over time. Its going to take some getting use to. I have 2 tie wires connecting all the springs on the deck. I could maybe cut that too. My wife thinks it great. She is a normal sized person LOL. The front seat backs are great. Nice and firm. I do like how it looks.    
Last edited by rohrt; 06-10-2019 at 11:12 AM. |
|
#57
06-10-2019, 06:15 PM
|
||||
|
||||
 
__________________
When I die, I want to go peacefully like my grandfather did, in his sleep. Not screaming like the passengers in his car. 
|
|
#58
06-10-2019, 07:46 PM
|
||||
|
||||
|
Ryan, not only do your seats look awesome, your car has come such a long way since you started posting. Really nice job dude!
|
|
#59
06-11-2019, 07:21 AM
|
|||
|
|||
|
Looks really nice. Good job.
|
|
#60
06-11-2019, 01:38 PM
|
|||
|
|||
|
Jeff H. Thanks for putting in the normal size pics.
Thanks all for the compliments. |
| Reply |
|
|
The PY Online Forums is the largest online gathering of Pontiac enthusiasts anywhere in the world. Founded in 1991, it was also the first online forum for people to gather and talk about their Pontiacs. Since then, it has become the mecca of Pontiac technical data and knowledge that no other place can surpass.


 Linear Mode

