| FAQ |
| Members List |
| Social Groups |
| Calendar |
| Search |
| Today's Posts |
![]() |
|
| THE LOBBY A gathering place. Introductions, sports, showin' off your ride, birthday-anniversary-milestone, achievements, family oriented humor. |
| Reply |
|
|
Thread Tools | Display Modes |
|
#221
|
||||
|
||||
|
I used Chief Architect to basically design the whole house before we even went to an architect, they used my floorplan unchanged. Saved us a couple of months of working with these boneheads probably
I should have gone with a builder/designer that actually knows how to build a house, they could have had a draftsman just convert my stuff to buildable plans. I sent them all kinds of wonderfully rendered 3d views of the inside and out. Which they seem to have completely ignored. I shouldn't be venting here, but the last plans they just sent for review are about six weeks old, all the corrections we made since then appear to be gone. Like you I tend to plan everything out in 3d these days, even a simple shed. I'm starting to think a lot of the free "open source" apps are better to use than "professional" stuff. The free stuff seems to use many more commonly used file types so exchange and importing/exporting objects is much easier. And of course FREE is always good. I miss my old industrial sewing machine, used to make all kinds of canvas covers and such for equipment, soft cabs parts for tractors etc. Here is a render of the Kitchen area from Chief Architect. Makes the stuff from the "professionals" we are working with look like crayon drawings.
__________________
I'm World's Best Hyperbolist !! |
|
#222
|
||||
|
||||
|
AI says this is the guy doing the plans for our house.
__________________
I'm World's Best Hyperbolist !! |
|
#223
|
||||
|
||||
|
Rendering looks great! I can understand an architect not wanting to invest in that detail. Hopefully they reviewed your floorplan for you before importing it!
As to the artificially intelligent architect... I resemble that. |
| The Following User Says Thank You to Shiny For This Useful Post: | ||
|
#224
|
||||
|
||||
|
Curses, foiled again.....
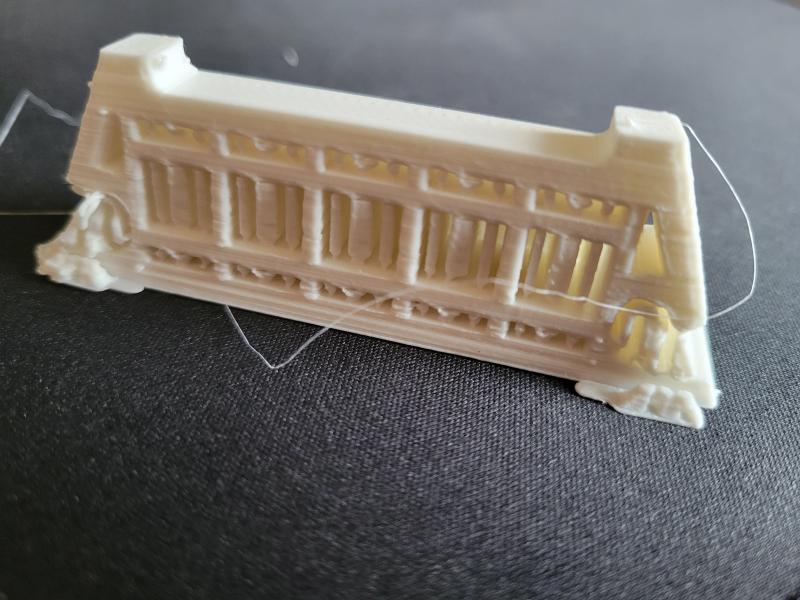
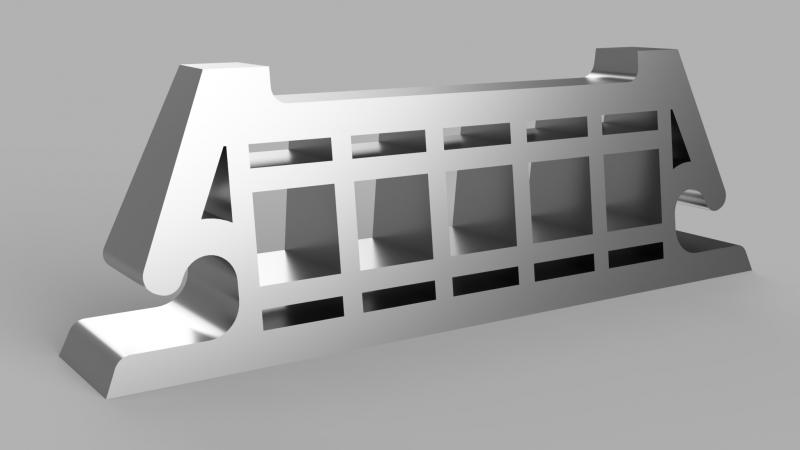
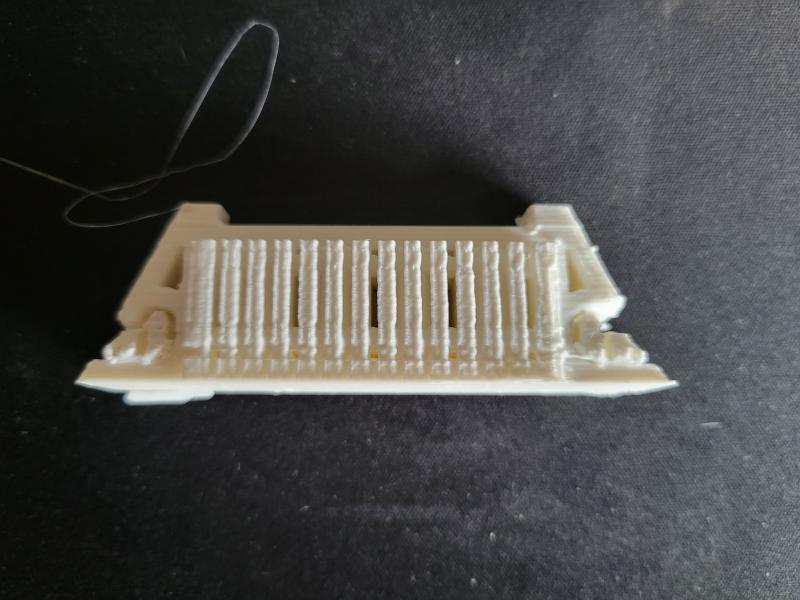
I generated a 3rd version of my design to shorten and adjust a dimension. I simplified it a lot as I'm learning more about both the Fusion design tools and the printing process. Good news, the library printed it fast. Bad news, they printed unusable garbage. Help me interpret this.... Did their software add a ridiculous amount of supports or was my STL file somehow "corrupted" or contained artifacts their "slicer" decided to print? Here's an image of the STL file: Here's what they printed: I interpreted this mess as "supports" and asked them to print again with the "side" of the part against the build plate, as no supports should be needed. I hope this fixes it but thought I'd ask as I have no visibility into what they are doing. Mike |

|
#225
|
||||
|
||||
|
Your file looks fine, and I think you are right on the money, they didn't lay it flat on the bed so the slicer generated supports to fill the gap.
Also it appears their printer is totally fubarred, if that is PLA it should have printed out perfectly. I'll PM you, email me the file and I'll print it, find out if it's you or them
__________________
I'm World's Best Hyperbolist !! |
|
#226
|
||||
|
||||
|
I got a defensive reply from the library when I asked them to print it laying down.
I interpret this to mean they are just trying to help people learn a little but aren't committed to much beyond that. I get it. The library is not a paid job shop and for all I know, some employee decided it was a good idea to print stuff, then quit and left other staffers hanging with barely enough knowledge to drag, drop, and hit a button. All good, I got some prototypes that did what I needed and know I can design a simple part with some confidence. It's fun! Mike |
|
#227
|
||||
|
||||
|
It's been my experience that most "public sector" 3d printers are kinda like place holders, something they can add to the list some official or politician can claim to have provided. Rarely does anyone at those locations actually have an in-depth knowledge of the device, and to be honest most of the time the printers are older, obsolete, worn out, or poorly maintained examples.
If you ever want to get into printing yourself feel free to ask questions, there are some excellent and affordable machines out there. Like the Bambu A1 series, incredible print quality and ease of use for like $300-400. Most of the Pontiac Project parts in this thread were printed on an A1 Mini.
__________________
I'm World's Best Hyperbolist !! |
|
#228
|
||||
|
||||
|
Wow, that's really lower than I'd expect to do anything useful.
Seed planted, thanks. |
|
#229
|
||||
|
||||
|
More 3d printing fun.
I got tired of NOT rearranging my tools where I wanted them because I didn't want to relabel the drawers. So I printed up a bunch of magnetic labels so I can move them whenever and wherever I want. Also printed up hangers for my T-handle allen wrenches since no matter how hard I tried I could not find an efficient way to lay them out in a drawer.
__________________
I'm World's Best Hyperbolist !! |
|
#230
|
||||
|
||||
|
Slick! Mikey likes it.
Are you printing "around" the magnets or gluing them into recessed pockets? Two-color prints or paint? I got stuck in a parallel universe today.... my youngest son showed me this little label printer so I bought one and spent a half hour labeling stuff today. This thing is rechargeable, portable, easy, and fast. Also amazingly inexpensive. I discovered that with a click it will print today's date, which is cool for tracking stuff in the freezer, furnace filters, battery replacements, etc. Link to Niimbot on Amazon |
| The Following User Says Thank You to Shiny For This Useful Post: | ||
|
#231
|
||||
|
||||
|
I had label maker mania for a while, loved them, still have two of them. But I found that either the labels didn't stick well enough, or they stuck too well and I had to stack them on top of each other when I wanted to relabel something.
Although, I'd pick up one of those in a heartbeat just for the date printing feature. I'm gluing the magnets in pockets, but I have in the past also printed "around" the magnet, which is kind of a pain. You have to add a pause in the print after a few layers and after the magnet "pocket" is printed, then put the magnet in, then resume printing, which means you have to kind of stay and watch the print. Does make for a more neater looking piece, you do lose a bit of stiction. It's a bit more of an advanced process, you have to design the label properly (right depth pocket) and coordinate it with the printer layer depth settings so the magnet is at the perfect height to lay a layer on top of it. Also, not sure how the process would work with the commonly used hardened steel nozzles these days, I can picture the nozzle dragging the magnet around I printed these in two colors.
__________________
I'm World's Best Hyperbolist !! |
| The Following User Says Thank You to dataway For This Useful Post: | ||
|
#232
|
||||
|
||||
|
Rat-hole of the day.
Another car-related learning adventure... and it definitely could be used to generate models for printing. I was thinking about how to generate some templates for body work and gave up trying to cut them from cardboard. I don't have the patience. I won't buy a laser scanner or any other tool beyond a contour gauge but thought I'd try again to see what could be done for free using cell phone photos. I went looking for photogrammetry software, thinking if I could generate a CAD model, I could maybe slice it and print sections to use as templates. I ended up trying something called Zephyr 3DFlow that has a free version. I took a bunch of pictures (not enough), fed them to the software, and it generated a 3D mesh object. I can export to Fusion if I can get the size down... I may need to pull it into another tool like Blender to simplify for Fusion... don't know yet. But this is cool! Takes the software a long time to process on my laptop (and it iterates painfully) but it did it. I will try again with more photos and taking more care with lighting. Might not be useful nor even accurate but it's a free way to digitize a 3D object. These are just screen captures of the 3D mesh model. The lines are my marker scribes where I thought I'd try to cut templates before I canned that idea. |
| The Following User Says Thank You to Shiny For This Useful Post: | ||
|
#233
|
||||
|
||||
|
Still missing with the GTO 3d models now and then. Timing cover is a pain.
__________________
I'm World's Best Hyperbolist !! |
| The Following 2 Users Say Thank You to dataway For This Useful Post: | ||
|
#234
|
||||
|
||||
|
That's impressive for photogrammetry. I keep an eye on affordable scanner technology, still seems a bit clunky in the price range I would be shopping.
What I really need is a set of factory engine dimension drawings It's a very laborious process to take dimensions that are east to get, like air cleaner diameter, crank snout, and gaskets and try to scale everything to match. Rock Auto part descriptions have been a big help, they often include dimension details for part.
__________________
I'm World's Best Hyperbolist !! |
|
#235
|
||||
|
||||
|
I'm a fan of your effort on this so glad to see you back at it.
I do think the freebie photogrammetry software is more than capable but I haven't tried again... maybe it would help with your engine modeling. It takes a decent PC to run efficiently and mine is not it... I have an i9/16GB laptop but not really designed like a workstation. The heads look excellent! Interesting to learn you are leaning on RockAuto descriptions. I would not have expected that to be useful... good work! |
| The Following User Says Thank You to Shiny For This Useful Post: | ||
|
#236
|
||||
|
||||
|
For example, Rock Auto gives the dimensions of the damper, ID, OD of the sleeve, overall OD, total length etc. Other parts it just gives the length/width/height but you have to be careful it's not talking about the shipping size.
The heads are a real pain, I used photos of gaskets that give you intake, exhaust, head surface and valve cover shapes (I have to scale them to 1/10), then I use a known measurement like bore size to dimension everything properly. I'm certainly not a professional so I make a lot of errors in work flow, which is VERY important to ensure you can go back and change things. If you don't do it right you end up with a "solid" object that is no longer built up of "features", but just a solid model like an STL file. Doesn't help that a lot of these parts were done in Autodesk Inventor, then I switched to Solidworks and a LOT is lost in translation. The passenger head is just a mirror of the driver side, so the "16" is backwards (among other problems) unfortunately the heads came over from Autodesk as a solid.
__________________
I'm World's Best Hyperbolist !! |
| The Following User Says Thank You to dataway For This Useful Post: | ||
|
#237
|
||||
|
||||
|
Slowly getting the timing cover shaped up. Jeez, I see why they cast this part in Aluminum, what a complex piece, doing it in iron would have been difficult.
Yes I'd like to finish 3d printing all this as a model someday, but, getting on in years makes me wonder why go to the trouble to create these files, they'll probably disappear into obscurity after my demise. I do enjoy the process, kind of like doing a puzzle or something I guess. In the not too distant future I'll probably post all the STL files on a 3d file site, who knows if anyone will ever find it useful. The 3d printing community doesn't seem to intersect the vintage Pontiac community much Ideally it would be nice to pass down the Solidworks files so people could improve on the work, but not a lot of people "playing" with Solidworks.
__________________
I'm World's Best Hyperbolist !! Last edited by dataway; Yesterday at 02:24 AM. |
|
#238
|
|||
|
|||
|
You got way further than i have.
I did the Pontiac engine in Autocad about 10 years ago. I Never had the time to bring the whole engine it into Solidworks, i just small things like gaskets and a partial intake manifold design.
__________________
It is easier to fool a man than it is to convince he has been fooled |
| The Following User Says Thank You to 68azbird For This Useful Post: | ||
|
#239
|
||||
|
||||
|
Quote:
I often wonder how they designed complex parts like these PC (pre-CAD) and PCNC (pre-CNC)? When I started work mid-70s, everything was still hand-drafted. This meant circles and lines were much preferred over arcs and abstract shapes. Dimensions were pre-ordained, not pulled off the CAD system. Can you imagine being told to design that pump housing and timing cover if it was manually drafted? Even worse, imagine you were the guy sitting at a mill being told to machine the prototypes and/or casting patterns. Then you'd have to be ready to change it when you got feedback from the foundry and machining centers... Maybe parts like these were modeled in clay and not designed on paper? Either way, the labor had to be huge. |
| The Following User Says Thank You to Shiny For This Useful Post: | ||
|
#240
|
|||
|
|||
|
I know how it was to be drafting parts on a drafting board. My first job out of high school was working for a company that built RF filters. Drawing iron cores with copper windings 2 to1 or 4 to 1 scale.
Then the engineer changes his mind. Fun stuff.
__________________
It is easier to fool a man than it is to convince he has been fooled |
| Reply |
|
|