


| FAQ |
| Members List |
| Social Groups |
| Calendar |
| Search |
| Today's Posts |
|
#21
 05-25-2026, 01:09 PM
|
||||
|
||||

Quote:
__________________
70 TA, 467 cid IAII, Edelbrock D-port heads, 9.94:1, Butler HR 236/242 @ .050, 520/540 lift, 112 LSA, Q-jet, TKX (2.87 1st/.81 OD), 3.31 rear https://youtube.com/shorts/gG15nb4FWeo?feature=share |
|
#22
05-25-2026, 08:52 PM
|
|||
|
|||
|
Yes I've read reread Herbs articles,his Fiream book,and chassis book. Ideas.
|
|
#23
05-30-2026, 07:06 AM
|
||||
|
||||
|
This thread prompted me to check this 72 Firebird I just bought a month ago. Sure enough it was out about 1/8". I found a socket that fit perfectly in the index hole. I loosened the 4 bolts on the frame to body mounts and pulled the body forward 1/8". I actually was very easy even with the engine and tranny in. I supported the frame on the lift and was done in less the 1/2 hour. The body bushing are global west Solid Aluminum.
One thing that I notice is and maybe is to do with solid mounts. There is nothing to hold the body in place except for using frame connectors. Maybe the rubber bushings hold the body to the frame more secure. What am I missing here.? There are no fenders or hood on the car at the moment. The car is being restored by myself. I watch Doug at Global west talk about these solid body mounts. Here is what he says. Global West's Interloc body mount bushings are solid aluminum, self-locking mounts designed to eliminate frame-to-body slippage in classic muscle cars. Engineered to replace factory rubber mounts, they sandwich the frame, making them highly recommended when installing Global West Subframe Connectors. Now this 72 I bought has Global west frame connectors that were not welded or bolted to the main frame when I purchased the car. I have since bolted them to the frame after I did the alignment. I guess these unibody cars are really held together by the radiator support through the fenders and wheel wells from moving around. I have Hotchkis frame connectors on our 76 and 68 without any issues. I mostly posted this for info, but was looking for opinions/thoughts on the subject. I guess what I realized from this post by Jhein is that anybody with these unibody car and having upgraded H/P may want to look at installing frame connectors. A big Thank you to Jhein for posting his experience.
__________________
68 Firebird. IA2 block, 505 cu in, SD Performance E-head, Solid roller 3600 weight. Reid TH400 3:90 gear. 28" slick. Best so far 9.95@135 mph. 1.39 60 ft. 76 Trans am, TKX .81 o/d, 3.73 Moser rearend, 468 with KRE D-ports, Doug headers, 3" Exhaust 950 Quickfuel. Last edited by chuckies76ta; 05-30-2026 at 07:27 AM. |
|
#24
05-30-2026, 11:04 AM
|
||||
|
||||
|
Quote:
If your connectors weren't bolted or welded, what was holding them in place? My parts are trickling in from PTFB. I just got the subframe connectors a couple days ago which is convenient since they are next to go in. I'm going to bolt them in for now but eventually, I think I'll have them welded. The final chassis mod will be the PTFB pro G-braces. Then the subframe will be pretty well locked in place.
__________________
70 TA, 467 cid IAII, Edelbrock D-port heads, 9.94:1, Butler HR 236/242 @ .050, 520/540 lift, 112 LSA, Q-jet, TKX (2.87 1st/.81 OD), 3.31 rear https://youtube.com/shorts/gG15nb4FWeo?feature=share |
| The Following 2 Users Say Thank You to jhein For This Useful Post: | ||
|
#25
05-30-2026, 06:41 PM
|
||||
|
||||
|
OK, got the subframe bushings done. I put the car on wheel blocks (don't ask me why I didn't do that before...)
I got the right and left diagonal measurements to 1/8" and front to rear on the same side are exactly the same. All my panels are unchanged including the hood. I then test fitted the connectors. A couple things about the aluminum bushings. The floor pan crossmember surface isn't perfectly flat and not exactly parallel to the subframe. So the bushing doesn't make full contact all the way around. There's a small gap at the rear of each of the rear mounts. Also, the bolts on these are much smaller diameter than the ID of the bushings. So when you tighten them down, the bolt moves off center based on the previously mentioned alignment issue. Seems like maybe that's done intentionally so that the bolt will move and not the bushing? Don't know. Hopefully this is not a problem. Also thinking that I'll need to check these periodically once I start driving it. Although, once the connectors and the G-brace are in, I don't think anything will be able to move much at all. 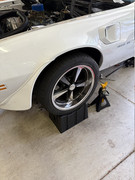 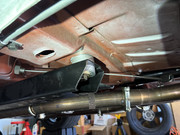 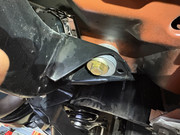 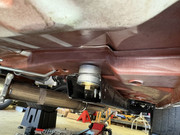 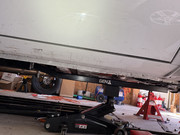
__________________
70 TA, 467 cid IAII, Edelbrock D-port heads, 9.94:1, Butler HR 236/242 @ .050, 520/540 lift, 112 LSA, Q-jet, TKX (2.87 1st/.81 OD), 3.31 rear https://youtube.com/shorts/gG15nb4FWeo?feature=share |
|
#26
05-31-2026, 12:11 AM
|
||||
|
||||
|
Question about the subframe connectors. Is there any reason I should, or should not, install them as far forward as possible? That is to say with the forward end pushed up tight against the subframe, or should I leave a small gap? Or does it not matter? I mentioned that I may get them welded, but that's not a firm decision. PTFB instructions say that welding is optional, especially if you have solid bushings. So maybe it's better to not weld?
Here's a link to the connectors in case you're not familiar. https://www.pro-touringf-body.com/pr...ame-connectors
__________________
70 TA, 467 cid IAII, Edelbrock D-port heads, 9.94:1, Butler HR 236/242 @ .050, 520/540 lift, 112 LSA, Q-jet, TKX (2.87 1st/.81 OD), 3.31 rear https://youtube.com/shorts/gG15nb4FWeo?feature=share Last edited by jhein; 05-31-2026 at 12:31 AM. |
| The Following User Says Thank You to jhein For This Useful Post: | ||
|
#27
05-31-2026, 07:47 AM
|
||||
|
||||
|
Quote:
They were being held in place as they get sandwich between the frame and the body mounts. Haven said that I believe the body moved a bit during transport as the car was on a rotisserie. But even being sandwich doesn't keep everything solid. That is where welding or bolting them in is the final step to being secure. The previous owner of the car had passed away before finishing the upgrade.
__________________
68 Firebird. IA2 block, 505 cu in, SD Performance E-head, Solid roller 3600 weight. Reid TH400 3:90 gear. 28" slick. Best so far 9.95@135 mph. 1.39 60 ft. 76 Trans am, TKX .81 o/d, 3.73 Moser rearend, 468 with KRE D-ports, Doug headers, 3" Exhaust 950 Quickfuel. |
|
#28
05-31-2026, 08:11 AM
|
||||
|
||||
|
I'm curious on the brand name of the body bushings you used. I don't really have an opinion on the bolt being able to move around in the bushing. I would have thought it would have had a more interference fit. The Global west ones I have installed don't move around like that. I can remove one and post a few pics if you like. Once the frame connectors are in place and secure, I can't see anything moving around after that is done.
As far as the frame connectors installation, you could leave yourself a small gap in case you need to tweak things. In my case I was extremely happy I was able to move the body forward 1/8" to line things up. The one thing I did do was leave the sockets I used in the body alignment holes on passenger and drive side and tightened and torqued the 4 bolts in body mount bushings. I also drilled and secured the frame connect before remove my alignment sockets. But I can't see anything moving around after frame connectors are installed. To weld or bolt them in is a personal preference. It's nice to be able to remove the frame in the future for whatever reason. The welds can also be cut off in the advent it's required. I have all 3 cars bolted in. In my opinion, the frame is bolted to the body through the bushings and not welded, so having the frame connectors bolted is secure enough I'm thinking. Where is it gonna go! I think the key to bolting the frame connectors in is to drill the correct size holes for the bolts and use 1/2" bolts with nylock nuts.
__________________
68 Firebird. IA2 block, 505 cu in, SD Performance E-head, Solid roller 3600 weight. Reid TH400 3:90 gear. 28" slick. Best so far 9.95@135 mph. 1.39 60 ft. 76 Trans am, TKX .81 o/d, 3.73 Moser rearend, 468 with KRE D-ports, Doug headers, 3" Exhaust 950 Quickfuel. Last edited by chuckies76ta; 05-31-2026 at 08:19 AM. |
|
#29
05-31-2026, 10:31 AM
|
||||
|
||||
|
Quote:
__________________
If it breaks. I didn't want it in the first place. _____________________________________________ 69 GTO \ 72 FIREBIRD \ 1/2 OF A 64 GTO \ 70 JAVELIN \ 52 FORD PU \ 51 GMC PU \ 29 FORD PU \ 85 ALFA ROMEO SPYDER \ A HANDFUL OF ODD DUCATI'S \ 88 S10 LT1 BLAZER & MY DAILY DRIVER 67 SUBURBAN. |
| The Following User Says Thank You to VCho455 For This Useful Post: | ||
|
#30
05-31-2026, 10:35 AM
|
||||
|
||||
|
I felt the bolt being tighter in the bushings keeps the subframe located better, no chance for shifting. I have a similar set of bushings I got to those still new in the box!
__________________
Skip Fix 1978 Trans Am original owner 10.99 @ 124 pump gas 455 E heads, NO Bird ever! 1981 Black SE Trans Am stockish 6X 400ci, turbo 301 on a stand 1965 GTO 4 barrel 3 speed project 2004 GTO Pulse Red stock motor computer tune [email protected] 1964 Impala SS 409/470ci 600 HP stroker project 1979 Camaro IAII Edelbrock head 500" 695 HP 10.33@132 3595lbs 1964 Corvette Coupe 327 4 speed |
| The Following User Says Thank You to Skip Fix For This Useful Post: | ||
|
#31
05-31-2026, 10:53 AM
|
||||
|
||||
|
Quote:
__________________
70 TA, 467 cid IAII, Edelbrock D-port heads, 9.94:1, Butler HR 236/242 @ .050, 520/540 lift, 112 LSA, Q-jet, TKX (2.87 1st/.81 OD), 3.31 rear https://youtube.com/shorts/gG15nb4FWeo?feature=share |
|
#32
05-31-2026, 11:22 AM
|
||||
|
||||
|
Quote:
As far as the rubber bushings being more secure, that's an interesting question. They're large, soft rubber so they're designed to flex. But, being rubber, they're able to conform to irregularities and imperfections in the fit between the frame and the body. So they can flex, but they probably won't move. Alternatively, the solid bushing can't flex but maybe more likely to move if the forces are great enough? I definitely agree that if you install solid bushings, the subframe connectors seem like a really good idea, almost mandatory. And similarly, I think if you have rubber bushings, the connectors may not be as good of an idea?? The amount of wear that I had on my rubber bushings after just 10k miles demonstrates (no surprise) that kind of forces and flexing that happens there. But, who knows how these repo rubber bushing compare to factory bushings as far as stiffness and durability?
__________________
70 TA, 467 cid IAII, Edelbrock D-port heads, 9.94:1, Butler HR 236/242 @ .050, 520/540 lift, 112 LSA, Q-jet, TKX (2.87 1st/.81 OD), 3.31 rear https://youtube.com/shorts/gG15nb4FWeo?feature=share Last edited by jhein; 05-31-2026 at 11:59 AM. |
| The Following User Says Thank You to jhein For This Useful Post: | ||
|
#33
05-31-2026, 08:14 PM
|
||||
|
||||
|
There are urethane bushings if you want something stiffer than factory rubber that might last longer.
__________________
Skip Fix 1978 Trans Am original owner 10.99 @ 124 pump gas 455 E heads, NO Bird ever! 1981 Black SE Trans Am stockish 6X 400ci, turbo 301 on a stand 1965 GTO 4 barrel 3 speed project 2004 GTO Pulse Red stock motor computer tune [email protected] 1964 Impala SS 409/470ci 600 HP stroker project 1979 Camaro IAII Edelbrock head 500" 695 HP 10.33@132 3595lbs 1964 Corvette Coupe 327 4 speed |
| The Following 2 Users Say Thank You to Skip Fix For This Useful Post: | ||
|
#34
05-31-2026, 09:18 PM
|
||||
|
||||
|
I had a spare bushing from Global west, so here is a pic of it for reference.
__________________
68 Firebird. IA2 block, 505 cu in, SD Performance E-head, Solid roller 3600 weight. Reid TH400 3:90 gear. 28" slick. Best so far 9.95@135 mph. 1.39 60 ft. 76 Trans am, TKX .81 o/d, 3.73 Moser rearend, 468 with KRE D-ports, Doug headers, 3" Exhaust 950 Quickfuel. |
| The Following User Says Thank You to chuckies76ta For This Useful Post: | ||
|
#35
05-31-2026, 10:25 PM
|
|||
|
|||
|
I used the GW aluminum ones on one my first gens, they worked and didn't slide. On a second gen I set up for a friend for autocross, we actually used no bushings, bolted the frame up, and welded the frame to the body. Dropped the car almost an inch with no change in geometry. Fabricated frame connectors, and really stiffened up the whole car. I've never had a subframe shift unless it hit something, I use the torque specs for whatever bushings are installed.
|
|
#36
06-01-2026, 12:07 AM
|
||||
|
||||
|
I was just speaking in hypothetically. I don't really think the solid bushings will move. They're clamped down pretty tight. They are definitely high stress points though. But with the subframe connectors and G-braces the forces there will be reduced significantly. The whole subframe should be pretty well locked into place as much as possible without welding it to the body as mentioned.
__________________
70 TA, 467 cid IAII, Edelbrock D-port heads, 9.94:1, Butler HR 236/242 @ .050, 520/540 lift, 112 LSA, Q-jet, TKX (2.87 1st/.81 OD), 3.31 rear https://youtube.com/shorts/gG15nb4FWeo?feature=share |
|
#37
06-01-2026, 10:36 AM
|
||||
|
||||
|
Quote:
__________________
Skip Fix 1978 Trans Am original owner 10.99 @ 124 pump gas 455 E heads, NO Bird ever! 1981 Black SE Trans Am stockish 6X 400ci, turbo 301 on a stand 1965 GTO 4 barrel 3 speed project 2004 GTO Pulse Red stock motor computer tune [email protected] 1964 Impala SS 409/470ci 600 HP stroker project 1979 Camaro IAII Edelbrock head 500" 695 HP 10.33@132 3595lbs 1964 Corvette Coupe 327 4 speed |
| The Following User Says Thank You to Skip Fix For This Useful Post: | ||
|
#38
06-10-2026, 07:23 PM
|
||||
|
||||
|
I was held up a bit because I wanted to talk to Dave at PTFB about these fitment issues before I proceeded. He was at the Pigeon Forge Bandit event so I couldn't reach him until this week. Anyway, everything is at it should be with the bushings. So I got those torqued down and I got the left side subframe connector in. Had to drop the rest of the exhaust so I could get the holes drilled on the inside but that came out pretty easy. Anyway the other side should go faster. Still waiting for my leaf springs and control arms. But I should be able to start on the exhaust once I'm done with the other connector.
__________________
70 TA, 467 cid IAII, Edelbrock D-port heads, 9.94:1, Butler HR 236/242 @ .050, 520/540 lift, 112 LSA, Q-jet, TKX (2.87 1st/.81 OD), 3.31 rear https://youtube.com/shorts/gG15nb4FWeo?feature=share |
|
#39
06-10-2026, 09:52 PM
|
||||
|
||||
|
Quote:
Yes, it impacts the shaker fit, but there too is a solution, as I recall it's to trim the air cleaner base, but I would have to look it up again. Personally, I fitted the shaker to the hood, which is one of the options. Yeah it doesn't 'shake', and it does sit higher in the hood opening, but in the end I found it was a better solution, you can swap intakes, filters, carbs, etc, without having to worry about fit. I've seen where folks have sectioned the shaker scoop where it look 'normal', but after a little time you can deal with it sticking up a little higher. I rolled my fender lips too, and it allows wider tires/wheels. That gap between the fender & well can be filled with sheet ABS and/or rubber to help with keeping road splash out of the bay, but it has never been an issue for me. I may actually end up doing it this time around but will cross that bridge when time comes. Lowering the body improves roll center and helps with aero, which is needed over say 130-140mph, for stability. If that's not a concern then you can skip the mod. There are 2 height drop bushings, and it did the max drop. The one in between doesn't require the mod, so choose your poison. EDIT: I can dig out the page that shows the fan shroud trimming, but it's very similar to the well trimming. EDIT 2: Found it, attached photo. .
__________________
. 1970 GTO Judge Tribute Pro-Tour Project 535 IA2 http://forums.maxperformanceinc.com/...d.php?t=760624 1971 Trans Am 463, 315cfm E-head Sniper XFlow EFI, TKO600 extreme, 9", GW suspension, Baer brakes, pro tour car https://forums.maxperformanceinc.com...ght=procharger Theme Song: http://www.youtube.com/watch?v=7zKAS...ature=youtu.be Last edited by HWYSTR455; 06-10-2026 at 10:00 PM. |
|
#40
06-10-2026, 10:10 PM
|
||||
|
||||
|
Anti-Squat, anti-dive explained:
.
__________________
. 1970 GTO Judge Tribute Pro-Tour Project 535 IA2 http://forums.maxperformanceinc.com/...d.php?t=760624 1971 Trans Am 463, 315cfm E-head Sniper XFlow EFI, TKO600 extreme, 9", GW suspension, Baer brakes, pro tour car https://forums.maxperformanceinc.com...ght=procharger Theme Song: http://www.youtube.com/watch?v=7zKAS...ature=youtu.be |
| Reply |
|
|
The PY Online Forums is the largest online gathering of Pontiac enthusiasts anywhere in the world. Founded in 1991, it was also the first online forum for people to gather and talk about their Pontiacs. Since then, it has become the mecca of Pontiac technical data and knowledge that no other place can surpass.




 Linear Mode

