


| FAQ |
| Members List |
| Social Groups |
| Calendar |
| Search |
| Today's Posts |
|
#21
 06-29-2026, 10:26 AM
|
|||
|
|||

It looks like you have enough good parts and seals to put it back together after you clean it up and remove the rust. If your concerned about compatibility of the pistons, one area to check closely is the depth of the counterbore where the booster rod contacts. It needs to be the same depth, +- about .010". If different, I would reuse the old piston. That can effect the ability of the chambers to refill when you release the brake or give you a low pedal or possibly even give you light full time apply if off by enough.
I have had a few situations recently, finding parts and castings that look correct. 1. 1973 SD-455 TA. Wanted a MC that looked exactly the same with the bleeders on the casting. Ended up buying 2 different reproduction MC's and mixed and matched parts to get a great looking and functioning unit. OE casting was rusted beyond honing. 2. 1962 Catalina, power Delco brakes. A new, correct MC was not available, period. This one year MC used a weird wing nut cap and I wanted to retain the correct look. This one I had to send to White Post Restorations in Virginia. It had to be bored, and sleeved with a bronze sleeve. Then honed and drilled for the fluid passages. They do this process daily. Took 3-4 weeks and did a beautiful job. Works great. Perfection comes at a price. Had to bite the bullet and pay $250.00 to have it sleeved and machined. So there is a solution to almost any problem, although it can get a little costly and inconvenient. Looks like you have this one under control now. Good luck with it. |
| The Following User Says Thank You to mgarblik For This Useful Post: | ||
|
#22
06-29-2026, 11:22 AM
|
||||
|
||||
|
Quote:
|
| The Following User Says Thank You to Shiny For This Useful Post: | ||
|
#23
06-30-2026, 04:34 AM
|
||||
|
||||
|
Probably my fault, I tend to be a bit remiss when it comes to changing the brake fluid or using sealed containers. Last 45 years I lived in a low humidity location so I didn't pay much attention to it.
I'll get it put back together and report the results. Thanks for the help.
__________________
I'm World's Best Hyperbolist !! |
|
#24
07-11-2026, 09:37 AM
|
||||
|
||||
|
Couple of questions before I button this MC up.
Does the arrangement of the internal components appear correct? That is how they came out. ( I installed them about 7 years ago and it's worked fine). And, what is the purpose of the large groove at the rear of the MC? It appears to have no function in my application ( all drum, power), also there is a pic of the rear boot I am using. Also a pic of the cover gasket that was on it, obviously rust had compromised the seal a bit. Borescope video of the bore after about 30 seconds of honing. Not sure if this will work. https://youtu.be/HNHE-gz7kj8
__________________
I'm World's Best Hyperbolist !! Last edited by dataway; 07-11-2026 at 09:48 AM. |
|
#25
07-15-2026, 10:57 AM
|
||||
|
||||
|
Just a bump to see if anyone has any input.
__________________
I'm World's Best Hyperbolist !! |
|
#26
07-15-2026, 12:37 PM
|
||||
|
||||
|
That cast body may also do duty as a manual master if machined differently.
The large groove around the outside of the bore most likely is seating for the rubber boot which retained the manual push rod. I was never able to source these boots separately. I thought this rod retaining design was very poor in comparison to Mopar (deep hole in piston) and Ford (hole with one time locking clip). GM sometime in the early 70's dispensed with the shallow hole/boot design and went to a Ford-style clip. $0.02 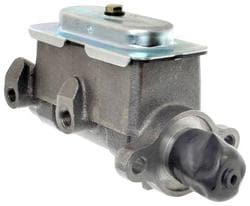
Last edited by Scarebird; 07-15-2026 at 12:43 PM. |
|
#27
07-15-2026, 07:04 PM
|
||||
|
||||
|
Thank you, noticed one of my kits had the manual boot.
__________________
I'm World's Best Hyperbolist !! |
| Reply |
|
|
The PY Online Forums is the largest online gathering of Pontiac enthusiasts anywhere in the world. Founded in 1991, it was also the first online forum for people to gather and talk about their Pontiacs. Since then, it has become the mecca of Pontiac technical data and knowledge that no other place can surpass.




 Linear Mode

