


| FAQ |
| Members List |
| Social Groups |
| Calendar |
| Search |
| Today's Posts |
|
#21
 04-11-2007, 11:45 AM
|
||||
|
||||

Quote:
I originally built this exhaust system to run on the street, I wanted this GTO to be a fast good-handling street car. I really didn't realize just how loud it would be, but at the time I really wanted the GTO to be a badass pro-touring car and I figured the 3" pipes would help with the 'evil' theme. It already had the tall F-body spindles and HO front springs when I first bought the car, but I decided to go bracket racing and changed direction like many of us do on our cars. But for now and forever this old GTO will be a drag-race type car.   
|
|
#22
04-18-2007, 02:19 PM
|
||||
|
||||

Pulled off the Torker II/650 Holley and went back to my matching '71 HO intake and '68 Buick 750 Q-jet. Should be a good street intake and carb until I get the tunnel ram setup going.
   While I had the intake off I slapped the bathtub tunnel ram in place to see how everything would fit. 
|
|
#23
04-22-2007, 09:45 AM
|
|||
|
|||

b-man,
How did you reef down the engine when you put that chanin on? |
|
#24
04-22-2007, 11:07 AM
|
||||
|
||||
|
B-Man,
A comment and a request: I think your driveshaft loop at the cross-member has way too big of an opening. If the U-joint failed, based on the pics, I think the driveshaft could possibly still tear up that nice body sheet metal. As the hoop is at the front of the shaft and there is little vertical movement there, I would have no more than 1" of clearance around the tube. Item two, can you post a pic of the driver's side of the round port tri-Y headers? Tom V.
__________________
"Engineers do stuff for reasons" Tom Vaught Despite small distractions, there are those who will go Forward, Learning, Sharing Knowledge, Doing what they can to help others move forward. |
|
#25
04-22-2007, 01:09 PM
|
||||
|
||||

Quote:
I removed the frame bracket, then drilled and tapped the chain attachment point. As long as you carefully mark and drill the hole in exactly the right spot the chain will be nice and tight. Both of the bolts holding the chain are 3/8-24 Grade 8. In order to keep the bolts snug in their holes as well as to properly locate the chain attachment points it's mandatory that both the chain attachment holes be tapped for threads, not just drilled as through-holes. The bolts also have a nut on the backside to further insure that the bolts don't come loose or wiggle around in the brackets. Any slack that you can see in the the chain now is the result of about 10 years of racing, from the chain wearing and stretching slightly over the years. You can still barely move the chain. 
|
|
#26
04-22-2007, 01:23 PM
|
||||
|
||||
|
Quote:
Thanks for the observation, I'll put the driveshaft loop on my list of items to take care of. As requested, some driver's side views of the HO Tri-Ys:   
|
|
#27
06-11-2007, 11:18 PM
|
||||
|
||||
 Getting closer.....
.....to getting the old warrior back on the street.
I was running a short loop of 5/16" tubing instead of a transmission cooler, the fluid never got hot enough while I was racing to need a cooler. Different story now that I'll be running around town with the car, so I bent up some 3/8" hard lines and installed a B&M Supercooler behind the front bumper. The cooling line fittings on a TH400 are for 5/16" tubing so I stole some off an old ST300 2-speed trans, they have fittings for 3/8" tubing.  The lines are far enough away from the headers so the fluid won't cook in the lines, I tried to keep them slightly above the A-arms so they wouldn't rub during suspension movement. I didn't make the lines follow the frame as they come toward the front past the A-arms so they could be easily removed without bending them. Note the new heater hoses, I put the heater assembly back in the car so my feet don't get cold while prowling around late at night (more likely driving to work in the morning).   Looking upward from under the radiator support, the lower line that carries hot fluid from the converter enters the bottom of the cooler. A store-bought 60" length of hard line just happened to reach from the trans to the cooler all in one piece, what are the chances of that?   The return line was made from another 60" length, but it wasn't quite long enough to reach. Just as well, if it was any longer I wouldn't be able to take it out without bending it up some. I had to make up one short length of tubing and put a 90 degree bend in it, along with a 3/8" inverted flare union to finish up the return circuit. 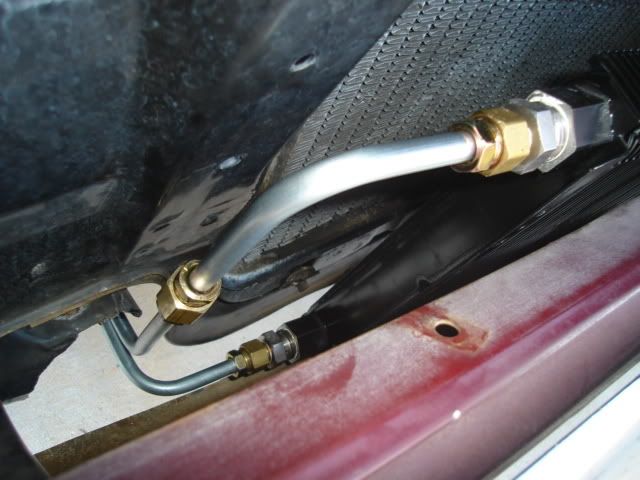 Easy access to the union from the slot in the front bumper, it just happened to end up in a good spot for getting wrenches on the fittings.  A shot of the cooler location from the front.  Bending up hard lines is a bit of work, but you end up with very durable lines that have the same look and quality as OEM equipment. Very reliable, and cheap too. I have less than $20 in these trans cooler lines and fittings, and a few hours worth of work making them up. Tube flaring tool set, a necessity when making up lines that seal with inverted flare fittings. 
|
|
#28
06-12-2007, 11:49 AM
|
|||
|
|||
|
B-Man,
Coud I get a close up of your air cleaner base (the bottom) and your throttle bracket/return spring arrangement on the Holley??? Also...could the dual belts be used with Power Steering??? I have seen dual P/S pulleys....just curious....Robert |
|
#29
06-12-2007, 12:46 PM
|
|||
|
|||
|
B-Man....
One of the best things I have seen on your car is eliminating the heater hose fitting in the heads. I have seen several blow out and cause damage. Musch better to come out of the intake like you did. Bravo!!! On my 1975 Formula, I am plumbing the hoses into the intake/water pump and fitting them with ball valves and hose nipples so the water can be shut off quickly in an emergency without tools. This is a common modification on our personal street cars over the years...Robert |
|
#30
06-12-2007, 01:33 PM
|
||||
|
||||
|
Bman i love your car! I think that the rusted body and perfect motor look is a good combo!
 I must say i envy your mechanical prowess, i was afraid to take my valve cover off Awsome!
__________________
 "Like i told my last wife, I said honey i never drive faster than I can see, besides that its all in the reflexes" |
|
#31
06-12-2007, 10:51 PM
|
||||
|
||||

Jack, thanks for the kind words. I've been fiddling around with cars for over 32 years, all it takes is some time to learn by doing. Not having a lot of money is a good motivator too, you learn to make what you can't afford to buy.
If nobody makes it then you make it yourself, to have a custom-made feature on your car that nobody else has is kinda cool and it's worth the work. Oh, and it's only surface rust. No rot in this puppy. Robert, here is a shot of my throttle bracket, pretty sure it's originally off of a '69 GTO RAIII 400 engine (stamped 'T 4' for Tempest 4-barrel) as that's what came in the car when I bought it. Unless you own an earlier A-body car it won't fit your throttle cable, it fits onto the Torker II intake the same way it fits this '71 455 HO intake. The return springs attach to the '77 350 800cfm Q-jet (17057262) the same way as on on my 650 Holley.  Air cleaner is a '73 -'74 B-body unit, I added the extra snorkel using a spot welder so it would look like factory issue. Nothing unusual about the base, no mods were needed to use a Holley carb.   Twin power steering belts on my '64 Tempest. This power steering setup was 'stolen' off of my GTO to use on the Tempest. The power steering pump pulley is made of cast iron. 
|
|
#32
06-12-2007, 10:58 PM
|
|||
|
|||
|
B-Man,
Interesting!!! and Thank You very much!!! I have to modify my 1975 Ram Air Cleaner for use with a Holley. Some guys pound dents in the bae, but I think I will silver solder copper plumbing caps into the base to allow the bowl screws to clear. Now...about the power steering....my 1975 Firebird 350 has a dual belt crank and water pump pulley. All I need is a dual alternator pulley and a dual P/S pulley. I have a buddy who owns an alternator/starter shoppe, so the pulley for the alternator is no big deal. Where/what should I be looking on to find that P/S pulley??? Thanks again B-Man...Robert |
|
#33
06-12-2007, 11:04 PM
|
||||
|
||||
|
Robert, as far as I know the twin-groove P/S pulley is an early '64 A-body item only. Later on in the '64 model year the belt/pulley arrangement was changed and a single-groove P/S pulley was used from then on.
|
|
#34
06-12-2007, 11:16 PM
|
|||
|
|||
|
Thanks!!!...Robert
P.S. Any photos of your Holley installation with the air cleaner off??? |
|
#35
06-12-2007, 11:26 PM
|
||||
|
||||
|
Quote:
|
|
#36
06-13-2007, 01:01 PM
|
||||
|
||||
|
"Here you can see the twin-snorkel 1974 air cleaner I modded that's plumbed into the cowl for cool air"
Can you take a few closeup pictures of the cowl/firewall, I was thinking doing the same on my 77 bijd
__________________
Can do the talk, can't do the walk......therefore need deep pockets  Injection is nice but I rather be blown  If you got it flaunt it, if not fake it (Snoopy) Original 1977 Firebird / Welded tube frame connectors TH350 with shift kit / 400 bored/stroked to 455 by PDude OCD=Waxing and polishing your oil filter SICK=wetsanding your exhaust pipe |
|
#37
06-13-2007, 03:00 PM
|
|||
|
|||
|
What a Beautiful set of Headers!!
__________________
GOOD IDEAS ARE OFTEN FOUND ABANDONED IN THE DUST OF PROCRASTINATION |
|
#38
06-13-2007, 03:14 PM
|
||||
|
||||
|
Those HO Tri-Y's came off of Ron Hildreth's '65 GTO. The only TRUE "bolt-on" part used in the assembly of that car.
__________________
Dave "Big Injun" Anderson [email protected] www.4mypontiac.com For GTO Celebration items click the tile coaster. 
|
|
#39
06-13-2007, 03:36 PM
|
||||
|
||||
|
Tri-Y truth.....
Quote:
headers on my GTO are actually a set that I bought brand-new from Ken at H-O Racing, I sent them out for Jet-Hot coating before installing them.My 3" system was was a 'bolt-on' just like the headers, each side was fabbed in a jig and bolted on as a completed unit. I fabbed each side in 3 pieces by fitting the tubing sections under the car and marking them with a Sharpie. The 3 sections were completely welded together as separate units after their locations were confirmed. The 3 finished sections (collector to muffler/muffler and over-axle bends/splitter tails) were welded together complete on a bench after putting them under the car (my 'welding jig') and marking them one last time. I took the completed pipes home, dropped the rear axle down and slid the pipes right onto the collectors. After turning them 90 degrees into their proper positions I bolted up the muffler and tailpipe hangers, done. None of the welding was done with the pipes on the car, even the first tack welds were done on the bench. Along with Ken's fine headers, my system was a TRUE bolt-on even if I did fab them myself. Someone had to fab those headers too.  Ron's 'old' headers (pictured below) will end up on my Tempest, I have 2 sets of these excellent headers.
__________________
1964 Tempest Coupe LS3/4L70E/3.42 1964 Le Mans Convertible 421 HO/TH350/3.08 2002 WS6 Convertible LS1/4L60E/3.23 1966 VW Type 2 Single Cab Pickup 140hp 2276 1956 VW Type 2 Panel Van 36hp 1200 1957 VW Type 1 Beetle 180hp 2276 |
|
#40
06-13-2007, 03:42 PM
|
||||
|
||||
|
Cold air setup.....
Quote:
http://forums.maxperformanceinc.com/...highlight=cool Unfotunately as the car progresses further along all the race-oriented parts get removed, so no more photo opportunities of the setup installed on the car. Here are a few shots of the components used to make the hose connections to the cowl/firewall. The larger piece bolts over the heater blower fan hole, the smaller one with the 3 tabs bolts to the wiper motor opening. I didn't need to drill any holes to mount these pieces, I made use of the factory mounting holes and hardware to minimize the hacking and enable me to go back to the original equipment someday (which is now).  I had access to all kinds of stainless steel material to make stuff out of at my old job. A lot of it made a trip through the electropolish tank, an etching process that cleans and brings out the shine on stainless steel.  
|
| Reply |
|
|
The PY Online Forums is the largest online gathering of Pontiac enthusiasts anywhere in the world. Founded in 1991, it was also the first online forum for people to gather and talk about their Pontiacs. Since then, it has become the mecca of Pontiac technical data and knowledge that no other place can surpass.







 Linear Mode

