


| FAQ |
| Members List |
| Social Groups |
| Calendar |
| Search |
| Today's Posts |
|
|
|
#1
 12-13-2015, 09:00 PM
|
||||
|
||||

Great pics with the two cars!
__________________
Some guys they just give up living And start dying little by little, piece by piece, Some guys come home from work and wash up, And go racin' in the street. Bruce Springsteen - Racing In The Street - 1978 |
|
#2
12-14-2015, 07:01 AM
|
||||
|
||||
|
No, G 7 3 is the casting date. Then the machining is done and the the knuckle is added for a sub-assembly waiting to placed on the car at assembly. Other side should be stamped also.
|
|
#3
05-07-2016, 05:15 PM
|
||||
|
||||
|
Vintage Certification is looking for originality, not surface cleanliness
|
|
#4
05-07-2016, 05:55 PM
|
||||
|
||||
|
Roger that. The evaporust was too old anyway and didn't end up doing much of anything to the original finish. :-)
|
|
#5
05-07-2016, 08:18 PM
|
||||
|
||||
|
I want to hear more about the vintage electronics you're hoarding and why......I'll jokingly submit that this stash may qualify for a tax deductible contribution to the Smithsonian.
Sorry, couldn't help myself. |
|
#6
05-07-2016, 08:48 PM
|
||||
|
||||
|
It was the results of a failed expeditionary attempt at cleaning the basement several years ago. At least it got to within six feet of the stairs.
And I got all my old NOS 1st Gen Viper parts in one place now. (where the computer relics formerly were). Anyone need some old 5" floppy drive IBMs? |
|
#7
05-14-2016, 10:08 AM
|
||||
|
||||
|
I rigged up a better method of soaking the driveshaft without damaging the original paint stripes in the center. These stripes are very fragile and definitely not an oil-based paint. I think they are latex based as they are very sensitive to water. I pulled the soaking driveshaft out of the plastic gutter-based soaking rig as soon as I saw that it was affecting the stripes. This is what I came up with: A 4" wide PVC pipe with one end capped off, tied to my garage banister. The driveshaft fits perfectly inside with 1/4" to spare. I filled it with evaporust a little at a time and would lower the driveshaft down into the tube to see where the water line was. I settled on 1" below the stripes and let it soak for several hours on one end. Every hour or so I'd pull it out and wipe the rust residue off the surface. Once I was happy with one end, I flipped ends, readjusted the liquid level and did it again. It took very little evaporust to do the process - less than one gallon, as the driveshaft takes up most of the space in the tube.

|
|
#8
05-15-2016, 08:57 AM
|
||||
|
||||
|
That stuff is amazing!
__________________
Some guys they just give up living And start dying little by little, piece by piece, Some guys come home from work and wash up, And go racin' in the street. Bruce Springsteen - Racing In The Street - 1978 |
|
#9
05-15-2016, 09:03 AM
|
||||
|
||||
|
Yes it is. Prior to dipping, I did not touch the surfaces with anything more abrasive than soapy water and an old nylon bristle brush for removing the heavy grease buildup, so the surfaces are exactly the same as when the parts were made. It's like automotive archeology!
|
|
#10
05-15-2016, 09:04 AM
|
||||
|
||||
|
I think I got the Boeshield from a boating supply warehouse via Amazon. It is used mainly in industrial and marine situations to preserve freshly machined parts from rusting. This is the stuff:
http://boeshield.com/why-boeshield/ As for the Evaporust, I got it via Advance Auto parts. Usually the stores only carry a single gallon jug in stock so I ordered 5 gallons online and used one of their 40% off coupons and got free shipping since it was over $75. Saved around $50 with the discount and free shipping. |
|
#11
05-15-2016, 02:01 PM
|
||||
|
||||
|
The cleaning continues. I have been carefully wiping down the underside of the car with some rags and a little diesel fuel. The diesel method seems to work wonders on the original exhaust system. It cleans the surface rust right up and then slowly evaporates leaving a slightly less rusty looking exhaust system.
I found some interesting items on the rear differential after wiping the grease off. It looks like the differental was half-heartedly blacked out on random surfaces of the tubes and the center section before installation at the assembly line. Here is the factory GYC stamp code (3.08 posi) on the partially black painted axle tube. There is also a "191" stamp which could be the date of assembly (191st day = July 10, 1973) which matches with the late July build date of the car.  and here is something I haven't seen before: a yellow ink stamp of the same "191" on the upper webbing of the center section.  An orange "G" on the top and bottom of the center section:   Some green paint marks on the upper portion of the axle tube, partially covered by the black paint: 
Last edited by njsteve; 05-15-2016 at 02:07 PM. |
|
#12
05-15-2016, 02:05 PM
|
||||
|
||||
|
And the underside view of the axle tubes, one side with black paint and the other, not so much. (and the shinier-looking exhaust after I wiped off the surface rust.)
 
|
|
#13
05-15-2016, 09:03 AM
|
||||
|
||||
|
WOW that is an amazing difference!!! Looks like I'm off to Lowes to purchase some PVC pipe
 . Where did you purchase the Boeshield Wax? . Where did you purchase the Boeshield Wax?Thanks.
__________________
1966 GTO Vert automatic. 1969 CR Judge Ram Air III 4sp Pattern Car. 1969 GTO standard 350HP TH-400. 2006 GTO Phantom Black 6spd. 1972 Formula 455HO Ram Air. 1976 LE Trans Am 50th Anniversary Edition with T top. 1976 Formula 350. 1977 Grand Prix Model J 350. 1978 Trans am 400 Pontiac. 1979 Trans am 403 Olds. 1968 Olds 442. 1971 TR6. |
|
#14
05-16-2016, 11:44 AM
|
||||
|
||||
|
Steve, looks great!!! What do you wipe down your rubber hoses with. I have been using the purple degreaser/cleaner stuff on everything, but on my hoses it takes off the writting with the grease. Should I start with soapy water and slowly work up to diesel fuel, or is the diesel just used on the exhaust?
Thanks.
__________________
1966 GTO Vert automatic. 1969 CR Judge Ram Air III 4sp Pattern Car. 1969 GTO standard 350HP TH-400. 2006 GTO Phantom Black 6spd. 1972 Formula 455HO Ram Air. 1976 LE Trans Am 50th Anniversary Edition with T top. 1976 Formula 350. 1977 Grand Prix Model J 350. 1978 Trans am 400 Pontiac. 1979 Trans am 403 Olds. 1968 Olds 442. 1971 TR6. |
|
#15
05-16-2016, 11:57 AM
|
||||
|
||||
|
I haven't really done anything to the hoses other than soapy water. The diesel was for the greasy metal stuff and the floorboards. I'd use a small rag soaked in it and then wrung out. I'd quickly wipe the damp rag over the area and then immediately follow with a clean, dry rag.
|
|
#16
05-16-2016, 12:28 PM
|
||||
|
||||
|
Thanks Steve!!
Chuck
__________________
1966 GTO Vert automatic. 1969 CR Judge Ram Air III 4sp Pattern Car. 1969 GTO standard 350HP TH-400. 2006 GTO Phantom Black 6spd. 1972 Formula 455HO Ram Air. 1976 LE Trans Am 50th Anniversary Edition with T top. 1976 Formula 350. 1977 Grand Prix Model J 350. 1978 Trans am 400 Pontiac. 1979 Trans am 403 Olds. 1968 Olds 442. 1971 TR6. |
|
#17
05-19-2016, 12:32 PM
|
||||
|
||||
|
Cleaning continues. I used some dishwashing soap and water in a bucket and sloshed it all around the wheelwels with a soft carwash brush. Got most of the road dust off. I then used the diesel-damp rag to wipe everything down including the frame rails. It seems like the assembly line used a bit more black-out paint on the passenger side than the driver's side. Looks like they were just trying to cover the white frame rails and a bit of the wheelwells. By the amount of non-coverage on areas shaded by things like the lower lip of the inner wheelhouse and the sway bar bracket, you can deduce that they didn't move the paint gun around much and just blasted it from one position.
I also pulled the brake drums and gave them a quick dip in the evaporust which removed the surface rust immediately (once it was warmed up to 70 degrees in the sun). They look asssembly line fresh now.  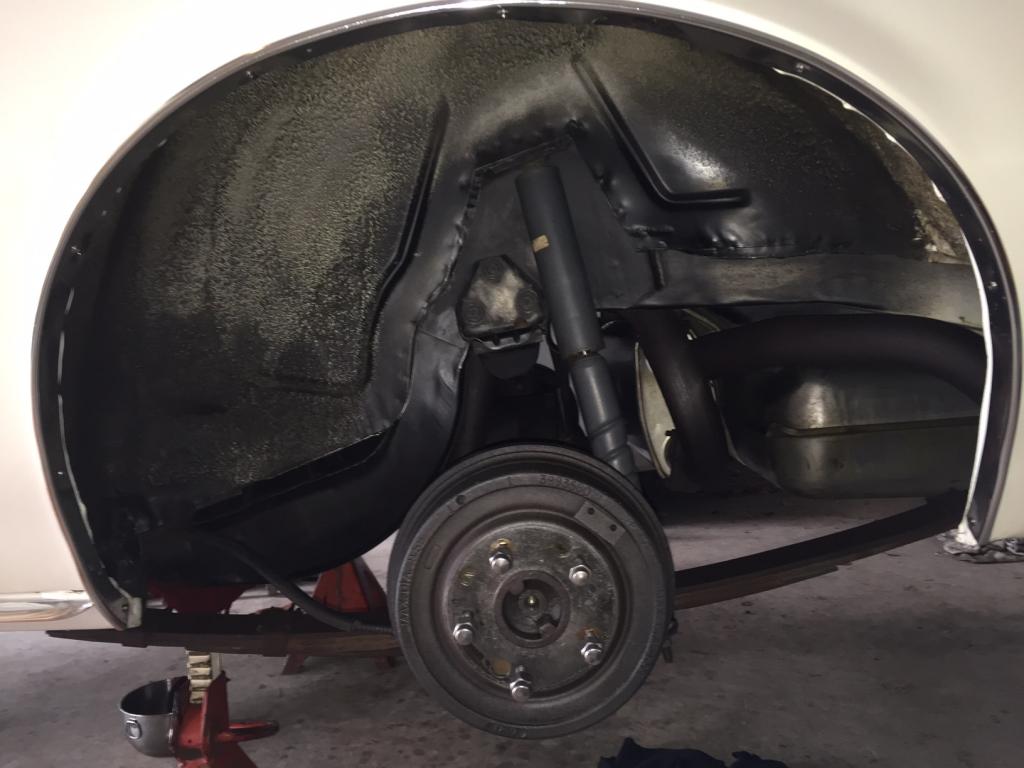
|
|
#18
05-19-2016, 05:16 PM
|
||||
|
||||
|
BTW, what I previously thought was a small section of black paint on the flange area was actually the portion of the drum that mated up to the wheel, and as a result never surface rusted.
|
|
#19
05-22-2016, 01:44 PM
|
||||
|
||||
|
The cleaning continues. I got the entire floor wiped down. It's nice and clean and shiny now. Even though I was wearing gloves, I got slashed quite a few times from the sharp edges on numerous original spot welds. It's like trying to wipe down a rose bush - lots of thorns everywhere.
   I started on the transmission and found some interesting things here and there. Notice the fact that the passenger side, top mounting screw on the converter cover is coming from the wrong side! It had never been installed any other way, as there were no mounting marks on the outside of the surface like the other three screw holes had. I documented the positions prior to removing the cover to wipe down the insides. From the position of the drip marks on the inside and the outside of the cover, it must have been suspended from that opposite side top screw hole when originally dipped in gloss black paint and allowed to drip-dry.  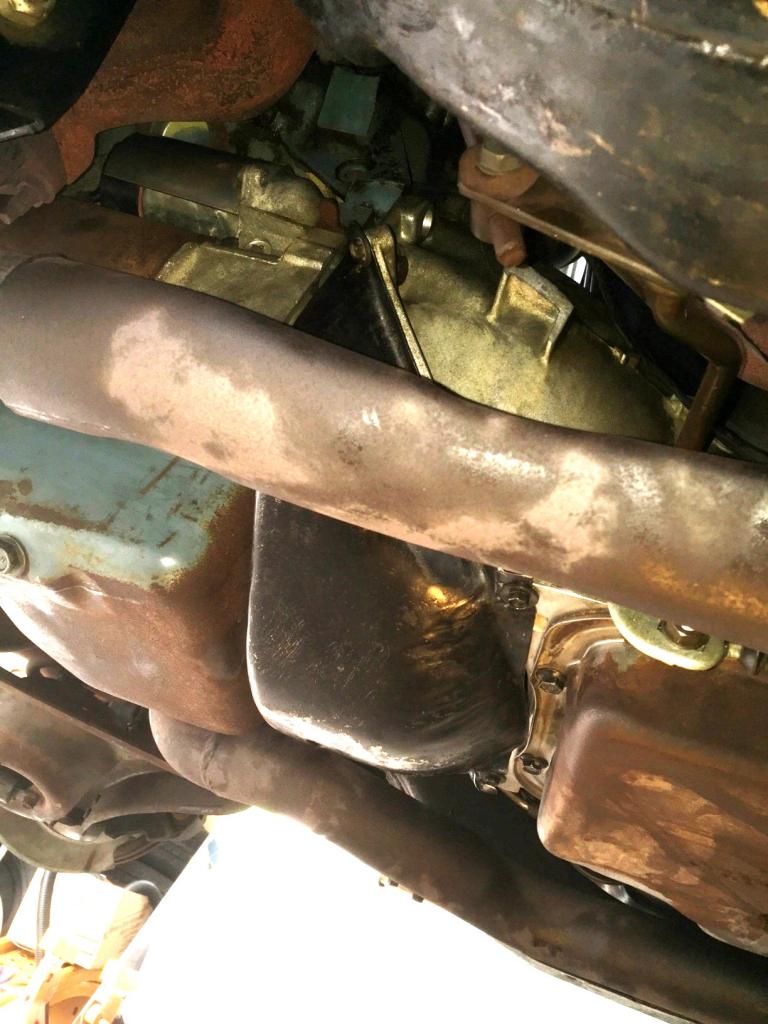 The three rubber nubs are still intact from the rear oil pan seal. (It's hard to get a good focus due to the depth between the oil pan and the converter cover)  Once the cover was removed I found a whole lot of blue paint overspray on the flexplate. The rear main seal and the front converter seal were bone dry. The only oil residue looks to be from seeping valve covers over the past 43 years. 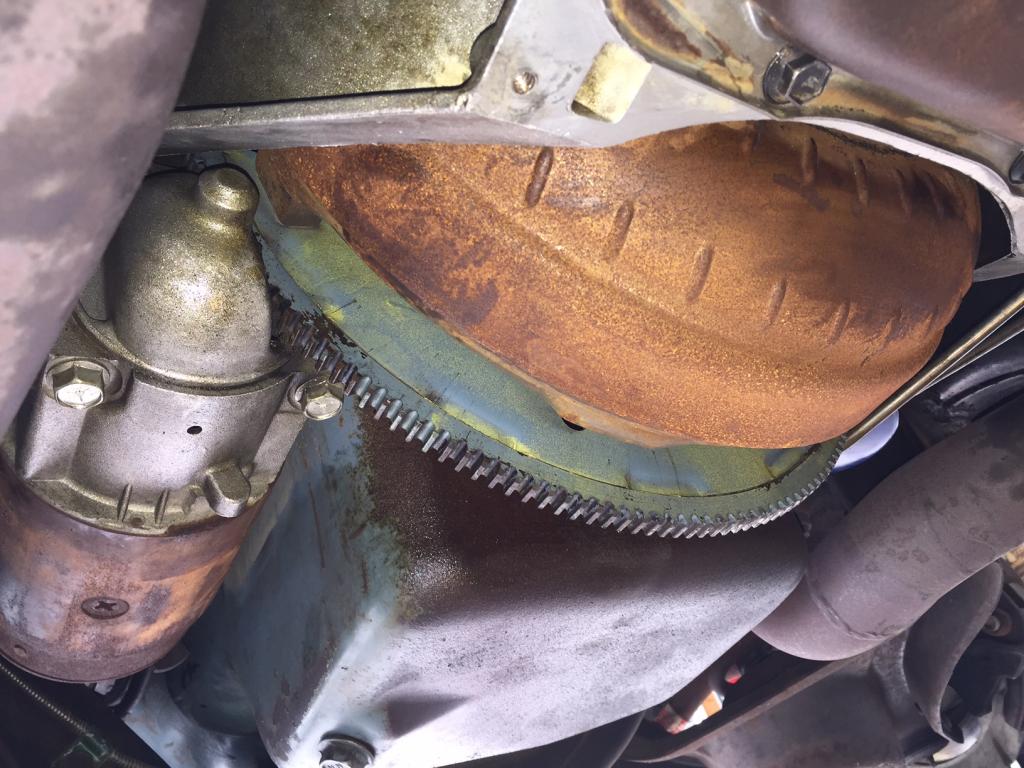 Super Duty starter part number 1108436  Here's an interesting marking: a blue arrow pointing to the starter shims: 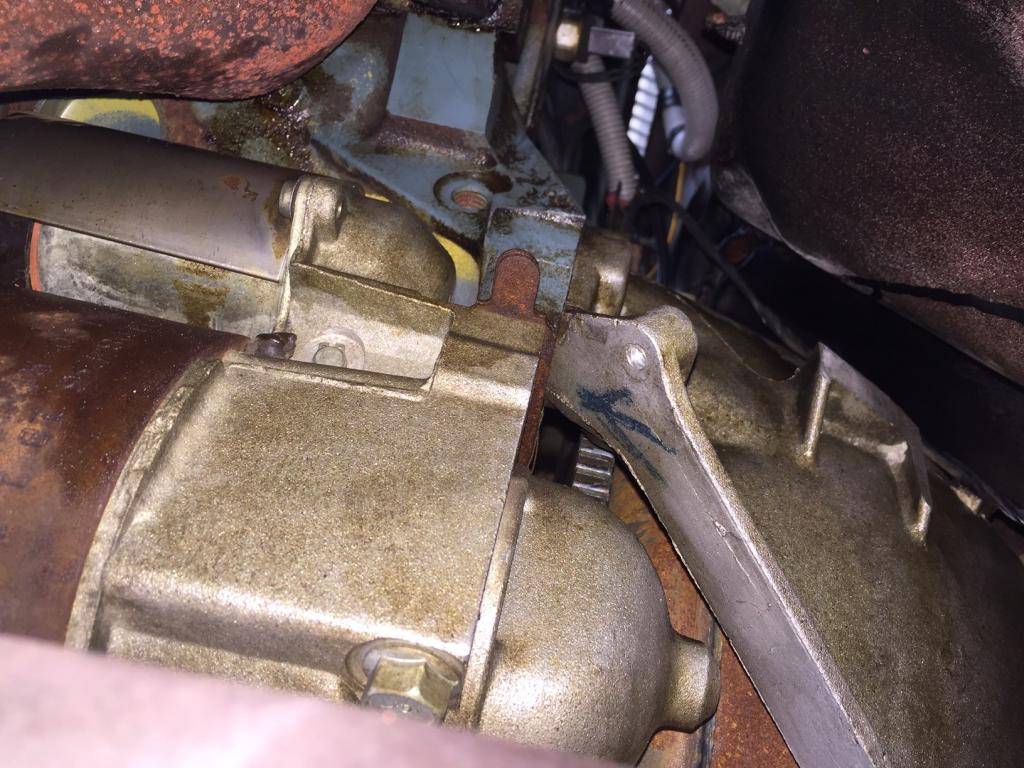
Last edited by njsteve; 05-22-2016 at 01:55 PM. |
|
#20
05-22-2016, 01:47 PM
|
||||
|
||||
|
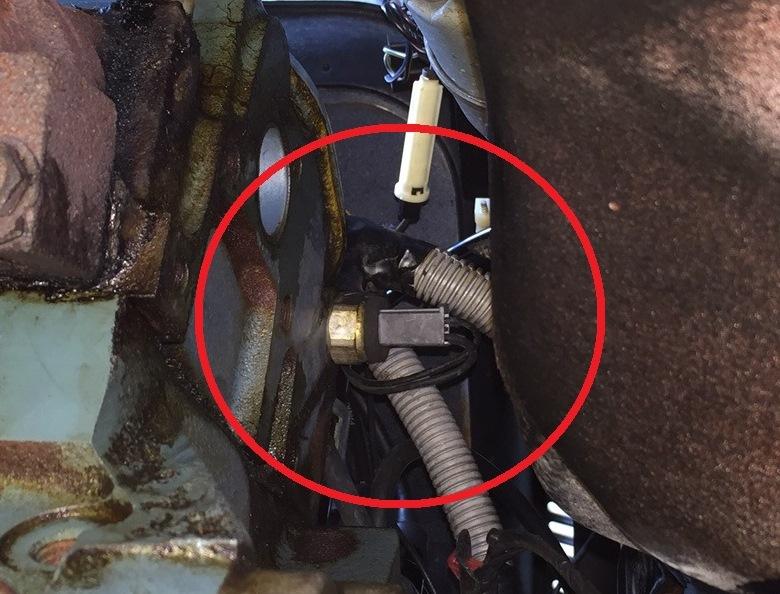
Here's a weird thing: What on earth is the terminal that is bolted directly to the rear of the driver's side cylinder head?
|
| Reply |
|
|
The PY Online Forums is the largest online gathering of Pontiac enthusiasts anywhere in the world. Founded in 1991, it was also the first online forum for people to gather and talk about their Pontiacs. Since then, it has become the mecca of Pontiac technical data and knowledge that no other place can surpass.









 Hybrid Mode
