


| FAQ |
| Members List |
| Social Groups |
| Calendar |
| Search |
| Today's Posts |
|
#661
 12-16-2012, 11:17 PM
|
||||
|
||||

Do you have a pic of the hat again? Mark L
__________________
My Gasser '63 Catalina build. Oh sorry, it's a Street freak. Either way it's a fun build. |
|
#662
12-18-2012, 08:27 PM
|
||||
|
||||
|
Yeah,it looks pretty plain compared to yours though.
|
|
#663
12-19-2012, 01:34 AM
|
||||
|
||||
|
OK, I remember it now. I was doing some modifications to the scoop today and just realized how bad the aluminum casting is on the scoop. Lots of little porosity holes all over inside. I'm going to have to completely line the inside surface with J-B weld like you'd do the body of a car with bondo. I'll have to swipe it on with a putty scraper. I was not expecting that. Mark L
__________________
My Gasser '63 Catalina build. Oh sorry, it's a Street freak. Either way it's a fun build. |
|
#664
12-22-2012, 12:52 PM
|
||||
|
||||
|
Two days ago I went to Tucson and picked up my finished long block engine from Paul Carter. I cannot tell you how happy and how impressed I've been through out the build on the motor. It was a long 2.5 years but it was at my request. I'm still building my car and did not need it since I had mock up blocks etc to do that with. Why hurry a build only to have it setting on a stand in the corner. Paul was great to work with. Always communicating either by phone or on the forums if anything needed discussion. Not one thing was done that I either did not want or approve of or dicussed. The quality of his work is top notch.
I must however make one comment regarding doing things that I did not know about. At the start of the build I originally wanted to have many of the parts Cryo'd to strengthen the parts and add to their reliablilty. When I picked up the motor Paul informed me that he still felt that at the level of power this motor is capable of, and my desire to put it to the test, he went ahead and did the Cryo procedure on most of my parts. For FREE! He would add parts in over time, as he had room in the equipment, while it was running. That alone saved me several hundreds of dollars and really adds to the reliability of the whole motor. He cryo'd pistons, rods, bearings rings and mroe that I probably don't even know. Basically all but the block. Then he floored me again. The heads were originaly intended to only get surfaced for the Cometic gaskets. So I had not more budget for them. Because Paul is very diligent, he discovered that the aluminum between the valve inserts was degrading due to the seats being improperly installed. It left too small of an amount of aluminum between the inserts and was burning out. So he rebuilt the seasts, convinced me to open the exhaust side from the original 1.77 to 1.66, since all the work is the same and the only real cost increase would be new exhaust valves. Something I would have done anyway with the 1.66's. With the added costs of the unexpected rebuild I decided to just go with a standard valve job as I'm boosting the motor and felt it will still fow well that way, versus the added cost of a race type valve job. Well Paul again felt that the motor deserved a good vavle job and went ahead and did the Race prep head workand race valve job. For the cost of the standard valve job. Again saving me several hundred dollars and giving me one hell of a capable motor. Now the first bad thing. After getting the motor home and on the stand I had to go right into mounting th eintake manifold to check out the intake port alignment for matching etc. Well the manifold has been cut pretty drastcally for a shaved heads or??? Which means it is very out of alignment. I have to figure out how to correct this or build spacers etc?? To be determined. My other thought is to cut the manifold right down the middle of the plenum, close/weld up the plenum and use one side on my 4 cylinder build down the road. Than buy another or new manifold base. I have to deterime how much spacer or clearence I have, to get the manifold in the correct installed position. Lots ot do but having the motor home I can complete the bottom end (oil pump, pickup, and pan etc) then I can finally finish my bellhousing adaptor and permanant starter mounting on the actual block I'm using. So, off to the garage I go. Still a very happy man. Mark L
__________________
My Gasser '63 Catalina build. Oh sorry, it's a Street freak. Either way it's a fun build. |
|
#665
12-22-2012, 01:00 PM
|
||||
|
||||
|
Good. Now Paul can put all his time into my engine.
 What a nice Christmas present you got.  Jim
__________________
****'63 Tempest, 475" IAII, Wenzler Super Chief heads, converted to blown alcohol, Birdcatcher, Littlefield 10-71 high helix. Best pass to date: 7.67 @ 181.59 (1/4 mi.), 4.95 @ 143.67 (1/8 mi.), 1.18 (60 ft) 7.75 @ 178 pass: https://www.youtube.com/watch?v=Iez3...ature=youtu.be First seven second pass(7.98): https://wwwoutube.com/watch?v=DK17...ature=youtu.be Thanks to Paul Carter @ Koerner Racing Engines 
|
|
#666
12-22-2012, 07:35 PM
|
||||
|
||||
|
Mark,for the manifold misalignment you could get a pair of steel/ali shims laser cut using an intake gasket as a template and then put an intake gasket either side of the shims.
Alternatively get a pair of extra thick intake gaskets custom made,maybe Cometic? There is a company in Thailand (run by an American guy) that makes gaskets for anything and everything,very reasonable prices,top quality workmanship, it's called Gaskets to Go I believe. He gave me a price for a pair of solid copper headgaskets that was half of what Husseys in the 'states quoted me. He can make solid copper,copper sandwich,composite etc in just about any thickness and configuration you want,might be worth a look. |
|
#667
12-22-2012, 08:50 PM
|
||||
|
||||
|
Taff, On your Compressor By-pass Hoses. I have found that most set-ups like that cannot pass the volume of air quickly enough on a rapid throttle closure event.
Pontiac Dude used to throw the belt off of his supercharger routinely when he tried to send the by-pass air out his Trans-Am side extractor scoops. Course tou have Turbos so maybe your deal just goes into surge a little bit. Tom Vaught
__________________
"Engineers do stuff for reasons" Tom Vaught Despite small distractions, there are those who will go Forward, Learning, Sharing Knowledge, Doing what they can to help others move forward. |
|
#668
12-23-2012, 11:41 AM
|
||||
|
||||
|
Hey Tom. Did you see what your reply number was??? 666---you should be very skeered!!! Ha!
Taff, great idea. I was about to set down and hand make a set of spacers from 1/8 inch steel and then use gaskets on either side. But. I actually have a pair of manifold flange plates someone made up and sold on the forum here. I bought them with no real place to use them.  But now I might get them lazer cut/sliced off to make my spacers. I was directed to a place not far from me here, but I have to wait until after the holidays. I hate waiting, LOL. The 1/8th thickness and two gaskets will do it. Again thanks for the heads up on the gasket maker though. May come in handy down the road, if not still on this. Mark L
__________________
My Gasser '63 Catalina build. Oh sorry, it's a Street freak. Either way it's a fun build. |
|
#669
12-23-2012, 12:16 PM
|
||||
|
||||
|
Quote:
When we designed Marty Palbykin's Boosted Turbo Intake Manifold we added thick spacers to the manifold flanges (welded them on) then machined them to get an exact match to the head ports and head angle. Welded manifolds move all over the place. Easy to take material off when all of the welding is done. Very nice project. Seriously thinking about a similar deal for a "chassis car" 64 LeMans (old retro Gasser look). Tom Vaught ps I will PM you with a couple of questions I have.
__________________
"Engineers do stuff for reasons" Tom Vaught Despite small distractions, there are those who will go Forward, Learning, Sharing Knowledge, Doing what they can to help others move forward. |
|
#670
12-26-2012, 08:50 PM
|
||||
|
||||
|
Tom ,are you talking about the placement of the dump valves in the front of my carb box or the hoses running from them to the catch can? The hoses did blow off on one run ,I drilled a series of holes in the top of the catch can and they haven't blown off since. They are 1 1/4" ID. I used the hose because I was concerned about dumping a load of water/meth into a hot engine bay when the dump valves opened. Thanks.
Mark,those manifold flanges look to good to cut up! I would have thought a pair of laser cut steel shims would only be a few dollars? |
|
#671
12-26-2012, 10:58 PM
|
||||
|
||||
|
Well I was able to cut off a 1/8th inch slab of the flanges that I bought. By using two gaskets on the pass. side and the spacer and two gaskets on the drivers side. I think I have it. I ported out the spacer to fit the ports in the gasket and heads. I have to port out the bottom of the manifold ports as the manifold ports are not tall enough. There's plenty of meat on the bottom so it should still be good. I think I will try it once the motor is running and see if there are any problems but I think I might be OK. I tried measuring the thickness of the flange from one end to the other, but the quality of the casting is not consistant enough to get proper readings. But I think I'll be OK. The bolt holes on the bad side (drivers side will have to be enlongated down to get a proper bolt hole line up. This has been interesting for sure. Mark L
__________________
My Gasser '63 Catalina build. Oh sorry, it's a Street freak. Either way it's a fun build. |
|
#672
12-30-2012, 09:18 AM
|
||||
|
||||
|
Mark...where/who did you get that intake flange plate from? I also sent you a email with my Gutsram measurements..Don't know how to send pics in a PM..
 You can PM info if you wish..
__________________
 ECM member. 2008 Outlaw Pontiac Drag Series Champion MANDRA Do it now fool! Life is short. 69 Grand Prix/3163lbs / IAII 535 w/ Tiger heads by Gaydosh....9.35@ 144 so far..  through mufflers. 1.26 60'. through mufflers. 1.26 60'. Going back to track with pump gas engine.... My 60 Ventura retired to street/strip duty.. |
|
#673
12-30-2012, 12:04 PM
|
||||
|
||||
|
Quote:
With your turbo deal you might have been in a partial turbo surge mode before you added the additional breather holes in your cans. Agree that dumping water/meth into the engine bay/under a car is a bad idea. Tom Vaught
__________________
"Engineers do stuff for reasons" Tom Vaught Despite small distractions, there are those who will go Forward, Learning, Sharing Knowledge, Doing what they can to help others move forward. |
|
#674
12-31-2012, 02:06 AM
|
||||
|
||||
|
Troy, someone on here made two sets of them for themselves and had no use for one of the sets. He had this pair it on here for sale. I'm a sucker for stuff like that, buying them just in case I could use them sometime, somehow. Well they came in really handy for this manifold problem. That's why I buy odd ball things, you just never know when you might need a slice of aluminum head flange for a spacer, LOL.
I finally took a couple of pics of the motor. This is a close up of the rear half of the lower end. You can see the aluminum rods, and the splayed 4 bolt mains. The polished look of the bottom of the counterweights is the result of having a really light rotating assembly. They had to remove a lot of the counterweight material just to get it all balanced. So it has a very good balance job. If you look up just above the pistons, at the block area between the mains, you can see the reinforcing rib that Pontiac cast into its early blocks. That, thicker main webs, thicker cast walls etc., and more nickel in the iron makes the early blocks much stronger and more wear resistant than later thinner cast blocks. This same basic block is in my friends 3000 HP nostalgic nitro burning fueler. So it ought to hold up to my little 1500 HP.  The front half of the bottom end. 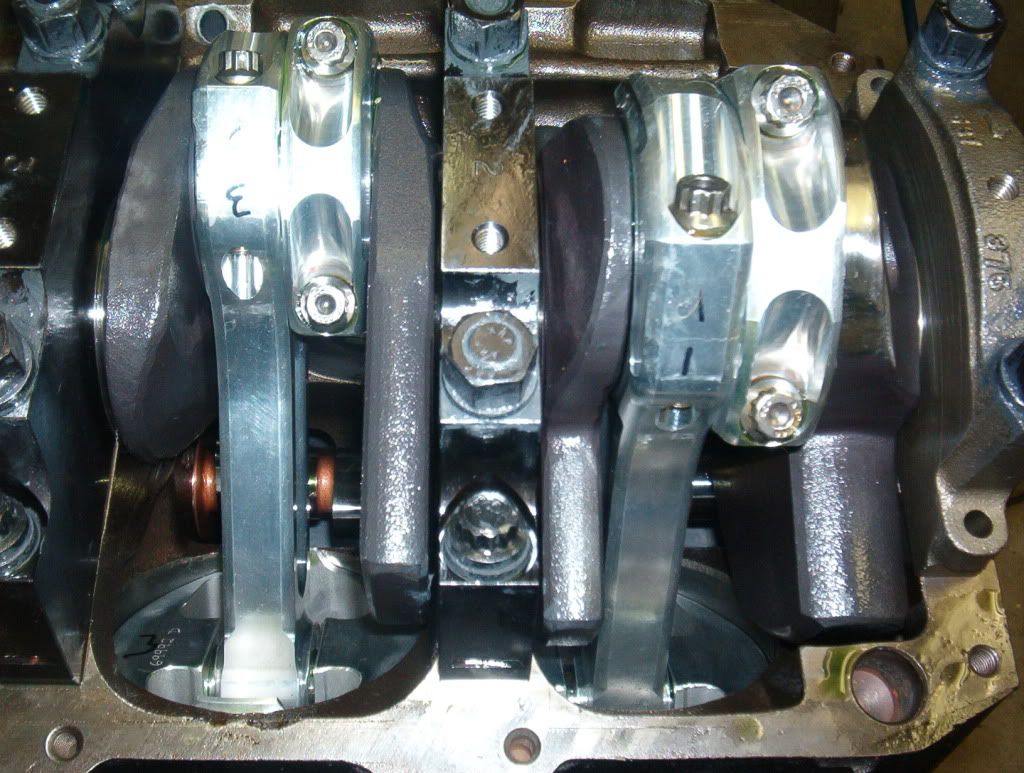 A shot of the timing chain and the drive spud for the cam drive front Hilborn fuel pump.  A pic of the Scorpion 1.65 aluminum rockers and the stud girdle. No push rods installed, just mocked up to look for anything that could be wrong.  More coming. Mark L
__________________
My Gasser '63 Catalina build. Oh sorry, it's a Street freak. Either way it's a fun build. |
|
#675
12-31-2012, 02:37 AM
|
||||
|
||||
|
I've been busy trying to get the manifold to fit well enough to work as it is by making that plate spacer and using the gaskets to get the right manifold height. The manifold flanges were cut not only to much making the manifold set too low in the valley between the heads, but one side was even cut on an angle, probably why no one ever ran it. Lucky me, I was next in line. When I cut the spacer off of the thick flange I used a piece of angle iron clamped to the little my saw plate on my band saw. I set it up on an angle in relation to the blade and I was able to get the spacer cut on an angle, thicker on one side than the other. Just like making a wood shim. The flange that was cut straight is the passenger side, and that side gets two gaskets and that is all. The angle cut side got two gaskets and the spacer. Luckily, the ports on the manifold were still a little undersized compared to my larger head ports so by getting the manifold all lined up with everything, I was able to finish port the manifold port outlets and it is almost a perfect fit. I just glued the single set of gaskets to the head aligned wth the head ports, and I glued the second set of gaskets to the manifold. This will allow me to drop the manifold down into place with the good side bolted down just about finger tight and aligned. The spacer will be laying on the other head over the ports and with the manifold aligned on the good side, I can position the spacer on the bad side looking thru the manifold down the ports and bolt it all together.
Gaskets and spacer in place.  Looking down the good side ports all aligned.  This is looking down the bad side ports with the spacer just peaking out (the shiny edges you can see). By moving the spacer around then bolting it all down I should be able to get everything almost perfect in the bad ports as well. There will be a little bit of rough transition as the air/fuel passes the gaskets and spacer but there won't be any blunt edges to hit on.  This how I set up the saw. Angle iron back fence set at an angle. After I made that starting cut that you see in the pic, and after the pic was taken, I added another angle piece in front of the flange to hold it tight at the saw blade so it could not wander. Believe it or not, it all worked---damnnnnn, HA!  More pics coming of the motor. Mark L
__________________
My Gasser '63 Catalina build. Oh sorry, it's a Street freak. Either way it's a fun build. |
|
#676
12-31-2012, 12:35 PM
|
||||
|
||||
|
I took pics of the motor with all three of the different kinds of valve covers that I have at my disposal. Give me your thoughts on which ones you think look th ebest to use. The Cal Custon ribbed aluminums. These are old school items that I got on the '59 motor, so they are original '60 valve covers made back then.
 These are a pair of '64 GTO covers that have the tall oil breather tubes. These would work well adding tubes from those long oil breather extensions up to a catch can on the firewall to catch the oil vapors.  These are a set of fabricated newer style covers that I got from my son for my Birthday.  Which ones do you think look the best for my motor? Mark L
__________________
My Gasser '63 Catalina build. Oh sorry, it's a Street freak. Either way it's a fun build. |
|
#677
12-31-2012, 12:38 PM
|
|||
|
|||
|
Mark...I would have cut the intake and welded flanges or at least squared existing flanges up...just me and way I approach things. Your way works too so nbd on that. Glad your gettin it done regardless.
Hey the home woodworkin stuff has been useful on aluminum stuff I've done over the years...seems to cut aluminum as well if not better than wood sometimes. First time I tried that was some 20 yrs ago or more. Needed an odd size fan spacer, my non factory radiator was too close for stock and next available size was just a bit shorter than desired. So... I squared the blade on the table saw measured including width of carbide tipped blade set my tall fence square and cut my spacer(slowly)...it came out perfect with no run out when I checked it on the car.... Since then have found that routers eat aluminum easy as do jig saws and band saws.... biggest concern is sheilding motors from metal shavings(I found they dont like that ) Keep at it Mark, have a great new year too! |
|
#678
12-31-2012, 12:39 PM
|
|||
|
|||
|
With that intake the fabed.If a "old" intake the finned.JMO,Tom
|
|
#679
12-31-2012, 05:39 PM
|
||||
|
||||
|
Thanks Bruce. My father in law was a carpenter. He used ot cut aluminum on th etable saw with a wood blade. I did it once but it's really loud!! Never thought of using a router.
Tom. That is beginning to be a theme with most answers. The tunnel ram and especially the turbos, brings it too much towards the present to mix well visually. The fabbed covers also saves buying spacers and another possible gasket leak. I guess the other two sets will go up for sale. Thanks for chiming in Tom. Mark L
__________________
My Gasser '63 Catalina build. Oh sorry, it's a Street freak. Either way it's a fun build. |
|
#680
12-31-2012, 06:35 PM
|
||||
|
||||
|
Quote:
Mark...you get my email re: Wenzler top?
__________________
ECM member. 2008 Outlaw Pontiac Drag Series Champion MANDRA Do it now fool! Life is short. 69 Grand Prix/3163lbs / IAII 535 w/ Tiger heads by Gaydosh....9.35@ 144 so far.. through mufflers. 1.26 60'. Going back to track with pump gas engine.... My 60 Ventura retired to street/strip duty.. |
| Reply |
|
|
The PY Online Forums is the largest online gathering of Pontiac enthusiasts anywhere in the world. Founded in 1991, it was also the first online forum for people to gather and talk about their Pontiacs. Since then, it has become the mecca of Pontiac technical data and knowledge that no other place can surpass.




 Linear Mode

