


| FAQ |
| Members List |
| Social Groups |
| Calendar |
| Search |
| Today's Posts |
|
|
|
#1
 12-30-2012, 05:03 PM
|
||||
|
||||

Grats! just the way my Grandpa showed me 40 years ago...
__________________
" Long may we DRIVE !" |
|
#2
12-30-2012, 05:39 PM
|
||||
|
||||
|
Quote:
I think they had outlawed Cyclamates as an artificial sweetener by then. :-) |
|
#3
12-30-2012, 06:48 PM
|
||||
|
||||
|
nah he drank it with REAL cream and REAL sugar...
was able to work at the same dealership with him for a couple years, was an honor
__________________
" Long may we DRIVE !" |
|
#4
12-30-2012, 09:42 PM
|
||||
|
||||
|
Here>>> Armasteel Rods
http://forums.maxperformanceinc.com/...d.php?t=716890 Here> Crane camshaft > http://forums.maxperformanceinc.com/...d.php?t=716879
__________________
" Long may we DRIVE !" |
|
#5
12-30-2012, 11:57 PM
|
||||
|
||||
|
And here's the cam from the 455HO, the other cam was in Gramma's Firebird Esprit.
http://forums.maxperformanceinc.com/...d.php?t=716885 |
|
#6
01-05-2013, 05:32 PM
|
||||
|
||||
|
Got the heat riser hoses installed for the Ram Air air cleaner. Thanks to "PB" who sent me the correct beveled plastic elbows and original clamps, as well as the heat stove base plate and 90 degree steel elbow. I got the corrugated hoses from Performance Years for $6 each.
This is sure one Rube-Goldberg contraption once all those hoses are hooked up. No wonder everyone who had one of these cars ripped them out and tossed them in the garbage. It takes two people to remove or install the air cleaner now. I also discovered that if you don't have the correct "thick" 1/4" carb to intake gasket, the air cleaner heat riser elbow on the drivers side will jam up against the valve cover and will hold up that side up, off the carb. 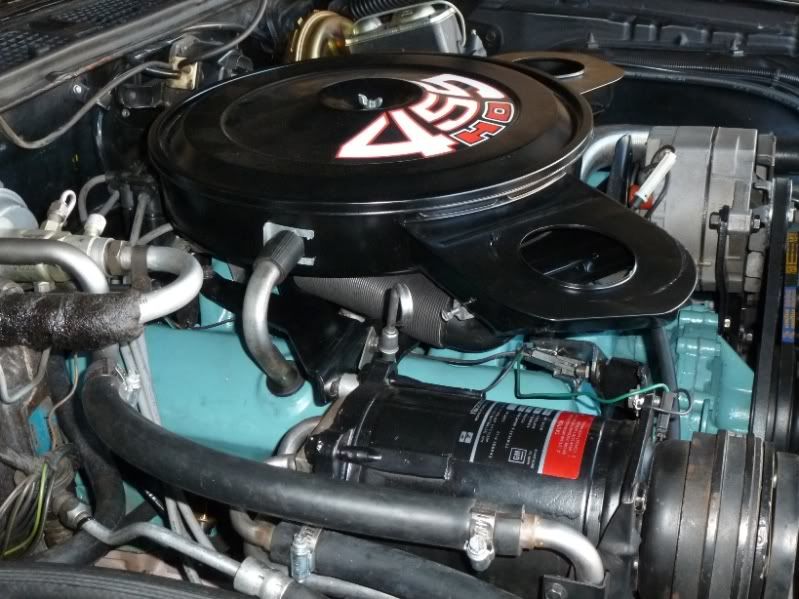 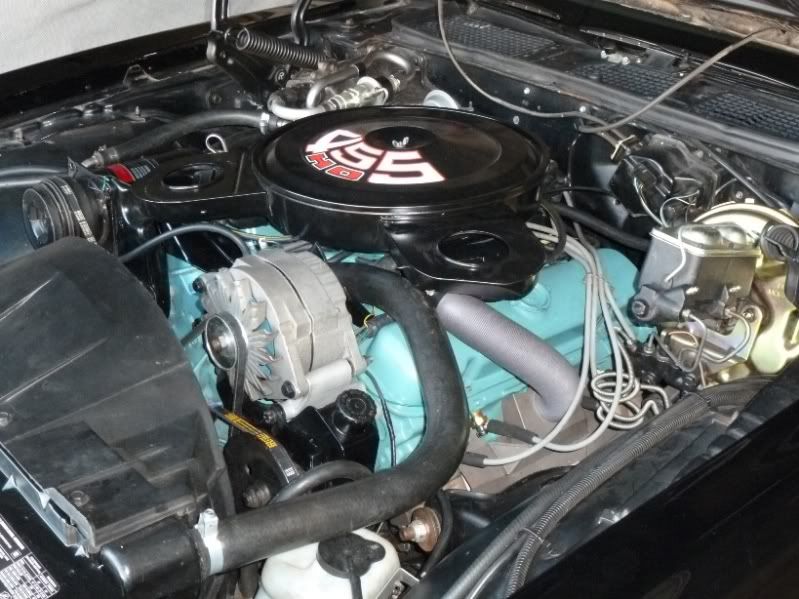 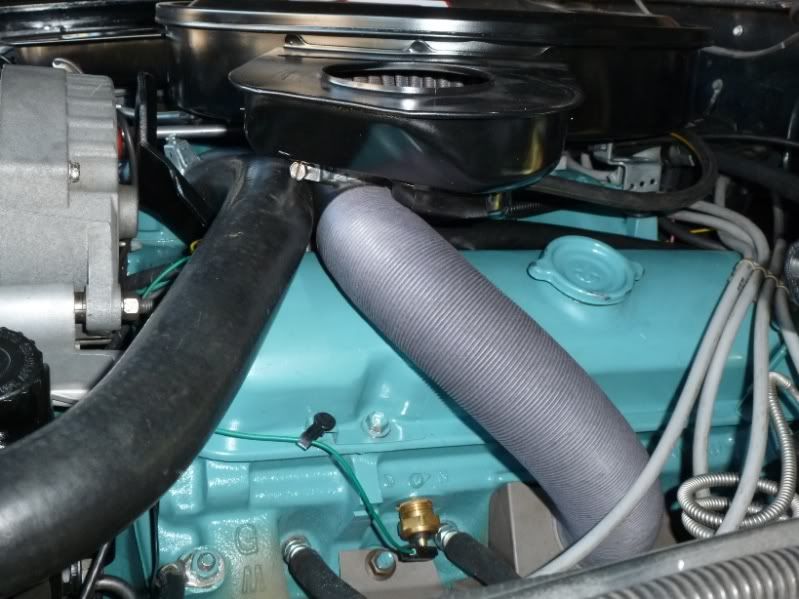
Last edited by njsteve; 01-05-2013 at 06:13 PM. |
|
#7
01-05-2013, 05:50 PM
|
||||
|
||||
|
I was actually going to suggest if you had the correct carb gasket in the other thread. It's still a close fit.
|
|
#8
01-05-2013, 06:00 PM
|
||||
|
||||
|
Thanks for the second opinion. Sometimes the obvious stuff escapes me. :-)
|
|
#9
01-05-2013, 06:00 PM
|
||||
|
||||
|
BTW, Here is a tip for the squeeling belt syndrome that Pontiacs have. These cars are very sensitive to belt thickness. If they are running multiple belts on the crank and water pump pulleys, the parallel running belts must all be of the same width or else they will scream at high RPMs.
The problem is due to the fact that they are trying to fight each other for traction while turning the same distance of water pump pulley at the same time. Because the thinner belt is sitting lower in the groove than the thicker belt, the thinner one is technically a longer belt by a few millemeters over the same distance of pulley groove. Unfortunately, most manufacturers have gone to narrower belts for the old cars. I just bought two new belts for the Formula and had to search a while on rockauto.com for a matching set from Goodyear. Rockauto actually lists the widths for each belt, and they were cheap - around $10 total with shipping. The Goodyears were .44 width which is a little bit more than 14/32. The Gates and Delco belts were .4063 (13/32 width). Napa were the worst - they were around 12/32. Here is the photo after the new same width belts were installed. As you can see, the inner, alternator belt only rides on about 3 inches of the water pump pully - just enough to create the scream if it is a different width. The power steering belt is what really operates the water pump pulley. 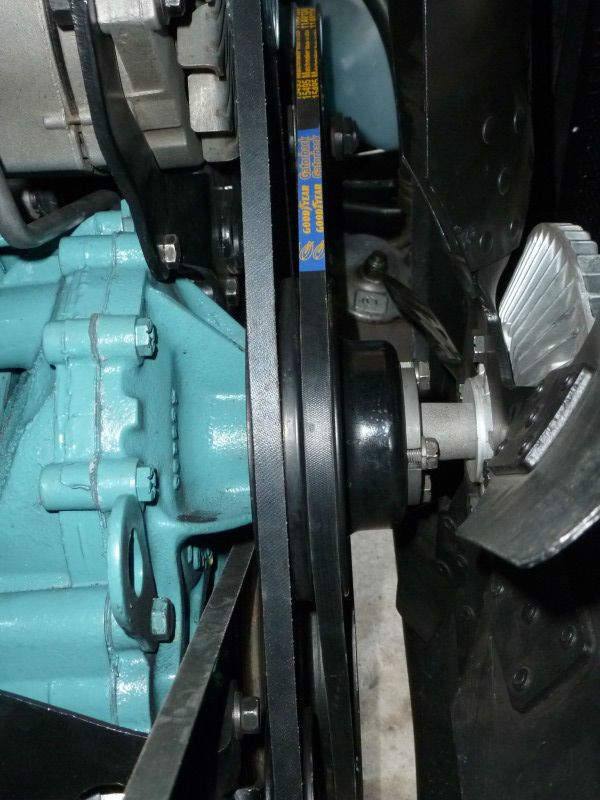 Compare that with this photo (courtesy of Steve Hoog) showing two different thickness belts on the water pump pully. 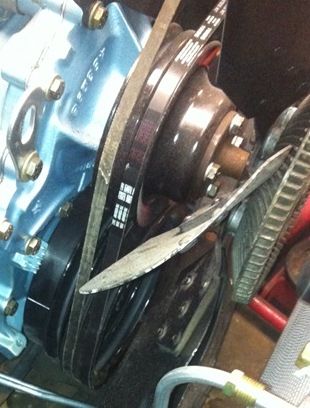
Last edited by njsteve; 01-05-2013 at 06:09 PM. |
|
#10
01-05-2013, 08:36 PM
|
||||
|
||||
|
I posted this in your other thread Steve:
Steve, I see exactly whats going on...that tower clamp needs to be rotated toward the middle of the engine. If you look on the under side of the air cleaner, there are grooves that go around the openings. The grooves are beveled outward. There is a section that is open, allowing that tower clamp to clear the grooves. The clamp is on that groove, not allowing it to sit flush underneath. When you turn over the air cleaner, you'll see exactly what I'm talking about. The tower clamp should be orientated just like the pass side.
__________________
Pat Brown |
|
#11
01-05-2013, 08:45 PM
|
||||
|
||||
|
I actually tried that first. The only groove is actually facing forward toward the radiator. The rear area is blocked by the Thermac mounting flap. When you have the clamp facing forward, the clamp bolt touches the radiator hose, with no change is air cleaner height.
Heres the underside photos from a couple months ago. http://forums.maxperformanceinc.com/...695444&page=27 Ill do some more finagling tomorrow and update as I go along. |
|
#12
01-05-2013, 09:00 PM
|
||||
|
||||
|
Man that is one nicely detailed engine compartment! Great work Steve.
__________________
http://www.starspangledbannerchallenge.com/ |
|
#13
01-05-2013, 09:02 PM
|
||||
|
||||
|
You know, the work is never done!
|
|
#14
01-05-2013, 09:14 PM
|
||||
|
||||
|
Heres my original owner photo from the 1980s

|
|
#15
01-06-2013, 01:14 AM
|
||||
|
||||
|
"This is sure one Rube-Goldberg contraption once all those hoses are hooked up. No wonder everyone who had one of these cars ripped them out and tossed them in the garbage. It takes two people to remove or install the air cleaner now."
No lie!! AND there's supposed to be a clamp on the both hoses too! One on the crossover elbow and one on the drivers preheater shroud. The hoses are literally screwed onto the air cleaner elbows. So just how are we supposed to remove the air cleaner?!! Lol. I'm guessing with the clamp on the crossover elbow, you were to loosen the set screw and pull the elbow off the stove base with the air cleaner assembly. Ridiculousness.
__________________
Pat Brown |
|
#16
01-06-2013, 08:34 AM
|
||||
|
||||
|
It must have been another of their diabolical emissions anti-tampering efforts, just like the preset idle mixture screws and plastic caps!
|
|
#17
01-06-2013, 07:55 PM
|
||||
|
||||
|
Looks delicious Steve! Which way did you position Norwoods bracket? Bend up? Or bend down? It looks like you have it with the bend up. I've installed mine with it down, but looking at the assembly line pic, I think it goes upward. Got a close up shot of that bracket and stove base you can post?
__________________
Pat Brown |
|
#18
01-06-2013, 08:34 PM
|
||||
|
||||
|
Actually, that is an original GM piece that was on the car already. It had no bend at all and I had to bend it up a little bit to mate with the tab on the collar.
|
|
#19
01-06-2013, 08:53 PM
|
||||
|
||||
|
Steve:
Looks great! I've fought this battle on my GTO since the day I bought it. As difficult as it was to get yours to line up just right - imagine adding to it the task of getting the two support brackets to line up with the studs on the bottom of the Thermacs! I notice your air breather doesn't have those studs -was that a GTO only characteristic? BJ
__________________
1971 GTO 455 HO 4-speed - Cameo White, White Vinyl Top, Jade Green Interior, Ram Air Hood, AC, Honeycombs and 8-track 1974 Formula 455 I Owned in 1975-1976. Now Own Its Twin From Same Dealership 
|
|
#20
01-06-2013, 08:59 PM
|
||||
|
||||
|
I think the mountIng stud issue is still under debate, based on date of installation and whether its a later replacement piece or assembly line piece.
|
| Reply |
|
|
The PY Online Forums is the largest online gathering of Pontiac enthusiasts anywhere in the world. Founded in 1991, it was also the first online forum for people to gather and talk about their Pontiacs. Since then, it has become the mecca of Pontiac technical data and knowledge that no other place can surpass.








 Hybrid Mode
