


| FAQ |
| Members List |
| Social Groups |
| Calendar |
| Search |
| Today's Posts |
|
#681
 12-31-2012, 07:15 PM
|
|||
|
|||

I'm still a fan of ribbed valve covers even when mixed with new stuff. My neighbor gave me a set of Holley(m/t style) valve covers that are red powdercoated with polished fins letters and center recangle section... I'm liking them moreI look at them. Had a set of early M/T covers with the angle curved top... needed thick gaskets on newer heads even with stock stuff underneath...but they were great to look at...I painted them early light blue and polished the fins... sometimes regret selling them.
Your scoop is finned...your valve covers can be finned too... Add matching color to both and it will look very right! Otherwise I tend to agree, uncolored polished fin valve covers look best with old school intakes and such. I like chrome with a splash of bright color too. (or a bit of transparent blue or red). My engine... block is going to be black gloss with alumacast on heads and intake and bright red valley cover and I'll use the Holley valve covers allready red. I might grind off where it says Holley and make numbers for engine size. This stuff http://www.aluminumrepair.com/ will braze aluminum, zinc or potmetal(any non ferrous metal really). Check the long video... http://www.aluminumrepair.com/video_new.asp might take a few moments to load. Alot of guys on yellow bullets turbo section using it to build their cold side stuff. |
|
#682
01-01-2013, 12:40 AM
|
||||
|
||||
|
Bruce, have you ever bought and tried that aluminum repair rod? I wonder how it worked. Do you think someone (me??) could fabricate aluminum parts with it?
Troy, sorry, I thought I replied to you. Yes I got the info, it was very helpfull. Especially the carb center to center measurement. It helped me to continue trying to make the early manifold work instead of buying a new one or a Gustram. Too many variables on the gutsram ports and top to buy one of those. So far I think I'm OK. MArk L
__________________
My Gasser '63 Catalina build. Oh sorry, it's a Street freak. Either way it's a fun build. |
|
#683
01-01-2013, 02:57 AM
|
||||
|
||||
|
This is the plate to mount the Shotgun blower scoop to my carburators. I drilled and tapped it to match the little bolt pattern on the bottom of the scoop. Then I added more bolt locations between the originals to better seal up the scoop to the plate. I found two aluminum carb hat spacers online that are used to raise the turbo carb hats. They come with an O-Ring on the bottom of the spacers to seal them to the carbs. Once I located them to the plate using the assembled carbs and t ram top, I took it all to the welder and had him finish weld them to the plate. This is the finished plate on the carbs.
 A pic of it laying on the motor so you can see the spacers welded to the plate.  The pics in the previous post about the valve covers shows the final assembly of the carbs on the manifold , the carb plate, and the blower scoop laying inplace on top of that the plate. Mark L
__________________
My Gasser '63 Catalina build. Oh sorry, it's a Street freak. Either way it's a fun build. |
|
#684
01-01-2013, 03:14 AM
|
||||
|
||||
|
That came out real good Mark. I like how the o-ring seats in the bottom like its part of the spacer. Looking good mann!
|
|
#685
01-01-2013, 03:14 AM
|
||||
|
||||
|
Mark,,,Looks good,,,Did you remove the "O" rings before welding?? If not, may want to check them out to ensure they didnt get too hot & start to melt/deform!
__________________
Keith Collier 61-63 Pontiac Tempest Tech advisor POCI.org |
|
#686
01-01-2013, 11:04 AM
|
||||
|
||||
|
Quote:

__________________
 ECM member. 2008 Outlaw Pontiac Drag Series Champion MANDRA Do it now fool! Life is short. 69 Grand Prix/3163lbs / IAII 535 w/ Tiger heads by Gaydosh....9.35@ 144 so far..  through mufflers. 1.26 60'. through mufflers. 1.26 60'. Going back to track with pump gas engine.... My 60 Ventura retired to street/strip duty.. |
|
#687
01-01-2013, 11:14 AM
|
||||
|
||||
|
Mark,,,give me a call when you are up & about. Need to stop by, I have a couple of things for you.
__________________
Keith Collier 61-63 Pontiac Tempest Tech advisor POCI.org |
|
#688
01-01-2013, 12:46 PM
|
||||
|
||||
|
Troy, U no be da nutz me friend. MArkus
__________________
My Gasser '63 Catalina build. Oh sorry, it's a Street freak. Either way it's a fun build. |
|
#689
01-27-2013, 06:13 PM
|
||||
|
||||
|
Well it's a been while since I got the motor home. I've been getting parts again and doing little things. Yesterday I threw off the gloves and took the monster on. I trimmed, fitted, and siliconed the crank scraper down. I found that the bolt heads on the Hilborn pump drive bolts were too big and were hitting inside the Moon pump mounting cover. I had to go on a hunt to find proper bolts but ended up getting some button head bolts, and grinding down the circumefrence enough to get the bolt head to fit in the pump drive slots. All good now. Installed the front cover and pressed on the front ATI balancer. The Moon cover with the added thickness of the pump drive cover, is just too thick to allow the balancer to bottom out on the bottom timing chain gear. ATI sells crankshaft shims/spacers so I'll be calling them tomorrow. Since all my pulleys will be custom installed I don't care where the bottom pulley ends up. I bought a Precision Pumps blueprinted 80 lb pump too. So that went on with the pickup for my oil pan. Last night I shot a coat of paint of the engine and the oil pan. But when I tried to install the pan, it's hitting on something inside preventing it from dropping down in place. I'll have to figure that out. Previously I had painted the Moon cover leaving the machined tops of ribs polished, and I painted between the ribs on the blower scoop too. I have not had time to do a good cleaning of the ribbed valve covers but they will get painted between the ribs eventually too. So I mocked up the painted motor to take some preliminary pics.
  Got much to do yet. Once I get the oil pan figured out and installed I will place the motor up on the steel table and start all the mods to get a starter bolted on. I was doing a lot of stuff while I still had the '59 block I had found. But I really needed the actual block that I was using so I could finalize every mod as I went along. Now I can do that and "I have a plan", heh. So far so good. Mark L
__________________
My Gasser '63 Catalina build. Oh sorry, it's a Street freak. Either way it's a fun build. |
|
#690
01-27-2013, 08:13 PM
|
||||
|
||||
|
Hey Mark, could you clean up that engine stand just a little?? A first rate engine deserves a first rate engine stand, common man ---- if you lived a little closer, I'd come over and clean it up and paint the stand to complement that beautiful engine!!!!!!!!!
|
|
#691
01-27-2013, 08:41 PM
|
|||
|
|||
|
Looks great Mark. Though you COULD maybe polish the intake and heads...hehehe. Cant wait to see this baby run. Gonna have to send you a pic when I get a chance of the mock up turbo I made. Should make you laugh. lol BTW, my tilt frond end is almost hinged! Hope to have it done this week.
|
|
#692
01-27-2013, 10:40 PM
|
||||
|
||||
|
Hey Lee, I have a theory. If I keep the engine stand ugly, dirty, and overall disgusting (kind like me, heh) it will attract all the garbage in the air and area around the motor, and keep it off the motor. I know it works for me, I walk out of that garage and I'm still dirty and really ugly, LOL.
Aron. Come on over Dude. You've got a lifetime invitation to come polish my aluminum any time you want. LOL. Yeah I'm lookng forward otseeing your Franken-turbo creation. I still think it's a great idea. I'll probably be calling you names when I start positioning my turbos and trying to handle them without dropping them. With the Firebird I suspended it from the ceiling but I don't have open rafters in this garage. Will have to built an A-frame to do it with. Good going on the tilt front end. Waiting for pics on that too. MArk L
__________________
My Gasser '63 Catalina build. Oh sorry, it's a Street freak. Either way it's a fun build. |
|
#693
01-27-2013, 10:54 PM
|
|||
|
|||
|
The turbo is made from the pink hard foam insulation from Lowes. Its 2" thickness and I took careful measurements of the actual turbo hot, middle and cold sides. I laminated the insulation sheets together with 3m spray adhesive (next time I'd just try contact cement....faster), marked them with my dimensions. Then I took an old hacksaw blade, held as much of the blade as I needed in the torch for 10 seconds and carved away.
After which I used a LONG bolt, heated it up and sunk it through the center of each section....used it with washers to connect all 3 sections but still be able to rotate the sides. A Folgers lid was almost perfect dimensionally for the Hot side exhaust flange. hehehe All told dimensionally I'm within 1/4" at the worst. So as long as I give myself that much room for error I'm good Its a LOT less heavy than my Garret GT 4788, and I think we have placement pretty much worked out now. lol
|
|
#694
01-28-2013, 02:17 AM
|
||||
|
||||
|
Quote:
__________________
Anybody else on this planet campaign a M/T hemi Pontiac for eleven seasons? ... or has built a record breaking DOHC hemi four cylinder Pontiac? ... or has driven a couple laps of Nuerburgring with Tri-Power Pontiac power?(back in 1967) ... or has a Pontiac born the same year as Jim Wangers? (1926} 
|
|
#695
01-29-2013, 03:10 AM
|
||||
|
||||
|
Somehow I knew that was going to happen, LOL. That's OK Jack, I owe you one now, HA!!! Actually Jack, if I had one you'd be my first visit. That would teach ya!!! Mark L
__________________
My Gasser '63 Catalina build. Oh sorry, it's a Street freak. Either way it's a fun build. |
|
#696
01-29-2013, 04:03 AM
|
||||
|
||||
|
Mark- totally off-topic- did I tell you that I "scored" a NOS set of Moraine M-400 2 5/8" main bearings? An eBay seller in Texas only wanted $55 for them. I just wanted to add them to my stash of '58 pieces. But they're .010" undersize, so I'll need to turn down the mains on my zero/zero crank someday.

__________________
Anybody else on this planet campaign a M/T hemi Pontiac for eleven seasons? ... or has built a record breaking DOHC hemi four cylinder Pontiac? ... or has driven a couple laps of Nuerburgring with Tri-Power Pontiac power?(back in 1967) ... or has a Pontiac born the same year as Jim Wangers? (1926}
|
|
#697
01-29-2013, 11:49 AM
|
||||
|
||||
|
Very nice score Jack. I would have "killed" for those back when I had the two 370 blocks and forged cranks. I've still got the bug to build either a 370 some day or even a 316 if I should come across one. There was a 316 on Craigslist a couple of months ago. I called on it right away as it was already sold (damn). I'm guessing that you don't know of an aftermarket bearing source for the 370 either? I had a machinist friend at work start to build me a set of upper bearing spacers using my old bearings form those blocks. I still have the bearing set here somewhere. But I don't know it they had too much wear or may have been scratched over time, to be used again??? I was going to use the crank in a 301. MArk L
Mark L
__________________
My Gasser '63 Catalina build. Oh sorry, it's a Street freak. Either way it's a fun build. |
|
#698
01-31-2013, 09:48 PM
|
||||
|
||||
|
More updates. I was having clearance problems with my ATi Balancer and the Moon front cover. The added thickness of the Hilborn pump mount plate on the front cover caused the balancer to hit and prevent me from drawing the the balancer all the way down. I ground everything I could on the timing cover and the plate. I finally got enough clearance that I got the balancer all the way down and bottomed out. But the top of the balancer was so close to everything up there that I was afraid if the balancer did not run perfectly true, it would be hitting. Then, when I tried to torque the balancer down I realized that the crank should have started moving under the torque that I was putting to the bolt. That's when I realized the bottom of the front cover oil pan flange was tight against the balancer. ATi sells crank spacers so I just went and ordered two .093 spacers and it'll be done. Plus it will give me back some clearence at the top of the balancer. I'll feel better with that.
Next I had to get the motor to Top Dead Center. But the heads were already installed. I tried to find a way to create a piston stop from the bottom of the motor but it was just to hard to do. So I removed the head. I used an old piston stop I made years ago and a degree wheel and got my TDC. I marked the front cover at the TDC location, drilled and tapped the timing cover for a 10-24 machine bolt, ground a point on it and added a nut. Screwed it into the cover and locked it in. The balancer is just sitting on the end of the crank, that's why it is not up against the cover in the pic.  This is a close up shot of how I'm going to mount the later starter. The early blocks do not have enough of the block flange stickng out to add the outside starter bolt. So I've add an angle iron extension. I located the starter properly for engagement. Then drilled the inside bolt hole and tapped it thru the angle iron into the block flange. The angle iron goes outside of the first adaptor plate that you can see just the edge of in the pic. The outside bolt goes thru a hole and will get a nut welded on the top so both starter bolts can be put in from the bottom. Then the angle iron piece will get welded to the first plate.  More on the starter and adaptor plates next. Mark L
__________________
My Gasser '63 Catalina build. Oh sorry, it's a Street freak. Either way it's a fun build. |
|
#699
01-31-2013, 10:06 PM
|
||||
|
||||
|
I'm using two plates for adaptors. One is a Chevy to BOP adaptor and the second is an AllPontiac motor plate. Both plates came drilled for the Chevy and BOP patterns. I added the early Pontiac pattern to them. This is the first adaptor on the block with the two ground down flat head bolts. The starter angle iron adaptor goes up against the bottom of the block flange and sticks up behind the first trans adaptor. The second plate/motor plate face will go level with the angle iron. The second plate will get cut out so the block saver plate for the blowproof bellhousing lays flat over the second plate and the angle iron.
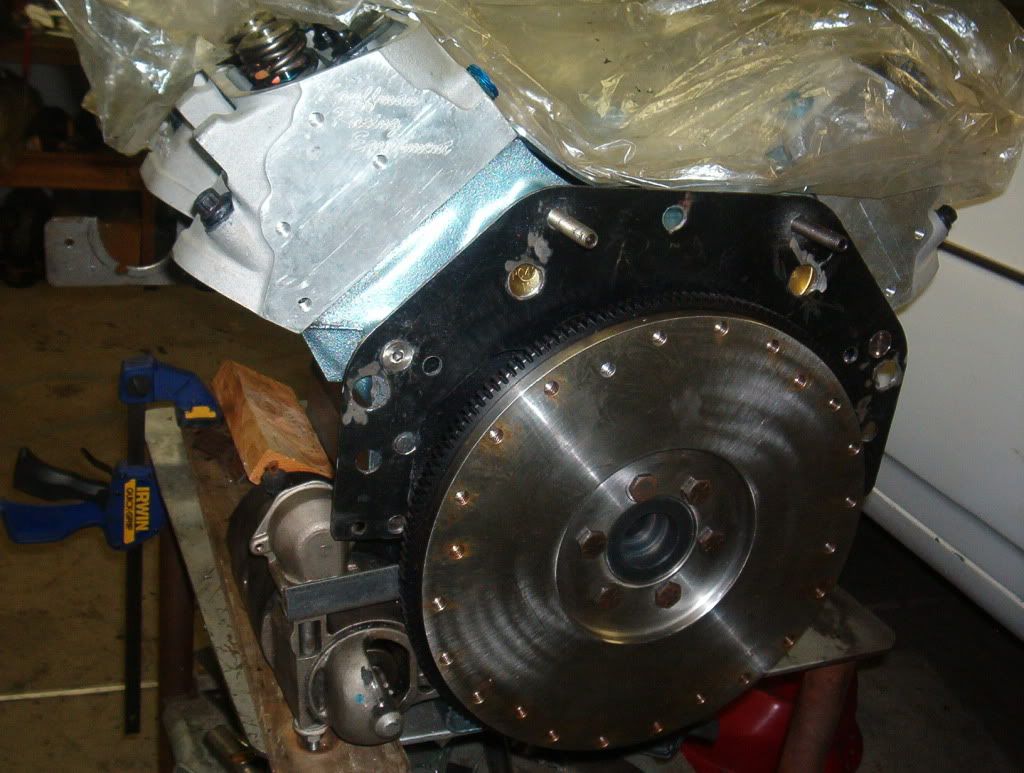 A pic of the ground down flat head bolt. You can also see the extra holes for adapting the various patterns.  This is the starter in place with the angle iron plate to be attached to the block and plates. 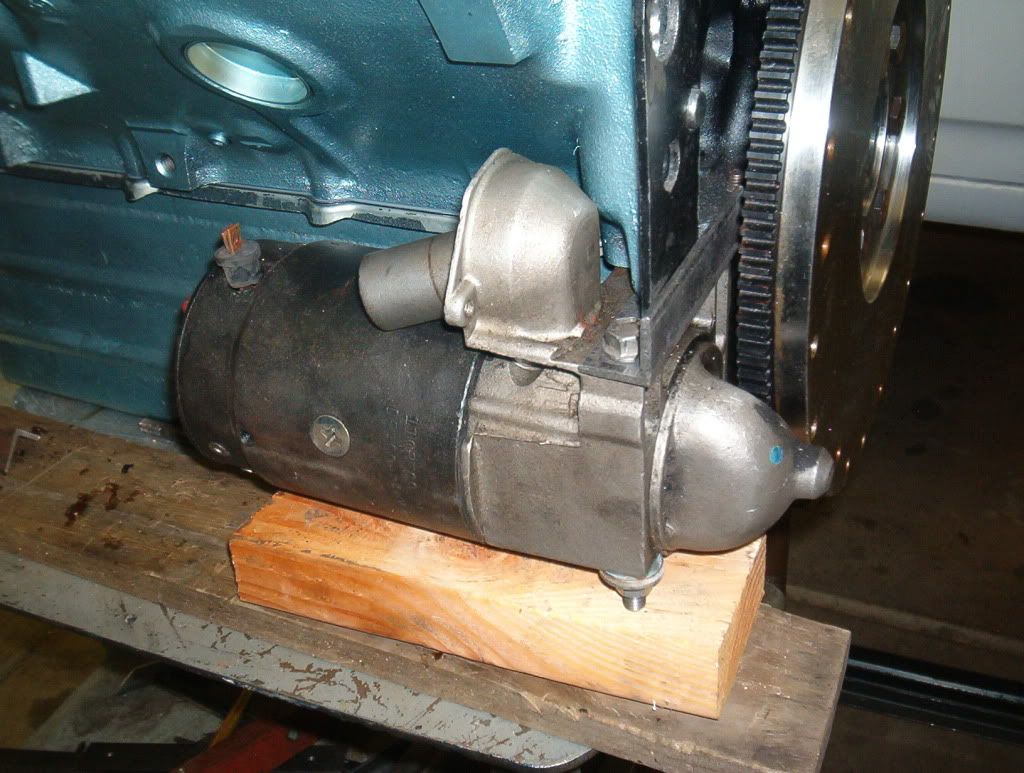 This is the second/motor plate in place. 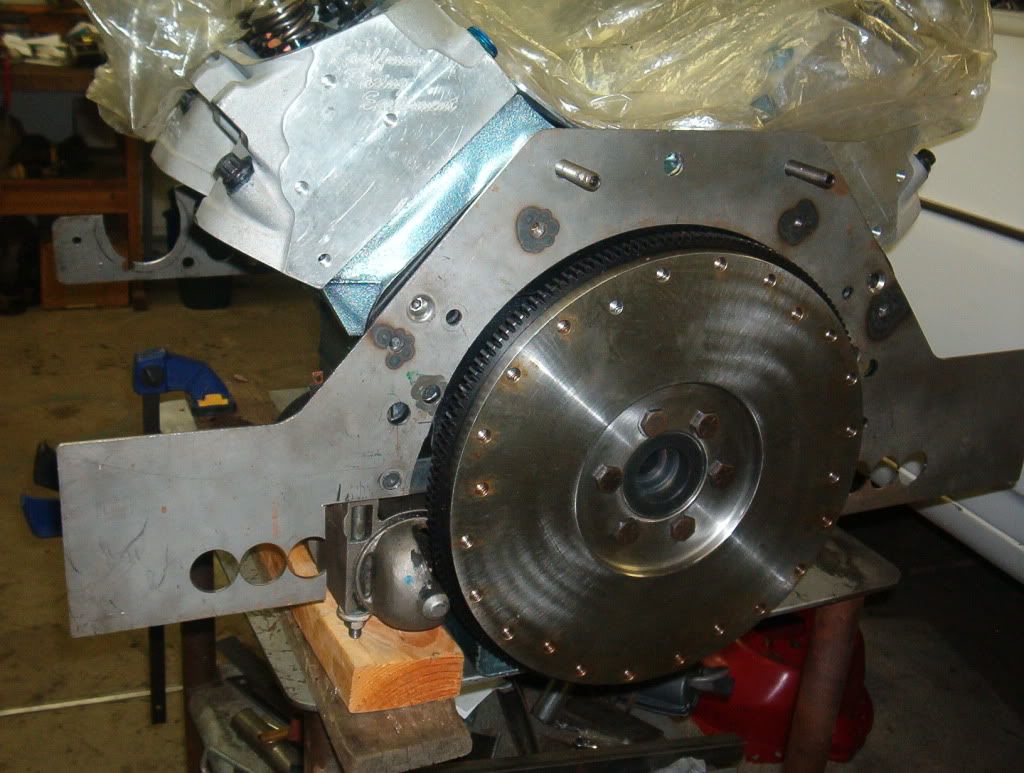 This is the starter again but with the motor plate in place. Once the starter angle iron is located and bolted in, the motorplate will get cut around it so the plate and the starter angle iron is level. 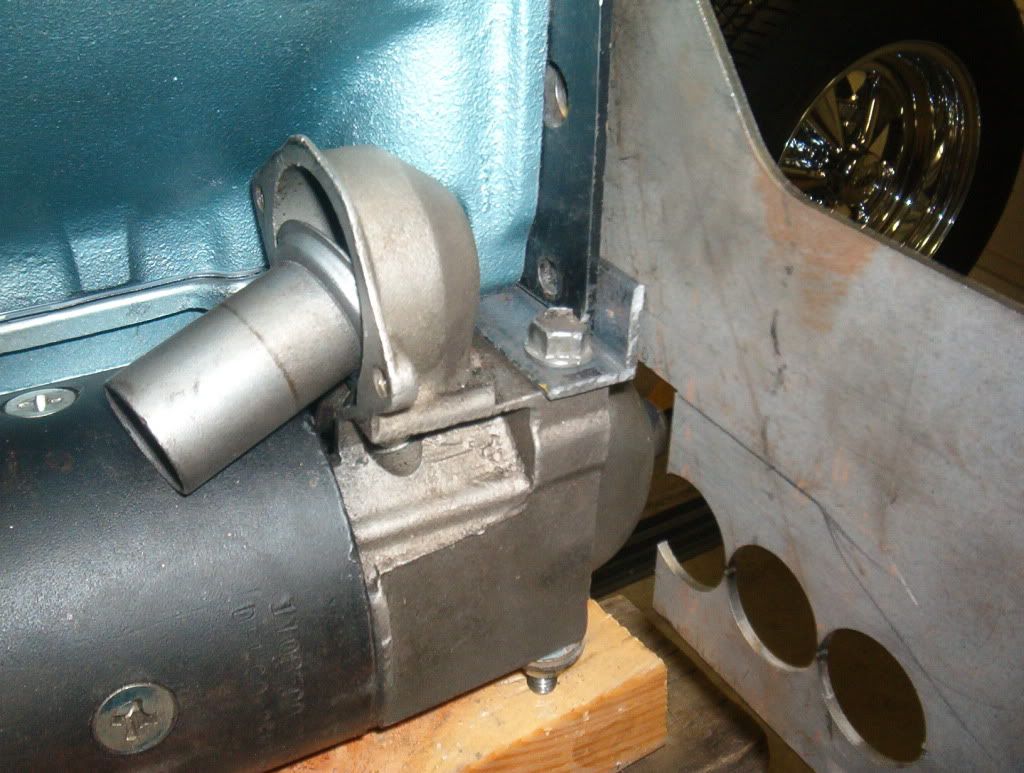 MArk L
__________________
My Gasser '63 Catalina build. Oh sorry, it's a Street freak. Either way it's a fun build. |
|
#700
02-01-2013, 06:08 PM
|
||||
|
||||
|
Mark it's easy to make a piston stop for use when the heads are on, take an old spark plug and break out the ceramic center using a hammer and punch. Next insert a short piece of steel rod through the centre of the plug so that it will protrude into the combustion chamber by about 2"and weld it in place,you can now locate TDC in the normal way by taking degree wheel/damper readings when the piston hits the stop either side of TDC.
I like the starter adapter idea,very basic and simple, I would use it myself but my oilpan had to be huge to clear the mains girdle I made and I can only just fit in a mini starter. |
| Reply |
|
|
The PY Online Forums is the largest online gathering of Pontiac enthusiasts anywhere in the world. Founded in 1991, it was also the first online forum for people to gather and talk about their Pontiacs. Since then, it has become the mecca of Pontiac technical data and knowledge that no other place can surpass.






 Linear Mode

