


| FAQ |
| Members List |
| Social Groups |
| Calendar |
| Search |
| Today's Posts |
|
#701
 02-01-2013, 08:12 PM
|
||||
|
||||

They say a idle mind will land you in the Devil's workshop.....
Have no fear Mark...you're safe.. 
__________________
 ECM member. 2008 Outlaw Pontiac Drag Series Champion MANDRA Do it now fool! Life is short. 69 Grand Prix/3163lbs / IAII 535 w/ Tiger heads by Gaydosh....9.35@ 144 so far.. through mufflers. 1.26 60'. Going back to track with pump gas engine.... My 60 Ventura retired to street/strip duty.. |
|
#702
02-01-2013, 09:22 PM
|
||||
|
||||
|
I bought a mini starter that a local man builds and sells here in AZ. I actually bought it used from another Pontiac guy here but it is the same thing. I found that when the mini was bolted into the location that the stock started bolted into, the stroke of the drive gear only moved enough to hit half the width of the ring gear. I could see by the wear on the drive gear that it was that way previously too. That's why I installed the stock starter. Its a good working starter and it engages the ring gear completely. Maybe I'll try it sometime in the future?? Again thanks for sending the old bell mount starter nose, it really helped me settle on a plan to make this happen. MArk L
__________________
My Gasser '63 Catalina build. Oh sorry, it's a Street freak. Either way it's a fun build. |
|
#703
02-01-2013, 09:23 PM
|
||||
|
||||
|
Troy. Does idle mind and addled mind mean the same thing???? heh. I've been called both, lol. MArk L
__________________
My Gasser '63 Catalina build. Oh sorry, it's a Street freak. Either way it's a fun build. |
|
#704
02-01-2013, 09:32 PM
|
||||
|
||||
|
Quote:

__________________
ECM member. 2008 Outlaw Pontiac Drag Series Champion MANDRA Do it now fool! Life is short. 69 Grand Prix/3163lbs / IAII 535 w/ Tiger heads by Gaydosh....9.35@ 144 so far.. through mufflers. 1.26 60'. Going back to track with pump gas engine.... My 60 Ventura retired to street/strip duty.. |
|
#705
02-04-2013, 08:15 PM
|
||||
|
||||
|
My mini starter only engages about half way too.
|
|
#706
02-04-2013, 10:21 PM
|
|||
|
|||
|
Quote:
Fwiw I tried using that early starter nose on a good modern Pontiac Hi torque starter... The newer starter pinion is a bit longer and the pinion "stop" is out further on the shaft... it prevents you from putting the old nose on by about 1/8"... I didnt bother trying to "fix" it... the old non HD starter motor is fine and at boost friendly compression it should be more than adequate. I could swap pinions and modify the shaft or maybe find a HD armature for the early starter... not worth it IMO... If I have starter failure or slow cranking, I may just buy a RobbMc mini with either the Toronado/Eldorado straight across pattern or his Buick nailhead pattern(offset bolts). All 3 have a 3.25" pilot same as the Pontiac. IMI has the offset pattern 61-64 Pontiac bell mount starter that will work. The RobbMc's are infinately adjustable though. Appreciate the deal on that old 58 starter... it does fit and I did get it freed up and it works. Here are some pics of my adapter... not pretty but very functional... I might build another but prettier. I made some minor revisions after these pics. I added countersunk allen head bolts in a few places for better clearance including the starter bolt near the ring gear... surprisingly I can tighten nut on other side TIGHT without needing to hold the allen head side... it wedges into countersink and doesnt budge. I even loosened it and lubed it and it still wedges in tight as soon as nut gets finger tight... cool... Last edited by BruceWilkie; 02-04-2013 at 10:43 PM. |
|
#707
02-05-2013, 12:56 AM
|
||||
|
||||
|
I wanted to make the adaptor fit the late starter just for simplicity. Now I can get a starter anywhere. Plus it will fit a late automatic without reinforcing the motor plate without the bell housing giving the main support. I like your adaptor though Bruce. I'm glad that the starter worked out too. Taff2 sent me a bell housing starter nose to use/try but it just became to cumbersome. Mine turned out to be really solid, I was afraid when I first started working out the design that it may have some flex and cause a problem. But it turned out fine. I've assembled the whole clutch and bellhouisng to get the throw out bearing depth measurement, then I have to remove the clutch and pressureplate so I can use a dual indicator and check the bellhousing run out. I've been building a pair of clothes line poles for the back yard so I still have to get back to the motor. Mark L
__________________
My Gasser '63 Catalina build. Oh sorry, it's a Street freak. Either way it's a fun build. |
|
#708
02-05-2013, 11:02 PM
|
||||
|
||||
|
interesting info...maybe a novice question, but Bruce, et al, does the thickness (any thickness) between the block and bell housing cause other problems with everything behind the plane of the bell housing being shifter back by the spacer's thickness?
__________________
RediRad circuit designs, branding and intellectual property are for sale. Serious inquiries only. |
|
#709
02-06-2013, 01:26 AM
|
|||
|
|||
|
Mine fits a t400 just fine or could put a stick behind it...I have it mounted to original block dowels plus I doweled the plate for t400. My adapter doesnt have to be used as a mid plate.
The adapter is doweled to the original block dowels. The starter is piloted to the adapter so there is no shimming once the pilot plate is located and welded in place. The adapter has separate dowels(for modern pattern) to keep the bell indexed. I can completely dis-assemble and re-assemble with no realignment issues or shimming if I change the starter. Have room for a clutch pivot/pivot ball too. Good luck with your starter mount plan...I almost did similar...but felt having a piloted starter like most non GM cars and early Pontiacs was a better way to go. The pilot takes quite a bit of loading off the bolts. |
|
#710
02-06-2013, 01:33 AM
|
|||
|
|||
|
Quote:
|
|
#711
02-13-2013, 09:20 PM
|
||||
|
||||
|
I decided to use a hydraulic throw out bearing to make the clutch system much simpler. So I got the Speedway hydraulic throw out, Wildwood 3/4 bore master (required for the bearing) and the floor mounted Wildwood pedal assembly. You assemble the complete clutch bellhousing but do not install the trans. Take a straight edge to lay across the face of the bellhousing (trans mounting face) and measure from the flat of the mounting face to the clutch fingers (where the throwout bearing contacts the clutch fingers). My measurement was 2 3/4 inches. Then you take the hydraulic throw out bearing assembly and slide it onto the trans throwout collar. All the way back. Measure the front contact face of the throwout bearing back to the trans mounting face. On mine it came to just a hair under 2 1/2 inches. So I had to shim the bearing assembly out. They give you several shims to use, all are .050 thick. I used 3 shims and it came out almost exactly at to 2 3/4 inches. The throwout assembly has two fittings that come out the side of the bearing. They give you two threaded studs to replace one of the trans bearing retainer bolts at the two o'clock position. The stud, once mounted, goes between the two fittings to prevent the bearing from spinning. One fitting is the fluid source from the master cylinder, the other is a bleeder valve. I still have to get everything kind of mocked up so I know how long of a braided line to buy to connect the two. These are the pics.
The new hydraulic bearing assembly slid on the trans collar. You can also see the locating stud and the fittings on the bearing in the next two pics.  The bearing slid forward to expose the shims I used.  These are the extra shims and the other stud that I did not use. They give you two sizes for different trans.  This is the pedal and the master assembly.  And this is where it will go. I have to remove the brake pedal and cut it down to a normal stick pedal size. This will allow me to move the clutch pedal assembly over closer to the brake. I'll also have to reinforce the floor where the pedal mounts because it is pretty flimsy right there.  When you meet those measurements using the shims etc, it says you should have .050 clearance between the bearing face and the fingers. I won't know until I get my braided line an dinstall it. Then I can slip it all together. Mark L
__________________
My Gasser '63 Catalina build. Oh sorry, it's a Street freak. Either way it's a fun build. |
|
#712
02-13-2013, 09:21 PM
|
||||
|
||||
|
I also finished setting my valves today. My cam has the 4/7 swap. But I thought when the 4/7 swap is made generally the 5/3 is swapped too. I started following the LS1 firing order but the second half of the order did not follow the LS1 order. Unless I'm crazy or I did something wrong, the cam was cut with only the 4 and 7 cylinders swapped. The 3/5 is the same as the regular Pontiac firing order??? The cam was a special custom ordered cam combination. So I sent an e-mail to the gentleman that built my motor to call the designer/grinder to get the proper firing order. We'll see what happens ther. But I'm very sure that I got the firing order figured out and all is set, ready for start up.
Update. After talking to Paul Carter, the cam was desigined with only the 7/4 swap. So I was right after going thru all the valve setting. MArk L
__________________
My Gasser '63 Catalina build. Oh sorry, it's a Street freak. Either way it's a fun build. |
|
#713
02-13-2013, 09:37 PM
|
||||
|
||||
|
I also finished setting my valves today. My cam has the 4/7 swap. But I thought when the 4/7 swap is made generally the 5/3 is swapped too. I started following the LS1 firing order but the second half of the order did not follow the LS1 order. Unless I'm crazy or I did something wrong, the cam was cut with only the 4 and 7 cylinders swapped. The 3/5 is the same as the regular Pontiac firing order??? The cam was a special custom ordered cam combination. So I sent an e-mail to the gentleman that built my motor to call the designer/grinder to get the proper firing order. We'll see what happens ther. But I'm very sure that I got the firing order figured out and all is set, ready for start up.
Update. I did talk to Paul Carter about my cam, he said they had designed it with only the 7/4 swap, so I was right after setting the valves. At least I know now. MArk L
__________________
My Gasser '63 Catalina build. Oh sorry, it's a Street freak. Either way it's a fun build. |
|
#714
02-13-2013, 09:56 PM
|
||||
|
||||
|
A friend ran a similar pedal assy in his 63 Tempest Chassis car in 1971. It worked fine for him.
Tom Vaught
__________________
"Engineers do stuff for reasons" Tom Vaught Despite small distractions, there are those who will go Forward, Learning, Sharing Knowledge, Doing what they can to help others move forward. |
|
#715
02-14-2013, 01:30 AM
|
||||
|
||||
|
Thanks Tom. I always wondered how it would feel to be swinging my pedal from the floor---wait--that didn't sound right, LOL. Once I reinforce the floor it should work great. A lot simpler than trying to hook up all kinds of mechanical linkage. We'll see how well it holds/holds up. Mark L
__________________
My Gasser '63 Catalina build. Oh sorry, it's a Street freak. Either way it's a fun build. |
|
#716
02-14-2013, 06:03 PM
|
||||
|
||||
|
"I have to remove the brake pedal and cut it down to a normal stick pedal size. This will allow me to move the clutch pedal assembly over closer to the brake. I'll also have to reinforce the floor where the pedal mounts because it is pretty flimsy right there."
You already have a small pedal. Just unbolt the large pad and there it is! Lookin' good MArk....
__________________
" Darksiders Rule "
|
|
#717
02-14-2013, 07:02 PM
|
||||
|
||||
|
Oh. I did not know there was much of a pad behind there, never really looked. Thanks for telling me about that. It'll save some cutting and fabricating. I grabbed a wrench and took the power brake pad off. I'll might still make a pad to make the surface area a little bit bigger but it's nto that bad as it is. I notice now that the new floor mounted clutch pedal assembly will raise the clutch pedal up a lot higher than the brake pedal. Something I'll have to get used to. Maybe I'll cut it down and have it rewelded??? Thanks for the heads up though about the brake pedal. MArk L
__________________
My Gasser '63 Catalina build. Oh sorry, it's a Street freak. Either way it's a fun build. |
|
#718
02-19-2013, 10:50 PM
|
||||
|
||||
|
I did preliminary fitting of the tranmission with everything installed. All the adaptors, the bellhousing and the clutch etc. A HEADSUP on the hydraulic throw up bearing. I thought I'd be able to slide the bearing assembly onto the trans input and then slide the whole thing in just taking care to run the hydraulic hoses out of the clutch fork opening. I ran two hoses instead of the single hose. The one hose was normal, the one that brings the hydraulic fluid from the master cylinder. The bearing has a second coupler with a bleed screw like on a caliper. I saw no way to get at the bleed screw once it was inside of the bellhousing the way they showed in the instructions. It would have been way up inside the bellhousing and I would think impossible to get at, especially once in the car. So bought two AN -4 hose lines, one for the hydraulic in and I installed a second -4 AN high pressure line to that bleed fitting running it out of the bellhousing too. I'll run the bleed line up the firewall and make a small bracket to hold it there. Then I can bleed the bearing from the engine compartment. So back to the install. Because of the length of the fittings for the line hoses, you can't fit the bearing plus the fittings, plus the lines all in through the bellhousing trans hole. So you have to place the bearing assembly inside of the bellhousing and install the trans while guiding the bearing onto the bearing collar. Sounds easy but the bearing has an o ring that helps seal it againts the collar. The bearing has to be slid onto the collar through the fork hole with basically just your finger tips. Mine were just not strong enough to push it on but I was able to use a bent small pry bar and large blade screw driver to get in and push the bearing back onto the collar.
So, BODDA BING, BODDA BOOM, I was able to get it all put in together and bolted down. Then I realized that, although I thought I had done a great job measuring the bearing for clearance using the supplied shims, the bearing was up right against the clutch fingers. I could just move the bearing but it was touching against the fingers. The installation instructions said the mesurements should leave you with about .050 clearence when all the measuring is done. Each shim was .050 thick so I had to pull the trans, pull one shim, and do the install all over again. This is a pic of the assembled engine and tranmission: 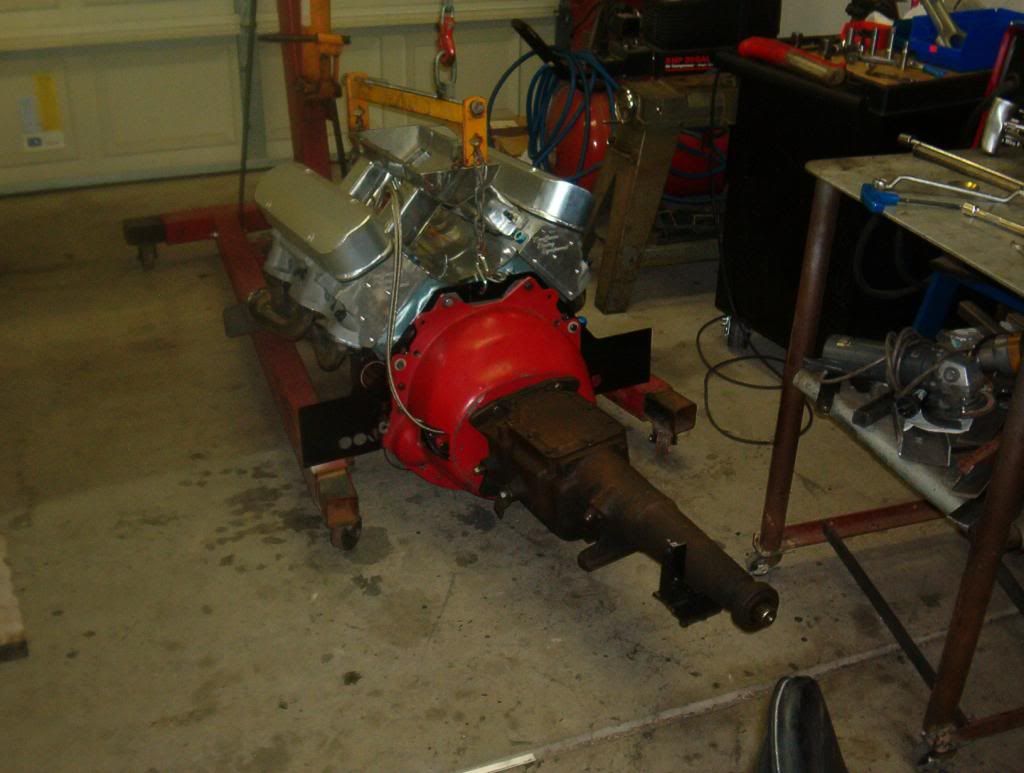 This is a pic I finally got from the BOP Fall Festival. It's me getting the award for Best Special Interest car of all the BOP cars there with Jim Wangers.  MArk L
__________________
My Gasser '63 Catalina build. Oh sorry, it's a Street freak. Either way it's a fun build. |
|
#719
02-19-2013, 11:39 PM
|
||||
|
||||
|
I will be interested in how well your hyd. clutch works out, and congrats on your special education award.
|
|
#720
02-20-2013, 01:39 AM
|
|||
|
|||
|
Very cool Mark. Since I mentioned it here and I know you are going to envy it...heres a view of my pink turbo. Its the latest thing. You want one dontcha? lol

|
| Reply |
|
|
The PY Online Forums is the largest online gathering of Pontiac enthusiasts anywhere in the world. Founded in 1991, it was also the first online forum for people to gather and talk about their Pontiacs. Since then, it has become the mecca of Pontiac technical data and knowledge that no other place can surpass.




 Linear Mode

