


| FAQ |
| Members List |
| Social Groups |
| Calendar |
| Search |
| Today's Posts |
|
#81
 04-19-2012, 10:34 AM
|
||||
|
||||
|
This is a great thread. I forgot what the car is getting for a drivetrain
|
|
#82
04-19-2012, 03:15 PM
|
||||
|
||||
|
Quote:
__________________

|
|
#83
04-22-2012, 10:04 AM
|
||||
|
||||
|
Here are some photos of the floorpans. Always takes longer than you think. Good old Rusty Jones was a pain in the a** .
__________________
|
|
#84
04-22-2012, 08:28 PM
|
||||
|
||||
|
Here's the fuel cell that I'm putting in the car. Sixteen gallon with a gm ohm meter for the fuel gauge.
__________________
|
|
#85
04-27-2012, 12:36 PM
|
||||
|
||||
|
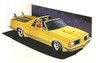
Now that I've got the body bolted back to the frame, it's time to put the roll bar in. I put pilot holes in the floor and trunk before I rolled the shell rightside up. So I wouldn't cut any more than I had to. I put the main hoop in and welded it to the frame. I used re-bar to make the shape for the two bars that go into the trunk. Dropped them off at a local metal shop to have them bent correctly.
__________________
|
|
#86
04-29-2012, 08:05 AM
|
||||
|
||||
|
This is the only way I'll be able to weld the roll bars in the trunk area. Also the fuel cell is not going in through the aero coupe trunk opening. You've only got 10 1/2 inches of trunk opening and have part of the trunk latch in the way!
__________________
|
|
#87
04-29-2012, 08:54 AM
|
|||
|
|||
|
I'm lov'n this build! What type of paint did you use on the frame (and was the frame sand blasted?).
Doug
__________________
 Doug |
|
#88
04-29-2012, 03:28 PM
|
||||
|
||||
|
Quote:
__________________
|
|
#89
04-30-2012, 03:15 PM
|
||||
|
||||
|
Just ordered the manual brakes master cylinder part #10-1905 "Cordone" from Advance Auto. $33.99 will be in tomorrow morning. Then I called Master Power and ordered the firewall plate adapter needed to complete the conversion. Part # AD2732K . I first checked on the =ir online catalog and that adapter plate wasn't listed for the 78-87 g-body. Talked to one of their tech guys. He said he was pretty sure that it worked but would physically get one out and call me back so we could compare measurements. He called me back and the part did check out for the good. So I ordered it. Needless to say I was happy with their tech service. All the info that I have for this conversion has come from the PY forums, again showing how valuable this forum can be for us Pontiac people.
__________________
|
|
#90
05-01-2012, 12:53 AM
|
|||
|
|||
|
Very cool that this car is getting the love they all deserve.
I am sure that with this powertrain, you are looking at different rims and tires. For those who are looking at restoring one and want the original look, Kelsey has just reintroduced the Eagle GT in 215/65/15 and 255/60/15. Here is a pic to remind you of what was the coolest tire at the time. http://www.kelseytire.com/pages/larg...p215-65-R.html If you have any questions about these tires, I am happy to help!!!!
__________________
Russell Small 1969 Hurst/Olds 13.26 @103.1 "Pure Stock is the way to Rock" |
|
#91
05-01-2012, 11:33 AM
|
||||
|
||||
|
Quote:
__________________
|
|
#92
05-03-2012, 01:18 PM
|
||||
|
||||
|
Came up with a company in california that can make custom width from your supplied rim. I'm thinking four inch in the front and nine inch in the back with my fifteen inch rally II's.
__________________
|
|
#93
05-03-2012, 01:32 PM
|
||||
|
||||
|
Here's the firewall finished. I'm using stainless brake lines and plan on stainless braided brake hoses. Refurbishing all the firewall components now.
__________________
|
|
#94
05-04-2012, 05:49 PM
|
||||
|
||||
|
She coming along really nice Mike! Gonna look good!
__________________

|
|
#95
05-14-2012, 10:57 PM
|
||||
|
||||
|
Got back the rear sections of my roll bar. I was hoping to get them a little quicker but all that really mattered was that they bend them correctly. Welded them in today and painted the welded areas. Next step is to close up the holes around the roll bars.
__________________
|
|
#96
05-15-2012, 10:01 AM
|
||||
|
||||
|
Quote:

__________________
|
|
#97
05-15-2012, 11:25 AM
|
||||
|
||||
|
Quote:
__________________
|
|
#98
05-15-2012, 01:49 PM
|
||||
|
||||
|
Quote:
OR... Go with 1/16" clear Lexan... for the "fish bowl look" - That way you can see header leaks while driving your Aero Back Coupe!!!  Geeeeze with all this work being done... making Michelle's old pile look NAKED ~ Raw Dog of-course Can't wait to see your new ride in motion!
__________________
|
|
#99
05-24-2012, 06:54 PM
|
||||
|
||||
|
I've been working on putting the fuel cell in the trunk. I had to take out the rear seat bracing so that I could fit the fuel cell in the trunk. I'll be putting the bracing back in for the rear seat. I ran into a clearance issue with the trunk hinges. They're nothing like a regular g-body or a-body for that matter . More like a hatchback that uses hydraulic hinges. Add a C shaped bracket that swings into the open trunk area. Here's a photo of that bracket. Fortunately I had enough room to set the fuel cell that I already bought in the trunk. I'm glad that I didn't have to buy another one.
__________________
|
|
#100
05-24-2012, 07:06 PM
|
||||
|
||||
|
Quote:
__________________
|
| Reply |
|
|
The PY Online Forums is the largest online gathering of Pontiac enthusiasts anywhere in the world. Founded in 1991, it was also the first online forum for people to gather and talk about their Pontiacs. Since then, it has become the mecca of Pontiac technical data and knowledge that no other place can surpass.


 Linear Mode

