


| FAQ |
| Members List |
| Social Groups |
| Calendar |
| Search |
| Today's Posts |
|
#161
 04-05-2011, 01:16 PM
|
|||
|
|||

For the power lock rod, just grind a notch close to the ends and c-clip them. A dremel with a small grinding disk works wonders.
|
|
#162
04-07-2011, 10:34 PM
|
|||
|
|||
|
Cut holes in body/door for power windows and door locks. I used hole saws for this. While punches would give a cleaner cut, I didn't want to spend $100 + for punches. If you use hole saws you should use new ones. Also sand the edges of the holes to remove sharp edges that could cut the power window feed through.
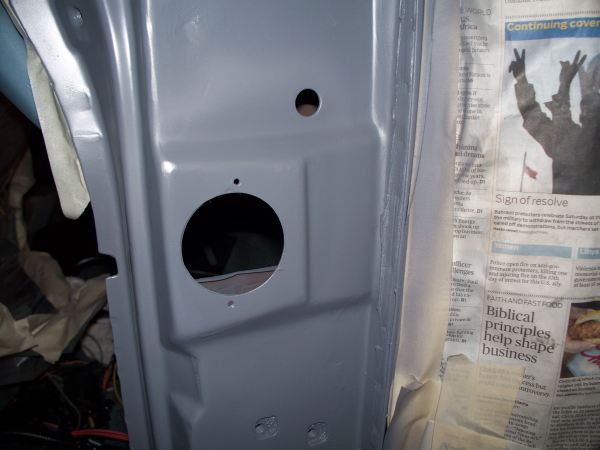 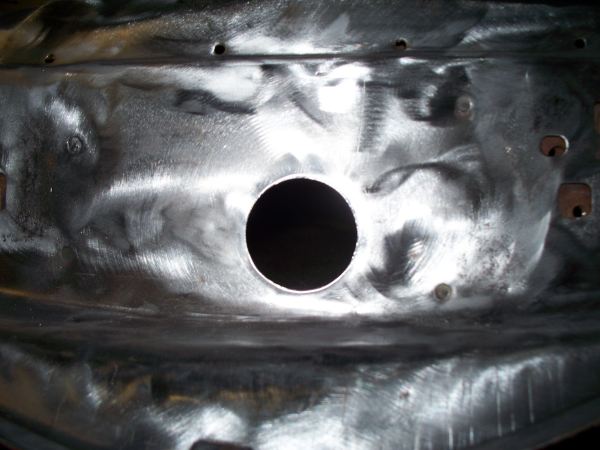 I started hooking up the engine wiring harness before installing the headers. There are connections down low on the engine that are hard to get to once the headers are installed. It's also easier to hook up the starter before installing headers. There is clearance to remove/install the starter with the header installed, but I took the easy way and wired it before installing the header. The driver side was no problem, but ran into a problem on the passenger side. 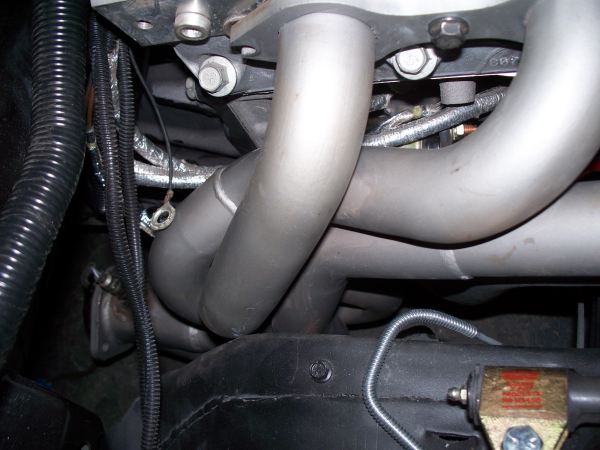 I had clearance before, but raised the engine slightly on the driver side for tie-rod clearance. Now the passenger header rests against the frame. I'm stopping for now while I decide what to do. Putting a dent in the header pipe is the most probable solution.
__________________
68 Lemans - GTO appearance LS3 68 Eldorado - waiting for restoration 96 Roadmaster Wagon 2014 Infiniti Q50S Hybrid Marietta GA |
|
#163
04-18-2011, 12:26 AM
|
|||
|
|||
|
It's been slow lately. Fighting Dental problems (Root canal) and not feeling so good so not getting much work done.
Dented the header. Not much clearance, maybe header won't hit the frame with engine running. 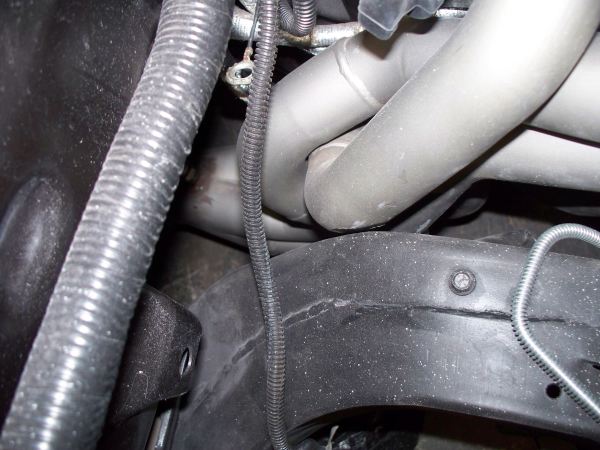 Primed the door. Here is result of the first coat of primer. Lot's of print through. It took 4 coats to completely hide this. 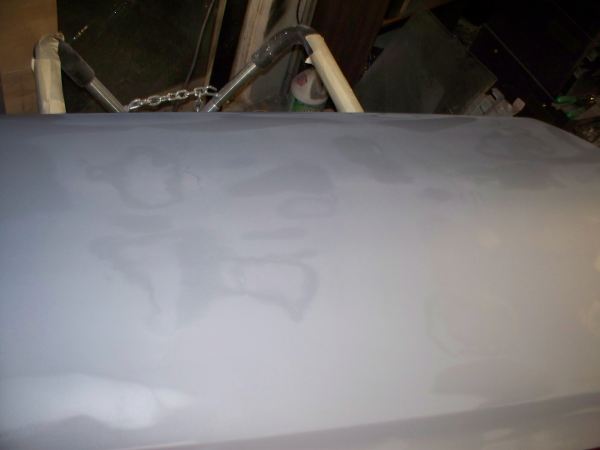 It's starting to look more like a car with a door installed.  Here is a shot of the power window boot. This boot is the 69 style 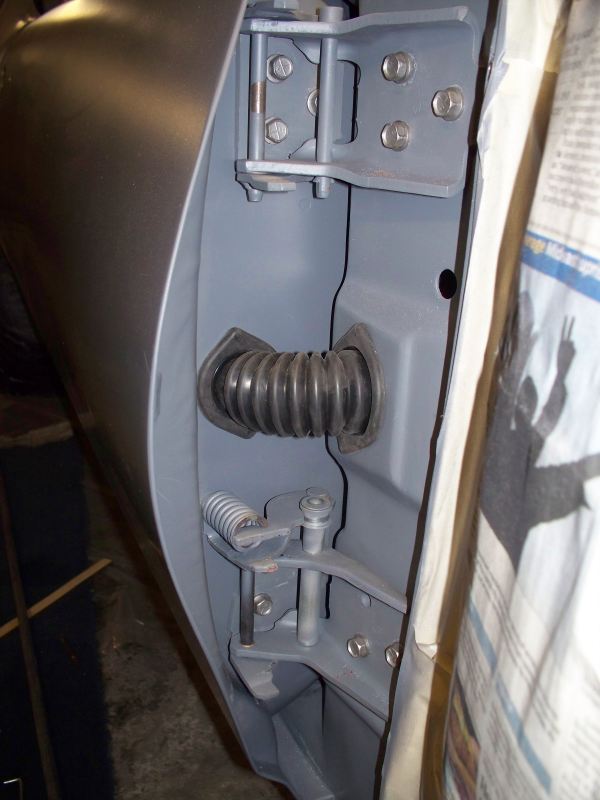 Started on the driver side door. I did not notice the rust before. 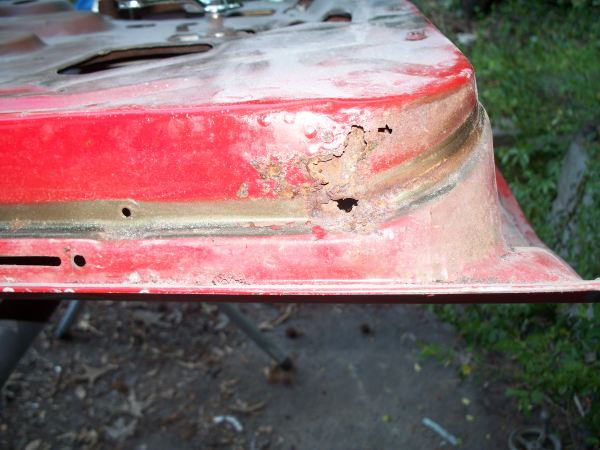 As I inspected the door I found more problems. A flap of metal is folded back that should be under the door skin lip. When I picked the door up to put it on my stand I felt something move. The spot weld in the upper green box was defective from the day the door was made. I will need to cut out the spot weld in the lower green box to fix the folded flap. 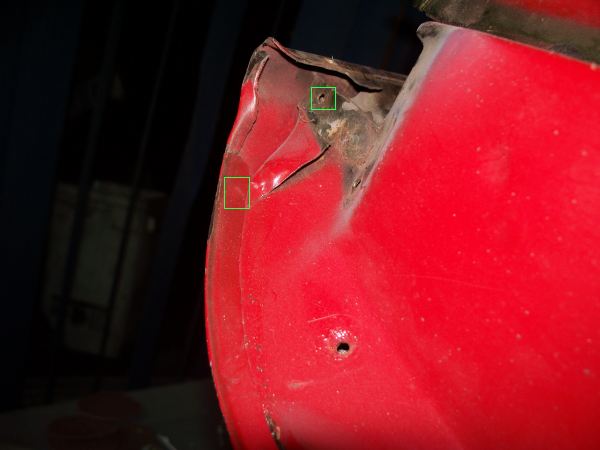 With the spot weld missing, stress and vibration cracked the door skin where it folded over.  After stripping the paint I find the door is severely rusted in one corner.  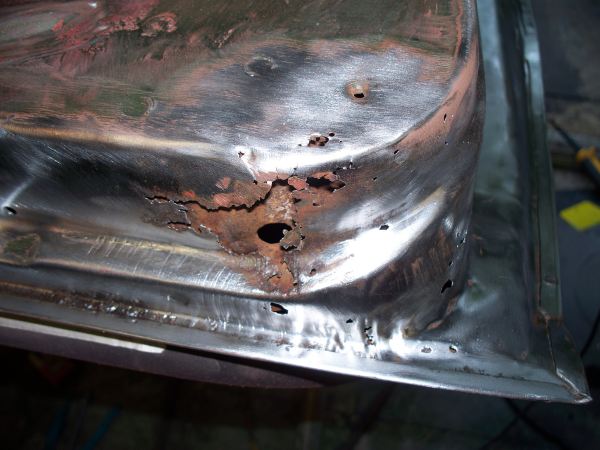 Even the other corner has some rust. 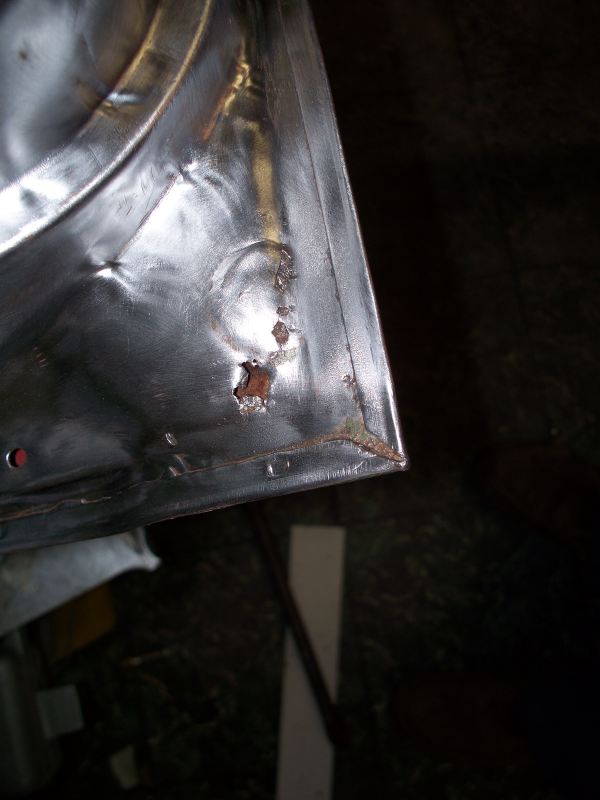 I guess I will try and repair the rust. Although this will be an extremely difficult repair, the worst that can happen is I end up buying another door. Here is a shot of dash clips. The one on the left is sold by Ames, it however is only for non-AC cars. The other two are a back and from view of the proper clip for an AC car. These don't seem to be available so used ones are the only choice. Many thanks to forum member Chris for selling me the proper clips. The AC style clips were bead blasted then clear coated. 
__________________
68 Lemans - GTO appearance LS3 68 Eldorado - waiting for restoration 96 Roadmaster Wagon 2014 Infiniti Q50S Hybrid Marietta GA |
|
#164
04-19-2011, 01:30 AM
|
|||
|
|||
|
I started on the door repair tonight. First thing was to bend the door skin lip back so that I have access to splice in new metal and to be able to inspect the condition of the metal in this area.
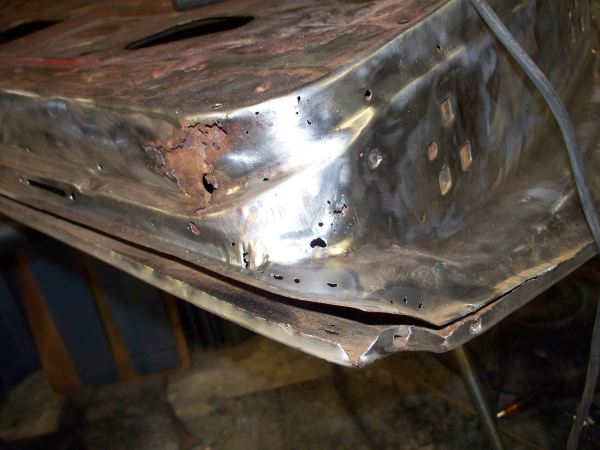 However things can go from bad to worse. After going across the area with wire brush I poked holes in the door skin. I will also need to make a patch the size of the green box. The metal from behind is not good in this area. 
__________________
68 Lemans - GTO appearance LS3 68 Eldorado - waiting for restoration 96 Roadmaster Wagon 2014 Infiniti Q50S Hybrid Marietta GA |
|
#165
04-19-2011, 10:33 PM
|
|||
|
|||
|
I got in about 3 hours today on the repair. I probably spent two hours deciding what to do and only about an hour doing real work.
Cut the rusted outer door skin corner. 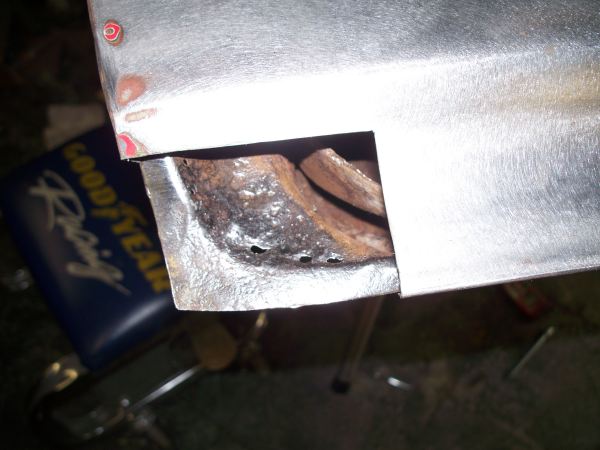 Cut the first part of the door frame away. I think I will tack the pieces in one by one until I rebuild the door frame and then go back and weld all the pieces together. 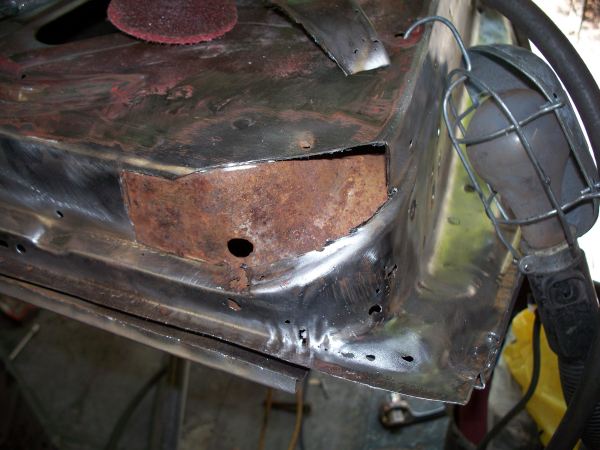 This is how the first patch started out. Simply bend with sheet metal brake.  After some shrinking and minor trimming.  A early trial fit. Getting there but not good enough. 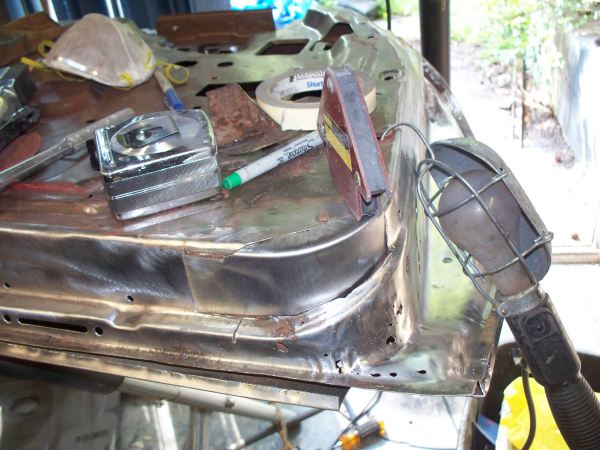 Ready to tack in place. Out of time today, have to wait till tomorrow to start welding. 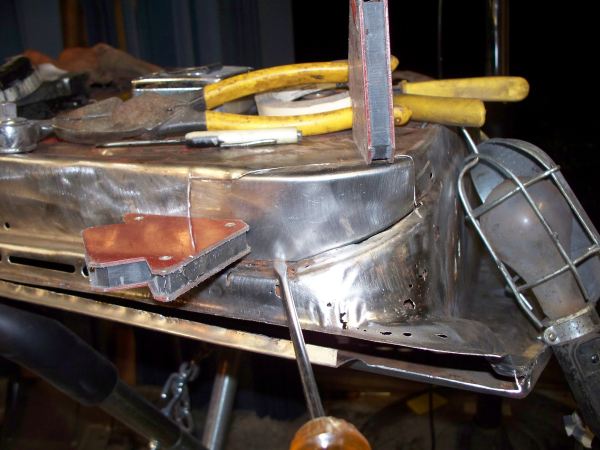
__________________
68 Lemans - GTO appearance LS3 68 Eldorado - waiting for restoration 96 Roadmaster Wagon 2014 Infiniti Q50S Hybrid Marietta GA |
|
#166
04-21-2011, 12:21 AM
|
|||
|
|||
|
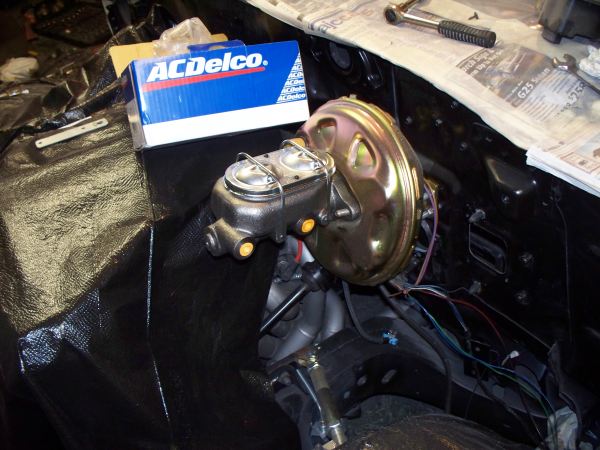
UPS was good to me today, master cylinder arrived. This is a third generation Corvette master cylinder, recommended by KORE for my custom brake system.
 Got home late tonight so I only got a couple of hours in. Tack welded the first part of the door frame repair and cut out the next piece. The gray is zinc coating. I have a fan sucking air out when I weld so the zinc fumes are not a problem. 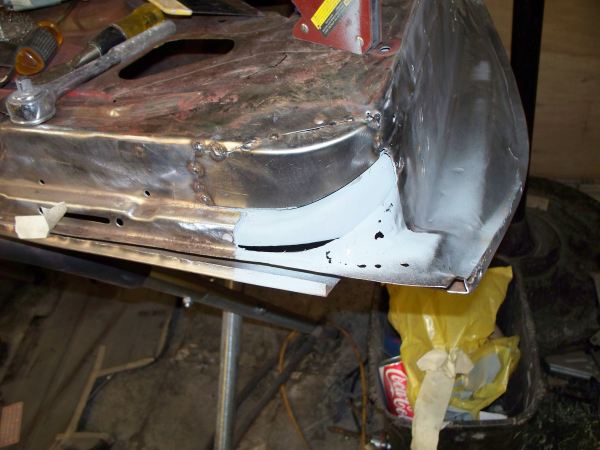 This is the next piece I need to make. This will be the hardest part since it curves in both directions. 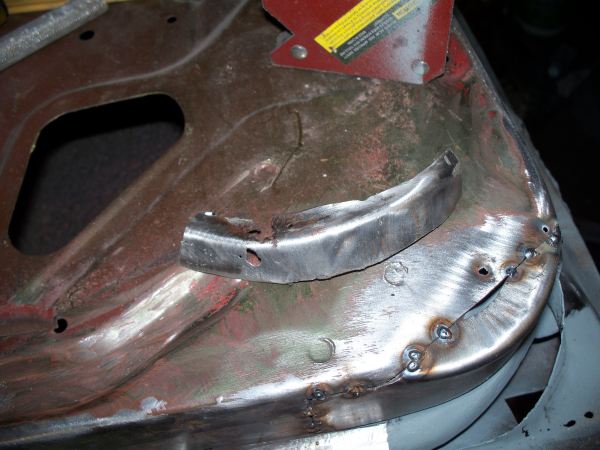 This is why you keep the piece you cut out, after getting the shape close you can continue to work the new piece until the two match. I still have a lot of shaping to do, but I believe I will be able to make the part. 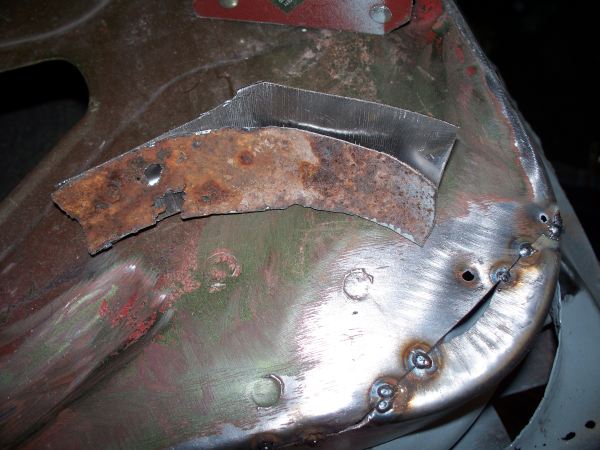
__________________
68 Lemans - GTO appearance LS3 68 Eldorado - waiting for restoration 96 Roadmaster Wagon 2014 Infiniti Q50S Hybrid Marietta GA |
|
#167
04-22-2011, 12:13 PM
|
|||
|
|||
|
great looking job, you are years ahead of me. i have a full quarter panel for the pass side on the 1970 lemans on order from summit racing since the first of feb and now get a notice it may come in by may 20. they have the goodmark brand and i know there quality is suspect. do any of you folks know of any other quarter panel brand ??
|
|
#168
04-24-2011, 12:59 AM
|
|||
|
|||
|
Quote:
__________________
68 Lemans - GTO appearance LS3 68 Eldorado - waiting for restoration 96 Roadmaster Wagon 2014 Infiniti Q50S Hybrid Marietta GA |
|
#169
04-24-2011, 02:22 AM
|
|||
|
|||
|
Door repair Continued
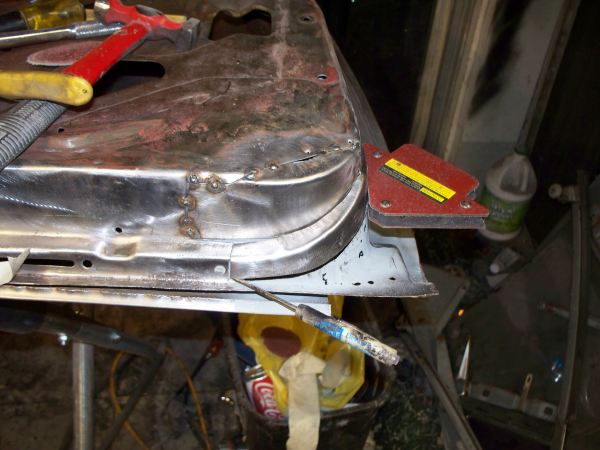 Cut the next piece out. Although not visible in the photo, this piece as almost rusted out and did have some pin holes.  The fabricated replacement 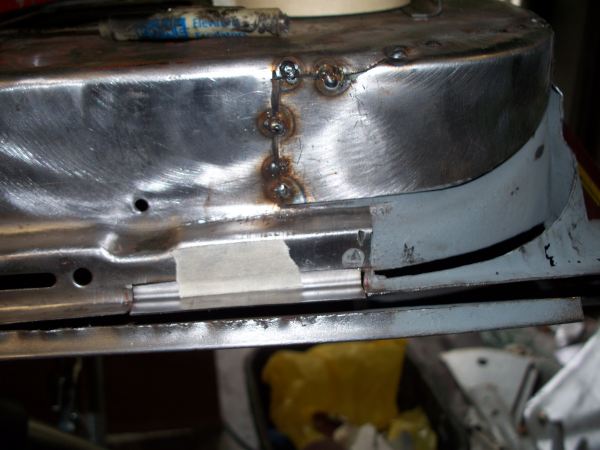 Welded in  Cut out the next piece. Up to this point the repair had been fairly easy. It got real hard after this.  I failed to take photos of most of the next steps, it took four additional pieces to get to this step, I tried to make fewer pieces but ending up cutting one of them in two, I was not able to get everything lined up.  The finished repair.  Observations from this repair. This was the most complicated repair I have attempted to date. I believe it turned out acceptable. Problems with the repair are the usual welding voids caused by rapid start/stop of the welding bead. There is also some distortion in part of the repair. However when compared to the factory part my repair is no worse than what might be found on any given factory door. In fact there is quite a bit of wrinkled metal in the curves in the factory part. In any event a thin layer of metal to metal would cover all of these problems. Also note this is the bottom of the door and this area will not been seen once the door is installed. I may put a thin layer of metal to metal in the area, mostly to fill the micro voids in the weld bead. Another question, why do such a complicated repair when reproduction doors are available? There are several reasons. 1. I saved about $450 on the cost of a repro door. This represents money that can been spent on something more important, like a drive shift. 2. I did this repair to show someone how to make complicated parts, by making one piece at a time and welding everything together to make a complex shape. In my buddy's case he survived a down sizing and was given a job to make a prototype case for a device his company was working on. He had no idea how to proceed until I showed him pictures of my door repair. 3. This repair gives me practice for my next project that will not have the luxury of plentiful reproduction parts. My next project will be my 68 Eldorado. I am converting it to rear wheel drive and powering it with a supercharged LS3 engine. There will be a lot of fabrication of special panels for this project. For what its worth I have about 20 hours of time in the door at this point. If I had it to do again I would make the patch pieces differently. So this was a good learning experience. Still to do is minor rust on the other end on the door and to fix the mistake at the top of the door where the metal is folded over rather than under the door skin.
__________________
68 Lemans - GTO appearance LS3 68 Eldorado - waiting for restoration 96 Roadmaster Wagon 2014 Infiniti Q50S Hybrid Marietta GA |
|
#170
04-27-2011, 12:08 AM
|
|||
|
|||
|
Never ending door repair
Hand formed patch for the door skin  Tacked In 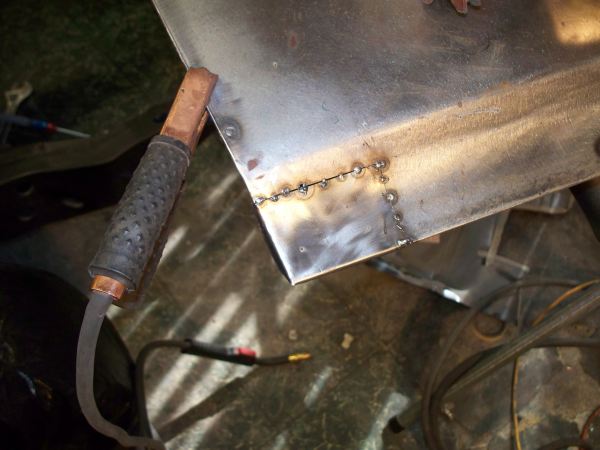 Welded In 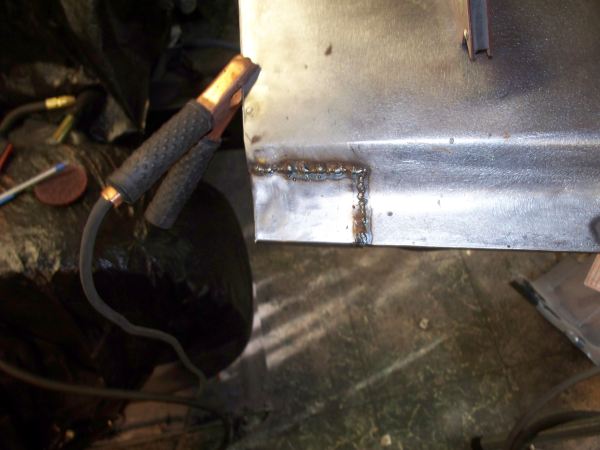 Weld ground with cut-off wheel 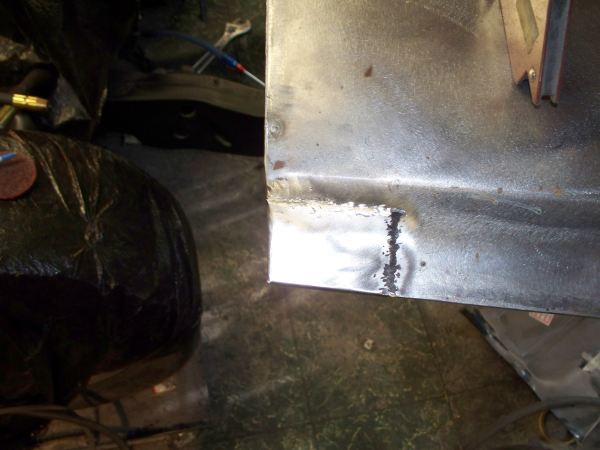 Angle grinder with 24 grit wheel followed with 80 grit DA. With a little more work this weld would not be visible at all. I am going to stop here because I will skim the whole door with Rage to get rid of all the minor surface flaws so its not worth the effort to make the weld disappear.  Now to correct the factory build flaw. Spot weld drilled out. It took quite a bit of effort to bend/beat this flap back under the door fold where it belongs. 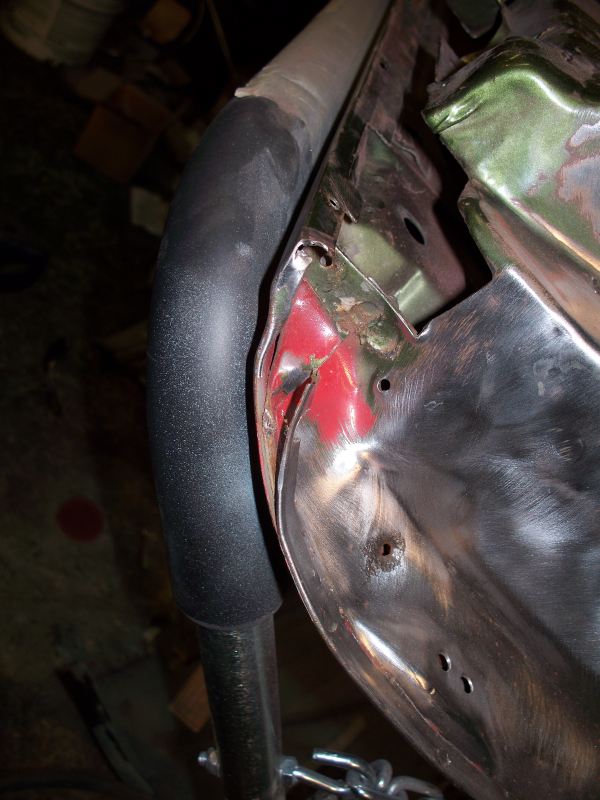 I spot welded the door skin and inner door structure as the factory attempted to do. I put a weld bead down the fold of the door skin to rejoin the lip where it was folded over and broke. This part of the repair would had worked better by TIG welding, but came good anyway. I have a TIG but it was buried under in a stack of body parts. And then TIG welding is very slow.  Next the last part of the rust repair. This is what is looked like on the surface This is how much I ending up cutting out. 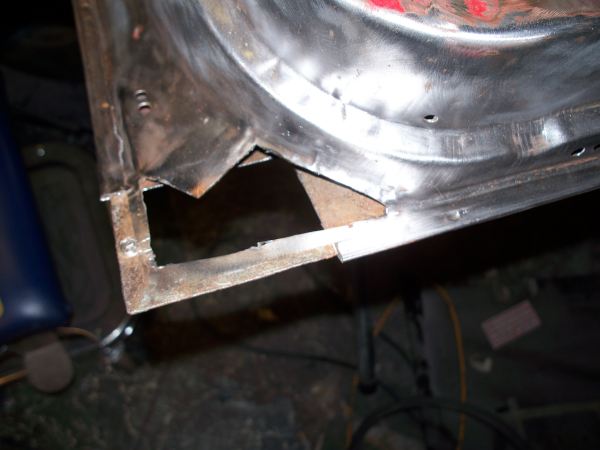 And then the corner of the door skin because it had almost rusted through from the back side.  The patch is almost ready. It's getting late so I calling it a night. A few more minute of bending and it will be ready to install. 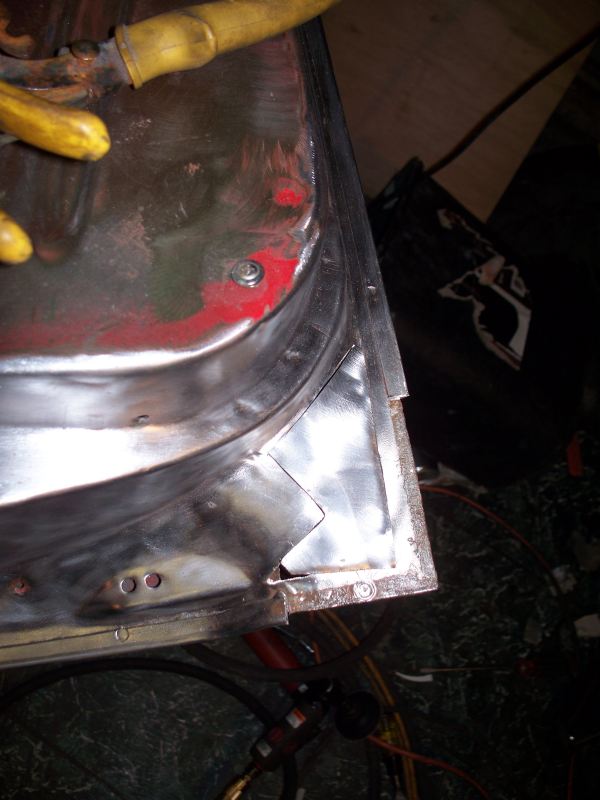 In between door repair I mounted the driver side seat. I will show pictures of how the seat frame was modified later. For those of you who thought I had black seats, I did, but I used them in a company van and then replaced them with blue seats. Unfortunately I have to modify seat frames again.  And UPS brought more necessary parts today. I decided that the wiring in the original dash harness was too brittle and bought a new harness. It's better to put the dash harness in now rather than redoing it later. 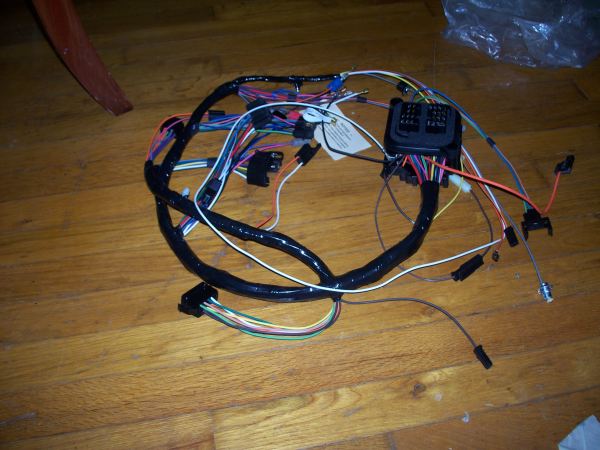
__________________
68 Lemans - GTO appearance LS3 68 Eldorado - waiting for restoration 96 Roadmaster Wagon 2014 Infiniti Q50S Hybrid Marietta GA |
|
#171
04-27-2011, 09:30 AM
|
||||
|
||||
|
This is great reading. Thank you for posting all of your work.
__________________
Send it! It’s going home on a trailer. |
|
#172
04-29-2011, 01:56 AM
|
|||
|
|||
|
Door repair continued again from 2 days ago.
Patch is ready to tack in. 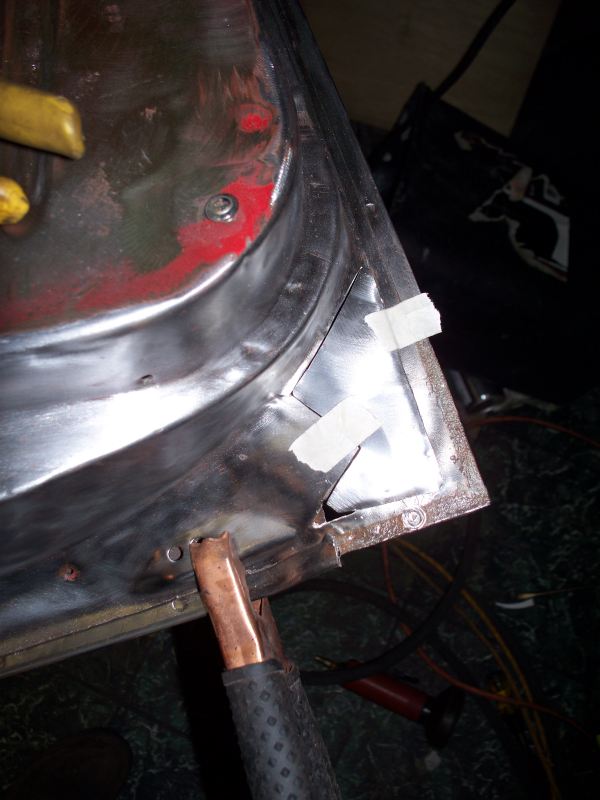 Patch is tacked in. This step took about 30 minutes. In order to get good results when butt welding, the metal needs to be even. The edges are adjusted for every tack weld which means, that it is tapped with a hammer to make the edges even, I used a vise grip on one edge to hold the edge of the patch down. It is very important that the metal be even at this step since when you grind the joint down you will end up with thin metal on one side it the edges are not even. The hole at the bottom left of the patch resulted from my scrap that I used to form the patch being slightly too small. 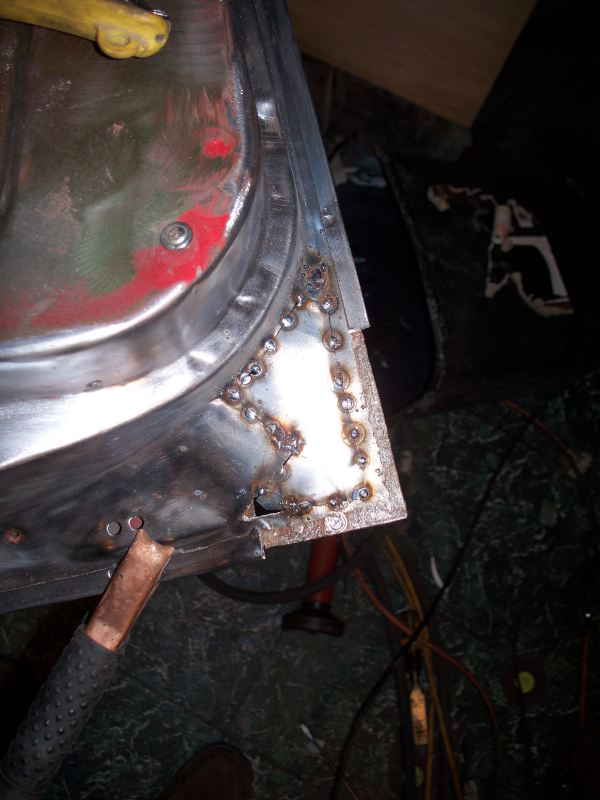 All of these tools were used during the tacking process to make sure the edges were even. Your patch should be very close to start with and should not require any major bending. 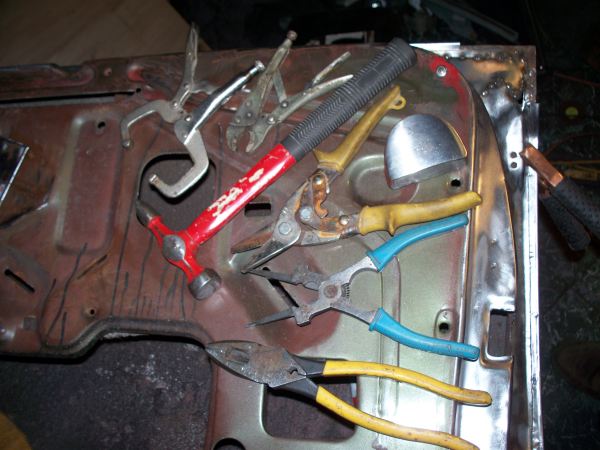 This is my MIG welder, it has variable amps and wire speed. When welding less than ideal metal these fine adjustments are necessary. The splatter that you see is the result of welding metal with slight surface rust. It is very easy to blow holes in the metal when welding under these conditions. Being able to turn the amps down slightly may make the difference between being able to join the panels without blowing a lot of holes in the joint. 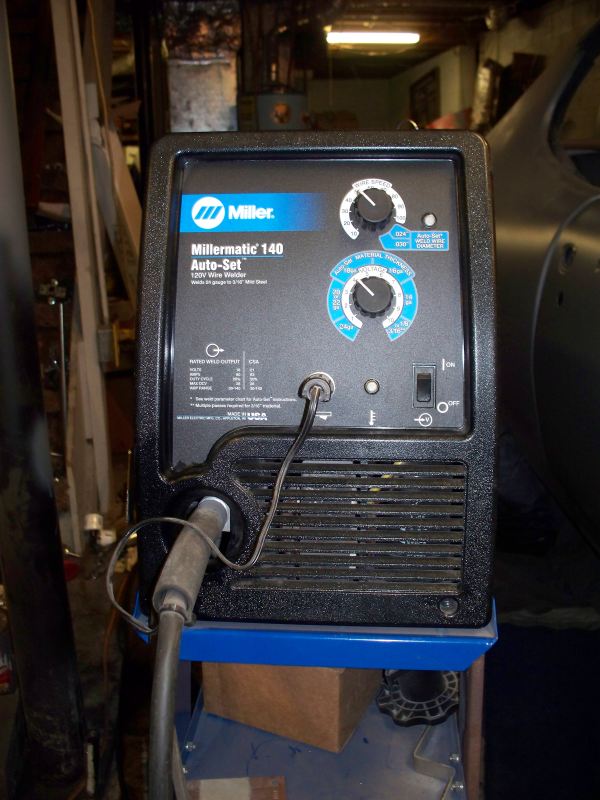 As to welding safety, welding can give off harmful/deadly fumes depending on what you are welding. Zinc fumes are very bad for you and should be avoided, if you can't blow the fumes away from you, wear a charcoal type mask when welding. I use this fan to suck the air away from me. This big fan moves 2700 CFM on the slow speed and nearly 4000 CFM on high. With a window open in the other end of the basement I get very good fume extraction. 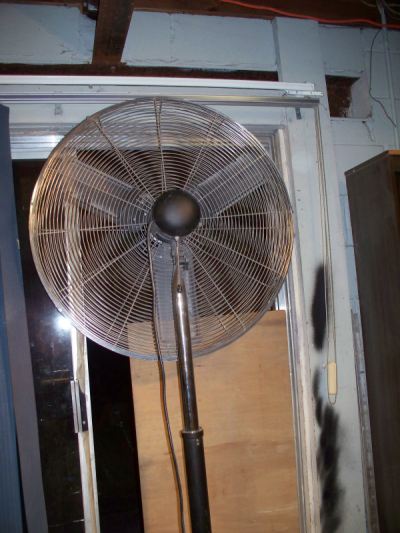 Welded in patch. There is a fair amount of spatter, but can't be helped since the metal being joined is not perfectly clean. 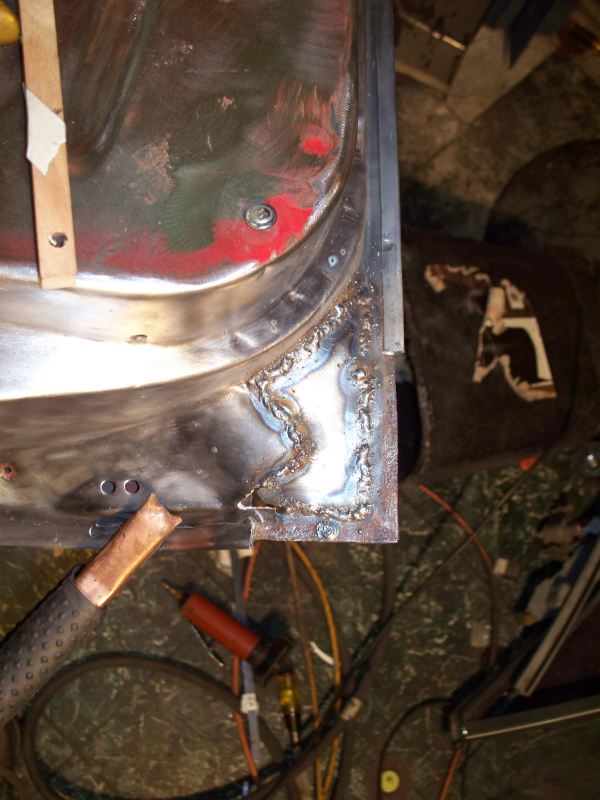 Now to fix the hole. Although you could probably fill this hole with nothing other than using short bursts with the MIG, this hole is really a little to big for this. I clamped a piece of copper to the back side to hold the the small patch in place. While you can buy expensive copper backing plates from companies like Eastwood the cheap way to get copper backing is to take a piece of copper pipe and hammer in flat. You can make many backing pieces very cheaply and bend them as needed to fit under what you need to back up. Also you may need copper backing pieces when welding to thin metal. 20 Gage sheet metal can become 22 Gage or thinner after removing surface rust. You can see the edge of the copper backing plate held in place by the vise-grip. The patch is simply laying in the hole on top of the copper backing plate.  And the finished result. I also slid the piece of door skin I cut off back on to check that I had not distorted the door frame. 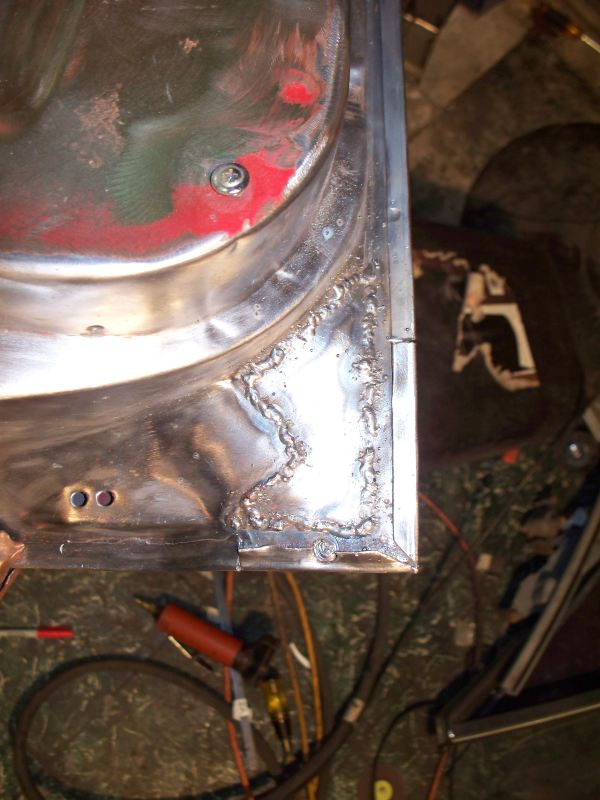 These are the tools I use to grind the weld bead down. I use the grinder with the wide wheel to do the initial bead removal. I prefer to use the grinder with the narrow wheel to do the finish grinding. I find the narrow grinding wheel is easier to control and takes less metal off when you are getting close to to having the bead ground flush. You should attempt to remove as much of the welding bead as possible with the grinder since a fresh disc on the angle grinder will only blend/cut well for 30-60 seconds of use. I start with a 24 grit disc and then switch to a 50 grit for final work.  The final result, 50 grit scratches were removed by using a medium condition pad in the angle grinder. 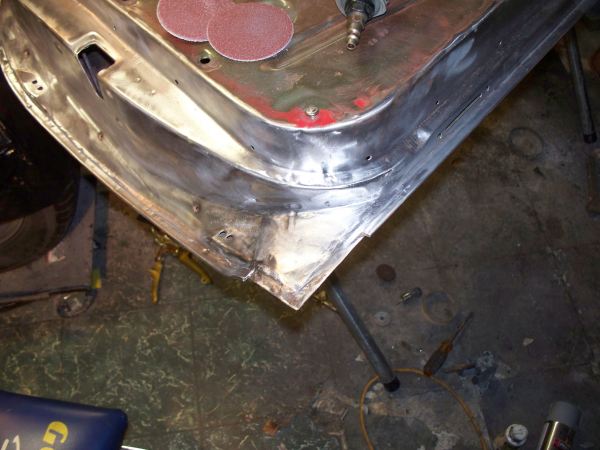 Hopefully tomorrow I will finish the remaining work. I need to make a patch for the corner of the outer door skin.
__________________
68 Lemans - GTO appearance LS3 68 Eldorado - waiting for restoration 96 Roadmaster Wagon 2014 Infiniti Q50S Hybrid Marietta GA |
|
#173
04-29-2011, 05:51 AM
|
||||
|
||||
|
What a great thread. Love seeing a plan come together! You're on the home stretch, looking great!
__________________
1970 GTO 455HO Convertible M40, Sierra Yellow, Saddle Int, Tan top. PDB, PS, PW, A/C, Rally Gauges, Hood Tach, Spoiler |
|
#174
04-30-2011, 02:03 AM
|
|||
|
|||
|
Thanks everyone for the kind words.
I am including a few more tips for welding sheet metal. I have done welding on and off for almost 20 years but it was all with a flux-core welder and it was all structural welding, 6x12 trailer among other things. I found joining sheet metal extremely difficult the first time I tried. I hope some of these tips will help convince some of you to buy a welder and start on a restoration. Prior to this project I had never welded thin gauge metal before. Here I have made the patch. This time the patch was difficult to make. I had a hard time getting the contour right. I spend almost an hour on the patch, I kept shrinking and stretching the piece but the contour just didn't quite match. I was about to give up an make another patch piece, but one last try and I got the contour right. Use a straight edge to align the patch. I clamped it at one corner and used a magnet to hold the edge flush. I put the first tack weld at the corner opposite from the clamp. 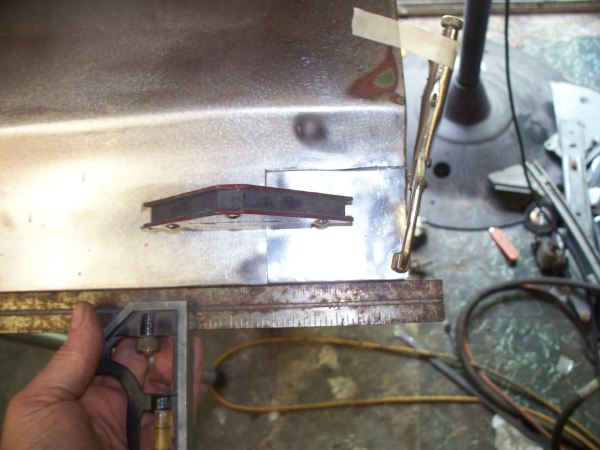 As I said before you must adjust the metal before each tack weld. Here I have remove the magnet and the clamp, you can lift the patch from the bottom if necessary to raise the edge to make it even with the adjacent edge. Lightly tap the metal to bring the edges perfectly even. You are only concerned with lining the edges up for the next inch. Then tack weld it. Repeat the process till you get to the end. 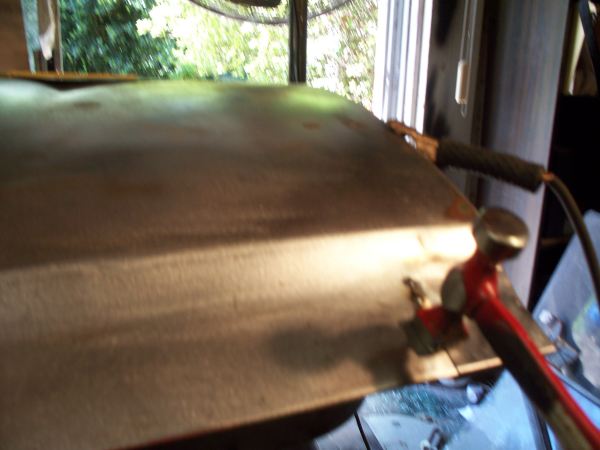 For the end of the patch I clamped the metal to pull it down even. I adjusted the pressure of the clamp to give me the desired movement of the patch. It you notice I used masking tape to hold the clamp out of the way. 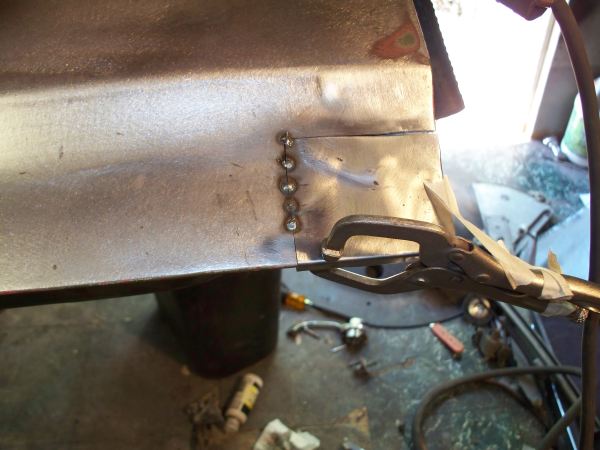 Sometimes impurities in the metal will cause splatter and smoke. It this happens use a stainless steel wire brush to brush junk away. You need a stiff wire brush and it should be stainless steel since other types could contaminate the surface. For what it worth the wire brushes sold in the welding section at Lowe's are too soft to be of any use. I ended up ordering mine on-line, since I was unable to find any decent ones at a local store. 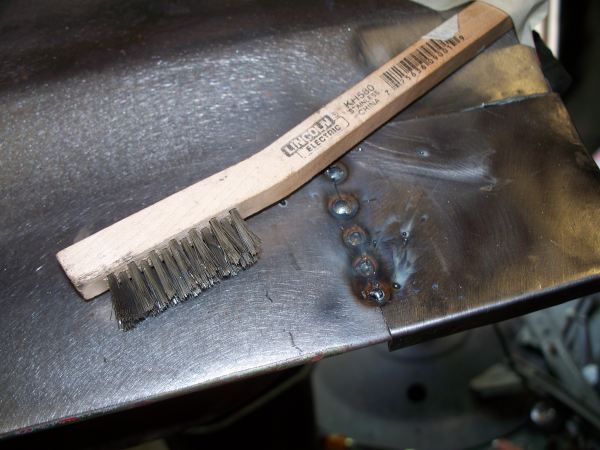 After brushing. 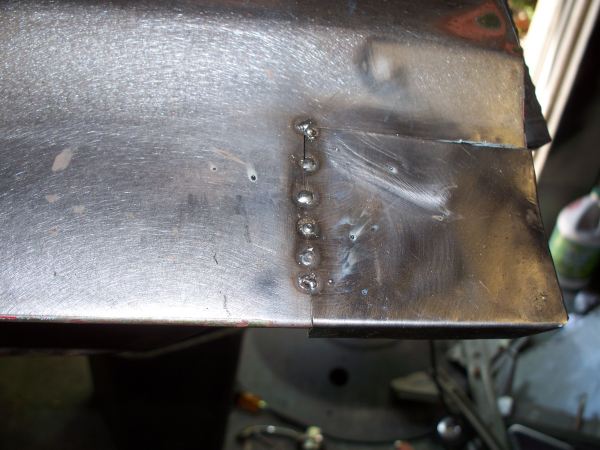 Should a ball develop, I recommend you cut it off. Sometimes the extra heat caused by the ball will blow a hole in the metal the next time you start to weld. This would not be a concern it you were welding all new metal. 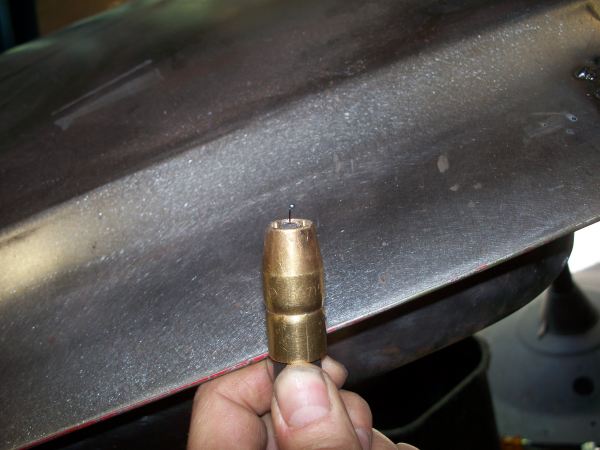 And the finished piece. All did not go perfectly well, when I bend the edge over I didn't get the bend to align perfectly with the existing panel. I solved this by laying a bead down the edge of the panel and then grinding it smooth. The upper left corner was ground a little too much, less than the thickness of a sheet of paper, but since I am covering the entire door with a skim coat of Rage, this is not a problem. 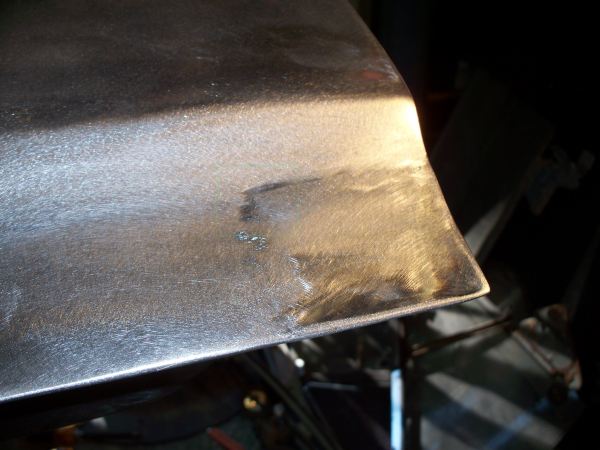 View from the back side.  Any questions just ask.
__________________
68 Lemans - GTO appearance LS3 68 Eldorado - waiting for restoration 96 Roadmaster Wagon 2014 Infiniti Q50S Hybrid Marietta GA |
|
#175
05-12-2011, 01:46 AM
|
|||
|
|||
|
I got the other door primed and just coated the inside with a Eastwood Product - Heavy Duty Anti-Rust. This product is designed for used where it is hard to prep the surface.
I plan on installing the driver door tomorrow, that is later today since it is very late. Here is the before with bad rust damage. And the after. 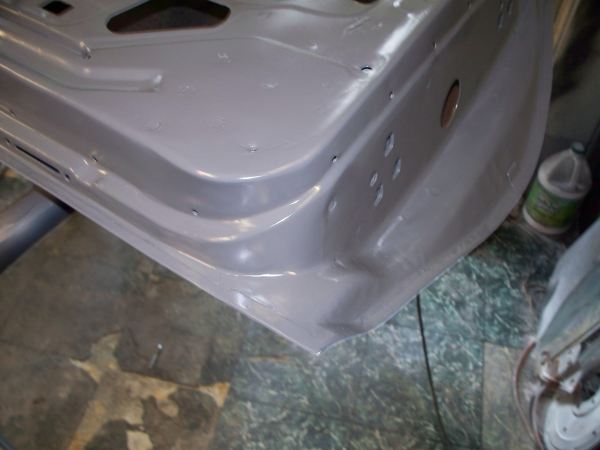 And before and after of the other end. 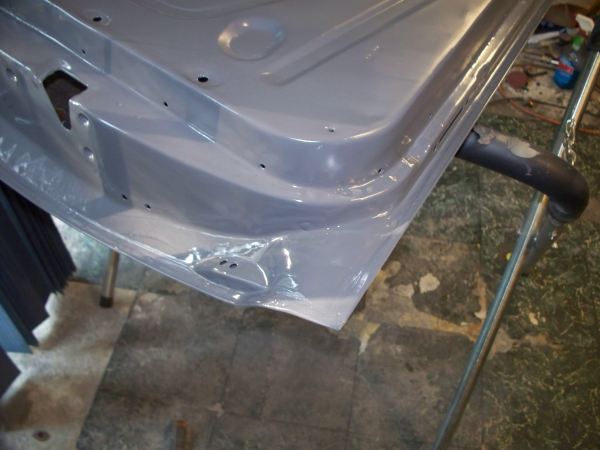 And the side that counts.  I started this restoration using Kirker Epoxy Primer, I ran out and ordered Epoxy Primer from Summit, since popular belief is the Summit Primer is repackaged Kirker primer. The Summit primer is not exactly the same. Both have similar not not identical claims. Both spay about the same, but the Summit primer dries with a higher shine than the Kirker primer. I can't tell that either is superior to the other. The only thing that I have noticed is the Summit primer has a slightly longer pot life than the Kirker. The Summit Epoxy Primer is cheaper than the Kirker primer and in my case, I get next day delivery since Summit has a warehouse in the Atlanta area. Now for re-branded products that are the same. Do you want Rage Extreme for $34 per Gallon. Just buy the FinishMaster product called "Smart Premium Body Filler" Part number SBF1192. The content list is exactly the same for Rage and the FinishMaster Product. I also used the two products back to back and can say they are the same. FinishMaster has locations in most major cities. I'm not sure if the ship however.
__________________
68 Lemans - GTO appearance LS3 68 Eldorado - waiting for restoration 96 Roadmaster Wagon 2014 Infiniti Q50S Hybrid Marietta GA |
|
#176
05-16-2011, 01:50 AM
|
|||
|
|||
|
04-06 GTO seat modification for 68-72 A-Body
Late model GTO seats are not a bolt in swap and requires modification. Some people have made brackets that fit the GTO rail without modifying the rail. While this keeps the late model seat intact, it causes the seat to set 2-3 inches higher. I'm 6'2" and giving up 3 inches of head room is not an option. The method that I use is somewhat complicated but allows me the option of bolting in the original seat should I desire it. The method I use is very strong, the seats will not break loose should the car be involved in an accident. I have seen some photos where people simply welded a 1/2" wide by 1/16" thing bar across the seat so they could bolt it to the original holes. This is far too flimsy to anchor the seat properly to the body. First unbolt the power seat rail from the seat, it is held by 4 nuts. 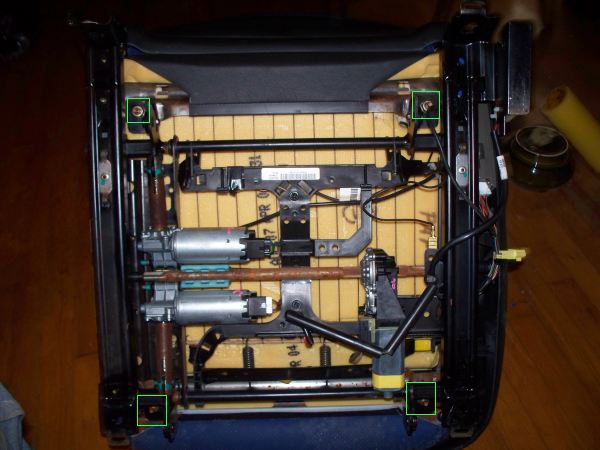 There are two brackets at the back of the seat rail, one is held by rivets the other is welded on, both must be removed. This is the side with the rivets, there is blue paint on each of the rivets. 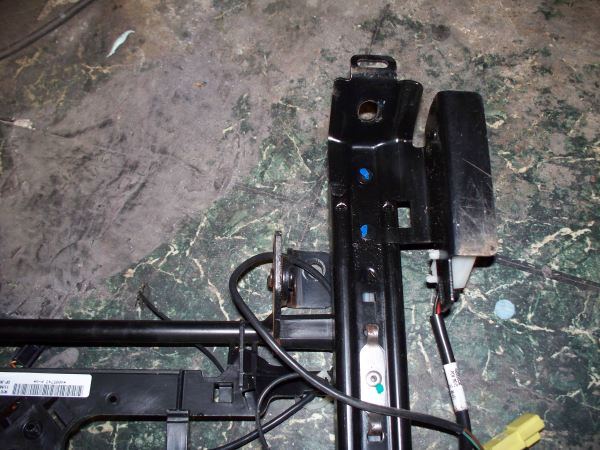 This is side that is welded, this bracket is cut off. 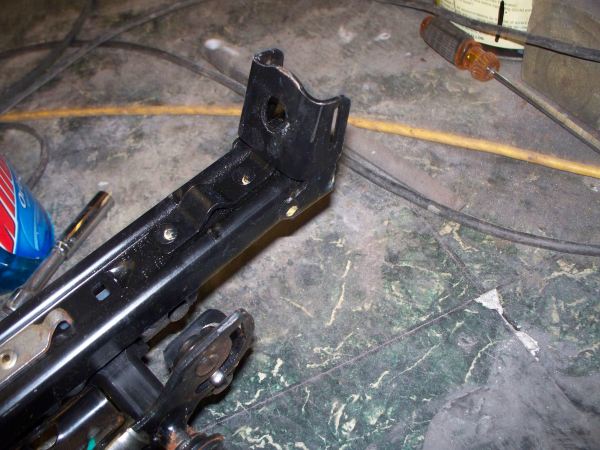 Grind the heads of the two rivets off pull the bracket off. You can then knock the back rivet out, the other one holds part of the seat mechanism and must be tack welded to hold it in place. Here the heads of the rivets have been ground off. 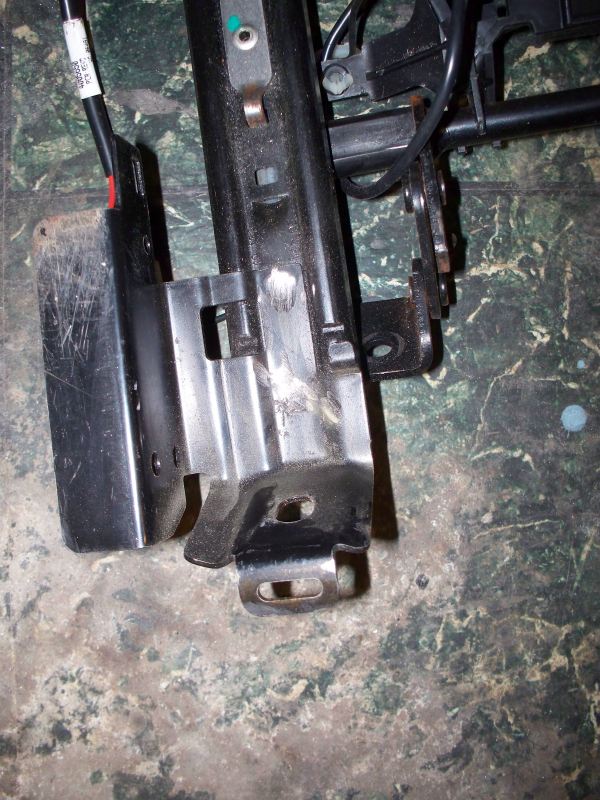 This is what you should have after beating the bracket off, you will probably need a hammer to knock it loose. You will need to tack weld the rivet circled in green.  Tack the rivet to keep it from coming out. 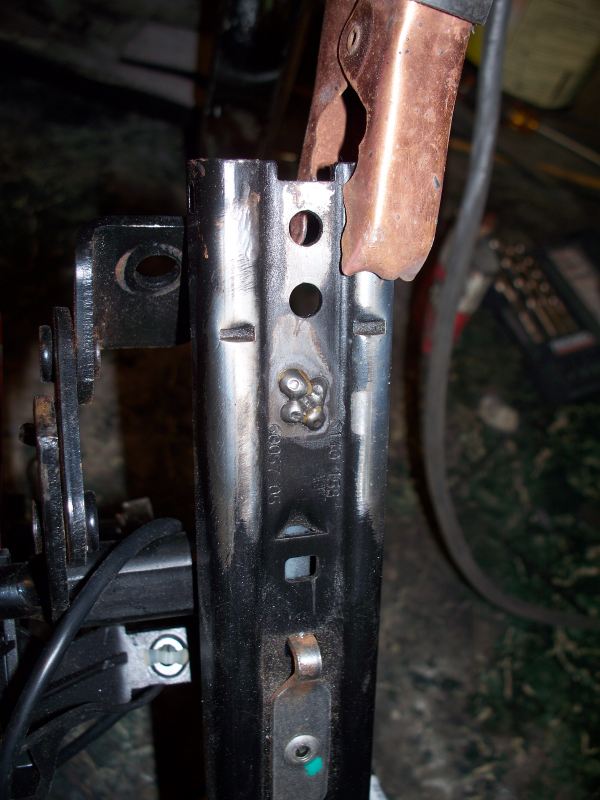 On the other side of the rail cut the welded bracket off. 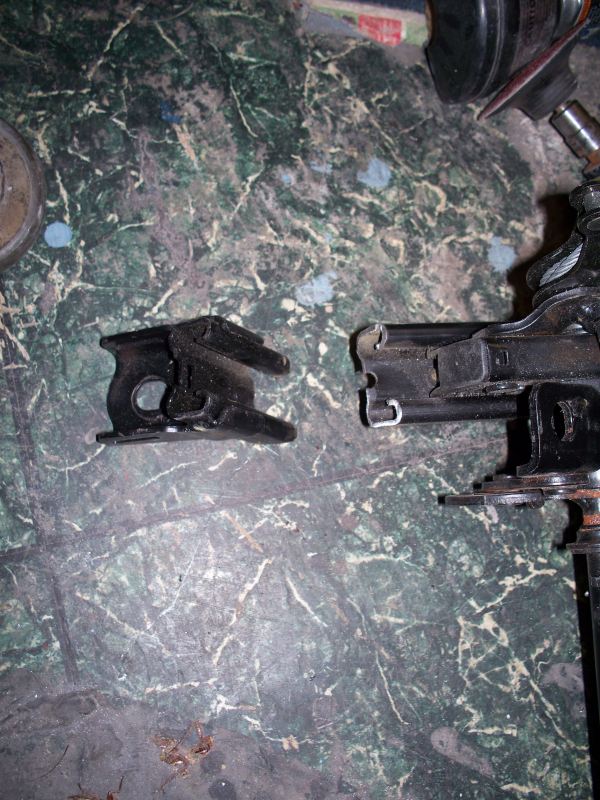 Cut two piece of flat steel to span the seat rail, this is needed to give a surface for mounting tabs to attach to. These should be 1/8" thick. One of them will need to be drilled to clear a rivet on the rail. 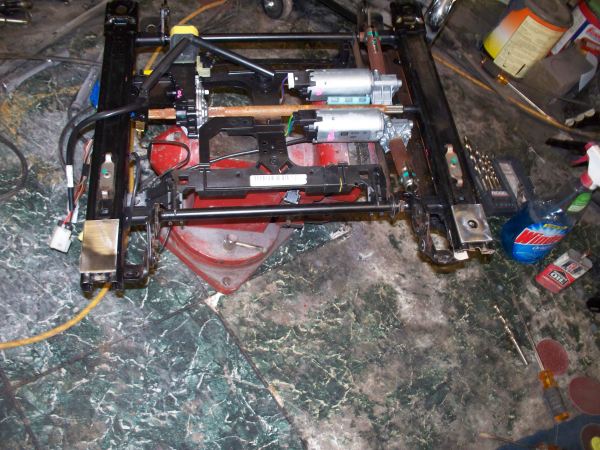 Weld the flat steel on. If you are not sure of your welding skills get help for this part. You don't want this to break should you be in an accident. 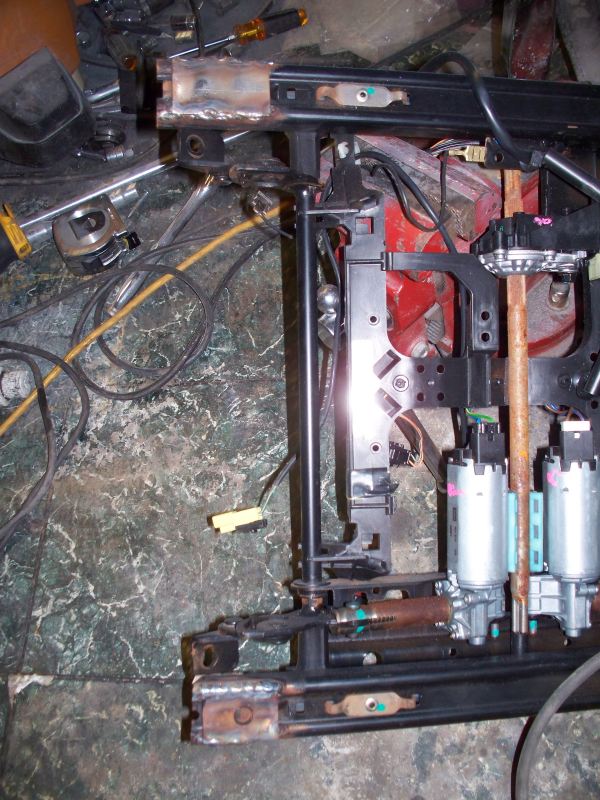 For the front I added extra support to the base of the floor pan to bolt the front of the late model GTO seats on. You can still bolt stock seats in if you wish. These were bent in a vise and then welded to the floor pan. 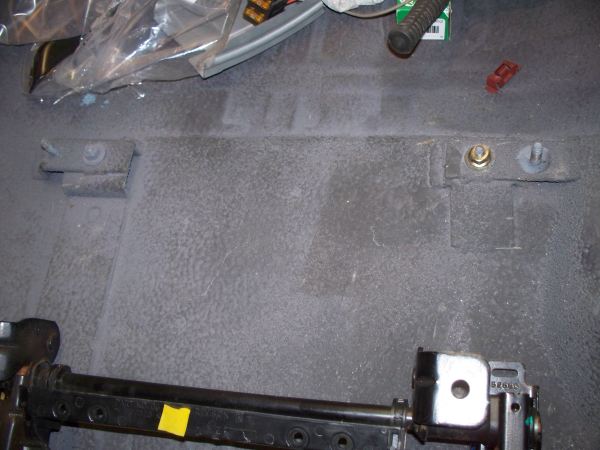 Bolt the rear mounting tabs to the car and place the seat rail in place. Center it between the mounting tabs and tack weld them it one place. The tabs do not lay flat against the rails. After tack welding the mounting tabs, remove the rail, add metal to bridge the space and weld the tabs. 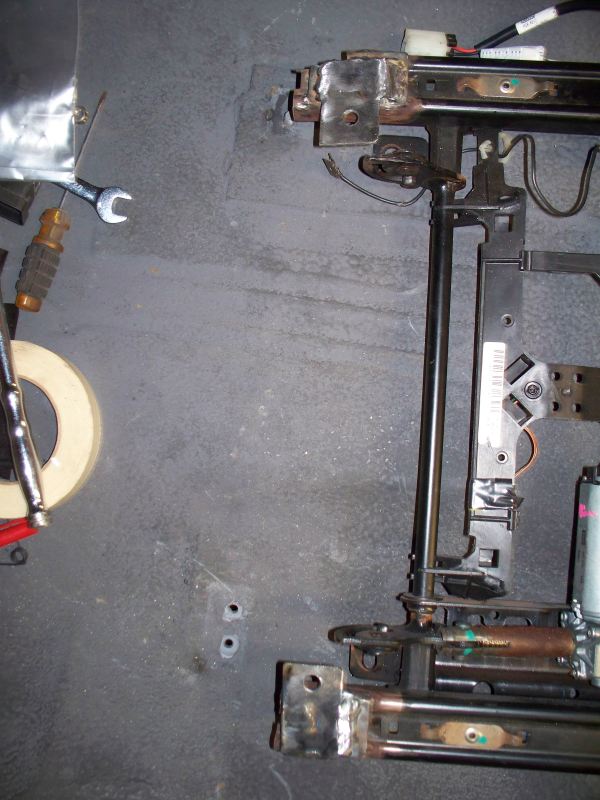 While not a simple solution, this mounts the rails as low as possible for maximum head room. 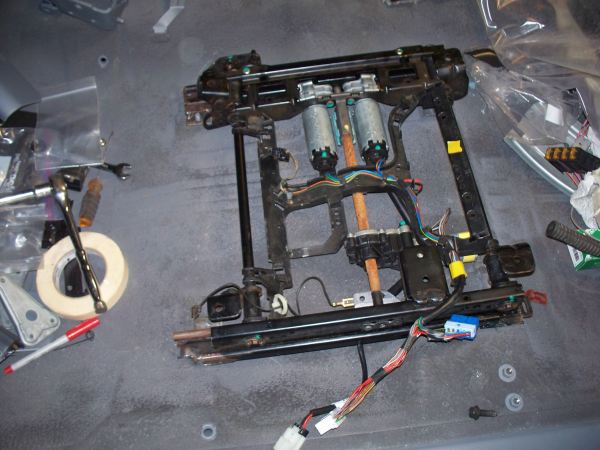 You should paint the work to keep it from rusting. I will be painting mine within a few days after a getting a few more items ready for paint. I don't like to paint only one item at a time. Too much work to clean the gun and too wasteful of paint.
__________________
68 Lemans - GTO appearance LS3 68 Eldorado - waiting for restoration 96 Roadmaster Wagon 2014 Infiniti Q50S Hybrid Marietta GA |
|
#177
05-16-2011, 05:43 PM
|
|||
|
|||
|
This project looks awesome. I've done a lot of the same stuff on my '72 (quarter panel replacement, '05 seats, door rust repair), wish I would have seen this thread before I did the work. Like you, many times I sat for a couple hours before figuring out how to proceed. This thread answers LOTS of great questions. Should be a sticky I think!
Anyway, your front fender patches look great. How did you measure/cut and align the patch. I'm trying to patch both my fronts and have the materials, but not sure how to make sure the alignment is right. Any tips appreciated, since I've seen the work on yours and they look super. Your car is coming along nicely. Good luck. Dave |
|
#178
05-16-2011, 09:55 PM
|
|||
|
|||
|
Quote:
 I found a picture of someone using a profile gauge. If you had a couple of these units you could take shapes at both ends of the panel and be certain to preserve the contour. By the way this panel is being TIG welded. Although it takes longer to weld, you don't have much of a bead to grind down and the weld bead is not as brittle. It is much quicker to dress a TIG welded bead compared to a MIG.  However I don't have a profile gauge. What I did was make a straight cut above the rusted out area and then use the cut out piece as a pattern to mark the patch panel. Then cut the patch panel to size.(CHECK THIS MANY TIMES BEFORE CUTTING) I took measurements of the fender before I cut rusted area off. Measure several times to be sure you maintain right dimensions. To maintain the contour I tack welded the patch panel to the fender in 3 places then mounted the fender and adjusted the patch with the door as my guide. Then I could make the final cut where the metal bends around the wheel well. (IMPORTANT TIP - make sure you cut the wheel well area too large at first) I also had to install the fender a couple of more times to check the fit of the inner brace where I butt welded the brace to the existing brace. This took a little effort since the reproduction brace does not quite match the shape of the factory brace. The reproduction patch already had the brace spot welded to the bottom, I cut I off since it gets in the way when you are butt welding the panels together. You should also be doing a little hammer a dolly work when you put tack welds across the panel to make sure the edges are level. I doesn't take much of a tap with the hammer to make sure the panels are aligned. If the panels are not aligned when you complete the weld, you will not be able to grind the weld bead flat without having real thin metal along one edge. If fact you may grind thought the panel it the alignment is bad enough. TIP - To get an edge to cut by use masking tape. You can stretch the tape straight, if you don't like it pull it off and try again. I use my painters masking tape frequently to mark lines. TIP - You can make minor changes in the fender edge contour by changing the point you spot weld it to the brace. I clamped mine with vise grips and adjusted many times before welding to the brace. There probably was more to it than this but this is all I can think of right now. If I remember right it took me about a day to complete one fender.
__________________
68 Lemans - GTO appearance LS3 68 Eldorado - waiting for restoration 96 Roadmaster Wagon 2014 Infiniti Q50S Hybrid Marietta GA |
|
#179
05-16-2011, 10:52 PM
|
|||
|
|||
|
And now for Dash restoration.
Since the reproduction dash goes for about $400, I decided to make an attempt to restore my dash. Since I am planning to use a Retro Sound Radio, I will need to cut my dash for the radio. This makes buying a $400 dash to immediate modify it not to appealing. Since this may not work I did the end piece first. If this fails I won't have wasted too much time. The end piece. The wood grain is just laying on it and is not installed. I think the results are good enough. 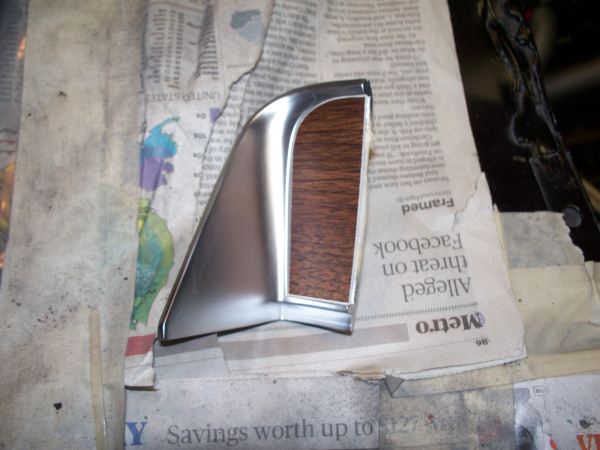 I didn't take a picture of the end piece before starting, but this is how all of the chrome looked. 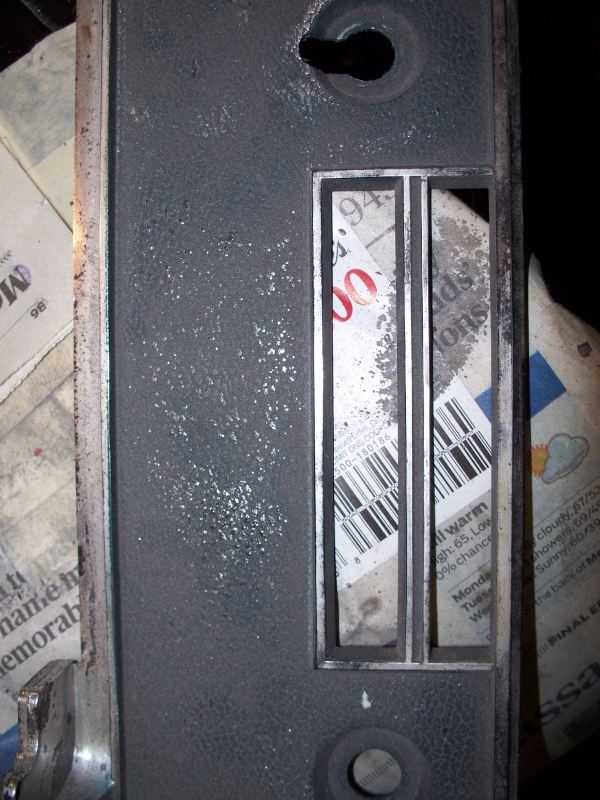 The glove box being prepped. It's primed and ready for blue dash paint. The gloss black is a base for the chrome. The edge that is being chromed was polished with a polishing compound. 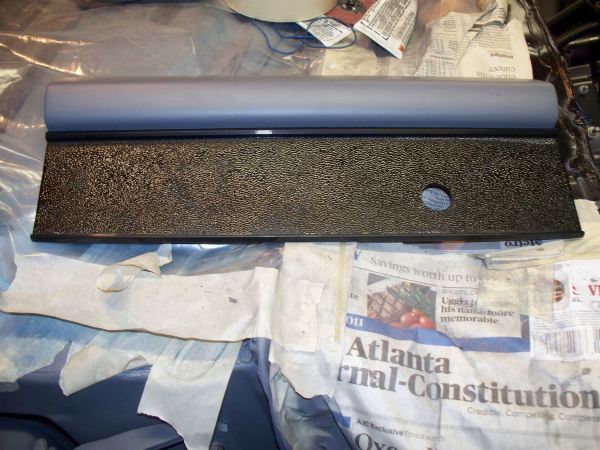 Masked and ready for the chrome. 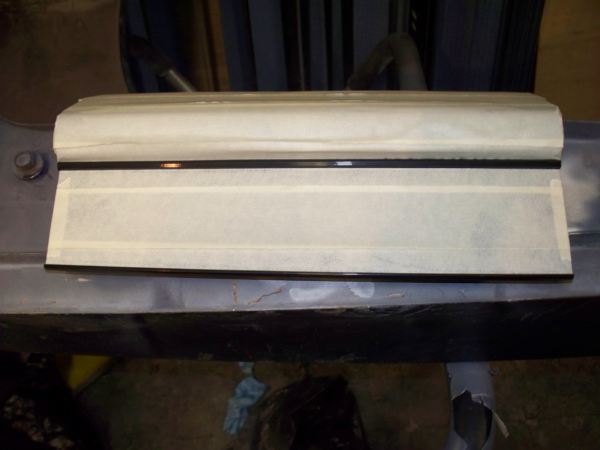 A close up of the chrome. 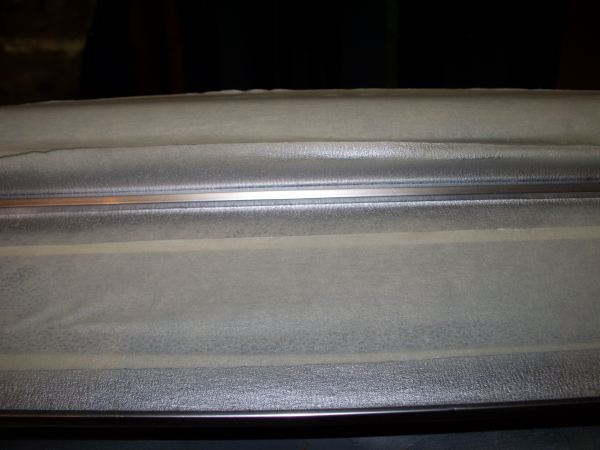 The product I used for the chrome. I applied the chrome with an air brush. 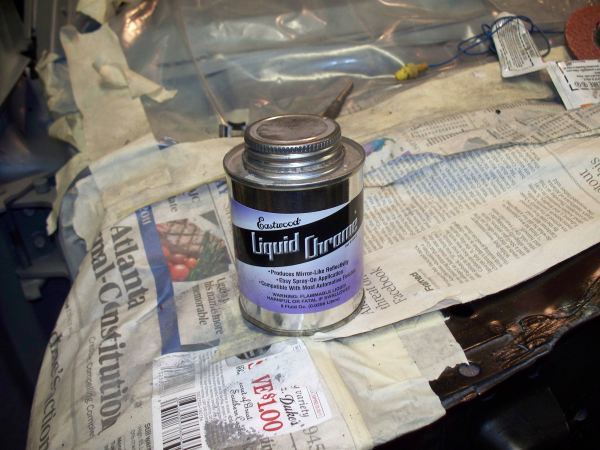 Now to order the Retro Sound Radio. I'm planning to mold a custom opening in the Pontiac dash for the Retro Sound Radio. Chrome the custom opening with Eastwood Chrome and it should look like the factory made it.
__________________
68 Lemans - GTO appearance LS3 68 Eldorado - waiting for restoration 96 Roadmaster Wagon 2014 Infiniti Q50S Hybrid Marietta GA |
|
#180
05-17-2011, 11:57 PM
|
|||
|
|||
|
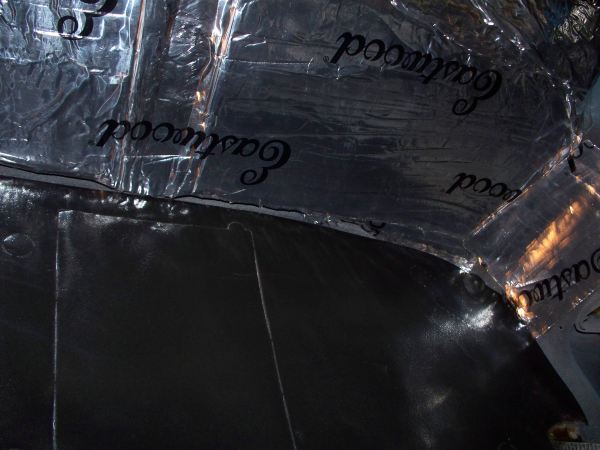
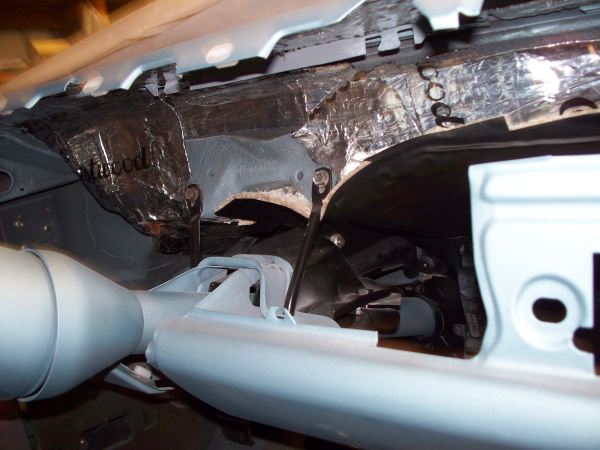
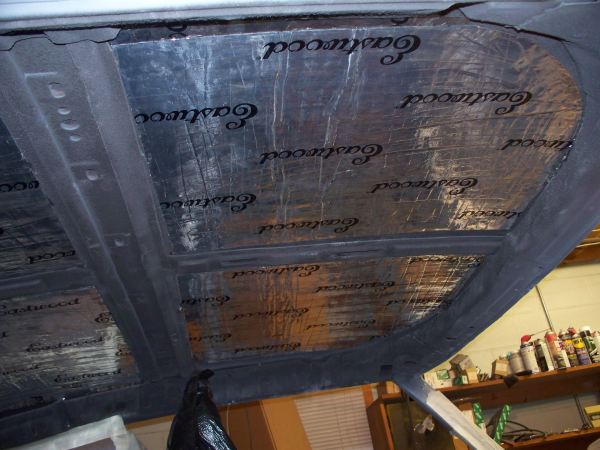
I put a little CheapMat in today. This stuff was installed over Lizard Skin Ceramic. Banging on the roof just makes a dull thud. I did the dash and the roof, it's hard to take photo's under the dash so sorry about the quality.
__________________
68 Lemans - GTO appearance LS3 68 Eldorado - waiting for restoration 96 Roadmaster Wagon 2014 Infiniti Q50S Hybrid Marietta GA |
| Reply |
|
|
The PY Online Forums is the largest online gathering of Pontiac enthusiasts anywhere in the world. Founded in 1991, it was also the first online forum for people to gather and talk about their Pontiacs. Since then, it has become the mecca of Pontiac technical data and knowledge that no other place can surpass.




 Linear Mode

