


| FAQ |
| Members List |
| Social Groups |
| Calendar |
| Search |
| Today's Posts |
|
#161
 11-10-2010, 07:52 PM
|
||||
|
||||

This is a pic of my block when I got it.
 Still not a good shot of the front cap but a good look at the no.2. The no.2 cap is sculpted backwards compared to the front. If you move the no.2 up you have to relocate the dowel compltely. He said he did not see enough difference int he two caps to warrent the extra cost of relocating the dowels. The no. 1 cap is still much more stout than a later cap so I'm good with the decision. And he saved me a buck or two. Mark L
__________________
My Gasser '63 Catalina build. Oh sorry, it's a Street freak. Either way it's a fun build. |
|
#162
11-11-2010, 05:22 PM
|
||||
|
||||
|
Glad to see the dipstick made it haha
__________________
Robert Lewis 1959 Star Chief 4 Dr HT dual quad 389 4 speed 1962 Pontiac Plain Jane Catalina http://pontiac-59.com/ |
|
#163
11-11-2010, 05:42 PM
|
||||
|
||||
|
Mark,did you have Paul cryo the block? I had him do a set of ali rods for my combo but as I picked up the block over here it would have been too expensive to ship it back and forth.
|
|
#164
11-11-2010, 07:44 PM
|
||||
|
||||
|
Origianlly I had planned to cryo everything but it became a money issue. I don't have enough. So that went by the wayside. Would have liked to. Mark l
__________________
My Gasser '63 Catalina build. Oh sorry, it's a Street freak. Either way it's a fun build. |
|
#165
11-13-2010, 03:16 PM
|
||||
|
||||
|
Mark-
With all the mods to that block, will you be in the vicinity of the cost of an IA2? |
|
#166
11-13-2010, 05:37 PM
|
|||
|
|||
|
ponjohn cant speak for mark but My 59 block was basically free. It came with a car I bought and I almost left it with the guy. I'm likely to add splayed caps and maybe a lifter brace IF I decide to go roller. So basically looking at cost of GOOD machine work, and splayed caps. Paul has added a center deck support for Mark. I dont see it as a must have as these blocks have a pretty thick deck and cylinder walls. Plus reinforcing rib on pan rail, thick meaty bulkheads and even 2 bolt stock caps are pretty stout.
The block/trans/starter adapter is available aftermarket for like $800. I dont like the design at all, partially because its 3/4" thick and uses a crank spacer and Mopar(I think) starter. All unneeded IMO. Mines 1/4" thick and puts bell flange in same plane as 400/455 relative to crank flange. I'll be using an IMI mini starter for a 61-64 full size but a same app delco will work. Using std 2.75" register Pontiac flexplate. I'm making my own for way under a $100(plus starter). Mondello offered to copy it in the cnc if I want to duplicate them. I didnt discuss cost(yet). I plan to duplicate my aluminum proto type in mild steel regardless and can do without cnc. The aluminum scrap I used is unknown grade and rather soft plus steel I can weld nuts where aluminum would have been a bit more difficult bolt arrangement. Are they strong ? Yes Pontiac used the casting for special projects and revised them for RA5 and SD455. Dont think RA5 or SD455 had thickwall casting cylinder walls though, they did get a better cam tunnel. 59 seems a bit meatier in the valley than newer blocks but still open. Its not an IA2 but with turbo power and approx 6000-6500 rpm redline and 3.75-4.0" stroke I dont see much issue using it to 1000+hp TURBO'd with the right parts. Heck MartyP's very well prepped 67 400 block went 3+ seasons over 1500 hp and 67 400 block while decent is NOT as strong as these are. |
|
#167
11-13-2010, 05:51 PM
|
||||
|
||||
|
I know mine owes me about £500 ($750) in machine work,ARP studs,mains girdle etc,so well below the cost of an IA11. Now if I factored in my own labour time........
|
|
#168
11-14-2010, 03:24 PM
|
|||
|
|||
|
I lucked out some too my block had been built back in early 60's as a race motor and already had alot of detail work like casting flash removal etc.. Even my armasteel crank is a very nice piece of work very well detailed smoothed rounded etc.. I'm tempted to use it but know eventual power potential I may reach would kill it eventually. Seeing stock 455 cranks in the 850+ range turbo'd live does leave one to wonder how much a well prepped 3.75 armasteel crank could take at 6000 rpm.
taff2, have you got your block adapter figured out or done? |
|
#169
11-14-2010, 05:29 PM
|
||||
|
||||
|
Mark and others,
Where did you guys get the idea from to run these early blocks? I learned of the virutes of these blocks myself before any aftermarket blocks were available. This was in the early to mid 9O's and have believed in them ever since. Have never read anything in any book about the advantages of using an early block in a high HP app. Has anyone? Also, when comparing costs, etc.. I feel the real advantage of an aftermarket block is you can run big inches, If you are building something med sized and blown, the early block really shines. More on costs. I would not compare the costs of hardware, like studs, main caps, etc. After buying those parts once, I was able to use them over and over again when the block itself wore out of blew up. The is real cost savings in the long run. Machine work is your real, valid cost comparison.
__________________
Hundreds of Pontiacs in Az "Real Pontiacs only..no corporate nonsense!" Facebook- Pontiac Heaven Hosting- 23rd annual Pontiac Heaven weekend- Phoenix pending due to covid Pontiac Heaven Museum in process Phil 2:11 |
|
#170
11-14-2010, 06:53 PM
|
||||
|
||||
|
Bruce ,yeah, I've made it out of 1/8" steel and it sandwiches in between my .250" thick T6 ali mid plate and bellhousing,pic attached.
Now where did I get the idea to run an early block? Some bloke called Steve? mentioned it if I remember right,can't recall his surname though..... 
|
|
#171
11-15-2010, 12:00 AM
|
|||
|
|||
|
Steve my first look inside one I knew it was special. Wasnt long after I discovered what you were doing and decided I wasnt going to waste such a good piece on a mild build. Did a lot of research along the way as well close to 10 years now. Finally doing stuff but still crawlin.
You might be interested in this as well . http://forums.maxperformanceinc.com/...d.php?t=634494 55-59 reverse cool meets 6x. Actually I will be starting my project with ported 4x's but this mod will work on them too. Its taken 3 tries but my adapter plate for the water necks I finally got right just need to detail the rough edges and trim them down a tid. Could have tapped front hole for pipe instead but wanted to keep my chromed water necks. |
|
#172
11-15-2010, 02:14 PM
|
||||
|
||||
|
Steve. I've looked at the early blocks for a long time but until I got to know you I didn't want to deal with the bellhousing pattern adaptation. But now that I'm building real power and not going to an aftermarket block, it's worth the hassle to use them. And I like the idea of saying that it is an actual '60 block. Tell me what other brand guys (chevy, ford, etc)are building at these power levels using a 1960 factory block? Other than the early Hemis, not many, especially someone at my monetary level (AKA, broke, heh). MArk L
__________________
My Gasser '63 Catalina build. Oh sorry, it's a Street freak. Either way it's a fun build. |
|
#173
11-15-2010, 06:23 PM
|
||||
|
||||
|
Yeah Mark,there's something cool about saying your racing with a 50 year old factory block
And factory heads in my case.
|
|
#174
11-15-2010, 07:00 PM
|
|||
|
|||
|
Kind of part of my reason to use the early reverse cool timing cover and hoses. I want it to look old school and hi tech too. Plus to keep my heads cool under boost. One more thing to show the bowtie boys how we were ahead of them way back then. They give us less respect than they give the Ford guys.
|
|
#175
11-15-2010, 07:13 PM
|
||||
|
||||
|
Here's a pic of how I'm doing my reverse cooling system,you can see the -10 fittings in the front and side of the block. Are you going reverse cooled Mark?
|
|
#176
11-16-2010, 06:52 PM
|
||||
|
||||
|
I'm going to place the radiator in the trunk. I'll use a R.A.R.E front cover that has no pump but you can use a chevy pump or just run it in without. I'll use a remote pump at the radiator to bring the coolant up or use it up front to pass it rearward. Or both with 2 pumps??? Bring the coolant into both ends of the heads and out the front cover and back to the radiator. I might add the exit bungs to pass it out the back of the block also. We'll see when I get that far. Mark L
__________________
My Gasser '63 Catalina build. Oh sorry, it's a Street freak. Either way it's a fun build. |
|
#177
11-17-2010, 12:43 PM
|
||||
|
||||
|
That is almost exactly the way I have the cooling system done for my 65 Tempest AWB Funny car. Execpt my radiator is under the trunk where the fuel tank normally is, Did not want the heat source of a radiator inside the trunk. Built a mount to put the radiator between the frame rails.
__________________
Hundreds of Pontiacs in Az "Real Pontiacs only..no corporate nonsense!" Facebook- Pontiac Heaven Hosting- 23rd annual Pontiac Heaven weekend- Phoenix pending due to covid Pontiac Heaven Museum in process Phil 2:11 |
|
#178
11-18-2010, 01:03 AM
|
||||
|
||||
|
Steve are you incorporating any kind of shroud/fan set up? Mark L
__________________
My Gasser '63 Catalina build. Oh sorry, it's a Street freak. Either way it's a fun build. |
|
#179
12-21-2010, 02:05 PM
|
||||
|
||||
|
Finally took some time to build some frame rails. My intent was to run a single rail all the way from the front frame kickout (perimeter frame) straight back, tie into the lower rear control arm mounting points, then up and over the rear end, then tie back into the original frame after the rear end. But the front kick out does not go far enough into the center of the car to line up straight to where the frame needs to tie into the rear control arm mounts. So instead of trying to bend or cut and Snake a rail back l made one rail from the front frame kickout back to the control arm mount location. And the overaxle frame rail will be seperate, sitting just along side of the front rail but inside of it enough to narrow the amount I need for my tires. The pic is the long front rail and the overaxle laying alongside of it in position. (The long rail still needs to be cut for length). You can see the chaulk mark on top of the rails where the long rail will be cut and welded to the frame/contol arm mount. You can see the overlap of the overaxle rail to the long rail. This will be about 4 inches of welded overlap. I'll angle cut the overaxle forward end to taper nicely into the overlap.
 The second pic is the whole rail and overaxle rail but showing the orientation of the whole set up. 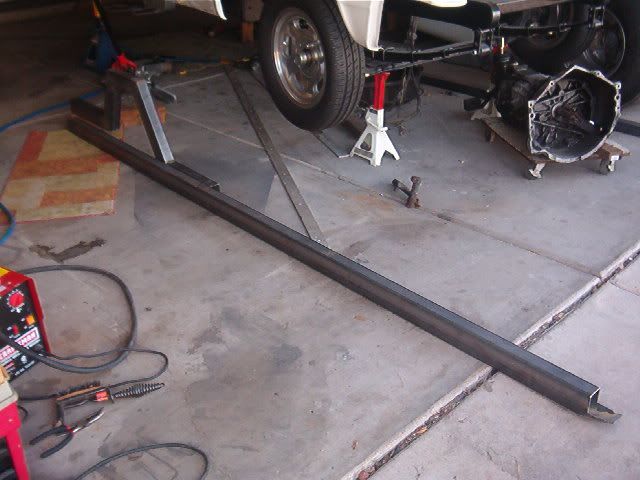 The last is a good look at the overaxle rail and the front end of the long rail. I cut the end that way to lay up under the front frame and give more support from under the rails and to give more welding area. The whole rail system will hang one inch under the original frame but it will not be noticed unless you look under the car. Once I cut off the rear cut I'll add that same lip at the rear of the long rail for the same reasons. 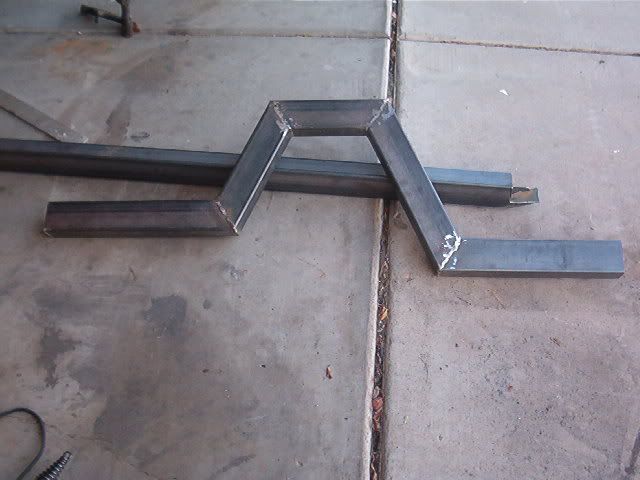 You can see the overaxle rail is higher at the rear to match the original frame heights. The back end of the overaxle will be cut sideways at a 45 into the original frame to tie it all in. If I do it right I can still use my original big gas tank back there. But the narrowed rails may interfer. If not too bad I'll have the tank sectioned a little bit to fit at the front corners, add a rear sump, and have a nice big tank for lots 'o miles 'o pleasure. This will give me a full 18 inches of space inside the wheel wells for my tires/rims. I will still grind all the seam welds and add gussets to the seams for strength. I still have to cut and relocate the inner sheet metal. Mark L
__________________
My Gasser '63 Catalina build. Oh sorry, it's a Street freak. Either way it's a fun build. |
|
#180
12-21-2010, 02:57 PM
|
||||
|
||||
|
That'll be sweet
__________________
Robert Lewis 1959 Star Chief 4 Dr HT dual quad 389 4 speed 1962 Pontiac Plain Jane Catalina http://pontiac-59.com/ |
| Reply |
|
|
The PY Online Forums is the largest online gathering of Pontiac enthusiasts anywhere in the world. Founded in 1991, it was also the first online forum for people to gather and talk about their Pontiacs. Since then, it has become the mecca of Pontiac technical data and knowledge that no other place can surpass.




 Linear Mode

