


| FAQ |
| Members List |
| Social Groups |
| Calendar |
| Search |
| Today's Posts |
|
#61
 05-20-2008, 05:54 PM
|
||||
|
||||
|
I dont think that skin is too bad. My driver's side door was horrible with about a hundred dent puller holes all the way down the side from sideswiping something. I found an NOS door skin on ebay a year ago that was near my house in Jersey and picked it myself. I think you can salvage that one without a ton of labor.
(by the way that is not the correct master cylinder for a 72 - you need the one with the two bleeders on it) Here's a photo of mine: |
|
#62
05-21-2008, 08:43 AM
|
|||
|
|||
|
repro skins are not very good. the corner peak above the handle is the wrong contour, the skin itself is much thinner gauge metal and the handle pocket is a very "soft" punch out, nowhere near as crisp or correct depth as the original. I have two repop door skins--currently being used as patch panel metal for a 1962 MGA. amazing how nicely they work for lower fender and rear body patches. )) i decided to salvage the used doors i have. if your side and lower skin edges aren't rusted out, try to save them. it is tough because of the side impact beam. on yours, you just have to watch out for length because that door definitely was involved in a front end hit, it may have crumpled back somewhat. it'll be tough to massage and stretch it back to shape, but with the right spoons (long, thin curved) being worked from behind the beam, it is savable. basically a two man job, one for the hammer, the other for the spoon.
|
|
#63
05-21-2008, 09:44 AM
|
||||
|
||||
|
Ive welded in over 20 holes from some old dent puller work and I think it will take too much filler to fix! But I will try to bump out the dents. Thanks on the heads-up on the repro door skins I would love to find a nos right side door skin! As for the master cylinder if that is the case I will have to get the correct one! Thanks
Pat |
|
#64
05-21-2008, 06:19 PM
|
|||
|
|||
|
just for future reference, if you've got dent puller holes in areas where you can't grind the mig fill smooth on the backside, do your hammer and dolly work before filling them. the mig piles will prevent you from using a dolly or spoon. you may be able to pry against the skin and beam to help push that front section out some. that beam is why so many doors have been drilled out, back in the 70s to early80s not many shops had the weld on stud puller setups. three of the four doors i have have runs of holes right down the peak. lousy drivers!
|
|
#65
05-24-2008, 12:59 AM
|
||||
|
||||
|
just wanted to thank Pat for the tip on the Snap-On Crud Thug undercoating removal tool on page 2 of this post. I did a search for one as I'm in the middle of the floors on mine and trudging thru slowly as always with the 4.5" braided wire wheels. I found the Crud Thugs are $400 from Snap-On for the air tool and wire wheel kit which was little over what I could justify so I found another brand identical to it and thought I'd post in case anyone else wants to use one on their underbody resto. It's made by Dynabrade and they call it a Dyna zip, it's a very close copy of the Crug Thug in my opinion. I got it on Amazon.com with a one time discount for $225 shipping included so not too bad considering how it flies thru the undercoating. Here's a pic as well, thanks again for the good info as this undercoating removal is one of the hardest/nastiest parts of the resto for sure.
__________________
'72 Formula 455HO TH400, Revere Silver, black deluxe '74 Trans Am SD 4 speed, Admiralty Blue, blue deluxe Last edited by RicksGTO; 05-24-2008 at 01:05 AM. |
|
#66
05-24-2008, 10:27 PM
|
||||
|
||||
|
Quote:
Good to hear one of my posts help some one! Glad I could contribute as I have used others suggestion & information posted on this great forum. Thanks! Pat |
|
#67
05-25-2008, 06:06 AM
|
|||
|
|||
|
Quote:
Bill |
|
#68
05-25-2008, 07:16 AM
|
||||
|
||||
|
The only difference is that the early 70's cars have the two bleeder screws above the ports. The later cars (74 and up maybe?) had the non-bleeder master cylinders. I don't recall which code is stamped on the front. The replacement part from GM was the non-bleeder unit, as well. Either way, the resto work does look great!
|
|
#69
05-26-2008, 09:51 AM
|
||||
|
||||
|
Bill,
I would like this car to look as visibly original as possible! But no Im not doing a concourse restoration. I think I have a line on the correct master cylinder, if not Ill buy one of yours. Thanks for the follow up! Pat |
|
#70
05-26-2008, 10:04 AM
|
||||
|
||||
|
The casting part number is 5470409. Here is an example on epay:
http://cgi.ebay.com/ebaymotors/70-79...QQcmdZViewItem |
|
#71
05-26-2008, 11:57 AM
|
|||
|
|||
|
That casting number is only 1/2 of the equation.They used that number on Firebirds, Station Wagons and Pick Up's. SO getting a Master with just the casting number will look ok, but its not the correct one. Inside, the promary metering piston needs to have the six grooves which has different metering ports than others.This is the piston that controls the front disc brakes.These have three holes whereas I have seen 5 or 7 holes on "generic" casting numbers. Basically differences in pedal feel and quickness of front brake reaction time.
Pat, glad you found an "EB"Master Cylinder. I only had one extra, it is sold now to someone else.. Good luck with your hunt finding the correct one.. Bill |
|
#72
06-10-2008, 10:32 PM
|
||||
|
||||
|
Great looking TA. I have a 72 Formula with same color scheme Lucerne Blue w/ blue custom interior.
|
|
#73
07-06-2008, 01:45 PM
|
||||
|
||||
|
Im restoring the heat/air box (under the dash) and most of the foam gaskets inside have disintegrated! 1st question is there replacement gaskets, if so who sells them? Or I could use some picture of the gaskets so I can make my own!
Thanks! Pat |
|
#74
07-06-2008, 10:21 PM
|
||||
|
||||
|
Here are some pictures where the foam gaskets go just don't know the size!
Pat |
|
#75
10-29-2008, 01:58 PM
|
||||
|
||||
|
Drop the T/A off at the paint shop and hope to get it back in 4 weeks??
Pat 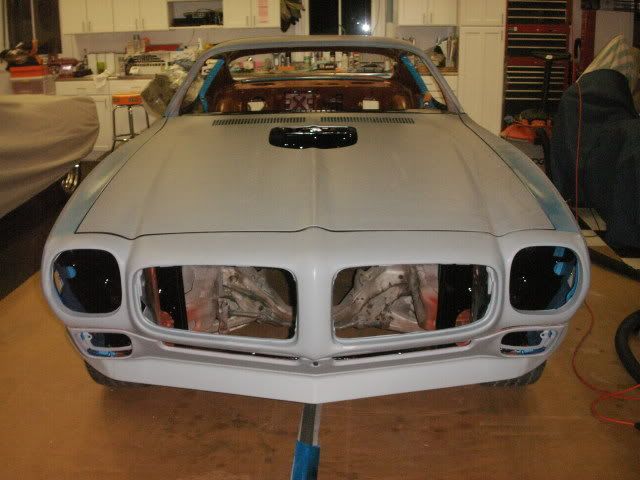 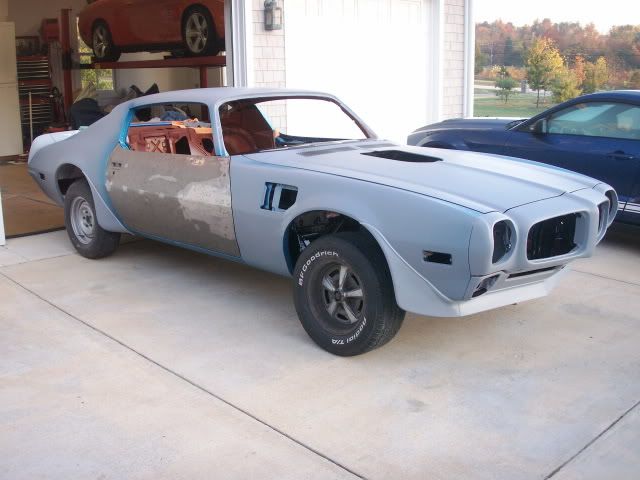 
|
|
#76
10-29-2008, 02:23 PM
|
||||
|
||||
|
It looks great and the panel fit is very nice, looks like you painted the jambs already as well. You've done so much of the prep I can see where you might get it back that quickly. The painter I'm going to use has gone from quoting how many people are on the waiting list, to calling to see if people can bring their cars in so maybe with the economy slowing they are all catching up on the waiting lists and the work is getting done faster than when they were swamped. Congrats on all the nice work you've done on that car in such a short time.
__________________
'72 Formula 455HO TH400, Revere Silver, black deluxe '74 Trans Am SD 4 speed, Admiralty Blue, blue deluxe |
|
#77
10-29-2008, 02:29 PM
|
||||
|
||||
|
Ditto what Rick said, Pat.
Just think, in four weeks (hopefully) you can start re-assembly!
__________________
Regards, "455HO" Lloyd 2008 GMC Sierra Denali 2WD Crew, L92 6L80E, Silver w/ Ebony guts, 14.26 @ 98 
|
|
#78
11-02-2008, 02:44 PM
|
||||
|
||||
|
Rick & Lloyd, Thanks!
My painter called, and my small parts are painted and I can pick them up monday! And he should have the car ready for paint buy the end of the week!  Pat |
|
#79
11-02-2008, 02:51 PM
|
|||
|
|||
|
Quote:
|
|
#80
11-02-2008, 07:58 PM
|
||||
|
||||
|
Quote:
Thanks
__________________
1974 400 4 speed |
| Reply |
|
|
The PY Online Forums is the largest online gathering of Pontiac enthusiasts anywhere in the world. Founded in 1991, it was also the first online forum for people to gather and talk about their Pontiacs. Since then, it has become the mecca of Pontiac technical data and knowledge that no other place can surpass.


 Linear Mode

