


| FAQ |
| Members List |
| Social Groups |
| Calendar |
| Search |
| Today's Posts |
|
#121
 03-24-2008, 05:34 PM
|
||||
|
||||
|
Jason did your Sister also paint the black on the dash bezel? Also, my dash is in about the same shape as yours, so I would like to attempt the taping and spraying the silver paint. What type of tape did she use and what silver paint did she use?
Thanks and keep up the awesome work. Brian |
|
#122
03-24-2008, 06:04 PM
|
|||
|
|||
|
Quote:
The black plastic on our bezel was in perfect condition. It was just the chrome that had worn off the edges. She used a combination of 3M Fine Line masking tape and regular 3M masking tape. The 3M Fine Line series is a flexible, skinny tape that leaves sharp edges and it good for very fine detail work. It's a very tedious task to do this on these bezels. I think she spent over 6 hours just masking to make it perfect. We used DupliColor Instant Chrome spray enamel. |
|
#123
03-24-2008, 07:46 PM
|
||||
|
||||
|
Thanks Jason for the info. I know my woodgrain is fine and the black maybe too, but I do know the silver trimming is wearing out.
Appreciate you posting all your steps. It really helps us novice guys see what things look like before and what it should look like finished. Brian |
|
#124
03-24-2008, 08:06 PM
|
||||
|
||||
|
Quote:
Also pictured is the tag on the rear seat. |
|
#125
03-25-2008, 06:13 AM
|
||||
|
||||
|
Here's a good pic of an original '68 carpet tag. From an HPP article.
__________________
Greg Reid Palmetto, Georgia |
|
#126
03-25-2008, 05:01 PM
|
|||
|
|||
|
The Judge is ready to paint now.......so last night we spent a few hours getting all the front sheetmetal pre-fitted to the car. The radiator support and both front fenders are new aftermarket parts, so I expected to have to do a little tweaking to get them perfect. You don't wanna be tweaking on freshly painted parts.......so we do all that now.
 Both fenders needed a little bending in the lower rear area of the "dog leg", as they didn't have the exact curve of the doors. A couple pulls of a slide hammer brought them out perfectly. I also had to do some metal work around the right side marker light to make it fit properly. I was having a heck of a time getting the front end perfectly square because it seemed to be pulled about 1/4 of an inch toward the passenger side in the front. After working on the problem for an hour, I measured the new radiator support and found that it was slightly out of square. I don't know if it was made that way or if it happened in shipping......but it was screwing everything up.  A quick push of the top of the radiator support over toward the driver's side about 1/8 of an inch with a Porta-Power jack and everything fell into place perfectly. The hood fits great and clicks into place easily. All the gaps look good. These fenders actually work very well after you do a little fitting with them.  Time to tear it all down again and start spraying some Polar White paint! 
|
|
#127
03-25-2008, 05:41 PM
|
||||
|
||||
|
Not being critical here Jason, but I would have figured that after all of the beautiful work you have done to maintain the original pieces of this car - you would have done whatever was necessary to repair the original fenders and core support.
__________________
Some guys they just give up living And start dying little by little, piece by piece, Some guys come home from work and wash up, And go racin' in the street. Bruce Springsteen - Racing In The Street - 1978 |
|
#128
03-25-2008, 06:28 PM
|
|||
|
|||
|
Quote:
The radiator support was gone on the driver's side from a leaky battery at some point in it's life......so there was no fixing that. The mounting point where it was attached to the frame literally disappeared.  Both fenders were rusted out at the bottoms and it was getting thin around the wheel lips too. Sometimes you have to bite the bullet and realize that some things are better replaced than fixed. Both of the old fenders will be kept with the car. It's kind of cool to know that the original paint and decals will be preserved on a couple parts. |
|
#129
03-26-2008, 07:44 AM
|
|||
|
|||
|
Enjoying the thread and not trying to start a rukus, but what are your regular hours? I understand pics can be taken at any time, but in youre album most are times and dates I would term 8-5 M-F. You have done a tremendous amount of work in just a couple months to be strictly after hours. Potential customers could be concerned as the customers' cars on your webpage seem at a standstill over that same period? What is youre usual turnaround on a restored car? Excellent product nonetheless.
|
|
#130
03-26-2008, 09:35 AM
|
|||
|
|||
|
Jason
Like everyone else that views this thread I really appreciate you sharing this with us. One question and I see this done all the time. How do you keep the detailed frame from getting overspray or getting loaded up with dust that will mess up the final paint job? thank Scott t
__________________
"Honestly the car will only be there for a few weeks, OK maybe a month at the most" |
|
#131
03-26-2008, 11:54 AM
|
|||
|
|||
|
Quote:
Turnaround time depends on the amount of work to be done and the condition of the car at the beginning. I give customers an estimated time of completion, but I'm not a guy who goes by a deadline usually. I'm not ever going to be like a Boyd Coddington who is throwing together a car at 3AM in the morning to make a photo shoot. That's not the way to build a car. |
|
#132
03-26-2008, 11:57 AM
|
|||
|
|||
|
Quote:
|
|
#133
03-26-2008, 05:14 PM
|
|||
|
|||
|
I've got a bad case of the flu, so I laid in bed today. My sister came in around noon and asked for my camera.....so I knew something was up.
 My dad decided to paint the Judge for me today! He's been painting since the early 70's so he's actually more experienced with single stage paint than I am. I haven't seen it in person yet but the pictures sure do look good. He says it turned out beautiful.   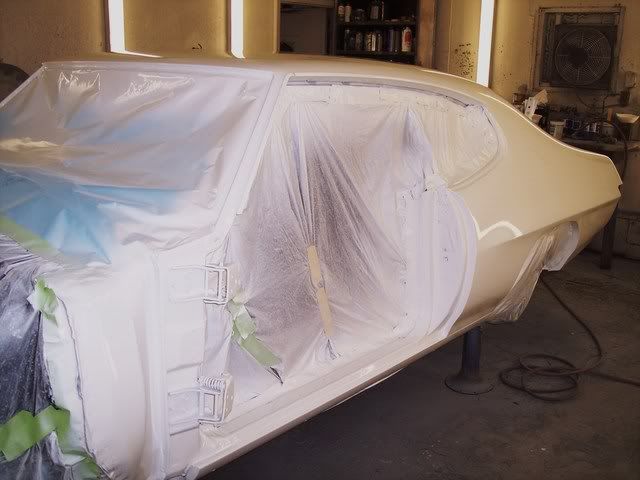 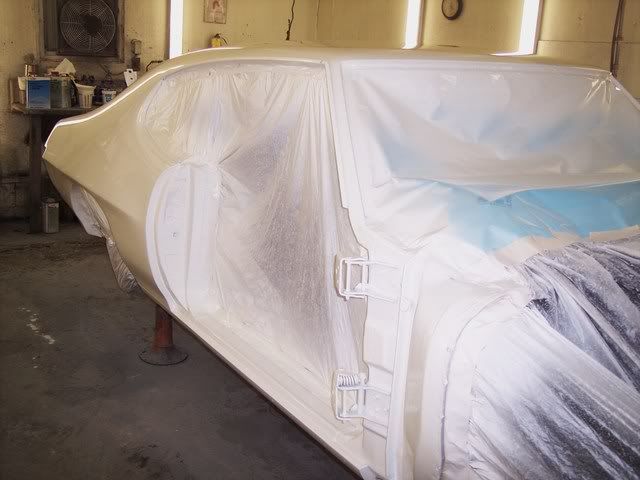
|
|
#134
03-26-2008, 08:54 PM
|
||||
|
||||
|
Quote:
__________________
1969 GTO 400-4speed, H/T 1969 GTO 400-RAIII-4speed, Convertible 1969 Grand Prix SJ |
|
#135
03-26-2008, 09:00 PM
|
||||
|
||||
|
Quote:
__________________
1969 Judge, 4-speed, CR/Parchment, Quasi-Survivor, #'s match - under restoration |
|
#136
03-26-2008, 11:42 PM
|
|||
|
|||
|
Just out of curiosity, since you're doing the car to factory original everything, do you paint all the bolt heads seperately for the door hinges and trunk bolts since those were installed before paint originally? Or do you hit the bolts with a touch up gun after install? I guess I could just shut up and wait for pictures further along the process and that would answer these questions!
|
|
#137
03-27-2008, 01:46 AM
|
||||
|
||||
|
That one is stunning!!! Shazaam!
Outstanding work. Jim |
|
#138
03-27-2008, 05:58 PM
|
|||
|
|||
|
Quote:
|
|
#139
03-27-2008, 06:00 PM
|
|||
|
|||
|
Quote:
Thanks Jim! I'm pretty sick with the flu......but my dad was begging me to come up and see the car today, so I went up this afternoon and took a video so people can see the reflection and clarity of the paint. It's hard to take good pictures of white paint. Click on the picture to see the video: 
|
|
#140
03-27-2008, 06:57 PM
|
||||
|
||||
|
Quote:
Looking great, Jason! Thanks for the regular updates.
__________________
keith k 70 Trans Am RA III / T400 / Lucerne Blue / Bright Blue 70 Trans Am RA III / M20 / Lucerne Blue / Sandalwood 70 Formula RA III / M21 / Lucerne Blue / Bright Blue |
| Reply |
|
|
The PY Online Forums is the largest online gathering of Pontiac enthusiasts anywhere in the world. Founded in 1991, it was also the first online forum for people to gather and talk about their Pontiacs. Since then, it has become the mecca of Pontiac technical data and knowledge that no other place can surpass.


 Linear Mode

