


| FAQ |
| Members List |
| Social Groups |
| Calendar |
| Search |
| Today's Posts |
|
#81
 11-29-2011, 10:36 AM
|
||||
|
||||
|
All are correct. Bottom holes for splash shield AND vac can if needed and top holes are plastic plugs. Do you need pics??
|
|
#82
12-03-2011, 01:56 AM
|
||||
|
||||
|
Bolted the hood on today after getting the fenders aligned as well as I could, along with the rocker panel trim.
At first, both sides of the hood were WAY too high midway between the front and rear. After adjusting the bolts that hold the hood hinges to the fender, I got the driver's side just about perfectly flush with the fender. I improved the passenger's side from about 1/2" too high midway between the front and rear to about 1/8" too high. All of this was done with the fender-to-hood hinge bolts. It seems that raising the hinge on the rear bolt lowers the rear of the hood. Raising the front bolt lowers the hood a little bit, but not enough. The above took about three hours of small adjustments. I'd really like to get the passenger's side down a little more. With the search feature, I found a good description of how to accomplish this from 2007. The poster said that if you shim the front hood-to-hinge attachment point, the side of the hood will actually go DOWN. If you shim the rear hood-to-hinge attachment point, the rear of the hood will go DOWN. I intend to try this tomorrrow, but would really appreciate your comments on this procedure. The last picture, #005, shows the problem the best.
__________________
BONESTOCK GOATS '64 GTO Tripower Hardtop (Wife's Car) '64 GTO Tripower Post Coupe (My Car) '99 Bonneville SE Sedan |
|
#83
12-03-2011, 11:49 PM
|
||||
|
||||
|
Dick
As a member of the Hotrodder's Bulletin Board/body and exterior section I asked the same question about hood alignment. The pros on the Forum gave me a great guide to hood alignment: here it is. http://www.hotrodders.com/forum/alig...od-139169.html regards
__________________
Ron 64 GTO convertible, gone but not forgotten 76 CB750K 72 CB350F " why yes, I am old school, so what?" |
|
#84
12-04-2011, 01:52 AM
|
||||
|
||||
|
That's a very good write-up by someone who has done it many times. After reading it a few times, the whole procedure begins to make sense. Thanks for posting.
__________________
BONESTOCK GOATS '64 GTO Tripower Hardtop (Wife's Car) '64 GTO Tripower Post Coupe (My Car) '99 Bonneville SE Sedan |
|
#85
12-10-2011, 05:35 PM
|
||||
|
||||
|
I've learned a while aligning my front fenders and hood. While the write-up referred to in post #83 is helpful, there are a few misleading statements made by the writer. One of them is that the edges of the hood could be adjusted to 1/2" below the inside edges of the fenders. That is not possible unless one would elongate the hood hinge-to-fender mounting holes. Left stock, you can lower the rear of the hood by about 1/4" below the fender line but that raises the edges of the hood forward of the hinges. He also suggests that putting a shim between the hood and hinge in the forward stud will lower the edge of the hood. I did not find that to be true--it raises the edge of the hood as you would expect. Please understand that I'm not criticizing the write-up--it is excellant---just pointing out that getting the edges of the hood to set even with or below the fenderline forward of the hinges is not as easy as the writer leads us to believe.
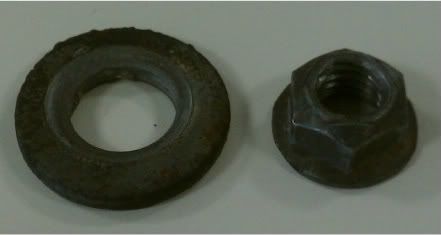
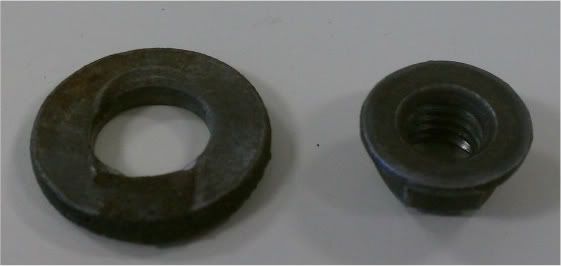
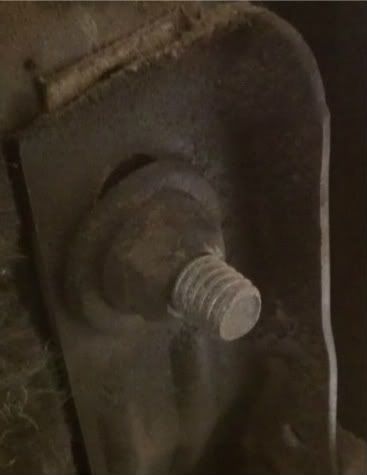
Does anyone know what type of washers are used under the nuts that hold the hood to the hinges? The nuts I used are made with washers as part of the nut. Problem is, the studs that they thread onto have an area near the head that is square (like carriage bolts) which prevents the nuts from actually sandwiching the hinge between them and the hood. I'm sure many of you have run into this problem before. I'm using the original studs and repro nuts. I can post pictures if my explanation is not clear.
__________________
BONESTOCK GOATS '64 GTO Tripower Hardtop (Wife's Car) '64 GTO Tripower Post Coupe (My Car) '99 Bonneville SE Sedan |
|
#86
12-10-2011, 06:26 PM
|
||||
|
||||
|
|
#87
12-11-2011, 01:29 AM
|
||||
|
||||
|
Thanks, that's what I needed. I used four of the serrated bumper bracket washers temporarily. It looks like if I use some heavy duty 7/16" hole diameter washers, they would look like originals once in place. Black Oxide or zinc? The nuts are black.
__________________
BONESTOCK GOATS '64 GTO Tripower Hardtop (Wife's Car) '64 GTO Tripower Post Coupe (My Car) '99 Bonneville SE Sedan |
|
#88
12-11-2011, 11:29 PM
|
||||
|
||||
|
These look like grey or black phosphate.
|
|
#89
12-15-2011, 06:37 PM
|
||||
|
||||
|
Here's today's progress. Headlight buckets assembled, mounted to car with temporary bulbs for testing. Horns temp. hookup for function. Tried the restored front park/turn signal lights. Everything works AOK except green inside turn signal indicator. I was hoping this would work after front park/turn signal lights were hooked up.
This past week, I tweaked the front fender/hood/rocker panel trim alignment to the best I could get it (I think I said this before!!?). One thing to be aware of, if you're not already, is that shimming the top and bottom of the front fender rear mount flattens the side profile (edge next to the door). Removing shims bulges it out toward the center. This helps a lot with setting the door-opening clearance along the back edge of the front fender. Also learned that raising the front of the front fender (radiator support shims), reduces the "bulge" in the bottom dogleg of the rear of the fender. It all makes sense when you think about it!
__________________
BONESTOCK GOATS '64 GTO Tripower Hardtop (Wife's Car) '64 GTO Tripower Post Coupe (My Car) '99 Bonneville SE Sedan |
|
#90
12-15-2011, 08:18 PM
|
||||
|
||||
|
looks absolutely fantastic. Great pics, Thanks for sharing
|
|
#91
12-15-2011, 10:51 PM
|
||||
|
||||
|
I think I mentioned that fact back in a recent post Dick. It worked for me as when the lower fender touches the rocker panel and you don't have enough shims in the rad support and tighten it down, it bows out the front part of the lower front fender.....Car looks great!..JB.
|
|
#92
12-16-2011, 12:46 AM
|
||||
|
||||
|
JB, Yes, you did mention how raising the front of the fender improves the "bow" problem with the fender lower dog leg. That's what got me to put more shims under the radiator support. You can tell when you're about right--the fender doesn't push back against the rocker panel end.
It is worth noting however that due to the angle of the bottom fender bolt next to the rocker panel, it is really difficult to hold the bottom of the fender out to line up with the rocker panel while you tighten the bolt. It takes quite a lot of force to bow out the profile of the fender, but holding the bottom with a pry bar against the frame does do the trick. Sometimes you need three hands to hold the shim(s) in place down there.
__________________
BONESTOCK GOATS '64 GTO Tripower Hardtop (Wife's Car) '64 GTO Tripower Post Coupe (My Car) '99 Bonneville SE Sedan |
|
#93
12-16-2011, 09:35 AM
|
||||
|
||||
|
Dick
Are you doing your own phosphate plating with one of the several do-it-yourself-kits or are you sending the parts to a commercial plater? regards
__________________
Ron 64 GTO convertible, gone but not forgotten 76 CB750K 72 CB350F " why yes, I am old school, so what?" |
|
#94
12-16-2011, 11:46 AM
|
||||
|
||||
|
I'm lucky to have a local zinc plater that does black oxide. I media blast the pieces and he treats them for me at a reasonable cost. Only problem is the need for accumulating a group of parts and the 3-4 day delay in getting them back.
I do plan to buy the Caswell kit. Anyone have experience with that one?
__________________
BONESTOCK GOATS '64 GTO Tripower Hardtop (Wife's Car) '64 GTO Tripower Post Coupe (My Car) '99 Bonneville SE Sedan |
|
#95
12-18-2011, 01:41 AM
|
|||
|
|||
|
Car looks great. Who did all the bright work I have a 1964 gto post car too?
|
|
#96
12-18-2011, 03:38 PM
|
||||
|
||||
|
Thanks for the compliment.
The trim pieces around the side windows were not restored. I picked the best pieces from two sets I had to make one set for my car. They are not perfect, but I'm happy with how the side windows look. You cannot polish these pieces because they are anodized aluminum. You can remove the anodizing and polish, but then have a maintenance problem with dulling. I also had two sets of windshield and rear window stainless trim. I polished the best pieces and used those on my car. The rear taillight panels were restored pieces I bought off eBay. All the emblems, door handles, and wheel well moldings were replaced with NOS or repro.
__________________
BONESTOCK GOATS '64 GTO Tripower Hardtop (Wife's Car) '64 GTO Tripower Post Coupe (My Car) '99 Bonneville SE Sedan |
|
#97
12-19-2011, 11:21 PM
|
||||
|
||||
|
Here's the latest. Fitting the grille frame is a challenge. Getting the ends of the horizontal sheet metal bar to line up with the outside edges of the fenders is done be bending the center of the bar backward or forward to widen or narrow the bar. I've got that adjusted, but want to raise the center nosepiece so it's closer to the hood. I'm going to have to raise the metal brace that you see below the nosepiece to tilt and raise the front of the nosepiece. There is already a slot to move the brace up and down, but I've used all the adjustment so will have to come up with a way to get it where the nosepiece is high enough and level. You see many '64's with the nosepiece drooping since this was never adjusted properly. One of my pet peeves.
I removed the hood and trunk after this picture was taken. The hood has the typical sheet metal crack (for '64 Tempests) at the front tip next to the latch. The body shop is going to weld the crack and repaint the tip as needed. The trunk has developed little raised bumps that look like pimples. There are hundreds of them over portions of the trunk horizontal surface only. Nowhere else on the car did this occur. This was fixed once by sanding with 1500 paper and machine polishing the trunk surface. Result was perfect, but the same bumps returned after about a month even though the trunk was never exposed to the outside weather. This time, they're stripping the paint chemically to the metal surface, priming and repainting with the same DuPont Ureathane paint.
__________________
BONESTOCK GOATS '64 GTO Tripower Hardtop (Wife's Car) '64 GTO Tripower Post Coupe (My Car) '99 Bonneville SE Sedan |
|
#98
12-20-2011, 02:06 AM
|
|||
|
|||
|
Those pimples are solvent pop. Solvent gets trapped under the surface and works it's way up, sometimes popping through leaving a crater. Moisture in the paint can do the same thing too. Only way to solve it is to remove and repaint. Otherwise it will come back to haunt you.
|
|
#99
12-20-2011, 12:26 PM
|
||||
|
||||
|
Quote:
__________________
"What ain't no country I ever heard of. They speak English in What?" - Jules Winnfield ------------------------------ 2015 Jaguar F-Type 340hp Convertible, Polaris White/Ebony Interior 1964 Pontiac GTO, Tri-Power, 4 Speed, Grenadier Red/Black Interior 1965 Chrysler 300 Convertible, 383/727TF, Factory Air, Spanish Red/Red Interior/White Top |
|
#100
12-20-2011, 03:40 PM
|
||||
|
||||
|
Yes, the grilles will be painted as OEM. Still don't have ones that are usable, however.
__________________
BONESTOCK GOATS '64 GTO Tripower Hardtop (Wife's Car) '64 GTO Tripower Post Coupe (My Car) '99 Bonneville SE Sedan |
| Reply |
|
|
The PY Online Forums is the largest online gathering of Pontiac enthusiasts anywhere in the world. Founded in 1991, it was also the first online forum for people to gather and talk about their Pontiacs. Since then, it has become the mecca of Pontiac technical data and knowledge that no other place can surpass.


 Linear Mode

