


| FAQ |
| Members List |
| Social Groups |
| Calendar |
| Search |
| Today's Posts |
|
#1
 01-17-2007, 09:57 PM
|
||||
|
||||
|
Here's a few pics of how far i've got on my 55. I was in the middle of putting the ball joint suspension on in the one pic. The engine is furthur along , i've got it running, but can't run it too long without exhaust, seems the neighbors don't appreciate load exhaust. Still working on the rear frame rails and wheel wells.
Not a whole lot going on until it warms up, I was bored and wanted to post up some pics. More to come-stay tuned Last edited by Bill Eveland; 01-17-2007 at 11:18 PM. |
|
#2
01-17-2007, 11:25 PM
|
||||
|
||||
|
Boy, that engine sure does look purdy!
more pics if you can! |
|
#3
01-17-2007, 11:37 PM
|
||||
|
||||
|
Thanks Tim, yea the Bill Hirsch blue/green paint sure looks nice and goes on nice, still have some touch up to do. It's darker in person though, the flash really brightens it up. Here's something else I did awile back, I scanned the rear end gaskets and put some sizes in, I have an original 1955 pdi sheet i'll rescan tomarrow and post that too.
Last edited by Bill Eveland; 01-17-2007 at 11:52 PM. |
|
#4
01-18-2007, 02:19 AM
|
||||
|
||||
|
Bill,
Do you know why the difference in our front bumpers? Was the extra stuff hanging off of mine an option, or some other add-on? Any history? 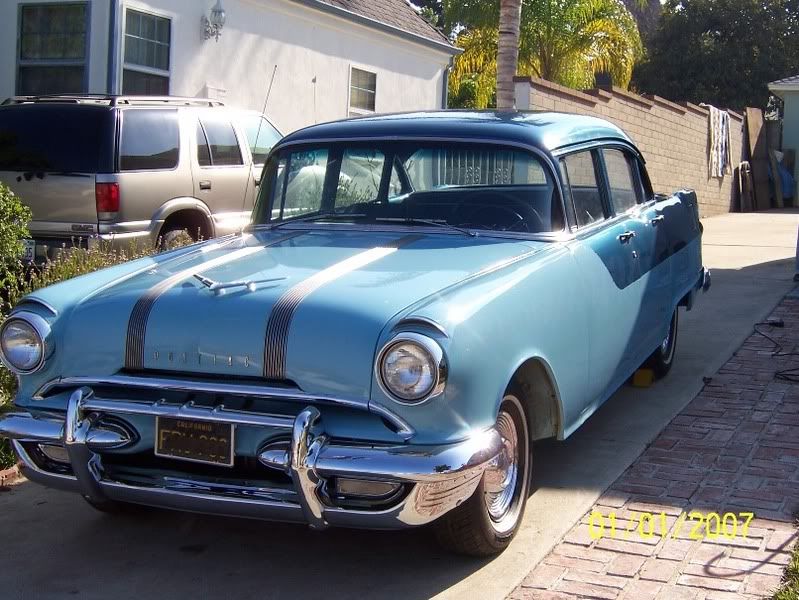
|
|
#5
01-18-2007, 02:38 AM
|
||||
|
||||
|
Bill can answer you better, but I remember all of the car makers offering optional 'bumper guards' manufactured specifically for each particular car. Most consisted of just a pair of vertical guards, much simpler than the '55 Pontiac option. Looks like yours has survived very well!
|
|
#6
01-18-2007, 09:01 AM
|
||||
|
||||
|
Other than yours being in alot better shape, i'm just building a poor mans hotrod, what Jack said. Your car has the optional guards.
Last edited by Bill Eveland; 01-18-2007 at 09:06 AM. |
|
#7
01-18-2007, 08:27 PM
|
||||
|
||||
|
Tim, the first scan was from an accesories booklet I have about the bumper guard, about 14 pages worth of stuff . The second part of a thank you brocure from Pontiac,
and third the original pdi sheet. |
|
#8
01-18-2007, 10:58 PM
|
||||
|
||||
|
Wow...that's fantastic, Bill!
I was wondering what the holes in the rear bumper were for?! Now I know that this car originally had the wing guards mentioned in your pamphlet. Man, I bet those things are hen's teeth.....Guess I'll need to start hitting the swap meets. Thanks for posting those, Bill! I love those old documents.... Tim |
|
#9
02-04-2007, 07:58 PM
|
|||
|
|||
|
what motor is that and what type of headers? Do they clear the steering box alright? I'm considering conversion myself and gathering information. Thanks.
|
|
#10
02-04-2007, 11:23 PM
|
||||
|
||||
|
The engine is a 66 389 , 3 tube cylclone headers, hedman may be the same or close for early GTO? The have the engine pretty high , off to the passenger side a little bit, flattened out the flange at the bottom of the firewall to make more clearance for the th400. I have almost 1/2" of clearance around the manual steering box. I'm also moving the master cylinder up to the firewall, I got rid of the heater defrost unit.
|
|
#11
02-05-2007, 12:52 PM
|
|||
|
|||
|
Yeah, I think the heater blower unit and the steering box would be the hardest obstacals. I would think that valve cover clearance between the blower would be super tight if the engine sat higher in the bay.
I have been considering a few mods like this, but from what I have been learning on here the last week or so, I have been looking for a 370 or '59-60 389 to just drop in. I wonder how hard it would be to re-flange a set of '55-57 chevy headers to work. They seem to be clipped back to clear the steering box in chevys and I wonder sometimes if they could be made to work with a little bit of fabricating and adjusting flange geometry. On the brakes.... one thing that might help... I have also been considering this type of conversion. Wilwood makes a master cylinder that allows you to have a remote reservoir. The MC has the option of side mount or flange mount and then a tube basically conects the MC to a reservoir some other place out of the way. I think that you could pretty much mount it in the stock location. Seems like that would be the easiest route to go if you were just looking for a little more clearance and to make checking fluid level easier. Now if you were hoping to get it out of the way because of heat, you may be stuck with a wall mount. I think the MCs are 1" bore. The units go for about $60-70 new on ebay. I have also found a place that sells brackets for a disk brake conversion for these ponchos. You may already know about it. You use their brackets with 71-76 Pontiac Bonneville components to get disks up front. www.scarebird.com Looks like you have a great project. I'm going to be keeping an eye out for your progress reports, and probably bothering you with questions 
|
|
#12
02-05-2007, 01:46 PM
|
||||
|
||||
|
I don't have room for a brake booster with the way i'm doing it, but I was plan on using a mopar mc-similar to a Wilwood mc, but i've seen the one your talking about. I have the Scarebird disc brake brackets already.
Scarebird had mentioned on making a bracket to mount a differant mc, I may even make my own to mount the mc in the stock location and make a heat shield . The stock mount location would be better with a 370 or 59 or 60 389, but it changes the exhaust deal around, would need at least custom headers. I did see a 57 with fenderwell heads, had a sbc though. But the blower motor is behind the driver fender on the firewall, so that would be in the way also. |
|
#13
02-05-2007, 04:26 PM
|
|||
|
|||
|
I talked to the guys at scarebird, and they said that the main reason they suggest a different MC is so you have dual reservoirs incase the proverbial S**t hits the fan.
He said the conversion will work fine for manual MCs. So I guess it is mainly a matter of preference for power or manual brakes. If you ditched your Blower motor and stuff, I would assume that the Booster and MC they use in the Tri-5 chevy conversion kits would work pretty well. Scarebird did suggest a couple residual valves depending on where the MC is located. I've got manual brakes and intend to just use one of those wilwood jobbies and see what happens. If they can stop race cars I would assume they could stop a street car. I'll tell ya what though.... that conversion really starts to add up though. I priced the stuff at Napa and without a new MC and without the brackets and hoses, the other components are going to run $240 before tax. Tack on the hosesm brackets and a MC and you're over $400. Ouch. Anyway, love the progress. Can't wait to see more. |
|
#14
02-05-2007, 05:48 PM
|
||||
|
||||
|
You only need the residual valve if the mc is mounted lower than the bleeder screws. The stock location of the mc is higher than the bleeder screws.
It's not the blower motor thats in the way for the mc on the firewall, it's the defrost unit on the firewall. The blower motor is behind the driver fender. I made a plate that covers up the holes and fills in the defroster area so I can mount the mc on the firewall. You can see the bottom of the plate and holes for the mc on the front pic of my engine. I can get a better pic if you want. If I ever add heat i'll get a vintage air heater/defrost unit and mount on the passenger side-they were about $200 for that set up. |
|
#15
03-03-2007, 05:43 AM
|
||||
|
||||
|
Hi Bill
Nice project. Is the headers original or have you modified them?
__________________
1948 Hudson 1948 Pontiac streamliner 1959 Oldsmobile 2dr post 1967 Ford F100 1972 Chevelle 1975 Buick LeSabre conv 
|
|
#16
03-03-2007, 11:35 PM
|
||||
|
||||
|
The headers are unmodified. They would have been for an early GTO.
|
|
#17
03-04-2007, 06:55 AM
|
||||
|
||||
|
I don't know if they produce the headers, you have, anymore.
But this headers looks very similar. Did you bought your headers new? Link to heddman headers. http://store.summitracing.com/partde...5&autoview=sku 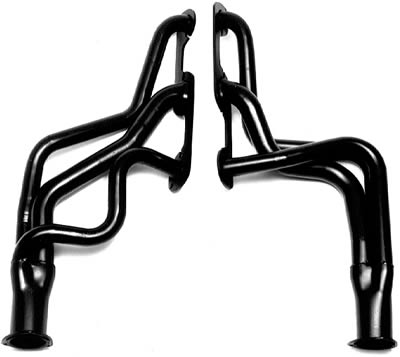 Do you have more pictures of your project? And what kind of rear axle are you going to use? Do you have more pictures to share?
__________________
1948 Hudson 1948 Pontiac streamliner 1959 Oldsmobile 2dr post 1967 Ford F100 1972 Chevelle 1975 Buick LeSabre conv
|
|
#18
03-04-2007, 01:19 PM
|
||||
|
||||
|
Those look close to what I have. I think Cyclone and Blackjack are very close, I think thats what the Summit brand or hedman 3 tube look like. Another problem with the header clearance is at the upper control arms. Take a look at a 55-56 and notice how flat the manifolds are, they are pretty close, thats one reason I mover my engine up 3-4" from the original position. You'll have to have the exhaust mounted on the engine to figure the best position than install /build your mounts.
I'll be using a narrowed 9" 31 spline out of a truck. I'd rather use a 57-64 Pontiac, but I paid a $100 complete with a 3:50 posi, I couldn't touch the Pontiac anywhere close for that. I'll get it narrowed for about $250 around here. I'll be putting in a 3:90 gear also I have. I'll be posting some more pictures later, once it warms up, i'll be getting back to the car. I did some rust repair in front of the rear wheel wells thats almost done, I moved the wheelwell forward some to make room for the 30" tall tires i'll be running. |
|
#19
03-05-2007, 03:39 AM
|
||||
|
||||
|
It's good to see the progress, Bill.
"...narrowed for about $250..."- is that with shortened Ford axles? I hope you mean $250 to narrow the housing, and buying aftermarket axles. |
|
#20
03-05-2007, 09:09 AM
|
||||
|
||||
|
Jack, you don't think resplined factory axles are any good for the street? He said the weak point was were the splines were recut and not hardened? I can get the housing narrowed actually for half that. I figured I could the the money elsewhere to get the car going and back on the road.
Last edited by Bill Eveland; 03-05-2007 at 10:15 PM. |
| Reply |
|
|
The PY Online Forums is the largest online gathering of Pontiac enthusiasts anywhere in the world. Founded in 1991, it was also the first online forum for people to gather and talk about their Pontiacs. Since then, it has become the mecca of Pontiac technical data and knowledge that no other place can surpass.


 Linear Mode

