


| FAQ |
| Members List |
| Social Groups |
| Calendar |
| Search |
| Today's Posts |
|
#1
 03-11-2005, 05:25 PM
|
||||
|
||||
|
Just a thought,, I recently completed the (Mopar)electric hideaway conversion. I don't see many posts on this subject here,this is one of the all time best upgrades (in my opinion)It seems there was a lot of talk concerning controlling the doors. I built a simple capacitive discharge circuit unit controlled by the headlight switch,everything works beautifully. How many of you out there have done this conversion?
__________________
69 judge-RAIII Auto 69 conv 4spd a/c 66 conv TBI EFI 76 50th annv. T/A |
|
#2
03-11-2005, 05:25 PM
|
||||
|
||||
|
Just a thought,, I recently completed the (Mopar)electric hideaway conversion. I don't see many posts on this subject here,this is one of the all time best upgrades (in my opinion)It seems there was a lot of talk concerning controlling the doors. I built a simple capacitive discharge circuit unit controlled by the headlight switch,everything works beautifully. How many of you out there have done this conversion?
__________________
69 judge-RAIII Auto 69 conv 4spd a/c 66 conv TBI EFI 76 50th annv. T/A |
|
#3
03-11-2005, 07:32 PM
|
||||
|
||||
|
cejay825,
Sounds interesting! Please post more details or pictures.
__________________
Larry Metzger Columbus, NJ 1968 GTO Verdoro Green Hardtop 1969 GTO Palladium Silver Hardtop 1969 Judge Carousel Red Hardtop X 2 Someday We'll Look Back On This And It Will All Seem Funny. From Rosilitia, Sung By Bruce Springsteen, CIRCA 1973 |
|
#4
03-11-2005, 07:58 PM
|
||||
|
||||
|
pictures are coming soon, I used a 92 chrysler fifth ave. for parts it all fits together so well its sacry. The parts you need off of it are the electric motor, the rod that runs through the middle of it and connects the doors together,and the "L" shaped brackets that bolt to the door. If your familiar with the gto set up, when your taking the chryler apart you can invision how its going to mount on the pontiac. Except for the operation of the motor. I didn't want to use a three way toggle switch, so I created my own circuit which wires into your headlight switch. When you turn the lights on the motor runs in one direction for two seconds and turns off......when you turn the lights off the runs in the opposite direction for 2 seconds and then turns off. I'll try to post pics by the end of the wkend.
__________________
69 judge-RAIII Auto 69 conv 4spd a/c 66 conv TBI EFI 76 50th annv. T/A |
|
#5
03-12-2005, 06:57 AM
|
||||
|
||||
|
Jack blum posted this conversion first. He had diagrams and pictures. Parts from any chrysler from the late 80 to early 90's will work. The rod off the labarons are a little short though. The only thing you have to make is a small bracket to mount to the center support. I'm doing this conversion and I'm very intersested in your switch idea. I was going to use a three way toggle. But like your idea better. Please post more on it.
Search Jack blum for more information. Here is the original post but the pictures are dead. http://forums.performanceyears.com/g...4823#276604823 Glen |
|
#6
03-12-2005, 07:34 AM
|
||||
|
||||
|
As far as modifing the chrysler parts, the rod had to be lengthed but that can be done a number of ways: get another rod off a car and cut n splice or lowes has something smilar to use, it just can go on the ends, because the factory rod has to fit in the end brackets. Also remeber to add length to one side only so that you can pull the rod out of the unit for any repairs. There is NO bracket to be made for mounting the motor, as long as you use the later style motor that looks like a window lift motor. One small note on this motor that is important, its internal gear parts are exactly the same as a Ford unit, so no hunting down odd ball chrysler parts. Simply drill one hole in the center support to mount motor. As far the contoller goes, I don't know what to tell you because I designed and built it myself.
__________________
69 judge-RAIII Auto 69 conv 4spd a/c 66 conv TBI EFI 76 50th annv. T/A |
|
#7
03-12-2005, 02:43 PM
|
||||
|
||||
|
How much to build another one.
|
|
#8
03-12-2005, 03:28 PM
|
||||
|
||||
|
I guess I could be direct too. How much would you be willing to pay?
__________________
69 judge-RAIII Auto 69 conv 4spd a/c 66 conv TBI EFI 76 50th annv. T/A |
|
#9
03-13-2005, 01:17 PM
|
|||
|
|||
|
cejay,
I am extremely interested in your module, I will contact you via private message. |
|
#10
03-13-2005, 01:51 PM
|
||||
|
||||
|
Sorry the old post lost the pics, here they are again.
Here is a pic of the center bracket:  The later motor will use the 2 holes on the left. The smaller and larger holes. This puts the rod in almost the perfect position. But because the rod is made of srping steel,, it just bows slightly. Seems to work great.  Here is a pis of the later motor by itself:  Here is the older motor:  The older motor with required bracket:  Here are some of the types of end brackets we have found out there. The one with the flexable ball and socket wont work:  Here we have just busted the end bracket off the junkyard cover: 
__________________
 TigerEFI.com (Classic Pontiac Fuel Injection) 2004 GTO Company car, 1994 TA 25th Anv, 1971 Grand Safari Wagon, 1968 GTO EFI, 1968 GTO Stock, 1968 GTO Convertible in desperate need of restoration. |
|
#11
03-13-2005, 01:58 PM
|
||||
|
||||
|
Here is the bracket I made.
 Schmatic for the older motor with internal cut-off switches:  Mounted in the car:  I had made a custom end mount but lost the file for making them. Sold 2 of them. If I ever find it again I will post it. Here is a simple toggle switch circuit for the newer motors without the internal cutoff switches: 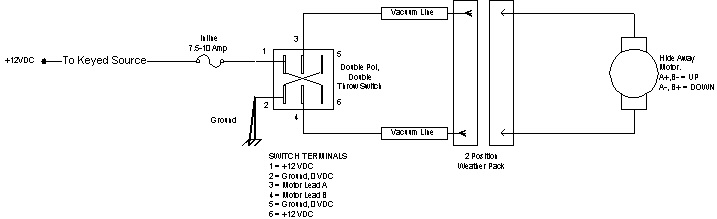 Notice the schmatic says vacuum line. I first used a vacuum cleaner to suck a kite string through the vacuum lines to the front of the car, then sprayed a bunch of WD40 into the line and with the help of a buddy I feed the wire through the vacuum line, soaking it with WD40 all the time. Feed through like a dream. Have fun all.
__________________
TigerEFI.com (Classic Pontiac Fuel Injection) 2004 GTO Company car, 1994 TA 25th Anv, 1971 Grand Safari Wagon, 1968 GTO EFI, 1968 GTO Stock, 1968 GTO Convertible in desperate need of restoration. |
|
#12
03-13-2005, 02:11 PM
|
||||
|
||||
|
<BLOCKQUOTE class="ip-ubbcode-quote"><div class="ip-ubbcode-quote-title">quote:</div><div class="ip-ubbcode-quote-content">By Jack Blum Here are some of the types of end brackets we have found out there. The one with the flexable ball and socket wont work: </div></BLOCKQUOTE>
I used the flexable ball on mine works great the ends match up and everthing. Glen |
|
#13
03-13-2005, 02:17 PM
|
||||
|
||||
|
Jack,
The pics are worth a thousand words thanks for reposting! Mine is all back together and i would hate to take it all apart just to take pictures.Does your headlight doors open with a toggle switch or were you able to find somthing else to operate them.
__________________
69 judge-RAIII Auto 69 conv 4spd a/c 66 conv TBI EFI 76 50th annv. T/A |
|
#14
03-13-2005, 02:26 PM
|
||||
|
||||
|
Yea I guess it would help with the slight miss alignment of the rod. I don't remember why I origonally said it would not work.
Found the assembly diagram for the end brackets, still can't find the mechanical drawing: 
__________________
TigerEFI.com (Classic Pontiac Fuel Injection) 2004 GTO Company car, 1994 TA 25th Anv, 1971 Grand Safari Wagon, 1968 GTO EFI, 1968 GTO Stock, 1968 GTO Convertible in desperate need of restoration. |
|
#15
03-13-2005, 02:33 PM
|
||||
|
||||
|
<BLOCKQUOTE class="ip-ubbcode-quote"><div class="ip-ubbcode-quote-title">quote:</div><div class="ip-ubbcode-quote-content">Originally posted by cejay825:
I guess I could be direct too. How much would you be willing to pay? </div></BLOCKQUOTE> Shoot I wouldn't even know where to start on offering a fair price. I have no clue on what all the circuits and risistors (sp) cost. And what the labor envolved would cost. I could only guess. Glen |
|
#16
03-13-2005, 03:27 PM
|
||||
|
||||
|
heres my set up
|
|
#17
03-13-2005, 03:37 PM
|
||||
|
||||
|
2
|
|
#18
03-13-2005, 03:38 PM
|
||||
|
||||
|
3
|
|
#19
03-13-2005, 05:16 PM
|
||||
|
||||
|
cejay825,
Do you have a schmatic for the capacive discharge unit you built? Regards,
__________________
Larry Metzger Columbus, NJ 1968 GTO Verdoro Green Hardtop 1969 GTO Palladium Silver Hardtop 1969 Judge Carousel Red Hardtop X 2 Someday We'll Look Back On This And It Will All Seem Funny. From Rosilitia, Sung By Bruce Springsteen, CIRCA 1973 |
|
#20
03-13-2005, 05:48 PM
|
||||
|
||||
|
Glen & Larry
You would be surprised how little the parts actually cost.For the electronicaly inclined the contruction is painfully simple, the hardest part was finding a configuration that worked. I did make some rough drawings to work from, but with so many changes that got made some did not make to the drawing board.One of the features that was unavoidable is the capacitor recharge time. I narrowed it down as much as possible.....meaning upon turning on and turning off you must wait at least 2.75 seconds. This really irritated me but it was this or nothing. I am going back and drawing the entire thing out for everybody to see,for the betterment of the GTO society.Drawing it out may take me a few days or so but I'll get it as it will require module disassembly. Here is a picture of my car still in progress, I'm making an entirely new electrical system.More stuff to come....
__________________
69 judge-RAIII Auto 69 conv 4spd a/c 66 conv TBI EFI 76 50th annv. T/A |
| Reply |
|
|
The PY Online Forums is the largest online gathering of Pontiac enthusiasts anywhere in the world. Founded in 1991, it was also the first online forum for people to gather and talk about their Pontiacs. Since then, it has become the mecca of Pontiac technical data and knowledge that no other place can surpass.


 Linear Mode

