


| FAQ |
| Members List |
| Social Groups |
| Calendar |
| Search |
| Today's Posts |
|
#21
 03-12-2023, 09:19 PM
|
|||
|
|||
|
you didn't really hijack anything, I'm still trying to figure out how to reassemble this heater box, too!
I'm pretty sure I've forgotten to re-install a spring or two somewhere. Is there supposed to be a spring at the defrost door? How does it attach? |
|
#22
03-13-2023, 12:27 AM
|
|||
|
|||
|
There's a return spring already built into the arrangement of rigging where the levers are, where cable attaches. There's also a return spring that holds the defroster/floor door sealed when not under vacuum.
|
|
#23
03-13-2023, 12:30 AM
|
|||
|
|||
|
Thank you, I think I forgot that second one. Somehow I need to figure out which of the leftover springs goes there...
I really wish there was a reassembly DIY with pictures somewhere. This heater box was a mess when I got to it, so figuring out how it's supposed to go back together is a nightmare. |
|
#24
03-13-2023, 12:49 AM
|
||||
|
||||
|
Quote:
Attached are a few photos of the levers and spring for the defrost door. The side of the spring on the defrost door that you cant see attaches to an existing hole on adjacent side aluminum plate. Last edited by i4abuygto; 03-13-2023 at 01:07 AM. |
|
#25
03-13-2023, 01:06 AM
|
|||
|
|||
|
Quote:
|
|
#26
03-13-2023, 01:07 AM
|
||||
|
||||
|
I edited my last post with photos.
|
|
#27
03-13-2023, 06:52 AM
|
|||
|
|||
|
Good pics. See first and 2nd for spring on door flap that keeps it shut, vacuum pulls it open. The staples normally hold a sponge foam seal onto the door, always long gone.
3rd pics you can see the spring at top right on the pivot post. |
|
#28
03-13-2023, 08:07 AM
|
|||
|
|||
|
Quote:
|
|
#29
03-13-2023, 01:56 PM
|
||||
|
||||
|
I am trying to figure out the vacuum system as I do this. Perhaps someone can help me with what is necessary and what is not.
I have a 403 that runs pretty strong but I acquired it with much of the vacuum components disconnected as an aftermarket edlebrock aluminum performer manifold and 750 Holley carb were added. I have found in fixing all that the vacuum advance on the distributor is not hooked up. Nor is the charcoal cannister, any of the vacuum lines associated with the air cleaner (except the main line down to the valve cover), or the small vacuum line that controls the AC system that is supposed to have a check valve in line somewhere. After market chrome valve covers are also added. I have attached two photos of the basic 403 vacuum system. The first photo is one that I found for reference - the second photo is edited to show what is not hooked up on my system (circled in red) - is not hooked up - the yellow shows only the manifold vacuum going down to the transmission and that is all that is currently hooked up to the manifold vacuum. My brake booster is to the rear base of the carb and noted in Blue on the second photo. I have to fix the vacuum system - I have a vacuum port open on the front base of the carb that I believe to be ported. I think I need to plug that line and run the distributor, transmission and AC controller off of the Manifold Vacuum - is that correct? Where do I connect the check valve and the AC controller vacuum line to the system? What is necessary on all the other components not hooked up and what is the simplest way to include them if they are necessary? Can I bypass or remove the cannister? Do I need to start a different thread with this topic? Please advise. Thank you. |
|
#30
03-13-2023, 02:20 PM
|
|||
|
|||
|
Those are all engine and emissions diagrams, the simple vacuum for dash controls come off the rear intake runner port.
Start a new thread, that sounds really messed up. Whoever carried out the carb swap obviously didn't know what or why they were doing it, which is nearly every carb swap. 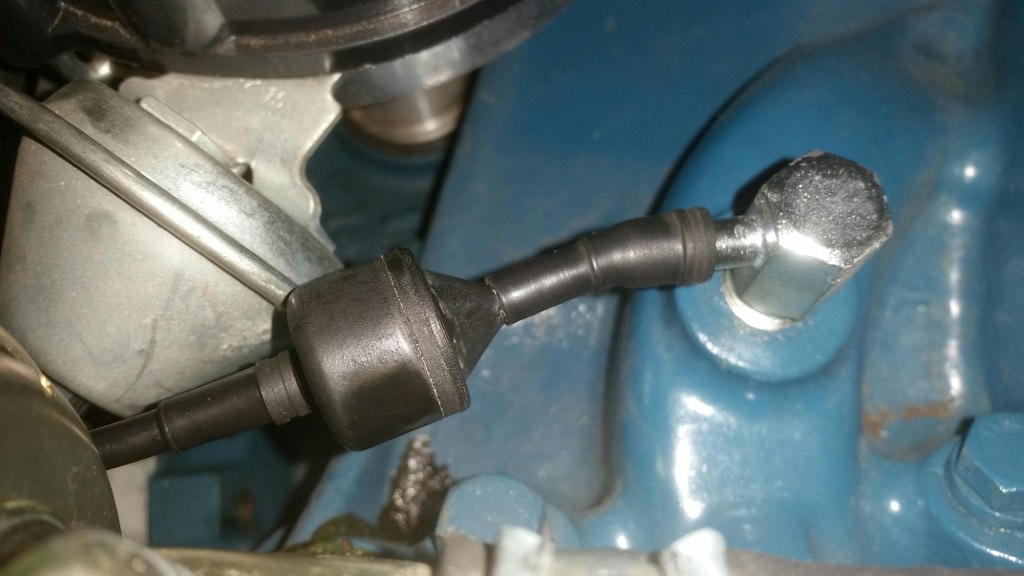 403 olds intake vacuum checkvalve (2) by Ben, on Flickr 403 olds intake vacuum checkvalve (2) by Ben, on Flickr 403 olds intake vacuum checkvalve (1) by Ben, on Flickr 403 olds intake vacuum checkvalve (1) by Ben, on Flickr
Last edited by Trevor78; 03-13-2023 at 02:42 PM. |
|
#31
03-13-2023, 02:40 PM
|
|||
|
|||
|
Quote:
Quote:
If you need info on the underhood system, you'll need to start a new thread in the Street Engine category of this forum |
|
#32
03-13-2023, 03:16 PM
|
||||
|
||||
|
Thanks guys, for your help.
I am not running any emissions either - 403 with better cam - headers - internals unknown but runs strong. Rear end has been upgraded to approx 3:25 gears. I just want to clean up the vacuum system so it is correct for what I have. I will start another thread in the street engine section. Thank you. |
|
#33
06-11-2023, 11:20 AM
|
|||
|
|||
|
Alright, I'm finally just about done and ready to put the heater box back in the car (engine took precedence for a bit). Almost everything is solved. One last question, what attaches to this screw?

|
|
#34
06-11-2023, 11:33 AM
|
|||
|
|||
|
That wouldn't ground it anywhere, though. That screw just threads into plastic
|
|
#35
06-11-2023, 11:34 AM
|
|||
|
|||
|
Might be a wire harness or vacuum line clip... but if it is, I misplaced it
|
|
#36
06-11-2023, 12:14 PM
|
|||
|
|||
|
Try this, loop retainer for the vacuum line that goes to kick panel and cowl door. It's just folded over and screwed.
 20230612_021013 by Ben, on Flickr 20230612_021013 by Ben, on Flickr 20230612_021613 by Ben, on Flickr 20230612_021613 by Ben, on Flickr
Last edited by Trevor78; 06-11-2023 at 12:23 PM. |
|
#37
06-11-2023, 12:43 PM
|
|||
|
|||
|
Ah hah! That's the one, thank you!
|
|
#38
06-26-2023, 12:55 PM
|
||||
|
||||
|
I fixed all vacuum issues and installed my heater box and everything seems to work good.
I have new carpet in and the dash and behind dash duct work is ready to be installed. Before I proceed..... I noticed on the attached photo of the duct schematic that there looks to be a gasket of some sort between the heater box and the cowl evaporator box. There was nothing there when I removed the heater box and is that missing seal necessary? The box was kind of a bitch to install and the lower nut is hard to get to with headers so I would rather not remove the box again to put in a seal if not necessary. Please advise. Thank you. |
|
#39
06-26-2023, 06:16 PM
|
|||
|
|||
|
That's the firewall seal.
|
|
#40
06-27-2023, 01:27 AM
|
||||
|
||||
|
Quote:
|
| Reply |
|
|
The PY Online Forums is the largest online gathering of Pontiac enthusiasts anywhere in the world. Founded in 1991, it was also the first online forum for people to gather and talk about their Pontiacs. Since then, it has become the mecca of Pontiac technical data and knowledge that no other place can surpass.


 Linear Mode

