


| FAQ |
| Members List |
| Social Groups |
| Calendar |
| Search |
| Today's Posts |
|
|
|
#1
 02-17-2023, 07:24 PM
|
|||
|
|||
|
Is there a grommet that goes over that hole at the above the vacuum canister? Or does that stay open like that? I realize a rubber line will come out of it to connect to a vacuum tube.
 Also, for the door that that vacuum canister actuates, I can only adjust it to seal at one extremity of the vacuum canister's range or the other, but not both. Should I bias it to seal in heater mode (vacuum applied to yellow tube) or NOT heater mode (vacuum applied to white tube)? The pontiac assembly manual doesn't appear to clarify. |
|
#2
02-17-2023, 08:25 PM
|
|||
|
|||
|
It has a rubber grommet that slides in from the side, often dried out and hard.
 76 Camaro AC heater box6 by Ben, on Flickr 76 Camaro AC heater box6 by Ben, on FlickrI'm not sure what you've tried, and can't recall how mine was which is modified anyway, but there's adjustments in the length of the control rods, location of the pivot brackets, and the manual cable length from the dash. From memory one is closed under vacuum but fights the spring tension so will open again just sitting there. Last edited by Trevor78; 02-17-2023 at 08:31 PM. |
|
#3
02-18-2023, 09:11 AM
|
|||
|
|||
|
Quote:
|
|
#4
03-13-2023, 12:27 AM
|
|||
|
|||
|
There's a return spring already built into the arrangement of rigging where the levers are, where cable attaches. There's also a return spring that holds the defroster/floor door sealed when not under vacuum.
|
|
#5
02-17-2023, 08:29 PM
|
|||
|
|||
|
Thank you! It seemed odd to leave it open when most of that area is sealed
|
|
#6
02-17-2023, 09:10 PM
|
|||
|
|||
|
I just dragged out a box of spares for a pic. No part numbers cast into it.
 20230218_114804 by Ben, on Flickr 20230218_114804 by Ben, on Flickr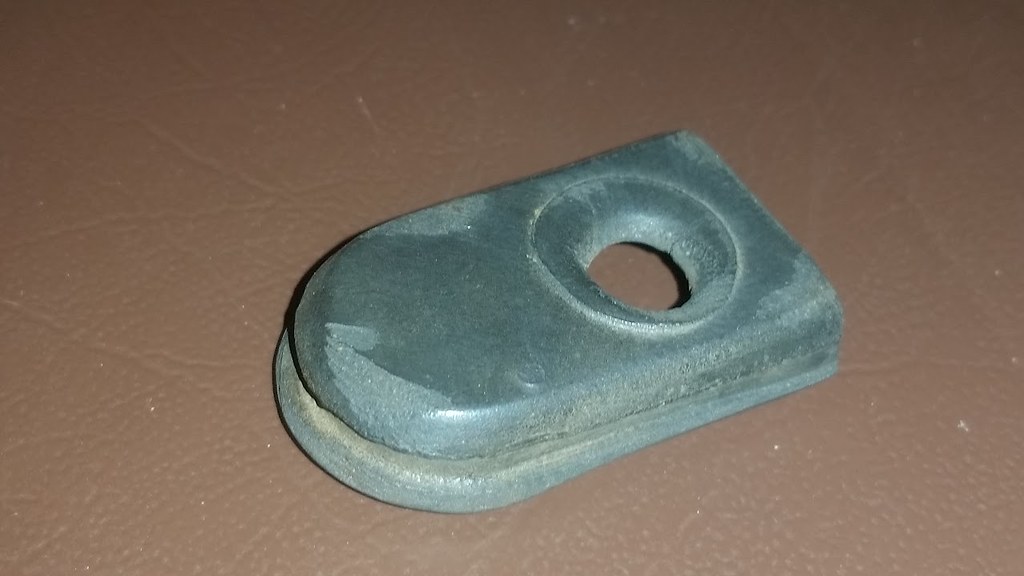 20230218_114819 by Ben, on Flickr 20230218_114819 by Ben, on Flickr
|
|
#7
02-18-2023, 09:17 PM
|
|||
|
|||
|
Quote:
 I can't find one anywhere, used or new. It's fine if you'd rather not, I can just make something that'll serve the same purpose, but I figured I'd ask. I can't find one anywhere, used or new. It's fine if you'd rather not, I can just make something that'll serve the same purpose, but I figured I'd ask.
|
|
#8
02-17-2023, 09:24 PM
|
|||
|
|||
|
Huh, doesn't appear to be anywhere in my box of parts that I removed. The hose is there (and in dire need of replacing), but not that grommet. How annoying...
|
|
#9
02-18-2023, 09:16 AM
|
|||
|
|||
|
Ah hah, just got confirmation from the service manual. When AC is on, there should be no flow from any vents except the AC vents. So that door needs to be adjusted so it's sealed with vacuum on the white tube, as I suspected.
|
|
#10
03-13-2023, 06:52 AM
|
|||
|
|||
|
Good pics. See first and 2nd for spring on door flap that keeps it shut, vacuum pulls it open. The staples normally hold a sponge foam seal onto the door, always long gone.
3rd pics you can see the spring at top right on the pivot post. |
|
#11
06-28-2023, 11:40 PM
|
|||
|
|||
|
Probably all engine types had their version of the retrictor fitting in Firebirds since there was no heater tap valve. I was only just posting info and pics of the Olds version on another forum.
|
| The Following User Says Thank You to Trevor78 For This Useful Post: | ||
|
#12
02-20-2023, 12:53 AM
|
||||
|
||||
|
I am in the same position as you with no rubber grommet to seal the opening for the rubber vacuum line for the yellow tube. I am just going to use a piece of tin shaped to a 90 bend with sealant between the tin and the box.
Quote:
I will be lubing all pivoting points with a dry lube (doesnt attract dust or dirt) before a put it back together. |
|
#13
02-20-2023, 08:28 AM
|
|||
|
|||
|
Quote:
|
|
#14
02-28-2023, 12:01 AM
|
|||
|
|||
|
Quote:
|
| The Following User Says Thank You to GoreMaker For This Useful Post: | ||
|
#15
03-08-2023, 08:28 PM
|
||||
|
||||
|
Quote:
I am in the same position- dash and interior is completely out of the car and I am fixing all electrical on the way up now. I figured out all of the connectors I had questions about - radio and rear defrost related. |
|
#16
03-12-2023, 12:59 AM
|
||||
|
||||
|
79 Trans am 403 engine.
Before I install my heater box I wanted to test all the vacuum canister operation with the AC controller hooked up. Using a vacuum pump system, I applied vacuum to the controller through main feed from the engine vacuum line as it would be with the engine running. While operating the controller, all seemed to work okay except the cowl vent door did not seem to move. The cowl vent door is the one that the vacuum is fed through the firewall above the heater box and one cant see any canister operation (see photos). The door appears to stay open and not move with the shared passenger side kick panel canister as they share the same vacuum control circuit. That circuit only appears to pull vacuum on the MAX control setting and I am getting vacuum at the kick panel canister. Is that correct and do I need to even be concerned about the cowl vent door operation. I would like to know how it all works before I install the heater box and put the dash and interior back in. Please advise if you have knowledge about this. Thank you. |
|
#17
06-11-2023, 12:14 PM
|
|||
|
|||
|
Try this, loop retainer for the vacuum line that goes to kick panel and cowl door. It's just folded over and screwed.
 20230612_021013 by Ben, on Flickr 20230612_021013 by Ben, on Flickr 20230612_021613 by Ben, on Flickr 20230612_021613 by Ben, on Flickr
Last edited by Trevor78; 06-11-2023 at 12:23 PM. |
|
#18
02-20-2023, 02:10 AM
|
|||
|
|||
|
Haha I'm in Australia but feel free to have one! I picked up several junk heater boxes years ago, just for vacuum lines and retainer spares.
|
|
#19
02-20-2023, 08:35 AM
|
|||
|
|||
|
Quote:
|
|
#20
03-13-2023, 02:20 PM
|
|||
|
|||
|
Those are all engine and emissions diagrams, the simple vacuum for dash controls come off the rear intake runner port.
Start a new thread, that sounds really messed up. Whoever carried out the carb swap obviously didn't know what or why they were doing it, which is nearly every carb swap. 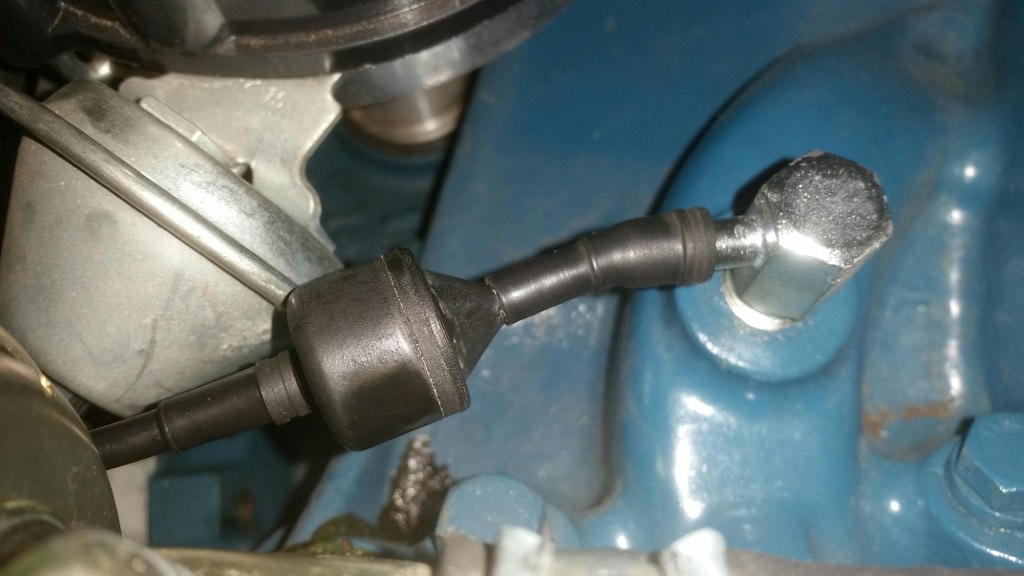 403 olds intake vacuum checkvalve (2) by Ben, on Flickr 403 olds intake vacuum checkvalve (2) by Ben, on Flickr 403 olds intake vacuum checkvalve (1) by Ben, on Flickr 403 olds intake vacuum checkvalve (1) by Ben, on Flickr
Last edited by Trevor78; 03-13-2023 at 02:42 PM. |
| Reply |
|
|
The PY Online Forums is the largest online gathering of Pontiac enthusiasts anywhere in the world. Founded in 1991, it was also the first online forum for people to gather and talk about their Pontiacs. Since then, it has become the mecca of Pontiac technical data and knowledge that no other place can surpass.


 Hybrid Mode
