


| FAQ |
| Members List |
| Social Groups |
| Calendar |
| Search |
| Today's Posts |
|
#1
 04-29-2021, 01:34 PM
|
|||
|
|||
|
I am wondering if any one can provide a picture of the two horns needed for the 80 pace car
I need to see exactly how they mount I have 1 wire with 2 female leads and that is it F body warehouse shows 1978 to 1981 A note and F note total of 2 Also if any one has the 2 horns for sale As always thanks again |
|
#2
04-29-2021, 04:27 PM
|
|||
|
|||
|
this shows the general mounting location, theres a small ear on the horn bracket that goes into a hole in the center bar to locate it, the bolt goes in from behind. & make sure the bolt hole threads, & metal area under the bolt head are clean metal, that show they ground. & i suggest buying a GM service manual, it has almost all the info you need to work on or restore the car. can buy them on CD for about $20 on ebay or other places.
the wire has a jumper on it for the other horn, connector with 2 wires in it goes to the pass side horn. they are A & F. i have a bunch of horns but havent tested them all yet since pulled off parts cars. i can test some if you dont find good working ones elsewhere. |
|
#3
04-30-2021, 01:49 AM
|
|||
|
|||
|
I've noticed that one horn mounts straight down, the other turned about 5 degrees. I'm not sure if this is intentional or correct, just those I've bothered to notice.
|
|
#4
04-30-2021, 09:12 AM
|
|||
|
|||
|
Quote:
|
|
#5
05-02-2021, 11:04 AM
|
||||
|
||||
|
GM Delco replacement horn part numbers:
Low "F" note horn 1892163 High "A" note horn 1892164 Some cars used: Low "D" note horn 1892162 High "C" note horn 1892246 The parts book didn't specify which models receieved which note.. https://www.ebay.com/itm/39323980717...AAAOSwl2pgcOBQ https://www.ebay.com/itm/26505739842...IAAOSw1EFgLUGd These are the correct horn bodies, but as with all NOS Delco replacement hoens have a universal bracket with a threaded boss spot welded to the horn body. You CAN drill the spot welds and R&R your original mounting brackets by rewelding them to the horn body..
__________________
1976 LeMans B09 Freeway Enforcer, 455/M40 Smokey 1977 Trans Am, 400/M21 Black/Gold Bandit. 44K actual miles 2017 Sierra SLT 1500 Z71 4X4  2019 Canyon SLT Crew 4X4  
|
|
#6
05-02-2021, 08:30 PM
|
|||
|
|||
|
Thanks for all the input
I am going to do E Bay used Does any one have a picture of what the factory mount / Placement looks like I checked the manual and did not see anything. |
|
#7
05-03-2021, 11:45 PM
|
|||
|
|||
|
The horns both have two prongs for aligning and a single bolt hole. They come as a left and right assembly. And they simply mount onto the face of the plate that is part of the core support bracket that has 6 holes in it.
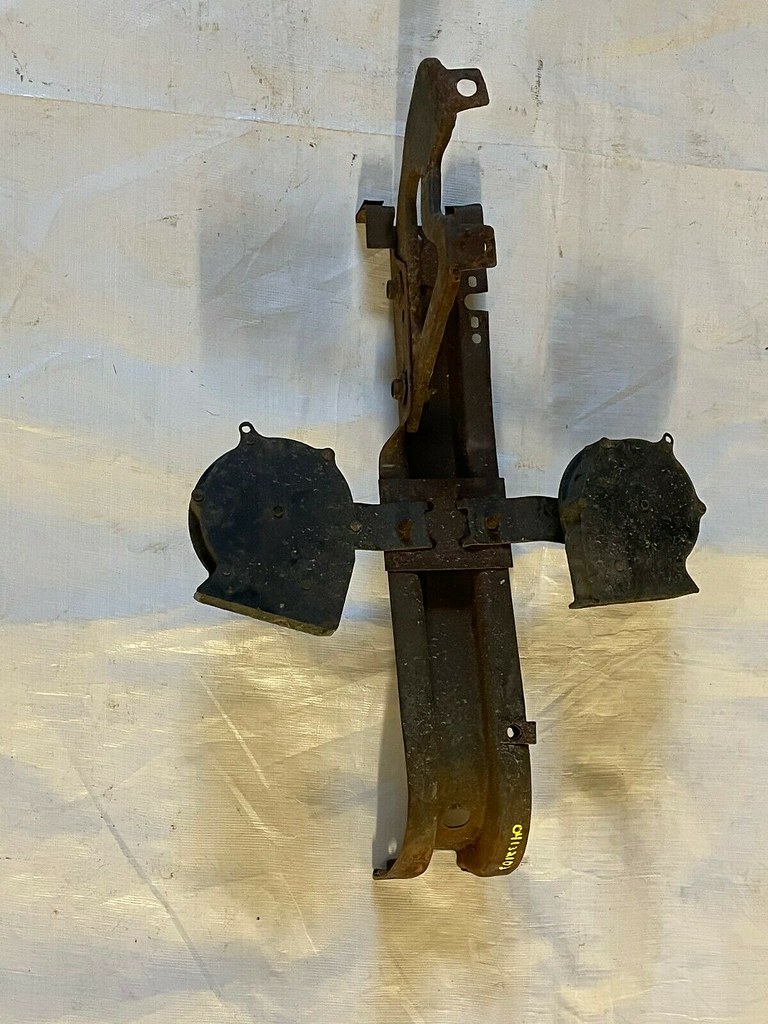 79-81 Firebird front support bracket horns nosecone 4 by Aus78Formula, on Flickr 79-81 Firebird front support bracket horns nosecone 4 by Aus78Formula, on Flickr 79-81 Firebird front support bracket horns nosecone 3 by Aus78Formula, on Flickr 79-81 Firebird front support bracket horns nosecone 3 by Aus78Formula, on FlickrThe horns actually have a nut that secures them to their mounting brackets but normally don't come apart. That possibly explains why one side also turned slightly as nipped up tight by hand. Last edited by Aus78Formula; 05-03-2021 at 11:57 PM. |
|
#8
05-04-2021, 02:57 PM
|
|||
|
|||
|
Thanks,
The pictures are perfect exactly what I was looking for. Thanks again. |
|
#9
05-05-2021, 02:12 PM
|
|||
|
|||
|
Does the main front wire harness for the head lights etc.
Go in front of the main bracket engine side or Does it run behind the bracket nose of car side The reason I ask is mine is on the nose of the car side but I see a plastic harness clip on the metal bracket that looks like it is for the harness Thanks |
|
#10
05-05-2021, 10:01 PM
|
|||
|
|||
|
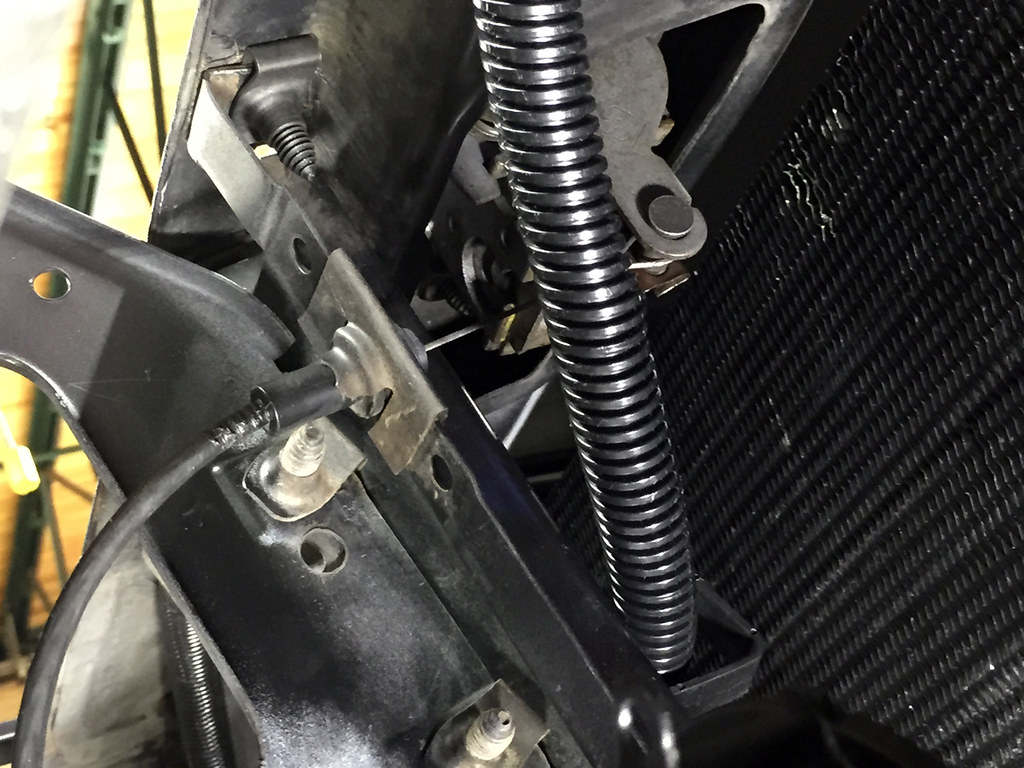
Will send a pic when home later. Do you have the 1980 Assembly manual?
Headlight loom runs along top, horn harness uses retainer behind upright. |
|
#11
05-05-2021, 11:47 PM
|
|||
|
|||
|
Not sure why I've added convoluted tubing over the hood cable. From memory it was damaged on each end and the tubing helped keep it to a smooth S shape to operate, it's gone now, only just noticed that. Funny looking back at photos and picking up errors or things that weren't quite done.
 Headlight wiring loom retainers radiator support by Aus78Formula, on Flickr Headlight wiring loom retainers radiator support by Aus78Formula, on Flickr
|
|
#12
05-06-2021, 10:22 AM
|
|||
|
|||
|
Thanks picture helps a lot
Explains perfectly |
|
#13
05-06-2021, 10:30 AM
|
|||
|
|||
|
I noticed that the part of the latch that bolts to the header panel is natural
I am going to believe that is factory great information for my detailing |
|
#14
05-07-2021, 07:09 AM
|
|||
|
|||
|
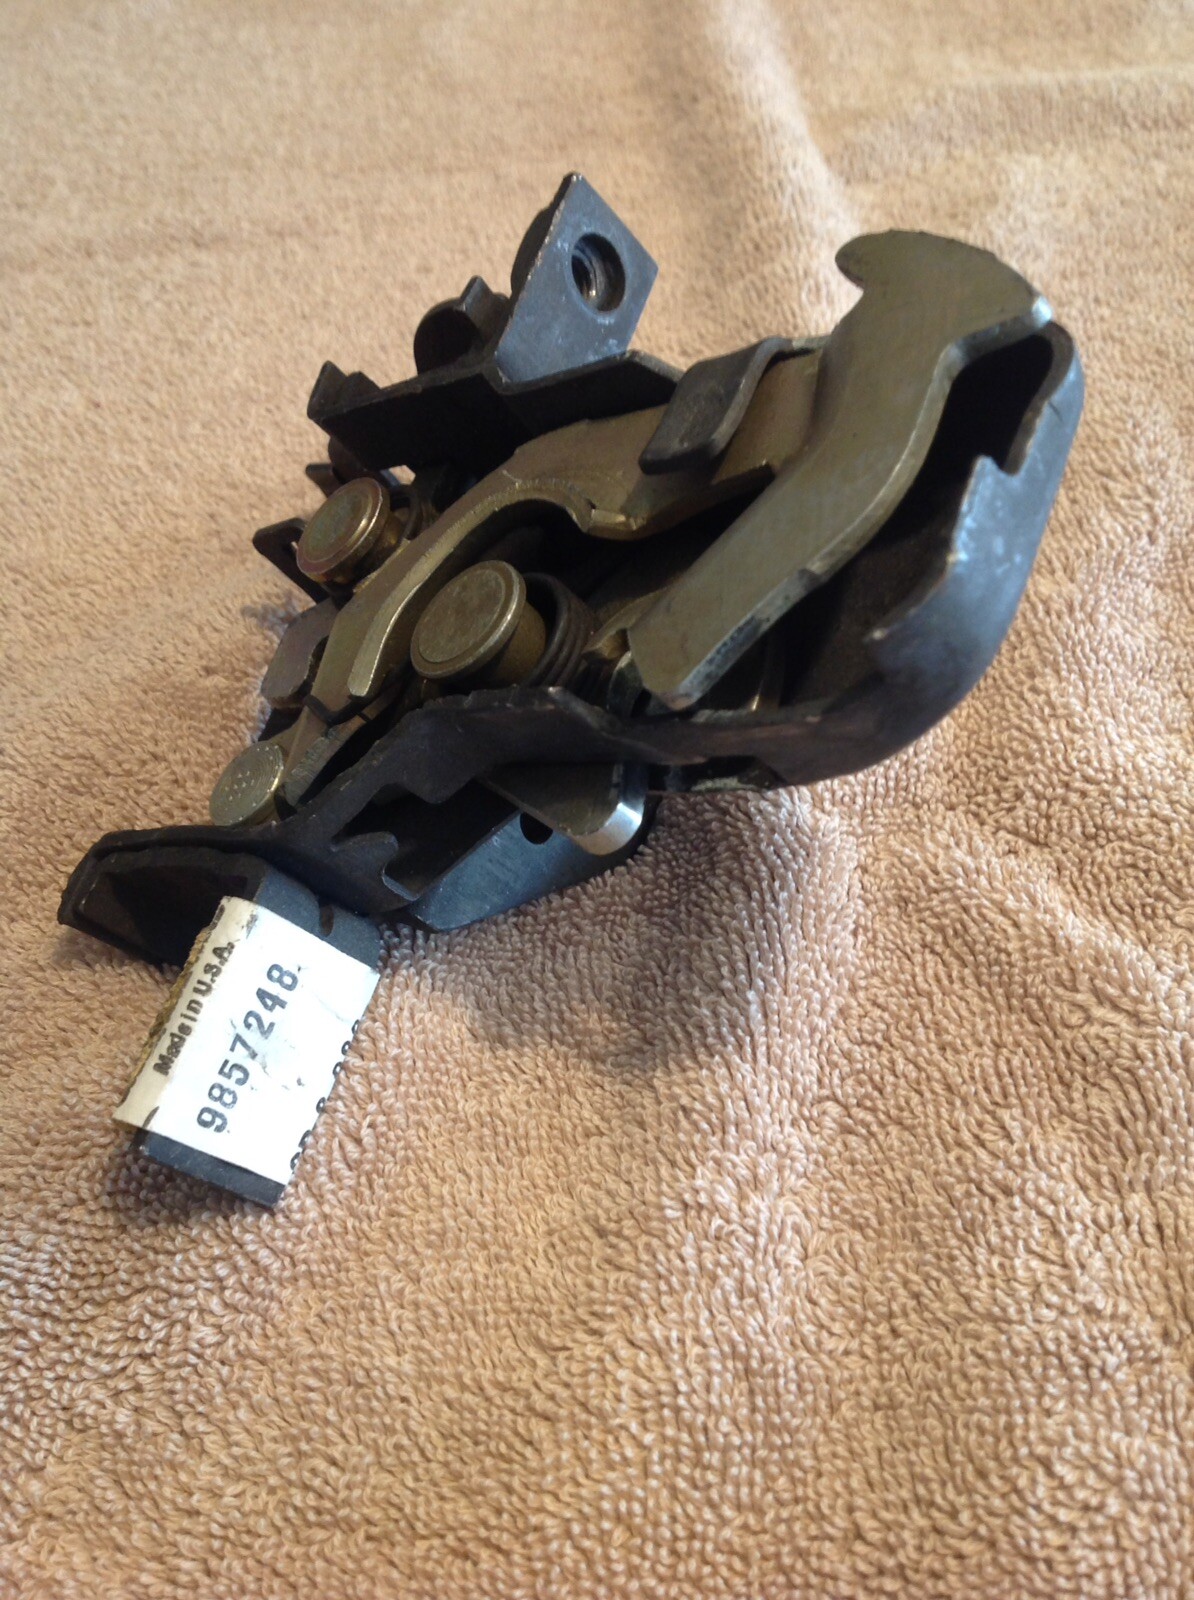
The latch is normally blackened housing and gold cap plated workings, both of which fade back to a grey metal over the years. Mine is still plated but looks silvery grey in pic. The cable retainers were also blackened normally, I had one that had plating, appears to be the one in pic.
|
|
#15
05-08-2021, 07:31 AM
|
||||
|
||||
|
From my 1977. This is an NOS unit. Gold cadmium plated mechanism parts and black phosphate dipped main body. It has a dark grey crystalline appearance. That hood cable clip was also the same black phosphate dipped.
__________________
1976 LeMans B09 Freeway Enforcer, 455/M40 Smokey 1977 Trans Am, 400/M21 Black/Gold Bandit. 44K actual miles 2017 Sierra SLT 1500 Z71 4X4 2019 Canyon SLT Crew 4X4
|
|
#16
05-08-2021, 09:36 AM
|
|||
|
|||
|
Quote:
 Hood latch and cable 77_78 Firebird1 by Aus78Formula, on Flickr Hood latch and cable 77_78 Firebird1 by Aus78Formula, on Flickr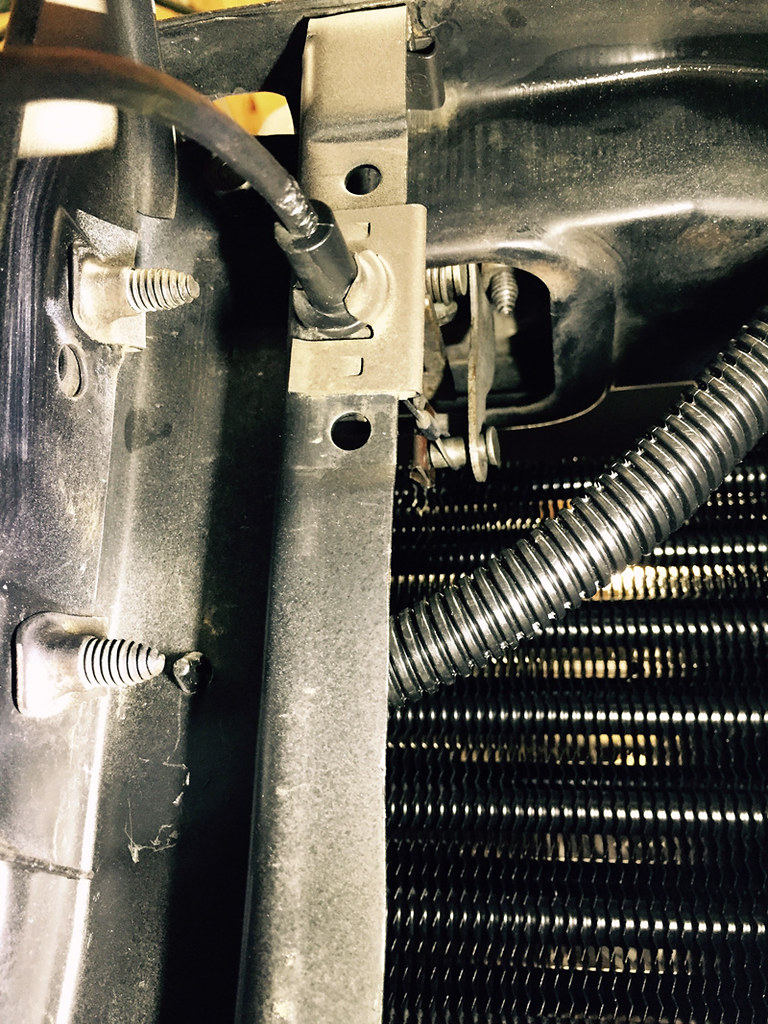 Hood latch and cable 77_78 Firebird2 by Aus78Formula, on Flickr Hood latch and cable 77_78 Firebird2 by Aus78Formula, on Flickr 78 TA hood cable2 by Aus78Formula, on Flickr 78 TA hood cable2 by Aus78Formula, on Flickr
|
| Reply |
|
|
The PY Online Forums is the largest online gathering of Pontiac enthusiasts anywhere in the world. Founded in 1991, it was also the first online forum for people to gather and talk about their Pontiacs. Since then, it has become the mecca of Pontiac technical data and knowledge that no other place can surpass.


 Linear Mode

