


| FAQ |
| Members List |
| Social Groups |
| Calendar |
| Search |
| Today's Posts |
|
#181
 09-16-2022, 10:28 AM
|
||||
|
||||
|
Why only rotate clockwise? It wasn’t about saving time, it just didn’t occur to me to go all the way around.
__________________
Ken '68 GTO - Ram Air II 464 - 236/242 roller - 9.5 TSP converter - 3.55 posi (build thread | walk around) '95 Comp T/A #6 M6 - bone stock (pics) |
|
#182
09-16-2022, 10:45 AM
|
||||
|
||||
|
It's most accurate that way, as the engine rotates or runs. Moving it back and forth sometimes will throw a smidge amount of play in it that will throw off the readings. Even if it's just a thou, you're trying to be as accurate as possible.
Try it and see if you get a different result. If not, then it sounds like you're good to go. |
|
#183
09-16-2022, 11:54 AM
|
||||
|
||||
|
Ok, so it's not about breaking or damaging anything, it's about avoiding any slack in the assembly. Sounds like my general measurement procedure is ok though? Will do it clockwise and see how it comes out.
I almost forgot about the crank scraper. I used grey Permatex to adhere it to the block. Well over .080 clearance from the crank across the board so no need to trim it. Next on my list is the oil pump. It's a 60psi Butler pump. Should I run the shim they provided for a little more pressure?
__________________
Ken '68 GTO - Ram Air II 464 - 236/242 roller - 9.5 TSP converter - 3.55 posi (build thread | walk around) '95 Comp T/A #6 M6 - bone stock (pics) |
|
#184
09-16-2022, 12:32 PM
|
||||
|
||||
|
I would weld some straps on the section where the dipstick is. Many have cracks and break off! Here is a thread where Old Man Taylor had pictures of his. All of mine have them now.
http://forums.maxperformanceinc.com/...t=Windage+tray
__________________
Skip Fix 1978 Trans Am original owner 10.99 @ 124 pump gas 455 E heads, NO Bird ever! 1981 Black SE Trans Am stockish 6X 400ci, turbo 301 on a stand 1965 GTO 4 barrel 3 speed project 2004 GTO Pulse Red stock motor computer tune 13.43@103.4 1964 Impala SS 409/470ci 600 HP stroker project 1979 Camaro IAII Edelbrock head 500" 695 HP 10.33@132 3595lbs Last edited by Skip Fix; 09-16-2022 at 12:39 PM. |
| The Following User Says Thank You to Skip Fix For This Useful Post: | ||
|
#185
09-16-2022, 12:40 PM
|
||||
|
||||
|
you going to drill a few more,larger holes in that windage tray for quicker oil return to the pan?
__________________
72 lemans,455 e-head, UD 255/263 solid flat,3.73 gears,,,10" 4400 converter,, 6.68 at 101.8 mph,,1.44 60 ft.2007 (cam 271/278 roller)9"CC.4.11gear 6.41 at 106.32 mph 1.42 60 ft.(2009) SOLD,SOLD 1970 GTO 455 4 speed #matching,, 3.31 posi.Stock manifolds. # 64 heads.A factory mint tuquoise ,69' judge stripe car. 8.64 @ 87.3 mph on slippery street tires.Bad 2.25 60ft.Owned since 86' |
|
#186
09-16-2022, 12:59 PM
|
||||
|
||||
|
Quote:
Quote:
__________________
Ken '68 GTO - Ram Air II 464 - 236/242 roller - 9.5 TSP converter - 3.55 posi (build thread | walk around) '95 Comp T/A #6 M6 - bone stock (pics) |
|
#187
09-16-2022, 01:03 PM
|
||||
|
||||
|
Please do drill more drain holes in that, and I know that you have that scraper glued down, but that .080” is not going to do a whole lot!
I when I use these I slot the bolt holes and trim what’s needed to get that clearance to be half of that ,080”.
__________________
I do stuff for reasons. |
|
#188
09-16-2022, 01:07 PM
|
||||
|
||||
|
Quote:
What size, how many holes and where do you place them in the windage tray? Assuming I could follow what the Tomahawk tray does. 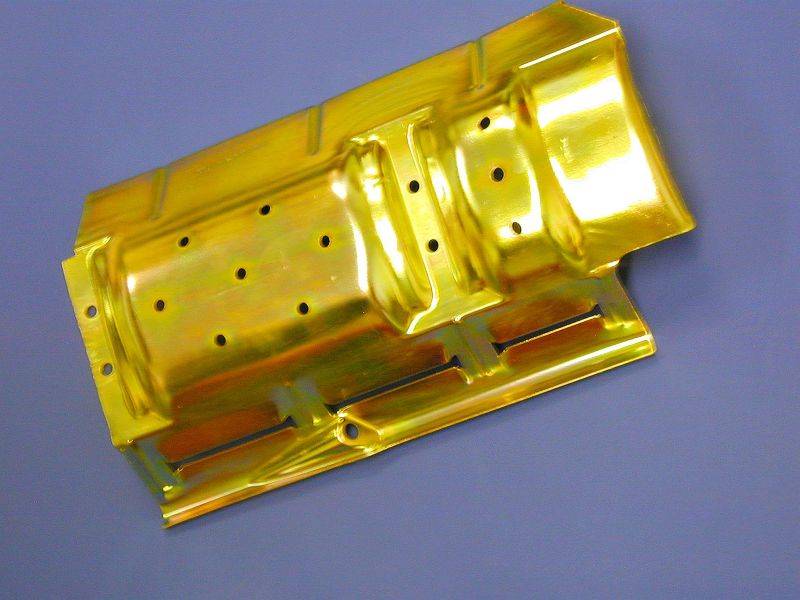
__________________
Ken '68 GTO - Ram Air II 464 - 236/242 roller - 9.5 TSP converter - 3.55 posi (build thread | walk around) '95 Comp T/A #6 M6 - bone stock (pics) Last edited by Verdoro 68; 09-16-2022 at 01:13 PM. |
|
#189
09-16-2022, 01:31 PM
|
||||
|
||||
|
I added a few more holes in mine and had them teflon coated.
__________________
Skip Fix 1978 Trans Am original owner 10.99 @ 124 pump gas 455 E heads, NO Bird ever! 1981 Black SE Trans Am stockish 6X 400ci, turbo 301 on a stand 1965 GTO 4 barrel 3 speed project 2004 GTO Pulse Red stock motor computer tune 13.43@103.4 1964 Impala SS 409/470ci 600 HP stroker project 1979 Camaro IAII Edelbrock head 500" 695 HP 10.33@132 3595lbs |
| The Following User Says Thank You to Skip Fix For This Useful Post: | ||
|
#190
09-16-2022, 07:01 PM
|
||||
|
||||
|
Quote:
__________________
72 lemans,455 e-head, UD 255/263 solid flat,3.73 gears,,,10" 4400 converter,, 6.68 at 101.8 mph,,1.44 60 ft.2007 (cam 271/278 roller)9"CC.4.11gear 6.41 at 106.32 mph 1.42 60 ft.(2009) SOLD,SOLD 1970 GTO 455 4 speed #matching,, 3.31 posi.Stock manifolds. # 64 heads.A factory mint tuquoise ,69' judge stripe car. 8.64 @ 87.3 mph on slippery street tires.Bad 2.25 60ft.Owned since 86' |
|
#191
09-16-2022, 07:10 PM
|
||||
|
||||
|
If you look at a used tray even in a motor that has had decent oil changes the old oil and debris sitting there and not draining build up crap.
__________________
Skip Fix 1978 Trans Am original owner 10.99 @ 124 pump gas 455 E heads, NO Bird ever! 1981 Black SE Trans Am stockish 6X 400ci, turbo 301 on a stand 1965 GTO 4 barrel 3 speed project 2004 GTO Pulse Red stock motor computer tune 13.43@103.4 1964 Impala SS 409/470ci 600 HP stroker project 1979 Camaro IAII Edelbrock head 500" 695 HP 10.33@132 3595lbs |
| The Following User Says Thank You to Skip Fix For This Useful Post: | ||
|
#192
09-17-2022, 02:22 AM
|
||||
|
||||
|
You all convinced me. I pulled the tray, drilled and deburred it using the Tomahawk pic as a guide. A stepped bit made quick work of the project. I did this outside about 20 feet from my short block and scrubbed it down really, really good with soap and water afterwards. I could see how the additional holes help a lot when cleaning it.
After I got that cleaned up, I degreed the cam again only going clockwise and came up with the same values , so I'm going to call the cam and timing set good to go. I put the fuel pump eccentric on and measured cam endplay, which is a little on the tight side of the spec at .003. The rotating assembly turns over with about 23 ft/lbs on the torque wrench give or take. Next I completely disassembled and cleaned the Butler oil pump. Glad I did because there was some debris in there. The pressure relief spring was also painted and the paint was starting to flake off. I probably should have picked up the 80lb pump, but I ordered the 60lb way back when. Reading other threads, it seems like it will be just fine, but I figured it wouldn't hurt to add the provided the shim to up the pressure a little bit more. It's a tiny washer, I'm not sure exactly how much more PSI it provides. Fitting the pickup depth to the new stock replacement Milodon pan is next on my list, then I'll move to fitting the pan, front cover and checking the balancer for TDC accuracy.
__________________
Ken '68 GTO - Ram Air II 464 - 236/242 roller - 9.5 TSP converter - 3.55 posi (build thread | walk around) '95 Comp T/A #6 M6 - bone stock (pics) |
|
#193
09-17-2022, 10:27 AM
|
|||
|
|||
|
So I have been watching the debates on the trays Im surprised no one has talked about the difference in trays. I had one come apart a few years back and under inspection found the tray had only had 3 ribs down the non dip stick side. Started looking at some of the others I had and found they made them with 6 ribs down the side that improves strength a lot anyone who has ever bead rolled aluminum with tell you that. As for the full length tray I personally dont think theres any advantage of it in the front of engine. I have noticed all the broken tray pictures posted have been 3 bead trays. I went out to take a picture of the difference but I have sold all the 3 bead trays already but heres the 6 bead picture. I dont have one to check but if I remember right the 6 bead trays are a little thicker.
|
|
#194
09-17-2022, 12:03 PM
|
||||
|
||||
|
Quote:
Never noticed that with the trays. I have a couple and will have to check them out. V68, I noticed in the 2nd to last pic, the three holes at the bottom. Is that the counter weight on the left hole? It might just be the angle of the pic but something looks really close?
__________________
'71 GTO, 406 CID, 60916, 1.65 HS, '69 #46 Heads 230CFM, 800CFM Q-jet, TH400, 12 Bolt 3.55 '72 Lemans, Lucerne Blue, WU2, T41, L78, M22, G80 |
|
#195
09-17-2022, 12:34 PM
|
||||
|
||||
|
Maybe Im naive, but this windage tray seems pretty solid. No indication of stress cracks anywhere and lower dipstick tube fits perfect. On the flip side, it is original to the car and is 54 years old. What causes them to crack? Is the safe bet just to bite the bullet and get a Tomahawk tray?
Quote:
__________________
Ken '68 GTO - Ram Air II 464 - 236/242 roller - 9.5 TSP converter - 3.55 posi (build thread | walk around) '95 Comp T/A #6 M6 - bone stock (pics) |
|
#196
09-17-2022, 04:42 PM
|
||||
|
||||
|
Quote:
I think vibration is the culprit for the tray cracking. 
__________________
John Wallace - johnta1 Pontiac Power RULES !!! www.wallaceracing.com Winner of Top Class at Pontiac Nationals, 2004 Cordova Winner of Quick 16 At Ames 2004 Pontiac Tripower Nats KRE's MR-1 - 1st 5 second Pontiac block ever! "Every man has a right to his own opinion, but no man has a right to be wrong in his facts." "People demand freedom of speech to make up for the freedom of thought which they avoid." Socrates |
|
#197
09-18-2022, 04:25 PM
|
||||
|
||||
|
Spent a few hours working on getting the bottom end tightened up. Since I'm using a factory-type oil pan, the notch in the oil pump provided about 3/8" distance from the bottom of the pan to the filter. Tacked the pickup into place, put the driveshaft into place, torqued it down to 40 ft/lbs with blue loctite and the copper gasket Butler provided. I think I'm good to go.
I started fitting up the pan while I was working on the pump. The BOP one piece gasket is a nice piece, but you need to pay attention to the details when installing one. The rear part of the seal had to be persuaded to seat into the in the valley in the main cap. I used a little screwdriver to pop it into place. Next, the 12 ft/lbs of torque in the instructions are critical to it to lay down properly. I used a little assembly grease to test how the seal was mating on the rear main. I ended up having to massage the pan a little bit to get the seal to even out. I probably spent 2 or 3 hours messing with the pan, had it on and off probably 10 times and I still don't feel like I'm done, but it's close. I'll be really irritated if this thing leaks like it did before when it's all together. Next, I fit up the front cover and balancer so I could validate TDC. Determining TDC by a dial indicator on the #1 piston, it looks like TDC is about 2 degrees off. I put the original cover back on to see if it was an anomaly with the reproduction, but got the same results. Curious how common this is. Everything else has been spot on so far. Perhaps I sign that I was overdue for a better front cover, I never realized the coolant fittings were drop in. They were so corroded in place on my original I thought they were press in! I also installed the alignment collars which I don't think my engine has ever had as far as I can remember. BTW, this is a '69 front cover. For whatever reason, my car had one when I bought it '91 so I decided to keep it that way. Everything else was original so my hunch is it may have had to do with the timing chain replacement.
__________________
Ken '68 GTO - Ram Air II 464 - 236/242 roller - 9.5 TSP converter - 3.55 posi (build thread | walk around) '95 Comp T/A #6 M6 - bone stock (pics) Last edited by Verdoro 68; 09-18-2022 at 04:37 PM. |
|
#198
09-21-2022, 12:32 AM
|
||||
|
||||
|
The two degrees was bugging me. I think the balancer I had is a stock replacement Pioneer I got for the build in 2010. Thinking that it might be wrong, I ordered a Powerbond 1056SS. This one is a little more accurate, maybe a degree off, plus it's SFI rated. I think I can live with it.
I need to go poke the machine shop on my heads since I'm about ready for them. Based on advice here, I do have a set of Harland Sharp diamond roller rockers on the way to replace the PRWs. They're backordered until the end of the month. The Crowers were backordered until December, maybe longer.
__________________
Ken '68 GTO - Ram Air II 464 - 236/242 roller - 9.5 TSP converter - 3.55 posi (build thread | walk around) '95 Comp T/A #6 M6 - bone stock (pics) Last edited by Verdoro 68; 09-21-2022 at 01:31 AM. |
|
#199
09-24-2022, 10:45 PM
|
||||
|
||||
|
I broke down an ordered the Tomahawk windage tray after reading it's made of thicker metal. I needed a new oil filter adapter from Butler anyway. Still waiting on the heads. He promised me he'd start at the end of the week, but he's been saying that for about 3 months now.
In the mean time, I've been trying my hand at gasket matching and modifying the repro RAIV intake. Been using a cordless multispeed Dewalt grinder I picked up for this job some aluminum grinding bits and a kit of sandpaper rolls from Amazon. I've been running the grinder at the lowest speed (10k), seems to do ok. Right now I have the ports rough finished with the 80 grit rolls. I've heard you want to leave some texture on them, not sure how much is ok. In addition to matching the ports, I opened up the carb plenum. I used pics of modified intakes I found in the forum as a guide. I didn't do the notch between the secondaries. Seems the benefit is debatable? At this point, I think I'm only limited by my knowledge and skills  Hopefully I'm not doing more harm than good. Hopefully I'm not doing more harm than good.
__________________
Ken '68 GTO - Ram Air II 464 - 236/242 roller - 9.5 TSP converter - 3.55 posi (build thread | walk around) '95 Comp T/A #6 M6 - bone stock (pics) |
|
#200
09-24-2022, 11:00 PM
|
||||
|
||||
|
You don't have to permanently modify the intake with the notch between the secondaries. You could make a short 1/2" spacer from phenolic or wood to match the intake, and then put the notch in that spacer, just to see if it's something that helps the car or not.
Usually what I do before I do something hard to reverse on the intake itself. Usually a spacer is helpful anyway, increasing plenum volume. Just tossing it out there. |
| Reply |
|
|
The PY Online Forums is the largest online gathering of Pontiac enthusiasts anywhere in the world. Founded in 1991, it was also the first online forum for people to gather and talk about their Pontiacs. Since then, it has become the mecca of Pontiac technical data and knowledge that no other place can surpass.


 Linear Mode

