


| FAQ |
| Members List |
| Social Groups |
| Calendar |
| Search |
| Today's Posts |
|
#61
 03-25-2015, 01:42 PM
|
||||
|
||||
|
A.I.R. pump has extra brackets & holes in head where exhaust gets fed air pumped into it by a "smog pump" driven by a belt. There are extra gaskets I never knew what for in the master gasket kit and they are for them.
Link with pictures. |
|
#62
03-25-2015, 04:48 PM
|
||||
|
||||
|
Thanks Ben for the info!
|
|
#63
03-25-2015, 04:51 PM
|
||||
|
||||
|
Was this a California only thing? I had an '87 Jaguar once that had the same type of thing. In fact I think the pump was a GM unit.
__________________
'69 Bonneville convertible Warwick blue/ parchment interior 53 option accessories 2 more to go :-) |
|
#64
03-26-2015, 12:45 AM
|
||||
|
||||
|
I'm pretty sure it was only for Ca. cars.
|
|
#65
03-27-2015, 12:33 PM
|
||||
|
||||
|
I'm getting ready to replace my heater core. What is the steps needed to replace the unit on a A/C car. I've been told removing the inner fender wheel is one step. My shop cd wasn't much help. Thanks Scott
|
|
#66
03-27-2015, 02:21 PM
|
||||
|
||||
|
Quote:
|
|
#67
03-27-2015, 02:24 PM
|
||||
|
||||
|
this is just my opinion so take it for what its worth.
Since your car is in the condition it is I suggest a dis-assembly. Remove the front bumper, lower valance panel, right fender, inner wheel fender and then the A/C unit and condenser housing and components. This will give you unfettered access to heater core. It will also let you address the restoration work for the parts you removed as well as check on lots of potential "bug-a-boo" points such as wires, hoses, seals, blower fan, etc.... in those areas. I know it sounds like a lot of work (and it is) but I think you'll be much happier with the result rather than just trying to do a heater core replacement like an auto repair shop would do.
__________________
'69 Bonneville convertible Warwick blue/ parchment interior 53 option accessories 2 more to go :-) |
|
#68
03-27-2015, 02:26 PM
|
||||
|
||||
|
Duh, what was I thinking. Ben is right. Access to the heater core is from the inside and dash removal will make it infinitely easier to access. I still advise doing the fender dis-assembly. In the long run I think you'll be happier.
__________________
'69 Bonneville convertible Warwick blue/ parchment interior 53 option accessories 2 more to go :-) |
|
#69
03-27-2015, 04:20 PM
|
||||
|
||||
|
On the inside, remove the plastic A/C ductwork piece hanging below the dash. Take the glove box liner out, and remove the kick panel over there. That will get you all the access you need. You'll be able to get the vacuum lines and control cable loose from there. Don't forget to re-attach everything, including the wiring connector on top of the box there that is part of the compressor switch (did that!). You'll have to pull the carpet and the firewall pad down out of the way a little bit to get access to the fasteners, but that's it. Once you get everything loose from the engine side, it's not that bad.
I had the whole front clip off when I did mine, so I'm not sure what the minimum steps are up in that area with the car assembled. Alan |
|
#70
03-27-2015, 05:18 PM
|
||||
|
||||
|
Thanks. The dash is 100% out. Was hoping to only have to remove the inner fender at this time. Dash first, vacuum hoses and electrical. Then do what ever it takes, so I can drive it. Then see what other issues it might have. My GF bought this for me, I LMAO. Hope it's not too rude for you guys!
|
|
#71
03-28-2015, 05:02 PM
|
||||
|
||||
|
LOL!!
|
|
#72
04-04-2015, 12:25 PM
|
||||
|
||||
|
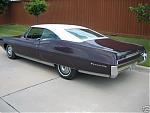
Love 67's..especially the Brougham and California AIR versions, so good to see another one being saved. I have a fairly substantial load of pictures, just let me know what your looking for. Attached a few.
__________________
------------------------------------------------------------ 1967 Bonneville Sport Coupe (Plum Mist), Org. paint, Org. 38K miles 1967 Bonneville Convertible (Montego Cream, Cal Car, 105K miles 1967 Executive Wagon (Plum Mist), Org. paint, Org 35K miles 1981 Bonneville Brougham Coupe (Black) Moonroof, Org. 11K miles Last edited by compsur; 04-04-2015 at 12:33 PM. |
|
#73
04-05-2015, 12:54 AM
|
||||
|
||||
|
Thanks for the pictures. Do you have an vinyl top pictures with the Brougham emblem? I'm in search of one emblem. Wanting to make sure the one I have is correct.
|
|
#74
04-05-2015, 03:01 AM
|
||||
|
||||
|
A Couple of more with the emblem.
Quote:
__________________
------------------------------------------------------------ 1967 Bonneville Sport Coupe (Plum Mist), Org. paint, Org. 38K miles 1967 Bonneville Convertible (Montego Cream, Cal Car, 105K miles 1967 Executive Wagon (Plum Mist), Org. paint, Org 35K miles 1981 Bonneville Brougham Coupe (Black) Moonroof, Org. 11K miles |
|
#75
04-05-2015, 10:59 AM
|
||||
|
||||
|
Nice! I do have the correct emblem. Now I need to locate another one. Update. My water pump was froze. Removed that and the timing cover. Installed a new billet timing chain set and timing cover, I had. Radiator is getting a new core. Inner fenders are off. New heater core will be installed. Replacing most if not all vacuum lines, for the a/c and power door locks. Then front suspension components.

|
|
#76
06-20-2015, 05:26 PM
|
||||
|
||||
|
Is that the correct under hood retractable lamp? My PHS shows my 67 GP came with one and I'd like to find the right one. I've run across an under hood lamp that is supposed to be for a '67 Grand Prix but the glass was the taller, kind of cone shaped that has half of the lens painted red.
|
|
#77
06-20-2015, 05:46 PM
|
||||
|
||||
|
There were several variations in '67 on the real-out lights offered.
The low puck style was a service light while the taller red & white was a Service/Safety light. I have also seen some low(puck) with red paint, just don't know if this was Pontiac. The trunk lights had a mercury switch on the mounting bracket, while the under-hood used the plunger type switch. So either would/could be correct for under hood, as well as trunk.
__________________
When I die, I want to go peacefully like my grandfather did, in his sleep. Not screaming like the passengers in his car. 
Last edited by Jeff Hamlin; 08-29-2015 at 06:09 AM. |
|
#78
06-20-2015, 06:01 PM
|
||||
|
||||
|
Quote:
Thanks for the information! |
|
#79
06-20-2015, 06:17 PM
|
||||
|
||||
|
Quote:
__________________
------------------------------------------------------------ 1967 Bonneville Sport Coupe (Plum Mist), Org. paint, Org. 38K miles 1967 Bonneville Convertible (Montego Cream, Cal Car, 105K miles 1967 Executive Wagon (Plum Mist), Org. paint, Org 35K miles 1981 Bonneville Brougham Coupe (Black) Moonroof, Org. 11K miles |
|
#80
06-20-2015, 09:55 PM
|
||||
|
||||
|
Quote:
__________________
"The great obstacle to discovery is not ignorance...but the illusion of knowledge." Daniel J. Boorstein "Gas is STILL your cheapest thrill!" Your opinion of me is none of my business. |
| Reply |
|
|
The PY Online Forums is the largest online gathering of Pontiac enthusiasts anywhere in the world. Founded in 1991, it was also the first online forum for people to gather and talk about their Pontiacs. Since then, it has become the mecca of Pontiac technical data and knowledge that no other place can surpass.


 Linear Mode

