


| FAQ |
| Members List |
| Social Groups |
| Calendar |
| Search |
| Today's Posts |
|
#1
 10-06-2014, 12:54 AM
|
|||
|
|||
 Best way to install Dougs headers into my 79 Trans Am SE
I will be installing my Pontiac 455 into my 1979 Trans Am SE with 4spd very soon. What is the best way to install a set of Dougs 1 7/8 headers on it?
|
|
#2
10-06-2014, 06:43 AM
|
||||
|
||||
|
Other than having the need to have jack stands or ramps to drive the front of the car up
on getting the exhaust manifolds off is most times the biggest adventure in using 4 letter words to express yourself! plan on buying a long open end wrench that will fit your header bolts and grinding it down on the outside of its jaws to give you good access to the center exh port rear bolt where the headers make a sharp turn back to the firewall. You may find the bending this wrench length wise into a bit of a S shape will help with access also. Be sure that all of your new header bolts are good thread wise and make sure that all the bolt holes will accept a bolt being treaded in with just easy finger motion, so it may be a good thing in this regard to have 3/8" course bottom tap on hand in case its needed. install all the header bolts for one side then install the gaskets, but what you want to do is to cut the gasket into 3 sections and then slot the bolt holes so you can just slip the gaskets in place by rocking the header as it hangs off of the bolts. First and for most is to apply antiseeze on all of the bolt threads and its not a bad idea to give each gasket section a fine coat of the stuff also! Its messy this way but if a gasket should blow out having to not use a single edge blade to scrape the old one off for ten minutes will make you smile! After the motor has been run up to normal temp by driving it then let it cool down to the point that you can touch one of the heads and then retighten all the bolts, do this again after the next time you drive the car and all should be well!
__________________
Wernher Von Braun warned before his retirement from NASA back in 1972, that the next world war would be against the ETs! And he was not talking about 1/8 or 1/4 mile ETs! 1) 1940s 100% silver 4 cup tea server set. Two dry rotted 14 x 10 Micky Thompson slicks. 1) un-mailed in gift coupon from a 1972 box of corn flakes. Two pairs of brown leather flip flops, never seen more then 2 mph. Education is what your left with once you forget things! |
|
#3
10-06-2014, 07:39 AM
|
|||
|
|||
|
It is a brand new engine with Edelbrock D Port heads so there are no stock exhaust manifolds to take off.
|
|
#4
10-06-2014, 08:27 AM
|
||||
|
||||
|
Oh you lucky person !
If the heads are not on the motor yet you can load the headers in from the top side and only have to jack the nose of the car up a tad, then you can use a bungee cord or whatever to keep them pulled back to the wheel wells to install the heads .
__________________
Wernher Von Braun warned before his retirement from NASA back in 1972, that the next world war would be against the ETs! And he was not talking about 1/8 or 1/4 mile ETs! 1) 1940s 100% silver 4 cup tea server set. Two dry rotted 14 x 10 Micky Thompson slicks. 1) un-mailed in gift coupon from a 1972 box of corn flakes. Two pairs of brown leather flip flops, never seen more then 2 mph. Education is what your left with once you forget things! |
|
#5
10-06-2014, 12:13 PM
|
|||
|
|||
|
best way to install headers on a 2nd gen is from underneath the car with engine in, as the direction should indicate. trying to do it from the top is more trouble than its worth IMO. jack the car up as high as you can, ramps are a minimum but even higher is better. 18-24" if possible, front & rear. & best value in bolts are summits stainless header bolts, they have knurling under the head that will keep them from backing out, get the small 5/16 or 3/8 head.
most headers have a keyhole slot on the flange to "hang" the header off the center bolt, install that bolt only a couple threads in the head. that allows you to install the rest of the bolts without fighting with holding the header up. get a helper to stand up top & guide the header in as you hold & lift it from underneath. motor mount bolts out, oil filter housing off & all 4 speed & neutral lockout linkage unhooked & removed. you may have to jack or lift the engine a few inches to help them slide in, but thats mainly for the big 1-7/8 or 2" tube headers, smaller ones should fit ok. i have installed & reinstalled due to test fitting, cam break in, or to ceramic coat headers no less than 10 times on my cars over the years, if you do it this way & be patient, they are actually a pretty simple & basic install. not sure why so many people have such a hard time installing headers. on an a/c car the pass side will be a little tighter but still very doable. & as stated above, retorque the bolts after a few heat cycles, i prefer to let the engine cool completely, not just untill you can touch a head. then again periodically every season/year or so. i have a set of hedman headers on my 78 t/a that used the cheapo supplied paper gaskets & they are doing fine after almost 6 years & thousands of miles & even some drag strip use & very hard running on the street. you dont need the high dollar gaskets IMO, the metal core graphite ones from felpro or mr gasket are fine. good luck |
|
#6
10-06-2014, 01:26 PM
|
||||
|
||||
|
And check your gaskets. The ones which came with the headers did not fit.
 I ordered Felpro's which were good. As an alternative you might use good quality stainless allen screws as I did. These allow some more space. But you need some 'special' tools. See pic.  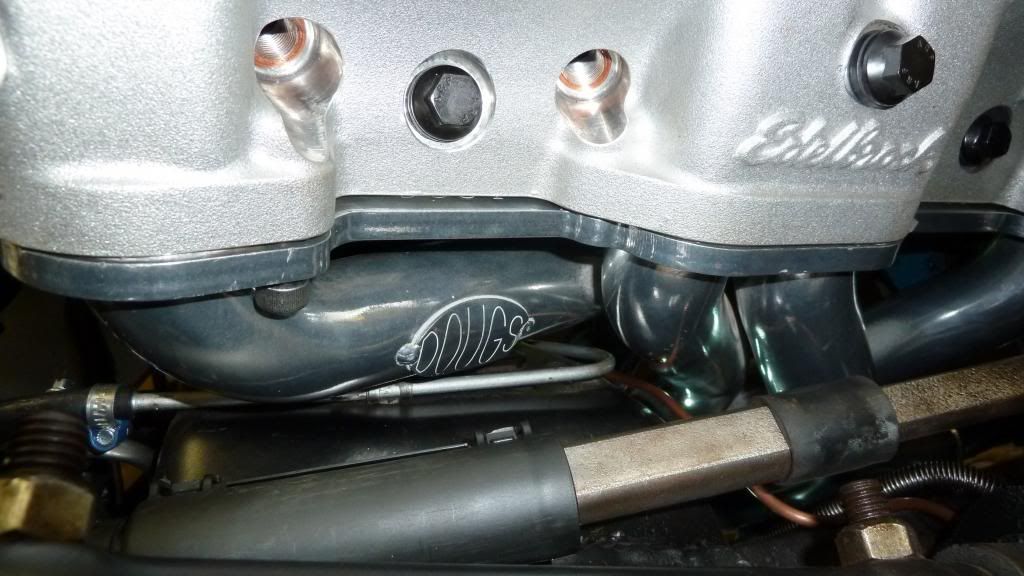
|
|
#7
10-07-2014, 06:20 AM
|
|||
|
|||
|
get some ARP header studs or 5/16" arp header bolts and some nice felpro gaskets for header and collector, and get the Torq Tech exhaust kits
it's a piece of cake to do with the right hardware and should stay sealed up a long time too for wrenches i have some snap on /SK long 5/16" and a U shaped one honestly just a 1/4" swivel head snap on socket is what i usually use, and various extensions too i prefer the 5/16 header bolt with D ports and the 3/8" with round ports (the round port dougs are much easier to get at) you may need to remove the oil filter housing for the d ports, the round ports i didn't have to in my 79 TA |
|
#8
10-07-2014, 11:45 AM
|
|||
|
|||
|
Would installing the headers before you put the engine into the mounts be of any help?
|
|
#9
10-07-2014, 12:19 PM
|
||||
|
||||
|
The gaskets that came with my Doug's are made so the raised pipe weld on the mounting surface presses up against them. That picture looks like the gasket openings go around the weld.
|
|
#10
10-07-2014, 12:25 PM
|
|||
|
|||
|
I ordered some Remflex header gaskets part #RF12-001. I have used them before and they seem to work really well. I did not want to worry about exhaust leaks. I was not sure what type of gaskets would come with the Dougs headers but will keep them as a back-up set.
|
|
#11
10-07-2014, 12:29 PM
|
|||
|
|||
|
Quote:
WOW! The Dougs headers come really close to the engine cross member don't they.  Not very much room there at all OR maybe it is just the angle of the pic taken. Not very much room there at all OR maybe it is just the angle of the pic taken.
|
|
#12
10-07-2014, 02:55 PM
|
||||
|
||||
|
It's the angle and no problem in that area. However I had to grind some material at the lower DS suspension bracket as you can see in these pics. I'm running the Dougs for 2 seasons now and they still look like this. (I don't drive the car in the rain)
 
|
| Reply |
|
|
The PY Online Forums is the largest online gathering of Pontiac enthusiasts anywhere in the world. Founded in 1991, it was also the first online forum for people to gather and talk about their Pontiacs. Since then, it has become the mecca of Pontiac technical data and knowledge that no other place can surpass.





 Linear Mode

