| FAQ |
| Members List |
| Social Groups |
| Calendar |
| Search |
| Today's Posts |
 |
|


Menu
| The Body Shop TECH General questions that don't fit in any other forum |


| Reply |
|
|
Thread Tools | Display Modes |
|
|
| The Body Shop TECH General questions that don't fit in any other forum |
| Reply |
|
|
Thread Tools | Display Modes |
|
#1
 03-14-2026, 05:56 PM
|
||||
|
||||
 How to Approach Removing a Sharp Crease?
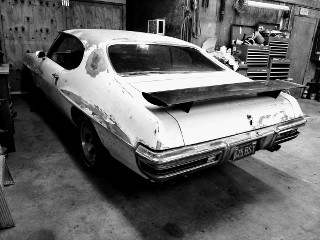
I decided to finally try and fix this damage on the PS quarter.
There are some sharp creases that I know won't be easy to just ding out. I bought a cheapo stud welder from Harbor Freight that I hope will help. Here's the mess: |
|
#2
03-14-2026, 06:04 PM
|
||||
|
||||
|
Luckily, it is very accessible from inside the trunk.
There are 2 creases that made me think a stud welder and some tension would help. Tell me how you would go at this... where would you start and how would you approach it? My thought was to start at "1" by pulling toward the rear where I have marked "x" while tapping the ridge of the crease. Hopefully there's enough room for the stud welder to work... |
|
#3
03-14-2026, 09:52 PM
|
||||
|
||||
|
It needs to be clamped onto and pulled back before hammering on it. Otherwise you are going to stretch everything and make it much harder to repair after you eventually have it pulled anyway.
|
|
#4
03-14-2026, 11:35 PM
|
||||
|
||||
|
OK, thanks.
I don't have equipment or skills to clamp and pull... that would be something I'd have to pay a shop to do. Maybe a PDR tech could do it? I was hoping I could get away with a slide hammer to pull on welded studs while I hammered the creases down but that may be wishful thinking. Someone already stretched the panel above the bumper when they hammered those big dings from inside near my #2 crease. I have had some success with a shrinking disc on dings but never dealt with this much damage. It's not clear to me the entire panel was displaced front to rear. I will run a straightedge along the trunk lid edge and compare this damaged side to the other. The top face, rear face, and radiused edge circled here all appear undamaged. Same along the mid body line and lower panel sections... no sign of compression damage (reflections are not waves): But this buckle on the upper panel is the unknown. I am hoping if I pull out where the "x"s are, it might relieve the compression up there??? It is clearly pushed in here. If not, then that may be where pulling it away from the buckle would help. Grabbing it to accomplish this might be a challenge... maybe at the weld but it would have to act through all the bends: Here's the other side for reference: Mike |
| The Following User Says Thank You to Shiny For This Useful Post: | ||
|
#5
03-15-2026, 10:22 AM
|
||||
|
||||
|
At the corner you have the X, I would be mig welding a plate with a hole on the edge of the panel. Use comealongs or chain falls hooked in the hole to put some constant tension and hammer and dolley the crease and dents. Think of pulling a bed sheet smooth. Try to pull at the same angle as the impact
|
| The Following User Says Thank You to Big Bear For This Useful Post: | ||
|
#6
03-15-2026, 11:20 AM
|
||||
|
||||
|
Thanks. I would have to get creative to make this happen but understand the concept.
I think the impact was mostly sideways into the panel. The tearing makes me think it was the bumper that pushed into it. |
|
#7
03-15-2026, 11:51 AM
|
||||
|
||||
|
I'm guessing no matter which way you "fix it" it won't be any worse than it is. Staring at your dent for about 15 minutes trying to decide how I'd do it got me thinking about a guy I worked with many years ago. Step 1 for him was always the same. Start doing something then make adjustments as you go until finished. I witness him doing this many times when he had no previous experience with what he was doing. I learned a lot from that guy. Dude had no fear.
Do you mig or tig weld?
__________________
72 Lemans sport 462 auto 75 Trans Am 4 speed 39k miles |
|
#8
03-15-2026, 04:22 PM
|
||||
|
||||
|
A manager once made our group take a class to try and get everyone working together with less frustration. The premise was there were people who analyze, then do something, then analyze again. Then there are those who dive in and do something, analyze a little, then do more.
Conclusion was Mike was a Think-Do-Think person in a Do-Think-Do group. I am capable of making this worse but will definitely try something. I have yet to do anything one time on the car so not afraid to make mistakes. It's the challenge of doing new stuff that keeps me hacking at it. Current thought is still to work on the #1 crease first. To me, that one is so rigid it will constrain everything else. In general, I will try to get that original edge looking more like it should before dealing with the "bigger" distortions. I have a 120V Eastwood MIG but learned it can easily create distortion, especially on large panels. If I attach a plate or ring to pull, I'll have to think about "where" I attach it but it will be close to an edge and probably not on a visible panel. Honestly, I'd rather glue something if that's possible.... The bigger challenge is what to pull "against" but I'll figure that out if/when I get there. Mike |
| The Following User Says Thank You to Shiny For This Useful Post: | ||
|
#9
03-15-2026, 05:38 PM
|
||||
|
||||
|
I like your plan. I always go in with a plan, usually an over thought one. That crease is a bad one, but maybe with the stud gun, a hammer, and trial an error you'll get it straight. Good luck.
__________________
72 Lemans sport 462 auto 75 Trans Am 4 speed 39k miles |
| The Following User Says Thank You to Skidmark For This Useful Post: | ||
|
#10
03-15-2026, 06:55 PM
|
||||
|
||||
|
If you're going to apply heat, placing cool damp rags surrounding the area can help reduce the panel heat somewhat.
|
| The Following User Says Thank You to 433lemans For This Useful Post: | ||
|
#11
03-15-2026, 10:05 PM
|
||||
|
||||
|
Made some progress... mostly good, learned some stuff.
The Harbor Freight stud welder worked great - better than I expected so I went for it. It pulled a little out before it pulled out a chunk so I attached a second and continued with the slide hammer: Comparing the DS to the damaged side, there was a well-defined fold line that I decided to focus on. The distortion is obvious on the damaged side: So I welded a 3rd stud and alternated with a slide hammer and a pick hammer inside the trunk to start restoring the fold: Got enough movement before the 3 studs pulled out that I started to hammer directly on the fold. I held a right-angled dolly on the fold as I flattened and kept using the pick hammer: |
|
#12
03-15-2026, 10:09 PM
|
||||
|
||||
|
This is where I stopped. The folds are defined better and the crease is pretty flat:
This is enough to feel OK about moving to the real challenge of the "#2" crease: |
| The Following 3 Users Say Thank You to Shiny For This Useful Post: | ||
|
#13
03-16-2026, 12:11 PM
|
||||
|
||||
|
Quote:
When PMD mounted the bumper to the rear body panel instead of the frame it made the 1/4 the crumple zone in an off center hit. |
| The Following User Says Thank You to steve v For This Useful Post: | ||
|
#14
03-16-2026, 09:25 PM
|
||||
|
||||
|
Quote:
Quote:
Quote:
Here's what I'm thinking today, please comment freely: The compression along the quarter panel appears isolated to the top half. The body line has no obvious deformation, nor does the panel below the body line, nor does the rear face. All this is good IMO. Above the body line there is a creased indentation that definitely oil-cans now... illustrating the need to apply tension and relieve the compression where it's oil-canning. The challenge for me is how to do this... One option is to pull from behind. The tear below the rear face makes it weak there and I don't want to risk destroying that face and radius into the quarter by trying to attach something to it and pulling. That's a strong visual element for me and it's not messed up... So one option is to clamp onto the flange and pull with a come-along winch. It might work. Another option is to pull at the upper bumper mount nut but I don't think the structure would transmit much force into the upper quarter panel. This looks like a reasonable tool to grip the flange and it's cheap on Amazon. I can also buy a come-along for not much at Harbor Freight and tie the other end to the hitch on my pickup ??? The idea I like the most is to use a hydraulic ram or leveraged pole inside the trunk and push directly on the rear face in the corner. It is easy to access and I could probably find something fairly strong and rigid to push against in the trunk. The downside is I don't have a porta-power or other hydraulic ram. I might be able to rig up something with a bottle or scissor jack.. maybe even some hinged 2x4s or some wooden wedges ?? I will call AutoZone tomorrow and see if they have something in their loan-a-tool stuff. Hmmmm Mike |
| The Following User Says Thank You to Shiny For This Useful Post: | ||
|
#15
03-17-2026, 07:16 PM
|
||||
|
||||
|
I expected this to be a challenge and so far, no disappointment.
I started on the upper panel (crease 2) by looking for obvious deformation along the "boundaries" or "anchors" (rigid folds that constrain the panel). The upper and rear edges and the body line had nothing obvious. But the edge of the bumper cut-out was clearly pushed inward a lot. I decided to find out if pushing that edge out would be a magic answer. I struck out on finding a rental porta-power ram so I improvised. I used a couple 2x2s to get a lot of leverage outward. This worked pretty well, pushing to deflect the edge and hammering above it. The vertical post was about 4 ft long - more than enough to deflect the panel. I didn't get the edge located great, nor did I get the creases flattened but it's a start. The buckle that oil cans (circled) was unfortunately still oil canning so I ran the shrinking disc around to see if that would help. No magic. I concluded I will need to try pulling to the rear so bit the bullet and ordered a clamp and come-along. Can only get better if I don't over-pull it. He said. |
| The Following User Says Thank You to Shiny For This Useful Post: | ||
|
#16
04-14-2026, 10:02 PM
|
|||
|
|||
|
A lot of good information here. The way I always fixed them is to imagine how the damage happened and then reverse the impact. The key to fixing that panel is to tie the car down and pull on the quarter and bumper mount while taking a body hammer and lightly bumping the quarter panel all over the panel to release the tension. Put the panel under the most tension you can without damaging it and go all over the panel with a wide head body hammer and then go to the bent places and bump it out. Repeat until you see the panel relax.
|
| The Following User Says Thank You to JJDeville For This Useful Post: | ||
|
#17
04-29-2026, 05:47 PM
|
||||
|
||||
|
I finally got back to this and made what I think is progress.
I followed your advice and put some tension on the quarter using a cheap clamp and a come-a-long hooked to the hitch receiver on my truck. Put a good load on it which made me nervous about the heavy clamp letting go and taking out my truck but didn't happen! First I worked to push the sharp line along the bottom edge pushed out. I pushed hard from the inside along the pink line and slapped the high areas and folds near the orange marks: Then I noticed this stiffening rib in the trunk was slightly buckled so I straightened it out: |
|
#18
04-29-2026, 06:06 PM
|
||||
|
||||
|
Then the good part - This indentation would oil can.. which was my biggest motivator for pulling on the quarter:
The concave region right above the body line was pushed out some. After I straightened the rigid fold, I knocked this concave region (orange) in while pushing out along the convex upper section (red) and it held! With much amazement, I found the buckled section that oil-canned had straightened out and was actually holding some shape!! This is where I ended today. I plan to weld the tear next, then strip and start looking more objectively at the shape... but so far, it's better than where it started. |
|
#19
04-29-2026, 09:26 PM
|
|||
|
|||
|
May not be the best/popular way but I have successfully on more than one occasion taken a zip wheel and made a slice on the high stretched area then tapped it down and rewelded. It was better than fighting the oil can effect. Taking out 1/16" out of the middle made a huge difference and calmed a lot of headache without having to try and shrink the metal.
|
| The Following User Says Thank You to DOC For This Useful Post: | ||
|
#20
04-30-2026, 12:48 PM
|
||||
|
||||
|
No welding yet.
I would not weld that seam until you have re-shrunk the stretched metal from that accident.
You need to get a porta power set from Harbor freight and push from the inside of the trunk caddy corner to the other trunk floor deck lid brace and get that rear portion pushed out more. That is causing most of your problems. I can see it in the shadow of your body line on the Eyebrow detail for the QP. Still pushed in about an inch or so. That needs to be addressed first. Then you need to strip the paint in the damaged area and heat, shrink the stretched area using a propane torch or acetylene torch and cool with wet rags. Then use the hammer and dolly to work that area back into shape. Rear corner first. You may still need to porta power the inside while you heat it up and shrink to hold the shape. Do little dimed sized heated areas along the worst part of the rear crease. You will instantly see the metal tighten back up and the whiskey can affect disappear. Just my 2 cents
__________________
White/Blue 71 455 HO T/A Auto Blue/Blue 71 455 HO T/A 4 Sp White/Sandalwood 71 455 HO T/A 4 Sp White/Black 70 RAIII T/A M21/373 (stripper) Carousel Red/Black 69 GTO Judge 4 Sp 2002 Firehawk Red/Black 6Sp |
| Reply |
|
|
The PY Online Forums is the largest online gathering of Pontiac enthusiasts anywhere in the world. Founded in 1991, it was also the first online forum for people to gather and talk about their Pontiacs. Since then, it has become the mecca of Pontiac technical data and knowledge that no other place can surpass.





 Linear Mode

